- Description: Allow customers to update the queue parameters and replace the involved compute nodes without having to stop the whole compute fleet. Currently, such an update requires the compute fleet to be stopped.
- Description: Make the instance provisioning component aware of EC2 insufficient capacity failures so to prevent, for a configurable amount of time, the usage of specific compute resources that are configured in the scheduler queue.
- Description: Allow customers to attach multiple EFS and FSxLustre file systems. Currently, they can attach multiple EBS volumes, but only 1 EFS and 1 FSxLustre.
- Description: Allow customers to attach up to 20 existing FSx for ONTAP and 20 existing FSx for OpenZFS to their clusters.
- Description: Allow customers to submit jobs to nodes with particular memory constraints. Currently our default Slurm configuration does not allow it.
- Setup a new stack following the quick create links on Github
- Change the Version parameter to
3.2.0b2
- Once the stack goes into CREATE_COMPLETE ~20 mins, you’ll get an email with a link and temporary password. Login and then you can create a cluster with the new beta version:

- Keep in mind that most new features are not surfaced in the UI yet, however you can modify the yaml template directly to test and still take advantage of the Web UI for ease of use.
Prepare a virtual environment for ParallelCluster (detailed instructions: here, skipping steps 4 and 5):
python3 -m pip install --upgrade pip
python3 -m pip install --user --upgrade virtualenv
python3 -m virtualenv ~/pcluster-ve
source ~/pcluster-ve/bin/activate
Install Node Version Manager and Node.js:
curl -o- https://raw.githubusercontent.com/nvm-sh/nvm/v0.38.0/install.sh | bash
. ~/.nvm/nvm.sh
nvm install node
node --version
Configure AWS credentials:
aws configureInstall ParallelCluster from PyPi:
pip install aws-parallelcluster==3.2.0b2We want to verify that you are able to update the parameters under the SlurmQueues section without restarting the compute fleet and without any impact on running jobs of the other queues (not impacted by the update).
All the parameters under the SlurmQueues can be updated selecting one of the two replacement strategies, except for DisableSimultaneousMultithreading, InstanceType, MinCount and decreasing MaxCount.
The feature also give you the possibility to add new queues or new compute resources without having to stop the whole compute fleet. N.B. Removing queues or compute resources still requires a compute fleet stop.
- Setup a
3.2.0b2cluster with either the CLI or Pcluster Manager - Modify the queue parameters, for example I can increase the max count of a queue in Pcluster Manager from 4 to 5
- Then I run Update and if the update goes through without giving me an error then it's working.
- Create a Cluster with multiple-compute resoures in the same queue:

In this example I used p4d.24xlarge which has very low capacity so I'm almost gauranteeting that it'll retry on another instance.
- Submit a job to that queue:
$ sbatch -N 1 -n 1 --mem=4GB --wrap "sleep 30"- See that it first tries the
p4dn.24xlargeinstance then fails over to another instance type:
watch squeue- Create a cluster with
3.2.0b2and in theSharedStoragesection include a snippet like:
SharedStorage:
  - Name: FsxLustre0
    StorageType: FsxLustre
    MountDir: /shared
    FsxLustreSettings:
      StorageCapacity: 1200
      DeploymentType: PERSISTENT_2
PerUnitStorageThroughput: 250- Create the cluster and confirm the filesystem attached
- Create a cluster with
3.2.0b2and in theSharedStoragesection include a snippet like:
SharedStorage:
  - Name: FsxLustre0
    StorageType: FsxLustre
    MountDir: /shared
    FsxLustreSettings:
      StorageCapacity: 1200
      DeploymentType: SCRATCH_2
  - Name: FsxLustre1
    StorageType: FsxLustre
    MountDir: /shared2
    FsxLustreSettings:
      FileSystemId: fs-123456789
See Mount External Filesystem for instructions on how to create a filesystem you can use with pcluster.
- Create a Filesystem following one of the guides:
- Mount it to the cluster with the following yaml config:
- MountDir: /shared
  Name: Ontap
  StorageType: FsxOntap
  FsxOntapSettings:
    VolumeId: fs-1234567890
- MountDir: /shared1
  Name: ZFS
  StorageType: FsxOpenZfs
  FsxOpenZfsSettings:
VolumeId: fs-1234567890- Verify it gets mounted correctly.
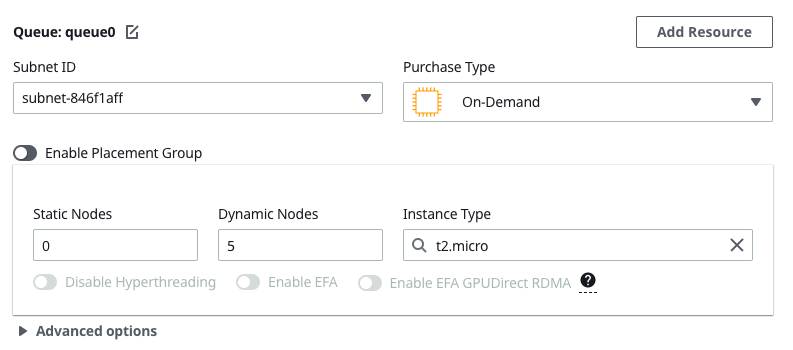
Using Pluster Manager:
- Confirm that when you select an EFA enabled instance type, such as
hpc6a.48xlarge, orc6i.32xlarge, both Placement Group and EFA are enabled.

- Confirm that when you select an instance type without EFA they are similarly disabled.
- Create a cluster and on the review screen add:
SlurmSettings:
        EnableMemoryBasedScheduling: true # Default is: false
For example, in pcluster manager that's:

Once the cluster is created SSH in and then you can submit jobs like so:
$ sbatch -N 1 -n 1 --mem=4GB --wrap "sleep 30"
$ sbatch -N 1 -n 1 --mem=4GB --wrap "sleep 30"
Lets say you have a queue with t2.micro:
| Instance Type | vCPUs | Memory (GB) |
|---|---|---|
| t2.medium | 2 | 4.0 |
Without memory scheduling you could schedule two jobs on it since it has 2 vcpus. However by specifying --mem=4GB you're restricting it to a single job since it only has 4 GB.