-
-
Save seaside2mm/695fb9c2eb1a9c8c9830d57d6dfa4857 to your computer and use it in GitHub Desktop.
https://pytorch.panchuang.net/ThirdSection/SaveModel/
当保存和加载模型时,需要熟悉三个核心功能:
torch.save:将序列化对象保存到磁盘。此函数使用Python的pickle模块进行序列化。使用此函数可以保存如模型、tensor、字典等各种对象。torch.load:使用pickle的unpickling功能将pickle对象文件反序列化到内存。此功能还可以有助于设备加载数据。torch.nn.Module.load_state_dict:使用反序列化函数 state_dict 来加载模型的参数字典。
模型的可学习参数(即权重和偏差)包含在模型的参数中,。 state_dict是Python字典对象,它将每一层映射到其参数张量。注意,只有具有可学习参数的层(如卷积层,线性层等)的模型 才具有state_dict这一项。目标优化torch.optim也有state_dict属性,它包含有关优化器的状态信息,以及使用的超参数。
因为state_dict的对象是Python字典,所以它们可以很容易的保存、更新、修改和恢复,为PyTorch模型和优化器添加了大量模块。
- 保存/加载state_dict
# 保存
torch.save(model.state_dict(), PATH)
# 加载
model = TheModelClass(*args, **kwargs)
model.load_state_dict(torch.load(PATH))
model.eval()
当保存好模型用来推断的时候,只需要保存模型学习到的参数,使用torch.save()函数来保存模型state_dict,它会给模型恢复提供 最大的灵活性,这就是为什么要推荐它来保存的原因。
在 PyTorch 中最常见的模型保存使‘.pt’或者是‘.pth’作为模型文件扩展名。
- 保存/加载完整模型
#保存
torch.save(model, PATH)
# 加载, 模型类必须在此之前被定义
model = torch.load(PATH)
model.eval()- 保存和加载 Checkpoint 用于推理/继续训练
保存成 Checkpoint 的时候,可用于推理或者是继续训练,保存的不仅仅是模型的 state_dict 。保存优化器的 state_dict 也很重要, 因为它包含作为模型训练更新的缓冲区和参数。你也许想保存其他项目,比如最新记录的训练损失,外部的
torch.nn.Embedding层等等。
要保存多个组件,请在字典中组织它们并使用torch.save()来序列化字典。PyTorch 中常见的保存checkpoint 是使用
.tar 文件扩展名。
要加载项目,首先需要初始化模型和优化器,然后使用torch.load()来加载本地字典。这里,你可以非常容易的通过简单查询字典来访问你所保存的项目。
-
在一个文件中保存多个模型
-
通过设备保存/加载模型 保存到 GPU、加载到 GPU
# 保存
torch.save(model.state_dict(), PATH)
# 加载
device = torch.device("cuda")
model = TheModelClass(*args, **kwargs)
model.load_state_dict(torch.load(PATH))
model.to(device)
#确保在你提供给模型的任何输入张量上调用input = input.to(device)当在GPU上训练并把模型保存在GPU,只需要使用model.to(torch.device('cuda')),将初始化的 model 转换为 CUDA 优化模型。另外,请 务必在所有模型输入上使用.to(torch.device('cuda'))函数来为模型准备数据。请注意,调用my_tensor.to(device)会在GPU上返回my_tensor的副本。 因此,请记住手动覆盖张量:my_tensor= my_tensor.to(torch.device('cuda'))。
- 从pytorch创建可序列化和可优化模型的方法。
- 用python保存,并加载到没有python依赖的进程中。
- 核心数据结构是
ScriptModule,类似nn.Module,代表整个模型作为子模块树。 - 两种实现方法:
tracing和Scripting
Tracing
调用PyTorch提供的torch.jit.trace函数即可。
- 只记录那些没有数据依赖的函数和nn.Module(例如没有对数据的条件判断),并且也没有任何未跟踪的外部依赖(例如执行输入输出或访问全局变量)
- 由于跟踪只记录张量上的操作,因此不会记录任何控制流操作,如if或循环
model = torchvision.models.resnet18()
# example input you would normally provide to your model's forward() method
example = torch.rand(1,3,224,224)
# generate a scriptmodule via tracing
traced_script_modle = troch.jit.trace(model, example)
Scripting
- 可以使用python语法直接编写Torch Script代码
- 在ScriptModule的子类上使用torch.jit.script注释(对于函数),或torch.jit.script_method(对于方法)来执行此操作
- 避免了Trace方法的局限
import torch
class MyModule(torch.jit.ScriptModule):
    def __init__(self, N, M):
        super(MyModule, self).__init__()
        self.weight = torch.nn.Parameter(torch.rand(N,M))

    @torch.jit.script_method
    def forward(self, input):
        if bool(input.sum()>0):
            output = self.weight.nv(input)
        else:
            output = self.weight + input
        return output

my_script_module = MyModule(2,3)
混合使用 TODO
torch.jit相关函数
- torch.jit.save
- torch.jit.load
- torch.jit.ignore
- torch.jit.unused
- pth转换pt
对于libtorch而言,其一般调用的是.pt文件,而PyTorch一般保存的是.pth文件。因此这就涉及到转换的问题。
由.pth到.pt的转换也非常简单。简单来说就是调用PyTorch提供的
torch.jit.trace函数即可。
"""转换SuperPointPretrainedNetwork的pth"""

# Load the network in inference mode.
self.net = SuperPointNet()
if cuda:
    # Train on GPU, deploy on GPU.
    self.net.load_state_dict(torch.load(weights_path))
    self.net = self.net.cuda()
else:
    # Train on GPU, deploy on CPU.
    self.net.load_state_dict(torch.load(weights_path,
                            map_location=lambda storage, loc: storage))
self.net.eval()
example = torch.rand(1,1,640,480).cuda()
traced_script_module = torch.jit.trace(self.net, example)
traced_script_module.save("superpoint.pt")- c++加载pt
在C++中,同样可以通过
torch::jit::load()函数进行加载,核心代码如下。
// 加载模型
auto device = torch::Device(torch::kCUDA,0);
//load model
auto model = torch::jit::load("weigth_path.pt");
model.to(device);
model.eval();

// 将OpenCV的Mat类型构造成Tensor,然后再转换成可求导的变量
auto input_tensor = torch::from_blob(image.data, { image.rows, image.cols, 3 }, torch::kByte).permute({ 2, 0, 1 }).unsqueeze(0).to(torch::kFloat32) / 225.0;

//forward the tensor
auto output = model.forward({input_tensor.to(device)}).toTensor();
output = torch::softmax(output, 1);- error1:cannot use GPU
Windows : try add the following content in the linker:
/INCLUDE:?warp_size@cuda@at@@YAHXZJetson: updating Makefile with “-Wl,–no-as-needed”. ref
reference.
# import ONNX Model
torch.onnx.export(model,                  # the pre-trained model
                  input,                  # tensor with the same size as input data
                  'name.onnx',            # save path
                  export_params=True,     # store the trained parameter weights inside the model file
                  input_names=['input'],  # the model's input name
                  output_names=['output'],# the model's output name
                  # dynamic_axes
                  )

# To check that the model converted fine, call onnx.checker.check_model
onnx_model = onnx.load('name.onnx')
onnx.checker.check_model(onnx_model)
- 可视化ONNX Model netron
haihai
使用TensorRT转换ONNX模型时,提示模型包含INT64变量,其不影响模型转换。如果想消除该提示,可以将INT64变量转为INT32即可。
Workflow The general TensorRT workflow consists of 3 steps:
Populate a tensorrt.INetworkDefinition either with a parser or by using the TensorRT Network API (see tensorrt.INetworkDefinition for more details). The tensorrt.Builder can be used to generate an empty tensorrt.INetworkDefinition .
Use the tensorrt.Builder to build a tensorrt.ICudaEngine using the populated tensorrt.INetworkDefinition .
Create a tensorrt.IExecutionContext from the tensorrt.ICudaEngine and use it to perform optimized inference.
核心概念
Logger Most other TensorRT classes use a logger to report errors, warnings and informative messages. TensorRT provides a basic tensorrt.Logger implementation, but you can write your own implementation by deriving from tensorrt.ILogger for more advanced functionality.
Parsers Parsers are used to populate a tensorrt.INetworkDefinition from a model trained in a Deep Learning framework.
Network The tensorrt.INetworkDefinition represents a computational graph. In order to populate the network, TensorRT provides a suite of parsers for a variety of Deep Learning frameworks. It is also possible to populate the network manually using the Network API.
Builder The tensorrt.Builder is used to build a tensorrt.ICudaEngine . In order to do so, it must be provided a populated tensorrt.INetworkDefinition .
Engine and Context The tensorrt.ICudaEngine is the output of the TensorRT optimizer. It is used to generate a tensorrt.IExecutionContext that can perform inference.
-
Netron 网络可视化
-
onnx-graphsurgeon onnx 计算图编辑 功能:
-
修改计算图:图属性 / 节点 / 张量 / 节点和张量的连接 / 权重
-
修改子图:添加 / 删除 / 替换 / 隔离
-
优化计算图:常量折叠 / 拓扑排序 / 去除无用层
-
polygraphy 结果验证与定位,图优化 功能: ➢ 使用多种后端运行推理计算,包括 TensorRT,onnxruntime,TensorFlow ➢ 比较不同后端的逐层计算结果 ➢ 由模型文件生成 TensorRT 引擎并序列化为 .plan ➢ 查看模型网络的逐层信息 ➢ 修改 Onnx 模型,如提取子图,计算图化简 ➢ 分析 Onnx 转 TensorRT 失败原因,将原计算图中可以 / 不可以转 TensorRT 的子图分割保存 ➢ 隔离 TensorRT 中的错误 tactic
➢Run 模式常用选项 ➢ --model-type 输入模型文件类型,可用 frozen, keras, ckpt, onnx, engine 等 ➢ --verbose 打印详细日志 ➢ --trt --tf –onnxrt 选用的后端(可以指定多个) ➢ --input-shapes "x:[4,1,28,28]" "y:[4,8]" 做推理时的实际数据形状,注意跟 trtexec 格式不同 ➢ --ckpt "./model.ckpt" --save-pb "./model.pb" --freeze-graph TensorFlow相关的模型在载入和保存 ➢ --save-onnx ".model.onnx" --opset 13 指定导出 Onnx 文件名和算子集编号 ➢ --shape-inference 启用 Onnx 的形状推理功能 ➢ --trt-min-shapes 'x:[1,1,28,28]' 'y:[1,8]' --trt-opt-shapes 'x:[4,1,28,28]' 'y:[4,8]' --trt-max-shapes 'x:[16,1,28,28]' 'y:[16,8]' 设定 TensorRT Dynamic Shape 的输入性状范围 ➢ --fp16 --int8 --tf32 --sparse-weights 指定 TensorRT 中网络计算精度和稀疏性 ➢ --workspace 1G 指定 TensorRT 工作空间大小,可用 M 或者 G 做后缀 ➢ --save-engine "./model.plan" 指定 TensorRT 导出的 .plan 文件名 ➢ --rtol 1e-6 --atol 1e-6 --validate 比较计算结果时的相对误差/绝对误差上限,并检查 NaN 和 INF
inspect 模式 ➢ 范例代码 08-Tool/polygraphy/inspectExample,运行 ./command.sh ➢ 首先生成一个 .onnx 文件(同前面基于 MNIST 的模型) ➢ 其次使用 polygraphy 导出 .onnx 详细信息(计算图属性、逐层属性、 权重信息等) ➢ 然后生成一个 FP32 的 TRT 引擎,使用 polygraphy 导出 .plan 详细信 息(网络属性、引擎binding信息,显存需求等) ➢ 使用 polygraphy 判断一个 .onnx 是否完整被 TensorRT 支持 ➢ 故意生成一个 TensorRT 不完整支持的 .onnx(含一个 NonZero 节点), 再次做上述判断
- Nsight Systems 性能分析
- PyTorch-Quantization 可以在Pytorch训练或者推理的时候加入模拟量化操作,从而提升量化模型的精度和速度,并且支持量化训练后的模型导出ONNX和TRT
trtexec
-
查看 .onnx 或 .plan 文件的网络逐层信息
-
模型性能测试(测试TensorRT 引擎基于随机输入或给定输入下的性能)
-
常用选项,构建阶段 ➢ --onnx=./model-NCHW.onnx 指定输入模型文件名 ➢ --minShapes=x:0:1x1x28x28, --optShapes=x:0:4x1x28x28 , --maxShapes=x:0:16x1x28x28 指定输入形状的范围最小值、最常见值、最大值 ➢ --workspace=1024(TRT8.4 以后要用 --memPoolSize) 优化过程可使用显存最大值(单位:MiB) ➢ --fp16,--int8,--noTF32,--best,--sparsity=… 指定引擎精度和稀疏性等属性 ➢ --saveEngine=./model.plan 指 定输出引擎文件名 ➢ --buildOnly 只创建引擎不运行 ➢ --verbose 打印详细日志 ➢ --timingCacheFile=timing.cache 指定输出优化计时缓存文件名[1] ➢ --profilingVerbosity=detailed 构建期保留更多的逐层信息 ➢ --dumpLayerInfo,--exportLayerInfo=layerInfo.txt 导出引擎逐层信息,可与 profilingVerbosity 合用[
常用选项,运行阶段 ➢ --loadEngine=model.plan 读取 engine 文件,而不是输入 ONNX 文件 ➢ --shapes=x:0:1x1x28x28 指定输入张量形状 ➢ --warmUp=1000 热身阶段最短运行时间(单位:ms) ➢ --duration=10 测试阶段最短运行时间(单位:s) ➢ --iterations=100 指定测试阶段运行的最小迭代次数 ➢ --useCudaGraph 使用 CUDAGraph 来捕获和执行推理过程[1] ➢ --noDataTransfers 关闭 Host 和 Device 之间的数据传输 ➢ --streams=2 使用多个 stream 来运行推理[2] ➢ --verbose 打印详细日志 ➢ --dumpProfile,--exportProfile=layerProfile.txt 保存逐层性能数据信息
# onnx 构建一个 TensorRT 引擎并作推理
# 注意参数名和格式跟 polygrapy 不一样,多个形状之间用逗号分隔,如:
# --minShapes=tensor-0:16x320x256,tensor-1:16x320,tensor-2:16
trtexec \
    --onnx=model.onnx \
    --minShapes=tensor-0:1x1x28x28 \
    --optShapes=tensor-0:4x1x28x28 \
    --maxShapes=tensor-0:16x1x28x28 \
    --memPoolSize=workspace:1024MiB \
    --saveEngine=model-FP32.plan \
    --shapes=tensor-0:4x1x28x28 \
    --verbose \
    --fp16 \
    > result-FP16.log


# 读取上面构建的plan 作推理并打印引擎的详细信息(since TRT8.4)
trtexec \
    --loadEngine=./model-FP32.plan \
    --shapes=tensor-0:4x1x28x28 \
    --verbose \
    --dumpLayerInfo \
    --exportLayerInfo="./modelInformation.log" \
    > result-PrintInformation.log
https://developer.nvidia.com/tensorrt-getting-started
- batch size Batch size can have a large effect on the optimizations TensorRT performs on our model. When using ONNX, we need to tell TensorRT what batch size to expect. Additionally, we need to tell TensorRT whether to expect a fixed batch size, or a range of batch sizes.
TensorRT is capable of handling the batch size dynamically if you don’t know until runtime what exact batch size you will need. That said, a fixed batch size allows TensorRT to make additional optimizations. For this example workflow, we use a fixed batch size of 32.
-
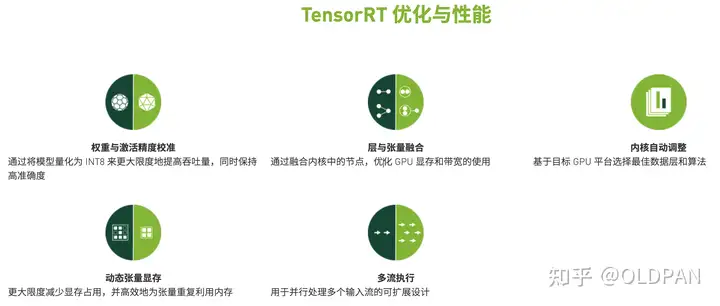
precision Inference typically requires less numeric precision than training. With some care, lower precision can give you faster computation and lower memory consumption without sacrificing any meaningful accuracy. TensorRT supports TF32, FP32, FP16, and INT8 precisions.
-
trtexec Tell trtexec where to find our ONNX model:
--onnx=resnet50/model.onnx
Tell trtexec where to save our optimized TensorRT engine:
--saveEngine=resnet_engine_intro.trt
Tell trtexec to expect a fixed batch size when optimizing (the exact value of this batch size will be inferred from the ONNX file)
--explicitBatch
trtexec --onnx=resnet50/model.onnx --saveEngine=resnet_engine_intro.trt --explicitBatch
logger = trt.Logger(trt.Logger.ERROR) # 指定 Logger,可用等级:VERBOSE,INFO,WARNING,ERRROR, INTERNAL_ERROR

builder = trt.Builder(logger)         # 网络元信息,Builder/Network/BuilderConfig/Profile 相关
network = builder.create_network(1 << int(trt.NetworkDefinitionCreationFlag.EXPLICIT_BATCH))  # 设置dynamic shape模式
profile = builder.create_optimization_profile()
config = builder.create_builder_config()

config.set_memory_pool_limit(trt.MemoryPoolType.WORKSPACE, 1 << 30)     # 设置空间给 TensoRT 尝试优化,单位 Byte

inputTensor = network.add_input("inputT0", trt.float32, [-1, -1, -1])   # 指定输入张量,每个维度都可变
profile.set_shape(inputTensor.name, [1, 1, 1], [3, 4, 5], [6, 8, 10])   # 指定输入张量 Dynamic Shape 范围
config.add_optimization_profile(profile)

identityLayer = network.add_identity(inputTensor)                       # 恒等变换
identityLayer.get_output(0).name = 'outputT0'
network.mark_output(identityLayer.get_output(0))                        # 标记输出张量

engineString = builder.build_serialized_network(network, config)        # 生成序列化网络
engine = trt.Runtime(logger).deserialize_cuda_engine(engineString)      # 使用 Runtime 来创建 engine
context = engine.create_execution_context()                             # 创建 context(相当于 GPU 进程)

context.set_input_shape("inputT0", [2, 3, 3])                           # Dynamic Shape 模式需要绑定真实数据形状
nInput = [engine.get_tensor_mode(engine.get_tensor_name(i)) for i in range(engine.num_bindings)].count(trt.TensorIOMode.INPUT)
nOutput = [engine.get_tensor_mode(engine.get_tensor_name(i)) for i in range(engine.num_bindings)].count(trt.TensorIOMode.OUTPUT)

for i in range(nInput):
    # Bind[ 0]:i[ 0]-> DataType.FLOAT (-1, -1, -1) (2, 3, 3) inputT0
    print("Bind[%2d]:i[%2d]->" % (i, i), engine.get_tensor_dtype(engine.get_tensor_name(i)),
                                         engine.get_tensor_shape(engine.get_tensor_name(i)),
                                         context.get_tensor_shape(engine.get_tensor_name(i)), engine.get_tensor_name(i))
for i in range(nInput, nInput + nOutput):
    # Bind[ 1]:o[ 0]-> DataType.FLOAT (-1, -1, -1) (2, 3, 3) outputT0
    print("Bind[%2d]:o[%2d]->" % (i, i - nInput), engine.get_tensor_dtype(engine.get_tensor_name(i)),
                                                  engine.get_tensor_shape(engine.get_tensor_name(i)),
                                                  context.get_tensor_shape(engine.get_tensor_name(i)), engine.get_tensor_name(i))
# 准备数据和 Host/Device 端内存
data = np.arange(2 * 3 * 3, dtype=np.float32).reshape(2, 3, 3)
bufferH = []
bufferH.append(np.ascontiguousarray(data))
for i in range(nInput, nInput + nOutput):
    bufferH.append(np.empty(context.get_tensor_shape(engine.get_tensor_name(i)), dtype=trt.nptype(engine.get_tensor_dtype(engine.get_tensor_name(i)))))

bufferD = []
for i in range(nInput + nOutput):
    bufferD.append(cudart.cudaMalloc(bufferH[i].nbytes)[1])
for i in range(nInput):
    cudart.cudaMemcpy(bufferD[i], bufferH[i].ctypes.data, bufferH[i].nbytes, cudart.cudaMemcpyKind.cudaMemcpyHostToDevice)

# 运行推理计算
context.set_tensor_address("inputT0", int(bufferD[0]))
context.set_tensor_address("outputT0", int(bufferD[1]))
context.execute_async_v3(0)

# 将结果从 Device 端拷回 Host 端
for i in range(nInput, nInput + nOutput):
    cudart.cudaMemcpy(bufferH[i].ctypes.data, bufferD[i], bufferH[i].nbytes, cudart.cudaMemcpyKind.cudaMemcpyDeviceToHost)

for i in range(nInput + nOutput):
    """
    inputT0
        [[[ 0.  1.  2.]
        [ 3.  4.  5.]
        [ 6.  7.  8.]]

        [[ 9. 10. 11.]
        [12. 13. 14.]
        [15. 16. 17.]]]
    outputT0
        [[[ 0.  1.  2.]
        [ 3.  4.  5.]
        [ 6.  7.  8.]]

        [[ 9. 10. 11.]
        [12. 13. 14.]
        [15. 16. 17.]]]
    """
    print(engine.get_tensor_name(i))
    print(bufferH[i])

for b in bufferD:                                                           # 释放 Device 端内存
    cudart.cudaFree(b)