Skip to content

Instantly share code, notes, and snippets.

Show Gist options
  • Star 0 You must be signed in to star a gist
  • Fork 0 You must be signed in to fork a gist
  • Save shinmiy/b7de49d368145888a1342b72a3177662 to your computer and use it in GitHub Desktop.
Save shinmiy/b7de49d368145888a1342b72a3177662 to your computer and use it in GitHub Desktop.

AndroidでTensorFlow Liteを使って花を認識する(ベータ版)

About this codelab

  • Last updated 6月 18, 2020
  • Written by Hoi Lam (revamping author), Yash Katariya (original author)

1. はじめに

このベータ版コードラボではTensorFlow Lite Model MakerとAndroid Studio 4.1 Beta 1以降を使った最新のツールを紹介します。また動作を確認するのに物理的なAndroid端末が必要になります。安定版のコードラボを試したい場合はこちらを参照ください。

TensorFlowは多目的機械学習フレームワークです。クラウド内で複数のクラスタをまたがった巨大なモデルの訓練からスマートフォンのような組み込みシステムでのローカルなモデルの実行まで、幅広い用途に使用することができます。

このコードラボでは、TensorFlow Liteを使ってAndroid端末で画像認識モデルを実行します。

このコードラボで学べること

  • TensorFlow Lite Model Makerを使用したカスタム画像分類器の訓練方法
  • Android StudioでTensorFlow Liteモデルをインポートし、CameraXを使用してカスタムモデルをAndroidアプリに導入する方法
  • スマートフォンでGPUを使用してモデルを高速化する方法

このコードラボで作るもの

TensorFlowの画像分類プログラムを実行して花を分類する簡単なカメラアプリを作ります。

2. Colabを使って花分類器を訓練させる

Colabを開いてみましょう。TensorFlow Lite transfer learningを使って、Kerasで分類器を訓練して花を認識する方法を確認します。

先に進む前に、

  1. 訓練されたモデル(model.tflite)をダウンロードして、
  2. FlowerModel.tfliteのファイル名を変更

したことを確認してください。

一部のブラウザではダウンロードがブロックされます:

Colabがファイルをダウンロードすることを許可する必要がある場合があります:

3. 作業ディレクトリのセットアップ

Gitリポジトリをcloneする

以下のコマンドでこのコードラボで必要なファイルが含まれるGitリポジトリをcloneします。

git clone https://github.com/hoitab/TFLClassify.git

次に、cloneしたディレクトリに移動します。ここでこのコードラボの残りの手順を行います。

cd TFLClassify

4. Androidアプリの骨子をセットアップ

Android Studioのインストール

まだインストールしていない場合は、AndroidStudio 4.1 Beta 1以降をインストールしてください。

Android Studioでプロジェクトを開く

以下の手順でAndroid Studioでプロジェクトを開きます。

  1. Android Studioを起動する。ロードが終わったら、以下のポップアップから"Open an Existing project"を選択する

  1. ファイル選択で、作業ディレクトリ内のTFLClassify/build.gradleを選ぶ。

このプロジェクトには、startfinishの2つのモジュールがあります。作業に行き詰まった場合はfinishを参照してヒントにしましょう。

  1. 初回はgradle wrapperの使用に関する"Gradle Sync"ポップアップが表示されます。「OK」をクリックします。

  1. まだの場合はスマートフォンの開発者モードとUSBデバッグを有効にします。これは1回限りのセットアップです。設定するにはこの手順に従ってください。

  2. プロジェクトとスマートフォン両方の設定が終わったら、実際に端末で動かしてみましょう。TFL_Classify.startを選択してツールバーのrunボタンをクリックします。

  1. Tensorflow Demoにカメラへのアクセスを許可します。

  1. 結果が表示される場所にランダムな数値が入った以下の画面が端末に表示されるはずです。

5. AndroidアプリにTensorFlow Liteを追加する

  1. 画面左側のプロジェクトエクスプローラーからstartモジュールを選択します。

  1. startモジュールを右クリック、またはFileからNew > Other > TensorFlow Lite Modelを選択します

  1. 先程ダウンロードした、訓練済みのFlowerModel.tfliteのパスを選択します。

このツールを使うと、自動的にbuild.gradleにML Model bindingや依存が挿入されモジュールの依存設定が行われます。
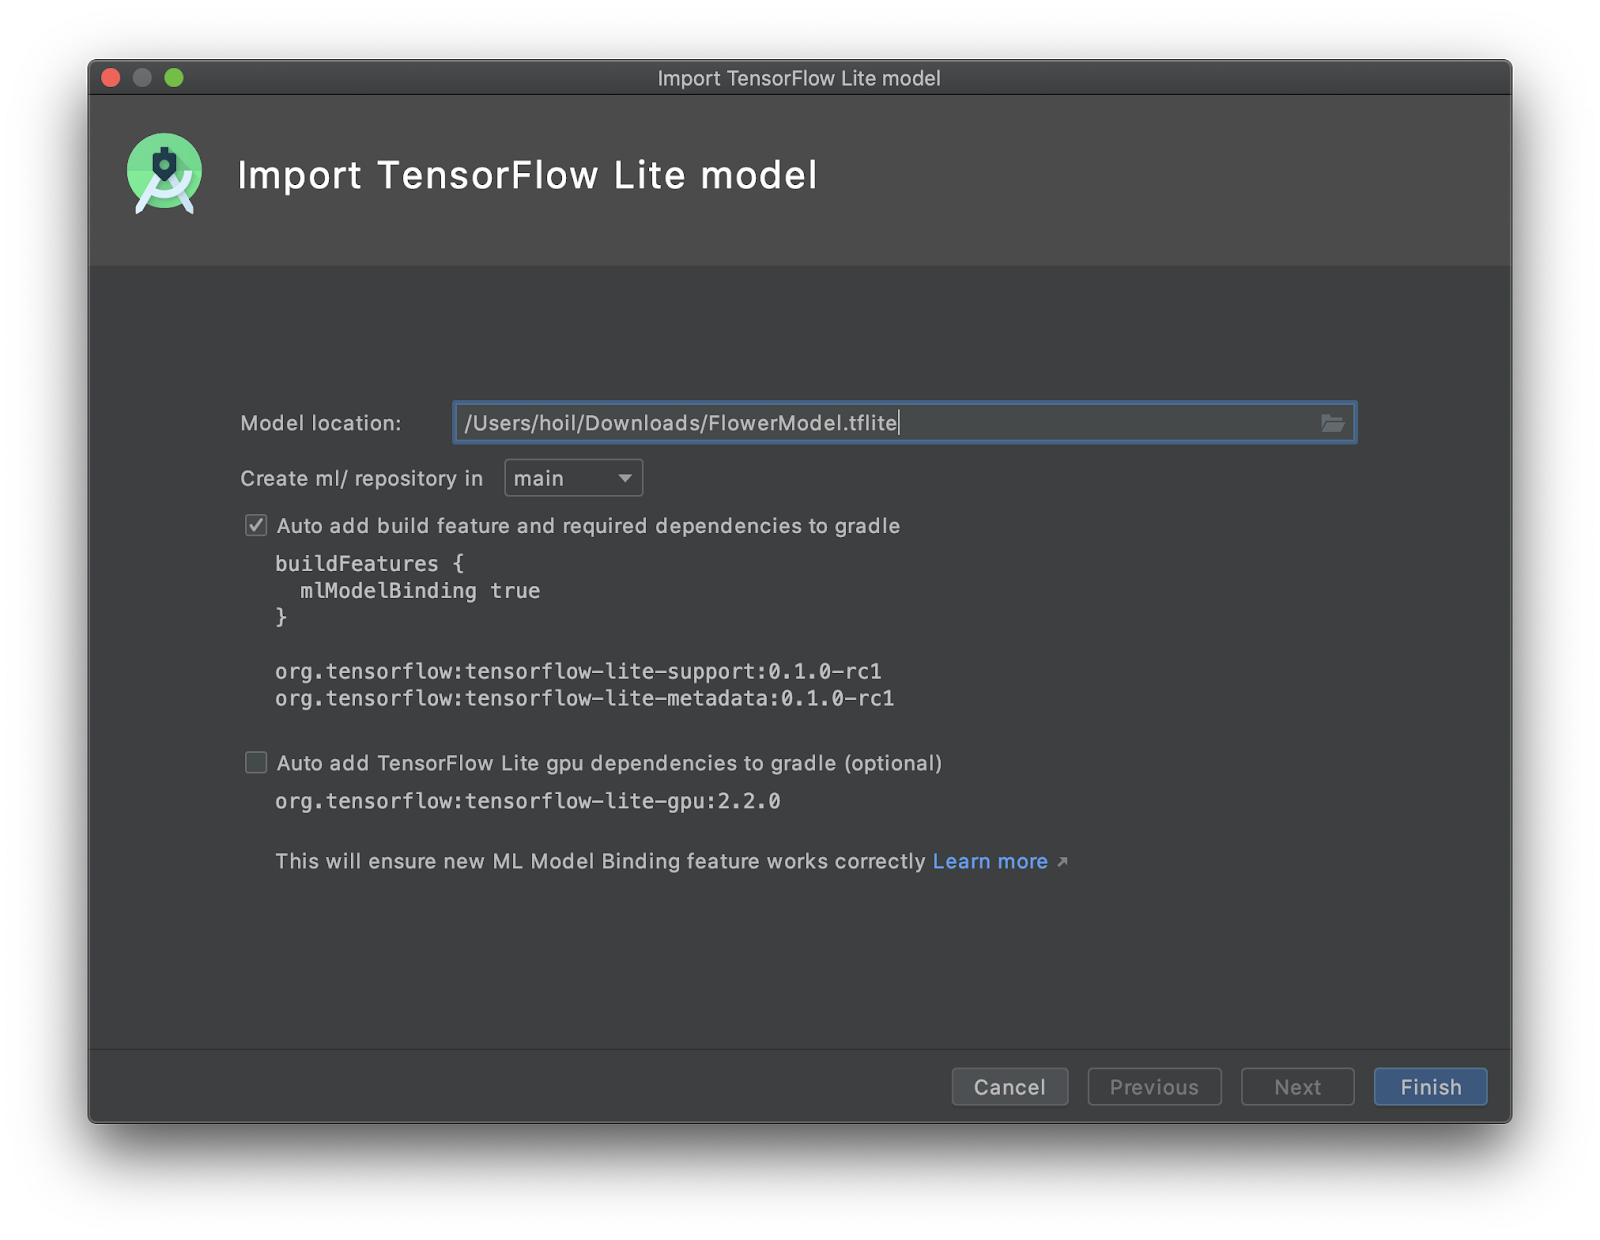
  1. Finishをクリックします。

  2. 最後に以下のような画面が表示されるはずです。FlowerModel.tfliteのインポートが成功して、入出力などモデルに関する高レベルな情報がサンプルコードとともに表示されます。

  1. (任意)TODOリストを使う

コードラボの更新に必要な場所へピンポイントで遷移するには、TODOリストが便利です。またAndroidプロジェクトで将来的に変更が必要な箇所を覚えておくのにも使えます。TODO項目を追加するにはコメントとTODOキーワードを使用します。TODOの一覧を確認するには以下の方法があります。

  1. やることを確認するにはTODOリストを表示するのが良いでしょう。画面上部のメニューから View > Tool Windows > TODO を選択します。

  1. 初期設定ではすべてのモジュールのTODOを表示するので、すこし分かりづらいかもしれません。TODOパネル端のgroup byボタンをクリックしてModulesを選択することでstartのTODOのみに絞り込むことができます。

  1. startモジュール内の項目を展開します。

7. TensorFlow Liteでカスタムモデル実行する

  1. TODOリストのTODO 1をクリックするかMainActivity.ktファイルを開いてTODO 1を探し、以下の行を追加してモデルの初期化を行います。
private class ImageAnalyzer(ctx: Context, private val listener: RecognitionListener) :
        ImageAnalysis.Analyzer {

  ...
  // TODO 1: Add class variable TensorFlow Lite Model
  private val flowerModel = FlowerModel.newInstance(ctx)

  ...
}
  1. CameraX Analyzerのanalyzeメソッドの中ではカメラからの入力のImageProxyBitmapに変換し、TensorImageオブジェクトを生成して、推論プロセスに使用します。

このツールでは画像の入力はBitmap形式である必要があります。

  • これはつまりImageProxyではなくファイルを入力として使う場合、fromBitmapメソッドに直接Bitmapとして流し込むことができます。
  • ImageProxyがどうBitmapに変換されているかについては、toBitmapメソッドとYuvToRgbConverterを参照ください。またこれは将来的なTensorImageImageProxy対応までの暫定的なメソッドです。
override fun analyze(imageProxy: ImageProxy) {
  ...
  // TODO 2: Convert Image to Bitmap then to TensorImage
  val tfImage = TensorImage.fromBitmap(toBitmap(imageProxy))
  ...
}
  1. 画像を処理して、結果に対し以下の操作を行います。
    1. 属性スコアを使って確立の高い順に結果をソートする
    2. MAX_RESULT_DISPLAYで定義される上位k個の結果取得する。この値を任意のものに差し替えて結果の数を変更することもできます。
override fun analyze(imageProxy: ImageProxy) {
  ...
  // TODO 3: Process the image using the trained model, sort and pick out the top results
  val outputs = flowerModel.process(tfImage)
      .probabilityAsCategoryList.apply {
          sortByDescending { it.score } // Sort with highest confidence first
      }.take(MAX_RESULT_DISPLAY) // take the top results

  ...
}
  1. ソートしてフィルタした結果をデータオブジェクトRecognitionに変換して、Data Bindingを使ってRecyclerViewに流し込めるようにします。
override fun analyze(imageProxy: ImageProxy) {
  ...
  // TODO 4: Converting the top probability items into a list of recognitions
  for (output in outputs) {
      items.add(Recognition(output.label, output.score))
  }
  ...
}
  1. 以前表示されていたプレースホルダーの結果を生成する以下の行をコメントアウトもしくは削除します。
// START - Placeholder code at the start of the codelab. Comment this block of code out.
for (i in 0..MAX_RESULT_DISPLAY-1){
    items.add(Recognition("Fake label $i", Random.nextFloat()))
}
// END - Placeholder code at the start of the codelab. Comment this block of code out.
  1. TFL_Classify.startを選択してツールバーのrunボタンをクリックして、実際の端末でアプリを起動してみます。

  1. 以下の画面が表示され、ランダムな値の代わりに実際の結果が表示されるようになります。

8.(任意)GPUデリゲートで推論を高速化する

TensorFlow Liteは複数のハードウェアアクセラレータに対応し、モバイル端末での推論を高速化することができます。GPUも利用できるアクセラレータのひとつで、デリゲート機能を使って比較的簡単に使用することができます。

  1. startモジュールのbuild.gradleを開くか、TODOリストのTODO 5を選択して、以下の依存を追加します。
// TODO 5: Optional GPU Delegates    
implementation 'org.tensorflow:tensorflow-lite-gpu:2.2.0'
  1. MainActivity.ktファイルに戻るかTODOリストのTODO 6を選択して以下のモデルオプションを初期化します。
private class ImageAnalyzer(ctx: Context, private val listener: RecognitionListener) :
        ImageAnalysis.Analyzer {
  ...
  // TODO 6. Optional GPU acceleration
  private val options = Model.Options.Builder().setDevice(Model.Device.GPU).build()
  ...
}
  1. 引数にoptionsを追加してモデルの初期化処理を変更します。
private class ImageAnalyzer(ctx: Context, private val listener: RecognitionListener) :
        ImageAnalysis.Analyzer {

  ...
  // TODO 1: Add class variable TensorFlow Lite Model
  private val flowerModel = FlowerModel.newInstance(ctx, options)

  ...
}
  1. TFL_Classify.startを選択した上でツールバーのrunボタンをクリックして、実機でアプリを実行します。

ハイ・ミドルレンジの端末では、CPUよりもGPUのほうが格段に高速です。一方でエントリー機には遅いGPUが搭載されていることが多く、機種によって推論の高速化度合いが異なります。

9. コードラボが終わったら

以下のリンクをたどってみましょう

Recognize Flowers with TensorFlow Lite on Android (beta)

About this codelab

  • Last updated 6月 18, 2020
  • Written by Hoi Lam (revamping author), Yash Katariya (original author)

1. Introduction

This beta codelab introduces the latest tooling using TensorFlow Lite Model Maker and Android Studio 4.1 Beta 1 or above. In addition, it will require access to a physical Android device to test. If you prefer to use the stable version of this codelab, follow this codelab instead.

TensorFlow is a multipurpose machine learning framework. TensorFlow can be used anywhere from training huge models across clusters in the cloud, to running models locally on an embedded system like your phone.

This codelab uses TensorFlow Lite to run an image recognition model on an Android device.

What you'll learn

  • How to train your own custom image classifier using TensorFlow Lite Model Maker.
  • How to use Android Studio to import the TensorFlow Lite model to integrate the custom model in an Android app using CameraX.
  • How to use GPU on your phone to accelerate your model.

What you will build

A simple camera app that runs a TensorFlow image recognition program to identify flowers.

2. Train a flower recognizer using Colab

Open the Colab which shows how to train a classifier with Keras to recognize flowers using TensorFlow Lite transfer learning.

Be sure that you:

  1. downloaded the trained model (model.tflite), and
  2. renamed the file FlowerModel.tflite

before continuing.

Some browsers will block the downloads:

You may need to give colab permission to download the files:

3. Set up the working directory

Clone the Git repository

The following command will clone the Git repository containing the files required for this codelab:

git clone https://github.com/hoitab/TFLClassify.git

Next, go to the directory you just cloned the repository. This is where you will be working on for the rest of this codelab:

cd TFLClassify

4. Set up the Android skeleton app

Install Android Studio

If you don't have it installed already, go install AndroidStudio 4.1 Beta 1 or above.

Open the project with Android Studio

Open a project with Android Studio by taking the following steps:

  1. Open Android Studio. After it loads select "Open an Existing project" from this popup:

  1. In the file selector, choose TFLClassify/build.gradle from your working directory.

The project contains two modules, start and finish. If you get stuck, refer to the finish module for hint.

  1. You will get a "Gradle Sync" popup, the first time you open the project, asking about using gradle wrapper. Click "OK".

  1. Enable developer model and USB Debugging on your phone if you have not already. This is a one-time set up. Follow these instructions.

  2. Once both your project and your phone is ready, you can run it on a real device by selecting TFL_Classify.start and press the run button on the toolbar:

  1. Now allow the Tensorflow Demo to access your camera:

  1. You will see the following screen on your phone with random numbers taking the place of where real results will be displayed.

5. Add TensorFlow Lite to the Android app

  1. Select the start module in the project explorer on the left hand side:

  1. Right-click on the start module or click on File, then New > Other > TensorFlow Lite Model

  1. Select the model location where you have downloaded the custom trained FlowerModel.tflite earlier.

Note that the tooling will configure the module's dependency on your behalf with ML Model binding and all dependencies automatically inserted into your Android module's build.gradle file.

  1. Click Finish.

  2. You will see the following at the end. The FlowerModel.tflite is successfully imported and it shows the high level information regarding the model including the input / output as well as some sample code to get you started.

  1. Optional: Checking out all todo list

TODO list makes it easy to navigate to the exact location where you need to update the codelab. You can also use it in your Android project to remind yourself of future work. You can add todo items using code comments and type the keyword TODO. To access the list of TODOs, you can:

  1. A great way to see what we are going to do is to check out the TODO list. To do that, select from the top menu bar View > Tool Windows > TODO

  1. By default, it lists all TODOs in all modules which makes it a little confusing. We can sort out only the start TODOs by clicking on the group by button on the side of the TODO panel and choose Modules

  1. Expand all the items under the start modules:

7. Run the custom model with TensorFlow Lite

  1. Click on TODO 1 in the TODO list or open the MainActivity.kt file and locate TODO 1, initialize the model by adding this line:
private class ImageAnalyzer(ctx: Context, private val listener: RecognitionListener) :
        ImageAnalysis.Analyzer {

  ...
  // TODO 1: Add class variable TensorFlow Lite Model
  private val flowerModel = FlowerModel.newInstance(ctx)

  ...
}
  1. Inside the analyze method for the CameraX Analyzer, we need to convert the camera input ImageProxy into a Bitmap and create a TensorImage object for the inference process.

Note that current tooling requires image input to be in Bitmap format.

  • This means if the input is a file rather than ImageProxy, you can feed it directly to the method fromBitmap as a Bitmap object.
  • If you are interested in how ImageProxy is converted into Bitmap, please check out the method toBitmap and the YuvToRgbConverter. We expect the needs for these methods to be temporary as the team works towards ImageProxy support for TensorImage.
override fun analyze(imageProxy: ImageProxy) {
  ...
  // TODO 2: Convert Image to Bitmap then to TensorImage
  val tfImage = TensorImage.fromBitmap(toBitmap(imageProxy))
  ...
}
  1. Process the image and perform the following operations on the result:
    1. Descendingly sort the results by probability under the attribute score with the highest probability first.
    2. Take the top k results as defined by the constant MAX_RESULT_DISPLAY. You can optionally vary the value of this variable to get more or less results.
override fun analyze(imageProxy: ImageProxy) {
  ...
  // TODO 3: Process the image using the trained model, sort and pick out the top results
  val outputs = flowerModel.process(tfImage)
      .probabilityAsCategoryList.apply {
          sortByDescending { it.score } // Sort with highest confidence first
      }.take(MAX_RESULT_DISPLAY) // take the top results

  ...
}
  1. Convert the sorted and filtered results into data objects Recognition ready to be consumed by RecyclerView via Data Binding:
override fun analyze(imageProxy: ImageProxy) {
  ...
  // TODO 4: Converting the top probability items into a list of recognitions
  for (output in outputs) {
      items.add(Recognition(output.label, output.score))
  }
  ...
}
  1. Comment out or delete the following lines which help generate the fake results we see before:
// START - Placeholder code at the start of the codelab. Comment this block of code out.
for (i in 0..MAX_RESULT_DISPLAY-1){
    items.add(Recognition("Fake label $i", Random.nextFloat()))
}
// END - Placeholder code at the start of the codelab. Comment this block of code out.
  1. Run the app on a real device by selecting TFL_Classify.start and press the run button on the toolbar:

  1. You will see the following screen on your phone with random numbers taking the place of where real results will be displayed:

8. Optional: Accelerate inference with GPU delegate

TensorFlow Lite supports several hardware accelerators to speed up inference on your mobile device. GPU is one of the accelerators that TensorFlow Lite can leverage through a delegate mechanism and it is fairly easy to use.

  1. Open build.gradle under the start module or you can click on TODO 5 under the TODO list and add the following dependency:
// TODO 5: Optional GPU Delegates    
implementation 'org.tensorflow:tensorflow-lite-gpu:2.2.0'
  1. Go back to the MainActivity.kt file or click on TODO 6 in the TODO list and initialize the following model option:
private class ImageAnalyzer(ctx: Context, private val listener: RecognitionListener) :
        ImageAnalysis.Analyzer {
  ...
  // TODO 6. Optional GPU acceleration
  private val options = Model.Options.Builder().setDevice(Model.Device.GPU).build()
  ...
}
  1. Change the model initializer to use this by adding options to the method input:
private class ImageAnalyzer(ctx: Context, private val listener: RecognitionListener) :
        ImageAnalysis.Analyzer {

  ...
  // TODO 1: Add class variable TensorFlow Lite Model
  private val flowerModel = FlowerModel.newInstance(ctx, options)

  ...
}
  1. Run the app on a real device by selecting TFL_Classify.start and press the run button on the toolbar:

On a medium/high end mobile device, GPU is much faster than CPU. Low end devices tend to have slower GPUs, so the speedup you see will vary.

9. What Next?

Here are some links for more information:

Sign up for free to join this conversation on GitHub. Already have an account? Sign in to comment