You will need to enable multilib before running this command. To do this, uncomment the [multilib] section in /etc/pacman.conf.
sudo pacman -S wine winetricks giflib lib32-giflib libpng lib32-libpng libldap lib32-libldap gnutls lib32-gnutls mpg123 lib32-mpg123 openal lib32-openal v4l-utils lib32-v4l-utils libpulse lib32-libpulse libgpg-error lib32-libgpg-error alsa-plugins lib32-alsa-plugins alsa-lib lib32-alsa-lib libjpeg-turbo lib32-libjpeg-turbo sqlite lib32-sqlite libxcomposite lib32-libxcomposite libxinerama lib32-libgcrypt libgcrypt lib32-libxinerama ncurses lib32-ncurses opencl-icd-loader lib32-opencl-icd-loader libxslt lib32-libxslt libva lib32-libva gtk3 lib32-gtk3 gst-plugins-base-libs lib32-gst-plugins-base-libs vulkan-icd-loader lib32-vulkan-icd-loader lutris cdemu-client cdemu-daemon -yIf you are using a custom kernel like xanmod, install vhba-module-dkms. If not, install vhba-module. Then, enable the daemon by running:
sudo systemctl enable --now cdemu-daemonMake sure your kernel is compiled with the following options enabled:
CONFIG_BLK_DEV_SRCONFIG_ISO9660_FSCONFIG_UDF_FS
It is recommended to have the following global use flags in your make.conf:
Xpulseaudiojpegpng
sudo emerge -av virtual/wine games-util/lutris app-cdr/cdemu app-emulation/winetricks
sudo modprobe vhba
Edit your /etc/conf.d/modules file and add this:
modules="vhba"In order for the CDEmu daemon to be started automatically on boot, you will need to have dbus enabled. You can enable it by running:
sudo rc-update add dbus defaultTo begin with, we have to create a wine prefix by running WINEARCH=win32 winecfg and also set the windows version to either 7 or 10. You might need to experiment with this setting and see what works best for you.
Next, we'll use winetricks to download various runtime libraries that are needed for some VNs to work.
winetricks ffdshow quartz d3dx9 dotnet35 dxvk vcrun2003 vcrun2005 vcrun2008 vcrun2010 vcrun2012 vcrun2013 vcrun2015Then, run this command to disable DLL overrides:
winetricks settings alldlls=defaultIn order to get 100% font coverage, we will need the fonts that windows uses and have wine use it. Download the font pack and unzip the archive. Move all the files inside the Fonts folder to ~/.wine/drive_c/windows/Fonts.
Then we will install LAVFilters for extra codecs that some VNs require Then, install LAVFilters for a few extra codecs that some VNs require.
Now open up a terminal and cd to where you downloaded it. Next, run wine {path to the installer}, and go through the setup.
Once thats done, we can setup lutris.
Open Lutris, and click the plus icon to add a game, and click install runners.
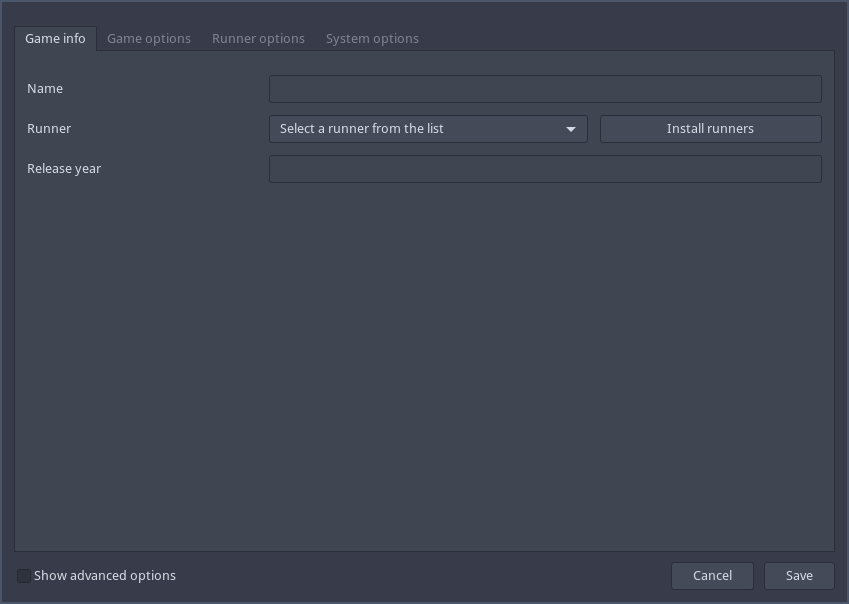
You will be shown a bunch of runners, but you want to install the wine runner. It doesn't really matter which version you pick, since we are going to be using the system-wide wine install anyways.


For this demo, I will be using Summer Pockets as an example. VNs have a few different kinds of installations. Sometimes (if you're lucky), there isn't one to begin with. Other times, you will have an ISO file or something that you can convert to an ISO file.
In this case, summer pockets uses an ISO file for the installation which adds one extra step of using CDEmu. CDEmu is a program that emulates an optical drive and disc (including CD-ROMs and DVD-ROMs) on Linux, which as a result, bypasses the DRM checks that a lot of VNs have.
First, we have to load the ISO using the cdemu client:
cd /path/to/visual/novel/folder
cdemu load 0 [iso file]
Now we have to mount the ISO file. Let's create a mount point for our VNs by running:
sudo mkdir -p /media/vnThen we can run the following command to mount it on the mount point we previously created:
sudo mount -o loop [iso file] /media/vnNow, we should all the files required for the installation in the /media/vn folder like this:
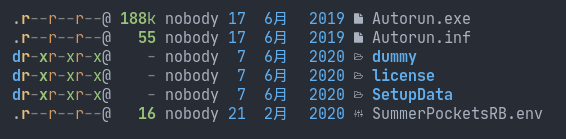
Next, we will run the setup file using wine:
LC_ALL="ja_JP.UTF-8" TZ="Asia/Tokyo" wine Autorun.exeAnd go through the setup process. Once its done, the program files should be in ~/.wine/drive_c/Program Files or ~/.wine/drive_c/.
The last step is to add this game to lutris so we can efficiently manage all our VNs and launch them with easily. Click "add game" like before and type in the visual novel name.
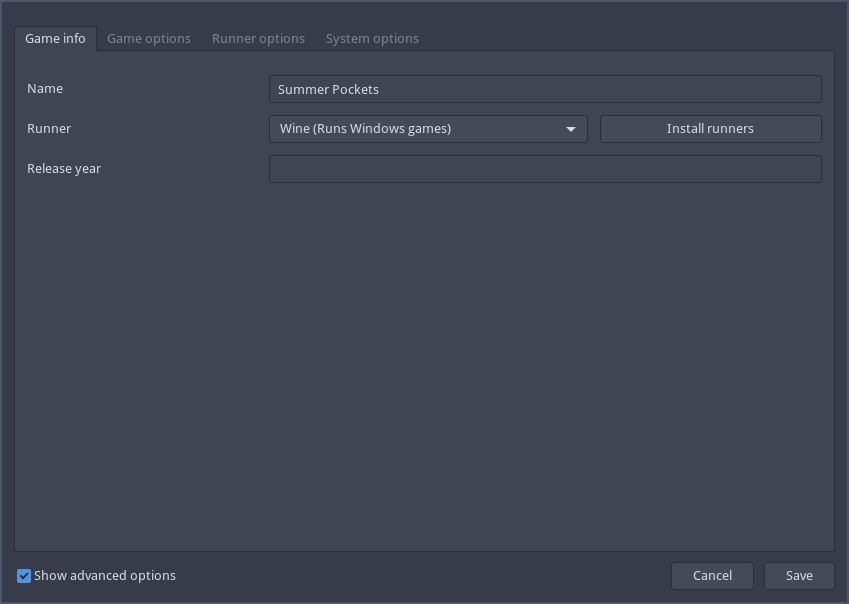
Now add the name of the game, choose Wine as your runner, and enable "Show advanced options".
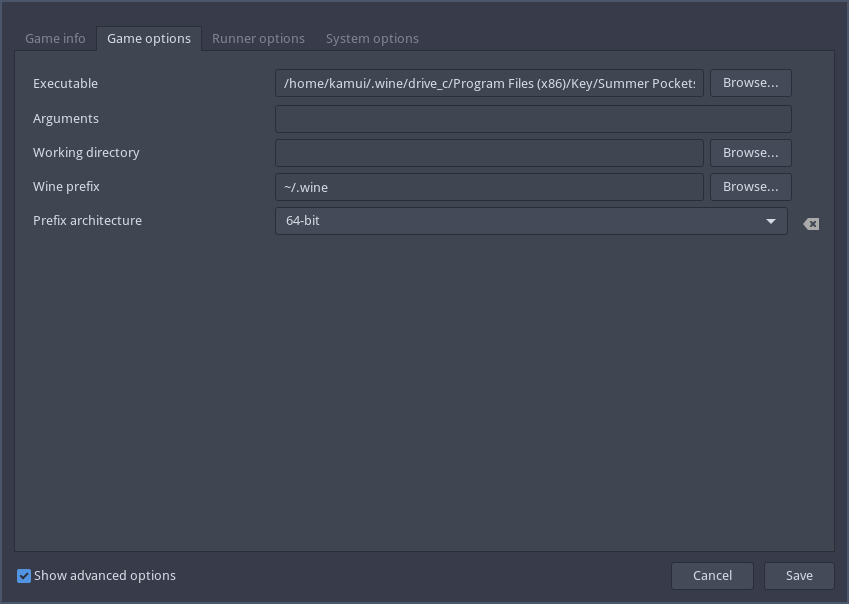
Next, click on the Game Options tab and choose the exe that launches the game, set the wine prefix to ~/.wine, and set the prefix architecture to x64.
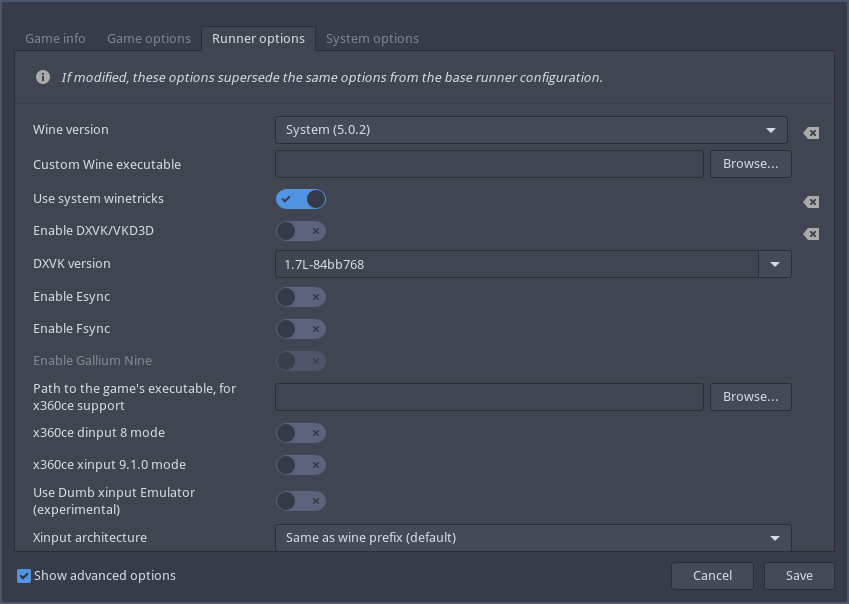
Then, click on the Runner Options tab and change your wine version to "System" and check "Use Winetricks". Disable DXVK since VNs don't usually have 3D graphics.
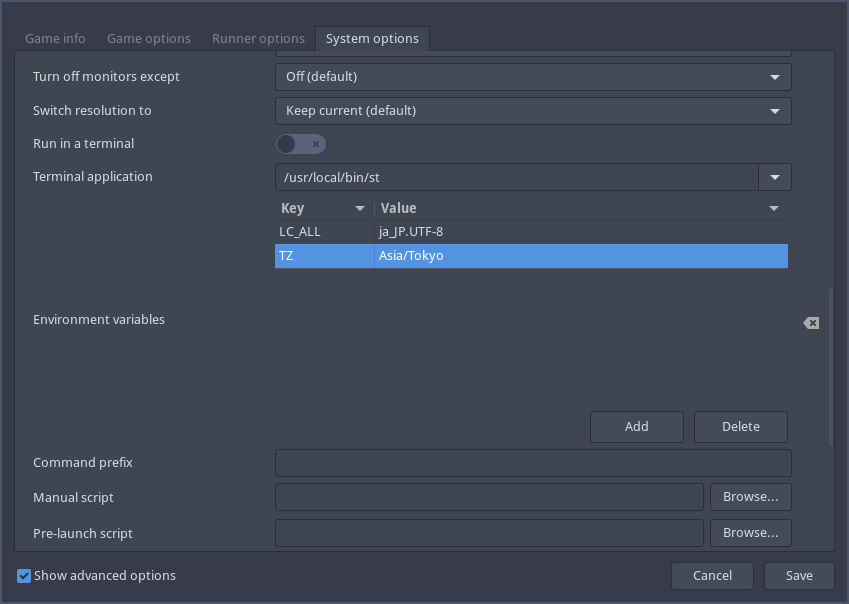
Finally, click on System Options and add an environment variable for LC_ALL and set it to ja_JP.UTF-8, and one for TZ and set it to Asia/Tokyo.
And that should be it! You can now save that configuration and double click on the game, and it should boot up.
Now that you know how to install a windows program through wine, setting up textractor will be relatively simple. Grab the setup file from the download site set it up normally like we did with LAV Filters.
Add the textractor executable file to lutris with the settings described in the previous section.
This is a mining setup created by eshrh
You can follow any windows guide to find out how to use textractor along with yomichan like this one. Your end goal is to be able to have a texthooker page open and have VN text automatically appear on it. You'll then be able to use yomichan to mine anki cards.
You might also want to include a voice clip and a screenshot of your visual novel along with your anki card. This can be done using ames. You should already have anki and ankiconnect installed, so install the following dependencies on your system (arch assumed):
sudo pacman -S pulseaudio pactl ffmpeg maim xdotool libnotify
- Then, download the ames.sh script somewhere safe
- Edit the script and change the first two lines to match the names of your Anki model image and audio fields.
- Bind the following commands to any key in your DE, WM, sxhkd, xbindkeysrc, etc.
sh ~/path/to/ames.sh -r: press once to start recording, and again to stop and export the audio clip to your latest-created Anki card.sh ~/path/to/ames.sh -s: prompt for an interactive screenshot selectionsh ~/path/to/ames.sh -a: repeat the previous screenshot selection. If there is no previous selection, default to -s.sh ~/path/to/ames.sh -w: screenshot the currently active window (requires xdotool)
Now, when you press a hotkey, ames should collect the screenshot or recording you selected, and export it to your last added card in Anki automatically, which should be a card you mined using Yomichan from the visual novel.