(Last updated: 1.18.2)
This is technically a shameless rip/edit of misode's guide that shows the traditional use of newly implemented custom structure system. I myself want to tackle the jigsaw aspect a bit, hence i'm making my own guice based on his. I will show how to create a data pack that adds custom structures to the world that also utilize jigsaw blocks. So treat this as a basic jigsaw guide in world generation. There is also a data pack download of this first example.
Always leave the world and rejoin to apply the new changes! Because traditional
/reloador/datapack disable & enabledo not refresh changes in worldgen files!
Let's make a simple house with a basement and a road that will lead away from the house to some shrine.


Use structure blocks in their SAVE mode, and set the bounding boxes of the structures.

Our starting structure can be the house, so there has to be a connection in front of the house, on the ends of the roads, and in front of the shrine.

Since we separated the house and the basement, we need to put two additional jigsaw block facing into each other.

We still haven't configured the jigsaws in the structures, but that will come soon. First we need to choose the names of those structures and save them. I choose some self explanatory names.

All saved structures can be found inside your world:
YourWorld/generated/minecraft/structures/...

CLICK ME: Saving structure in specific folders
Alternatively you can even use path in the Structure name in the structure block, like minecraft:project1/house_top. Then that structure would be saved, in automatically created folder
YourWorld/generated/minecraft/structures/project1/...
I like to use that when i work on separate projects at the same time.


It's also possible to save them in different directory (not minecraft:). Just change the minecraft: prefix to something else, like my_datapack_files: or whatever. Just remember where you put them.


The first part until jigsaws is rather basic, so i won't go in depth. Let's start constructing our datapack in our world.
Go to YourWorld/datapacks/... and create some folder. (1.18.2_structure_example_1 in my case). Inside of it create a file pack.mcmeta and a folder data.
If you can't figure out how to make pack.meta, then just download it from here.
In version 1.18.2, the pack format number is 9
{
	"pack": {
		"pack_format": 9,
		"description": "1.18.2 Structure with jigsaws - example 1"
	}
}
Next up, go into data and create a folder with your own name. It will server as a directory. If your datapack would aim to replace certain existing vanilla files, or just exist among them, then you can use minecraft. As you can see below, i used my own name.

CLICK ME: Why you should use your own name for this directory?
You can obviously use minecraft as a name. But if you were to compile multiple datapacks that also use minecraft as their directory, then there is a small chance that something with the same name might overlap onto each other and create problems. It's also easier to manage and search such datapacks because you know what directory does what.
I myself only use minecraft as the name if i want to replace vanilla structures, loot tables, worldgen parameters, etc. So associate minecraft directory with original vanilla parameters.
For example basing on a vanilla loot table:
minecraft/loot_tables/chests/ruined_portal.json
You can make a loot table with the same name and path, but in a different directory. In that case both of those loot tables will work in game, but will be called out in game, with different directory:
my_datapack_files/loot_tables/chests/ruined_portal.json
So in game you would use:
/loot give @p loot minecraft:chests/ruined_portal

/loot give @p loot my_datapack_files:chests/ruined_portal
And both of those would work. Same goes for structures and any other files.
Now go into this directory, and create structures and worldgen folders. The structures will contain all structural .nbt files, and worldgen will contain text based .json files, dictating the methods of generation for the structures, and the jigsaws.

Firstly, let's get into the structures folder. That's the place where the game will take the structure .nbt files from, and put them into the world. But I will not be prude, so I will create additional folder example_1_structures inside, for it to be a bit more organized (you can create a lot of folders here, if the structure consists of a lot of parts, or substructures).
The name doesn't matter but we will have to remember it later on. After creating this folder, I will copy the .nbt files that I generated with structure block previously, into this folder.

CLICK ME: It's not technically nessesary to copy those files yet. Why?
Because later on we will have to overwrite them anyway. We haven't programmed the jigsaws inside those structures yet. I'm doing this here because it will be easier to show how to program those jigsaws, when those files are already there, so you don't have to imagine them being here. Capiche?
Ok, the easy part is done. Now we need to back up a bit, and enter the worldgen folder. Inside of it, create configured_structure_feature, structure_set and template_pool folders. I'll try to explain, in simple words what are those for, as we go.

We begin our work in template_pool folder. Simply speaking, there are adresses (folder pathways) to structure files, that the game can randomly choose from. Inside of it, we can create additional folders, in the same manner as with the example_1_structures folder previously, but we will skip that here, because i'm lazy.
Inside the template_pool folder, we need to create pools from which the jigsaw will take an adress to the structure file. In total we will need 4 .json pools, because we need first for the house, second for the basement, third to the roads, and fourth for the shrines. If you don't know how to create a .json file the, just download it's empty form from here. There is no strict rule to naming the .json pools, but i just named them like this for easier understanding.

Let's start with coding the pool for the house, as it is meant to be the main/first structure to generate. This pool will only use 1 structure, so the code will look like this:
data/my_datapack_files/worldgen/template_pool/house_pool.json
{
  "name": "my_datapack_files:house_pool",
  "fallback": "minecraft:empty",
  "elements": [
	{
      "weight": 1,
      "element": {
        "location": "my_datapack_files:example_1_structures/house_top",
        "processors": "minecraft:empty",
		"projection": "rigid",
        "element_type": "minecraft:single_pool_element"
      }
    }
  ]
}
Notice that "name" is the path to this pool, and that we use our own directory (my_datapack_files:). This is exactly what we will be putting into jigsaws, later on.
The "fallback" is a path to a backup pool in case selected structure cannot be generated (when the jigsaw generation lenght limit has been achieved, or a structure cannot be placed, because it intersects with another one, that the game tries to generate at the same time). For example vanilla villages use those to form terminators, which are basically structures, that represent an abrupt ending of a road in a village. The "minecraft:empty" is a hardcoded value that just says do nothing. Since we don't use the "fallback" here, we could as well delete that line of code, but let's just keep it for convenience reasons.
The "location" is the pathway to the structure .nbt that the game will use, if it randomly chooses this element entry (100% of the time in this pool).
The "processors" is a structure modifying mechanic. For example it is used in random coalification of fossils, randomly replacing cobblestone with mossy cobblestone, random degradation of village roads (random replacement od dirt path blocks with grass blocks) etc. For simplification, we won't using this here.
The "projection" can be either "rigid" or ""terrain_matching". The second is used in village roads, where roads are altered to match the changing terrain height. The first one is used, pretty much everywhere else and assures that the structure will not be bended to match the terrain.
The "element_type" is best kept as "minecraft:single_pool_element", because it allows control over air blocks, and structure voids in structure.
Read more about those on the wiki or something.
CLICK ME: Are you confused, as to how to name the pathway to the pools, structures, loot tables, etc.?
It's easy to tell, how to write the path to the file, once you understand that the game knows to look for structures in structures folder, pools in template_pool folder, etc. The game is hardcoded to do that, so you only need to write the directory (in vanilla it's minecraft:) and the relative position of the file in those hardcoded folders. That's all there is to it.

The next 3 structure pools, are as follows:
data/my_datapack_files/worldgen/template_pool/basement_pool.json
{
  "name": "my_datapack_files:basement_pool",
  "fallback": "minecraft:empty",
  "elements": [
	{
      "weight": 1,
      "element": {
        "location": "my_datapack_files:example_1_structures/house_basement",
        "processors": "minecraft:empty",
		"projection": "rigid",
        "element_type": "minecraft:single_pool_element"
      }
    }
  ]
}
Since we have two shrine structures, we need to program it accordingly. In those cases "weight" starts to play a part, but let's leave it at the same value for both, for equal chance of generation.
data/my_datapack_files/worldgen/template_pool/shrine_pool.json
{
  "name": "my_datapack_files:shrine_pool",
  "fallback": "minecraft:empty",
  "elements": [
	{
      "weight": 1,
      "element": {
        "location": "my_datapack_files:example_1_structures/shrine1",
        "processors": "minecraft:empty",
		"projection": "rigid",
        "element_type": "minecraft:single_pool_element"
      }
    },
	{
      "weight": 1,
      "element": {
        "location": "my_datapack_files:example_1_structures/shrine2",
        "processors": "minecraft:empty",
		"projection": "rigid",
        "element_type": "minecraft:single_pool_element"
      }
    }
  ]
}
When it comes to roads, notice that we are using "terrain_matching" in "projection", because we obviously want the road to snug in nicely with the terrain.
Also notice that in the "fallback", we use adress to shrine pools. That is because we will use them as a terminator ( They will act as a road ending piece, when the limit of roads is achieved, or when a road cannot be generated further due to self colision ).
data/my_datapack_files/worldgen/template_pool/roads_pool.json
{
  "name": "my_datapack_files:roads_pool",
  "fallback": "my_datapack_files:shrine_pool",
  "elements": [
	{
      "weight": 1,
      "element": {
        "location": "my_datapack_files:example_1_structures/road1",
        "processors": "minecraft:empty",
		"projection": "terrain_matching",
        "element_type": "minecraft:single_pool_element"
      }
    },
	{
      "weight": 1,
      "element": {
        "location": "my_datapack_files:example_1_structures/road2",
        "processors": "minecraft:empty",
		"projection": "terrain_matching",
        "element_type": "minecraft:single_pool_element"
      }
    },
	{
      "weight": 1,
      "element": {
        "location": "my_datapack_files:example_1_structures/road3",
        "processors": "minecraft:empty",
		"projection": "terrain_matching",
        "element_type": "minecraft:single_pool_element"
      }
    }
  ]
}Ok, we're halfway done. Now we need to return to the game, and input those pools in their corresponding jigsaws. Let's start with the house.

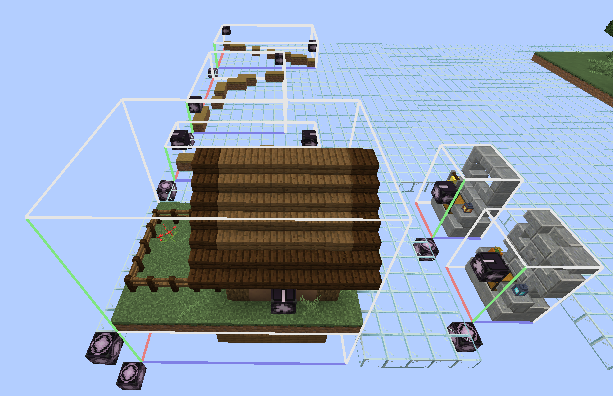
Let's see how other jigsaws are coded.

Regardning the image above. You might think that when the road is connected to the house, the jigsaw from the road might also try to call the "roads_pool.json", which would result in another road being generated, that would cut hrough the house. That is not the case, becuase this would create an infinite loop of generation, and would brick the game instantly. Jigsaw that is being connected to another jigsaw (that called for it), will not execute the calling for a target pool (even if a target pool is written there, so that also makes "Target Name" not being used as well), to prevent bricking the game.

Last thing, we need to do to the structures, is to place structure_void blocks, and cave_air blocks in them.
In simple terms cave_air guarantees, that upon generation, the air will stay there, and not be overwritten with a block. For example, it's used if you don't want the inside of the house to be filled with foreign blocks, if it were to generate partially into a wall of a mountain or something. It's also used everywhere in caves.
On the contrary, structure_void guarantees, that is will be overwritten with whatever block happens to be there where the world generates (even if it's air). For example roads use this, because it would look strange if a tree, that happened to generate next to the road, would be erased in half. This is also used in underground structures, to avoid making wierd empty spaces outside the structure, if it's non-cobuid shaped.
You can see all the "air" blocks and "structure_void" blocks, if you set Show invisible bocks to ON in the structure block.

For now, we obviously haven't done anything yet. So it only shows blue "air" blocks right now. I will fill the inside of the house, and the basement with cave_air blocks. I will also do that with the 1x3x3 entrance space in from of the house, and the garden part with the fence. When i fill the inside and other parts, with cave_air, then all the other block can be replaced with "structure_void" blocks. As you can see, the white-pink cubes represent "structure_void", and the blue cubes represent cave_air (because cave_air and air, look identical in game).

We need to do the same thing, with other structures, but we won't be needing the cave_air there. By now you can propably tell why we set, the turns into in the jigsaws to either "structure_void" or cave_air. We need the jigsaws to turn into something, according to our structure planning. According to your needs, you can set the turns into into any kind of block in the game. It all comes down to how you design your structures and connections between them.


The structures are finally finished. Let's save them with the structure blocks, and move them from the previously mentioned:
YourWorld/generated/minecraft/structures/...
To the datapack, same way as we did before.
YourWorld/datapacks/1.18.2_structure_example_1/data/my_datapack_files/structures/...
After this we only need to program two more things to complete our datapack.
In short, it's just a .json file for each separate structure, that points to the pool from which the first structure must be chosen to generate. It also dictates the type of a structure.
To create a configured_structure_feature.json we need to go into our datapack into the configured_structure_feature folder, and make a .json file there. I will name it house_shrine, but you can choose any kind of name. We will be later able to locate this structure in game using this exact name.
/locate my_datapack_files:house_shrine

data/my_datapack_files/worldgen/configured_structure_feature/house_shrine.json
{
  "config": {
    "start_pool": "my_datapack_files:house_pool",
    "size": 3
  },
  "biomes": "#minecraft:has_structure/pillager_outpost",
  "adapt_noise": true,
  "spawn_overrides": {},
  "type": "minecraft:village"
}
The "size" tells the maximum lenght of structure pieces that can be generated. The minimum value is 1 and maximum acceptable by game is 7.
You specify in which "biomes" can this structure generate. In 1.18.2 Mojang implemented the use of tags, with which you can use multiple biomes. So instead of just using:
"minecraft:plains",you can, for example use a tag (#), along with vanilla coded has_structure/pillager_outpost. That basically tells the game to generate the structure in every biome that the outposts generates. Of course you can even make your own tags to use. You can even make the structure generate in nether or the end, all you have to do is choose the correct biomes.
"#minecraft:has_structure/pillager_outpost",CLICK ME: Vanilla tags, and worldgen parameters by Slicedlime.

Slicedlime (one of the devs) keeps the vanilla parameters updated with each minecraft version. You can download them for reference on his github. It is extremely useful, when basing something on vanilla, or just learning how the game deals with something.
SLICEDLIMEvanilla/tags/worldgen/biome/has_structure/pillager_outpost.json
{
  "replace": false,
  "values": [
    "minecraft:desert",
    "minecraft:plains",
    "minecraft:savanna",
    "minecraft:snowy_plains",
    "minecraft:taiga",
    "#minecraft:is_mountain",
    "minecraft:grove"
  ]
}
The "adapt_noise" just creates artificial terrain, to adapt it to the structure. Slicedlime showed how it works here. This adaptation is both blessing and a curse. If you use small structures, then it's cool. But when you make a monstrous structures, know that the noise adaptation will extend all the way to where the final parts are generated. It does not stop at the starting structure part. Also, if your structure starts at the surface, and then extends into the ground, and spreads there, then the noise adaptation will go all the way along with the undergound parts, but it will work on the surface!!!. So you either will end up with large flat terrain, or unnatural spaghetti terrain in the air (if the structure started at a sloped terrain). See this in the spoiler below.
CLICK ME: How noise adaptation commits sudoku, when used in large custom structures.


The "spawn_overrides" dictate what to keep spawning in the proximity of the structure. It only works around the starting structure piece, on the same level (does not extend into, or above the ground). Pillager outposts and Ocean Monuments use this.
The "type" is very important. We can only choose between 3 types, because only those support jigsaw generation. We can choose village, pillager_outpost, or bastion_remnant. The village type always generates the structure on the surface (even on sea, or void), and puts the structures 1 block deep into the ground. Use this in pretty much anything. The pillager_outpost works in the same way as a village. The bastion_remnant ALWAYS generates the structure at Y=32. So it's suitable for generation underground, or any fixed height structures, like ships on the sea, or flying structures (you obvoiusly need to use jigsaw height extending of coure). Before 1.18 you could only use 1 structure of a "type" in a single biome, but since 1.18.2 you can use as much structures in a single biome of the same "type" as you want.
Misode has his own fancy way of explaining what that is, but in my own words, the structure set (set, as in, collection), is just a .json file that tells the game, of encoded structure group type that can exist in game. For example village is a structure set, because this village further divides into village_plains, village_desert etc. It's not mandatory that there need to be multiple subtypes (so that we can just have the "house_shrine.json" structure, that is of type "houses_with_shrines.json", i hope you understand what i mean).
Mojang just made that so people ale able to search for structure types regardless of what they further divide into.
To create a structure_set.json we need to go into our datapack into the structure_set folder, and make a .json file there.

data/my_datapack_files/worldgen/structure_set/houses_with_shrines.json
{
  "structures": [
    {
      "structure": "my_datapack_files:house_shrine",
      "weight": 1
    }
  ],
  "placement": {
    "salt": 121541467,
    "spacing": 12,
    "separation": 6,
    "type": "minecraft:random_spread"
  }
}
The "structure" is a pathway to the configured_structure_feature we made previously. The "structures" can have multiple entires, just like villages do.
The "salt" is kind of like a seed for structures. It is being combined with world seed to determine where to place a structure. Make sure that every different structure set has a different salt value, because otherwise structures with the same salt will be placed in the same place, which will result in a structural mess.
Misode explained the "spacing" and "separation" better that i can, so i'm just gonna copy those few lines like a lazy **** that i am:
"spacing": Roughly the average distance in chunks between two structures in this set.
"separation": The minimum distance in chunks. Needs to be smaller than spacing.
When using the random_spread placement type, it generates structures grid-based. Here's an illustration of an example with spacing = 5, separation = 2. There will be one structure attempt in each 5x5 chunk grid, and only at X a structure can spawn.
.............
..XXX..XXX..X
..XXX..XXX..X
..XXX..XXX..X
.............
.............
..XXX..XXX..X
..XXX..XXX..X
..XXX..XXX..X
The "type" refers to hardcoded generation method. It can either be concentric_rings that is used in strongholds, or random_spread, so always use random_spread.
Ok. The datapack is complete. Now all we have to do is to create some world (or use it in already existing one, it's up to you), that has enabled structure generation. First enter More world options and make sure that the structures are enabled. You can limit the type of biomes in the world, so that you can see the structure being used more often for testing purposes (you could do that with spacing and separation before too).


Now we need to click the Datapacks option, then Open Pack Folder, and copy our datapack, from where we were creating it in the first place.


Now all you have to do is click Create New World, and click Proceed when the game notifies you of experimental settings. After the game generates the world, you would need to use the locate command to instantly find the nearest structure.
/locate my_datapack_files:house_shrine
Since i chose low "spacing" and "separation" value before, i can instantly see several of those houses in sight without the need to locate command.
At the first example we can see, that everything generated nicely. Notice how the road adapts to the terrain due to "terrain_matching" we selected before, and how the tree isn't unnaturally cut, thanks to the structure_void blocks we used.

The basement below the ground generated nicely too, and it's not filled with dirt because we filled it with cave_air before.

In another example nearby, we can see how the random tree is also not cut in half, thanks to the structure_void block in the roads. Notice how the ground adapts to the structure, since the "village" structure type pushes the structure 1 block into the surface and how the adapt noise works just below the structure itself (hence, why the adaptation works underwater here).

Another example in the middle of the water (for some reason 1.18.2 generates large pools of water, even if only Plains biome was selected in settings, when creating a world)

For some reason sometimes more shrines are generated. Not sure why that happens, but after flying around i can say that this only happens around 1 per 8 structures, and on noticeably uneven terrain. Might as well be some bug, idk.

The datapack is finished. But if this thing were to be published, we need to pack it into a .zip format.
Go to inside the datapack so that you are looking at the data folder, and pack .json file.

Now select-drag all the files here (pack.png too if you have it) and use your installed archiver program to make a .zip file. (i use 7-zip).


Our datapack is finished and ready to publish. This .zip file can be read by game too, so you don't have to unpack it. Just make sure to move the zipped datapack to the datapacks folder if you plan to use it.

We're done here, you can download this datapack, if you want here - 1.18.2_structure_example_1
There are a few more fun uses for jigsaw blocks. I will present them here, but won't go too much in depth, since i will provide a download for a datapack with these extras, at the end anyway.
Mobs can be saved with structure blocks, and the generated with jigsaws. Villages use this exact method to place villagers in them. You can use this to save any kind of custom mob you want.
I will make an example by modifying the datapack we made previously. All i really need to do, is make another structures for the mobs, make a template pool for them, and implement jigsaws that call for that pool into some of the structures we made before.
First i obviously need to go into the world where i was making the datapack in the first place, and start making structural cages for the mobs, to keep them in place. For example an adult villager will need to use a 1x3x1 structural space since you need 1 block for jigsaw, and 2 block height for the villager. MAKE SURE THAT THE STRUCTURE BLOCK HAS ENABLED (ON) "INCLUDE ENTITIES".

I will do the same with some pets or whatever. Overall, you can put as much entities into the structure bounds as you want.

After saving the structures with structures blocks, we need to move them to the correct place, and make two template pools for each group. After that i will place the jigsaws into the house.


Notice how both pools have 1 empty entry (empty pool element), i just added it to have a change for nothing to spawn.
data/my_datapack_files/worldgen/template_pool/custom_mobs/pets_pool.json
{
  "name": "my_datapack_files:custom_mobs/pets_pool",
  "fallback": "minecraft:empty",
  "elements": [
	{
      "weight": 1,
      "element": {
        "location": "my_datapack_files:mob_structures/pet_3_parrots",
        "processors": "minecraft:empty",
		"projection": "rigid",
        "element_type": "minecraft:single_pool_element"
      }
    },
	{
      "weight": 1,
      "element": {
        "location": "my_datapack_files:mob_structures/pet_slime",
        "processors": "minecraft:empty",
		"projection": "rigid",
        "element_type": "minecraft:single_pool_element"
      }
    },
	{
      "weight": 1,
      "element": {
        "location": "my_datapack_files:mob_structures/pet_wolf",
        "processors": "minecraft:empty",
		"projection": "rigid",
        "element_type": "minecraft:single_pool_element"
      }
    },
	{
      "weight": 1,
      "element": {
        "element_type": "minecraft:empty_pool_element"
      }
    }
  ]
}
data/my_datapack_files/worldgen/template_pool/custom_mobs/villager_dudes.json
{
  "name": "my_datapack_files:custom_mobs/villager_dudes_pool",
  "fallback": "minecraft:empty",
  "elements": [
	{
      "weight": 1,
      "element": {
        "location": "my_datapack_files:mob_structures/harmless_pillager",
        "processors": "minecraft:empty",
		"projection": "rigid",
        "element_type": "minecraft:single_pool_element"
      }
    },
	{
      "weight": 1,
      "element": {
        "location": "my_datapack_files:mob_structures/trader",
        "processors": "minecraft:empty",
		"projection": "rigid",
        "element_type": "minecraft:single_pool_element"
      }
    },
	{
      "weight": 1,
      "element": {
        "location": "my_datapack_files:mob_structures/villager",
        "processors": "minecraft:empty",
		"projection": "rigid",
        "element_type": "minecraft:single_pool_element"
      }
    },
	{
      "weight": 1,
      "element": {
        "element_type": "minecraft:empty_pool_element"
      }
    }
  ]
}
After saving everything and setting it up, we can see this in action.

You can use multiple ministructures, that when used with jigsaws, can greatly enrich your structural variety.


{
  "name": "my_datapack_files:street_decor/lamps_pool",
  "fallback": "minecraft:empty",
  "elements": [
	{
      "weight": 1,
      "element": {
        "location": "my_datapack_files:decor_structures/lantern_decor1",
        "processors": "minecraft:empty",
		"projection": "rigid",
        "element_type": "minecraft:single_pool_element"
      }
    },
	{
      "weight": 1,
      "element": {
        "location": "my_datapack_files:decor_structures/lantern_decor2",
        "processors": "minecraft:empty",
		"projection": "rigid",
        "element_type": "minecraft:single_pool_element"
      }
    },
	{
      "weight": 1,
      "element": {
        "location": "my_datapack_files:decor_structures/lantern_decor3",
        "processors": "minecraft:empty",
		"projection": "rigid",
        "element_type": "minecraft:single_pool_element"
      }
    },
	{
      "weight": 1,
      "element": {
        "location": "my_datapack_files:decor_structures/lantern_decor4",
        "processors": "minecraft:empty",
		"projection": "rigid",
        "element_type": "minecraft:single_pool_element"
      }
    },
	{
      "weight": 1,
      "element": {
        "location": "my_datapack_files:decor_structures/lantern_decor5",
        "processors": "minecraft:empty",
		"projection": "rigid",
        "element_type": "minecraft:single_pool_element"
      }
    },
	{
      "weight": 1,
      "element": {
        "location": "my_datapack_files:decor_structures/lantern_decor6",
        "processors": "minecraft:empty",
		"projection": "rigid",
        "element_type": "minecraft:single_pool_element"
      }
    },
	{
      "weight": 1,
      "element": {
        "location": "my_datapack_files:decor_structures/lantern_decor7",
        "processors": "minecraft:empty",
		"projection": "rigid",
        "element_type": "minecraft:single_pool_element"
      }
    },
	{
      "weight": 1,
      "element": {
        "location": "my_datapack_files:decor_structures/lantern_decor8",
        "processors": "minecraft:empty",
		"projection": "rigid",
        "element_type": "minecraft:single_pool_element"
      }
    },
	{
      "weight": 3,
      "element": {
        "element_type": "minecraft:empty_pool_element"
      }
    }
  ]
}
It also can be done using horizontal jigsaws. Just make sure not to mix jigsaws that are destined for structure void spaces, with jigsaws for cave air spaces, since you might encounter stray terrain blocks where you don't want them.


{
  "name": "my_datapack_files:wall_decor/near_wall_pool",
  "fallback": "minecraft:empty",
  "elements": [
	{
      "weight": 1,
      "element": {
        "location": "my_datapack_files:decor_structures/wall_decor1",
        "processors": "minecraft:empty",
		"projection": "rigid",
        "element_type": "minecraft:single_pool_element"
      }
    },
	{
      "weight": 1,
      "element": {
        "location": "my_datapack_files:decor_structures/wall_decor2",
        "processors": "minecraft:empty",
		"projection": "rigid",
        "element_type": "minecraft:single_pool_element"
      }
    },
	{
      "weight": 1,
      "element": {
        "location": "my_datapack_files:decor_structures/wall_decor3",
        "processors": "minecraft:empty",
		"projection": "rigid",
        "element_type": "minecraft:single_pool_element"
      }
    },
	{
      "weight": 1,
      "element": {
        "location": "my_datapack_files:decor_structures/wall_decor4",
        "processors": "minecraft:empty",
		"projection": "rigid",
        "element_type": "minecraft:single_pool_element"
      }
    },
	{
      "weight": 1,
      "element": {
        "location": "my_datapack_files:decor_structures/wall_decor5",
        "processors": "minecraft:empty",
		"projection": "rigid",
        "element_type": "minecraft:single_pool_element"
      }
    },
	{
      "weight": 1,
      "element": {
        "location": "my_datapack_files:decor_structures/wall_decor6",
        "processors": "minecraft:empty",
		"projection": "rigid",
        "element_type": "minecraft:single_pool_element"
      }
    },
	{
      "weight": 1,
      "element": {
        "location": "my_datapack_files:decor_structures/wall_decor7",
        "processors": "minecraft:empty",
		"projection": "rigid",
        "element_type": "minecraft:single_pool_element"
      }
    },
	{
      "weight": 4,
      "element": {
        "element_type": "minecraft:empty_pool_element"
      }
    }
  ]
}
The result of those additional decor look like this. You can make as much additional decor substructures as you want, just keep it organized, because it's easy to get lost in the files after some time. Notice how the "adapt_noise" from before works on those lantern decors.


Knowing that the configured structure feature of the type "bastion_remnant" generates at Y=32, we can make structures generate at specific heights. It means that the lowest block af the starting structures will always generate at Y=32. We can use something, that i like to call Jigsaw Height Extender™, to generate the structures at ceratin heights. Let's analyze this at another example.
I will use baloon type structure, in which i want a specific part to be generated at Y=100. The process is rather straightforward, but since it's an entirely new structure, we need to code the structure set and configured structure feature as well.


Just make sure to name extender pools and structures differently for each different structure, that uses said extenders. Otherwise you won't know which extender belongs to which structure.
CLICK ME: Coding of this structure.


{
  "name": "my_datapack_files:extender/baloon_pool",
  "fallback": "minecraft:empty",
  "elements": [
	{
      "weight": 1,
      "element": {
        "location": "my_datapack_files:extenders_structures/baloon",
        "processors": "minecraft:empty",
		"projection": "rigid",
        "element_type": "minecraft:single_pool_element"
      }
    }
  ]
}
{
"name": "my_datapack_files:extender/upwards_32_79_pool",
"fallback": "minecraft:empty",
"elements": [
{
"weight": 1,
"element": {
"location": "my_datapack_files:extenders_structures/upwards_extender_32_79",
"processors": "minecraft:empty",
"projection": "rigid",
"element_type": "minecraft:single_pool_element"
}
}
]
}{
"name": "my_datapack_files:extender/upwards_80_97_pool",
"fallback": "minecraft:empty",
"elements": [
{
"weight": 1,
"element": {
"location": "my_datapack_files:extenders_structures/upwards_extender_80_97",
"processors": "minecraft:empty",
"projection": "rigid",
"element_type": "minecraft:single_pool_element"
}
}
]
}
{
  "structures": [
    {
      "structure": "my_datapack_files:baloon",
      "weight": 1
    }
  ],
  "placement": {
    "salt": 112561417,
    "spacing": 12,
    "separation": 6,
    "type": "minecraft:random_spread"
  }
}
{
  "config": {
    "start_pool": "my_datapack_files:extender/upwards_32_79_pool",
    "size": 5
  },
  "biomes": "#minecraft:has_structure/pillager_outpost",
  "adapt_noise": false,
  "spawn_overrides": {},
  "type": "minecraft:bastion_remnant"
}
After locating this structure in game, we can tell, that we got the result we wanted, by looking at the sign with F3 debug screen.
NOTE. For some unknown reason (could be a bug), sometimes the baloon structure refused to load, while the extenders generated fine. I had to regenerate the baloon structure file numerous times, so idk. Splitting it into multiple structures, and connecting them, might fix that. I haven't bothered to test.


When it comes to using this method downwards, we need to make the beginning different, because the lowest block is placed at Y=32. Therefore the first Jigsaw Height Extender™ must be only 1 block tall.
As for a structural example below Y=32, let's make some dungeon room, with a spawner at Y=10.

CLICK ME: Coding of this structure.


{
  "name": "my_datapack_files:extender/downwards_31_15_dungeon_pool",
  "fallback": "minecraft:empty",
  "elements": [
	{
      "weight": 1,
      "element": {
        "location": "my_datapack_files:extenders_structures/downwards_extender_31_15_dungeon",
        "processors": "minecraft:empty",
		"projection": "rigid",
        "element_type": "minecraft:single_pool_element"
      }
    }
  ]
}
{
"name": "my_datapack_files:extender/downwards_32_32_dungeon_pool",
"fallback": "minecraft:empty",
"elements": [
{
"weight": 1,
"element": {
"location": "my_datapack_files:extenders_structures/downwards_extender_32_32_dungeon",
"processors": "minecraft:empty",
"projection": "rigid",
"element_type": "minecraft:single_pool_element"
}
}
]
}{
"name": "my_datapack_files:extender/dungeon_pool",
"fallback": "minecraft:empty",
"elements": [
{
"weight": 1,
"element": {
"location": "my_datapack_files:extenders_structures/dungeon",
"processors": "minecraft:empty",
"projection": "rigid",
"element_type": "minecraft:single_pool_element"
}
}
]
}
{
  "structures": [
    {
      "structure": "my_datapack_files:dungeon",
      "weight": 1
    }
  ],
  "placement": {
    "salt": 212563616,
    "spacing": 12,
    "separation": 6,
    "type": "minecraft:random_spread"
  }
}
{
  "config": {
    "start_pool": "my_datapack_files:extender/downwards_32_32_dungeon_pool",
    "size": 5
  },
  "biomes": "#minecraft:has_structure/pillager_outpost",
  "adapt_noise": false,
  "spawn_overrides": {},
  "type": "minecraft:bastion_remnant"
}
Everything generates as we axpected yet again.


I'll try to summarize everything important that i know here.
- Propable bug. Using the
"adapt_noise"works fine with smaller structures, but using this with large structures sprawling over longer distance creates abnormal terrain distorsion, when not used with"terrain_matching", because the adaptation will stick to the level of the starting structure.


- Problematic hardcoded feature. When it comes to underwater structures like shipwrecks or sunken ruins. The game automatically waterlogs all waterloggable blocks if they generate where a water would be, so that it looks natural. There is no vanilla structure (except sometimes mineshafts) that would collide with this mechanism, so Mojang sees no problem. It becomes a problem, when you use your own custom structures. As we know, the general world shape is generated first, and after that the game tries to generate z structure. The game doesn't care if you use your own structure, it will waterlogg all the waterloggable blocks if when they generate in contact with water sources. This mechanism is hardcoded, and cannot be fixed unless Mojang changes the waterlogging mechanism. It's definitely low on their priority list, since i know of this feature since 1.16, so don't expect this getting fixed anytime soon. God help you if your structures happen to generate inside large pool of water, like oceans or flooded caves. Absolutely all blocks will be waterlogged (those that can be, that is).


- Structural intersection rule. What i said before, about the jigsaws needing to stick, and face to the structure bounds is not true. I just made that up before for easier understanding. The only rule you should know about is that the structure bounds must not intersect each other. They can stick to one another, and be inside each other, but they must never cross each other. I hope those pictures show better what i mean.


- Configured structure feature generation lenght (
"size")
As we know we can set the "size" in the configured_structure_feature.json from the values of 1 to 7. What does this number mean? In simple terms is means how much substructures in progressing line can sprawl away from the parent structure.
For example if I set the "size" to 3, then only 3 substructures can generate in a progressing line.

HOWEVER if, the substructure pool has specified the "fallback", then additional structure can be generated, due to termintator mechanism. Which increased it so 4, even if "size" is set to 3.
{
  "name": "my_datapack_files:test",
  "fallback": "my_datapack_files:test",
}
That means, if you use "size" with value 7, with specified "fallback", then you can squeeze in maximum of 8 substructures.
- P.S.
Speaking post scriptum, some things might change in the future. I know there are plenty of things i missed here - my knowledge only goes so far. For now, I'm so burned out by making this, that i might not update it in a while, so don't take everything here for granted.
Also don't bother asking me for things in the comments. Go to MC command Discord or to their subreddit, since they are much more knowledgeable than me.
1.18.2_structure_example_1 - Example datapack with only house, roads, and shrine.
1.18.2_structure_example_EXTRAS - Example datapack with house and it's decors, mobs, roads and shrine. Additionaly there is the baloon and dungeon.
Vanilla worldgen files - By Slicedlime
Custom structure generation tester - Amazing program by Jochen Jacobs, that allows you to instantly preview a randomized generation of your structure that can also use jigsaws. With this you don't have to create a world to test the changes everytime.