Disclaimer: Some commands in this sheet are avoided or rarely used by others (I don't know why). For instance, I use git switch instead git checkout to switch a branch. I tried to use memorable and resonable command names for my git workflow, without compromising its functionality (git switch really switches the branch for you 😀)
Last active
July 10, 2024 21:31
-
-
Save tapyu/0427afb25df969c1972942d945284ba2 to your computer and use it in GitHub Desktop.
personal git cheat sheet :)
| Command | Description |
|---|---|
config |
|
--list [--show-origin] |
list all git configuration [show from where this config comes from] |
--system |
read/write from the system configuration file (/etc/gitconfig). Unless you are the system administrator, you do not want to use this one. |
--global |
read/write from the system configuration file (~/.gitconfig or ~/.config/git/config). You should XDG_CONFIG_HOME=~/.config/git as it is XDG-compliant. |
--local |
read/write from the local configuration file of the git repository (/path/to/repo/.git/config). If you are in a repo and set some config without using --system, --global, or --local, the --local is assumed by default. |
|
submodule is link A Git submodule is a separate repository within a repository, to put it simply. Submodules are similar to child repositories in the way that pointer commits must be manually updated. They are easy for a team to work together at the same time. You don’t clone or integrate any of the actual code in your new repository when you use many submodules, it’s better to say that you include links to the "forest" repository on GitHub. Git submodules enable you to preserve one git repository as a sub directory of another. Also, Git submodules allow you to include and track the version history of external code in your Git repository. Submodule is best suited when you want to include external dependencies in your project but maintain them as separate projects with their own history and development lifecycle. Submodules have been around for a long time, and have their command (git submodule) and extensive documentation. If we compare it with adding a subtree, adding a submodule is fairly straightforward. All of the hazards and flaws do not appear until the last moment, which can be annoying.
|
|
submodule |
List all git submodules in the form of submodule-path commit-ish, no matter whether you pulled them or not. |
submodule update [--init] [--recursive] [--remote] |
Pull all git submodules. --init is necessary if they aren't initialized yet; --recursive that nested git submodules are also pulled; --remote makes git pull from remote, which is generally desired. |
submodule deinit submodule-path |
Delete git submodule with path submodule-path. |
submodule add [-b branch-of-submodule] submodule-URL path |
Create a link of submodule-URL repository in the path of the current repository (including the submodule name). Unfortunately, you cannot create a submodule containing only a subdirectory of the submodule repo. However, you can organize the submodule repo in branches and create a submodule for that branch by using the option -b branch-of-submodule |
|
subtree is copy (merge) Git submodule and git subtree are both features in Git used for managing dependencies within a repository, but they have different approaches and use cases. The module’s contents can be changed without the necessity to create a separate repository copy of the dependency. Unlike git submodule, git subtree does not create new metadata files (i.e., .gitmodule). They can be committed to, branched, and merged just like any other repository. Subtree is suitable when you want to include external code into your project as if it were part of it, and you want to keep everything in a single repository. Shortcomings of git subtrees
|
|
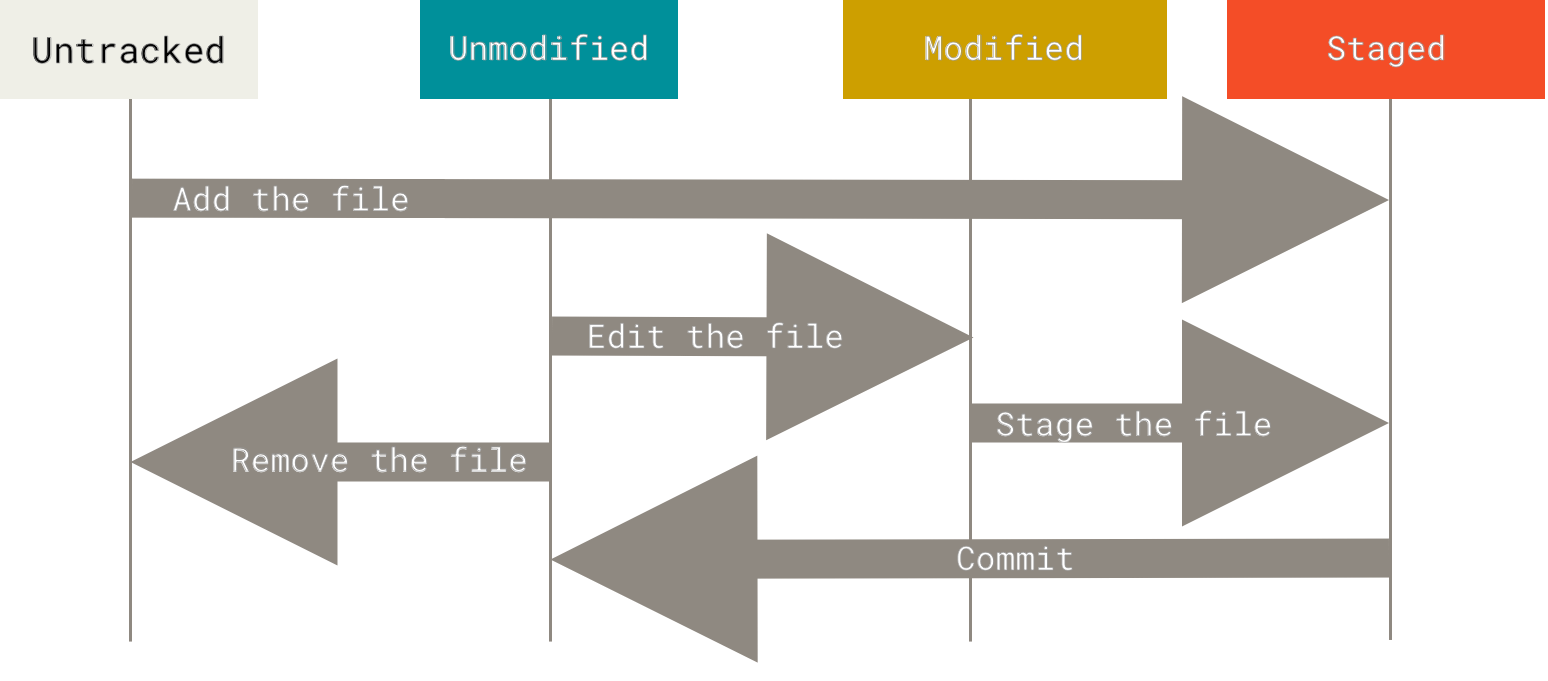
add files |
add working tree files to index area (modified or untracked→staged) |
{-A | --all} [-- ':!path/to/file1.txt'] |
all files [except path/to/file1.txt] |
--ignore-removal |
do not add removed files |
{-u | --update} |
do not add untracked files |
commit |
staged→local repository |
-m |
open a message log |
--amend -m |
change the message instead |
cherry-pick hash |
copy the commit from another branch to the current one |
push URL branch |
push local repository to remote repository |
--tags |
push the tags too |
-u URL branch |
add upstream to track reference (do it for a new created local branch) |
fetch [URL] |
fetch from remote repository [URL] to local repository. |
pull |
pull from remote repository to working tree (it also apply to the local repository) |
clone URL [path] |
download URL GitHub. If path is not given, then a new dir with the repo name is created. |
--bare |
clone a bare repository instead cloning a branch, it clones the files/directories inside .git/ to ./ |
--branch branch |
clone branch instead cloning the main branch |
clean |
delete untracked files |
-n |
show whats it is going to be deleted |
-d |
directories |
-f |
force |
rm |
Remove file in order to stop tracking it. Some main differences between them:
rm or git rm, they are still present in previous revisions. That's the whole point of git, is that even if you delete something, you can still get it back by accessing the history. If you want to remove file from the commit history in order to decrease the size of .git/objects/pack/pack-xxxxxxxxxxxxxxxxx.pack, you need to rewirte the commit history. See git filter-branch or BGF.
|
stash save description |
move the modified files in the working tree to the stash area to be able to switch to another branch whitout commit those changes |
{-u | --include-untracked} |
unclude untracked files |
stash pop |
remove a single stashed entry from the stash list and apply it on top of the current working tree state. The working directory must match the index. |
stash apply |
like pop, but do not remove the state from the stash list. |
stash drop stash@{n} |
remove the nth stash saved |
stash clear |
remove the all stashes saved |
stash show |
list all files stashed |
stash list |
list all files stashed |
PS1: use restore for unpushed commits |
|
PS2: use revert for pushed commits |
|
P3: HEAD~ – go backward in a straight line (no merge), get the previous linear commit. use HEAD~n to get the nth previous linear commit |
|
PS4: HEAD^ – go backward on merge commits — because they have two or more (immediate) parents. use HEAD^n to go backwards to get the nth previous linear commit |
|
diff [hash] [file1...] |
show differences between the working tree and the staged area (i.e., index) on file1...[if no file is given, show diff on all modified files] [if a hash is given, e.g., HEAD, the comparison is made between the the working tree and local repo of that hash] |
--name-only |
list only modified files names |
[past-hash[..]actual-hash] file |
compare just the file. If the hashes are passed, compare the file between them. The two dots are optional but advisable |
checkout file |
stage area→working tree (modified or untracked→staged or unmodified) |
restore file |
stage area→working tree (modified or untracked→staged or unmodified) |
restore --staged file |
restore file in index area from HEAD (staged→modified or untracked if it doesn't exist in local repo) |
restore --staged --worktree file |
restore file in both index area and working tree from HEAD (staged→unmodified) |
restore --staged --source=hash |
file in local repositoy from hash →stage area |
checkout hash-1 file |
file in local repositoy from hash → stage area and working tree |
reset --soft [hash-1] |
undo commit of hash-1. Keep modified files in added (staged), ready to be commited again (unmodified→staged). If hash-1, it is used HEAD~ instead. |
reset [--mixed] [hash-1] |
undo commited-but-not-pushed files in hash-1. Keep modified files, ready to be added again (unmodified→modified). If hash-1 is omited, it is used HEAD~ instead. |
reset [--mixed] ['path/to/files'...] |
undo added (staged) 'path/to/files'. Keep modified files, ready to be added again (staged→modified). If 'path/to/files' is omitted, use all added (staged) files instead. |
reset --hard [hash-1] |
undo commit and file modifications (unmodified→ unmodified from previous commit). If hash-1 is omited, it is used HEAD~ instead. If your hard-reseted commits were pushed, by running git push --force URL branch, you are literally killing commits in the commit history, which is not recommended, so use it only when necessary. Some repositories might prevent you from force pushing (e.g., Gitlab). In this case, you need to allow it on website first. |
revert hash-1 |
create a commit that undo a pushed commit with hash hash |
branch [-a] |
list all local branches and sign where I am [include remote branches] |
-m new name |
rename branch to new_name. You need: 1- git push --delete URL oldname to delete the oldname on the remote repository; 2- git push --set-upstream URL new branch to set the upstream to the new branch name |
switch branch |
switch branch |
switch -c new branch [URL/branch] |
create (and switch to) a new branch name [and set the upstream to URL/branch]. You must set the upstream. |
branch -v[v] |
get the HEAD of each branch [and the upstream, that is, [URL/branch]] |
branch --set-upstream-to=URL/branch |
set upstream to URL/branch |
switch --orphan new branch |
create an brand-new branch (without files). All tracked files (commit history) are removed (this is an orphan branch) |
worktree add path branch |
create a linked worktree brach to the path (path must contains the worktree root dir). Linked worktree contrasts with the main worktree, which is initiated via git clone or git init. It must be run inside a worktree, whether it is linked or main. In order to make it organized, one must to place all worktrees within the same parent directory |
worktree add {-b | -B} new_branch path |
Create a new worktree with name new_branch. -b refures to created an already created branch, while -B overwrites it. |
worktree list |
List all worktrees |
worktree remove branch |
Remove worktree branch |
branch {-d | -D} |
remove branch name locally |
{-f | --force} |
required to remove modified/untracked branch |
push URL branch |
update the branch, if it doesn't exist in remote repository, upload it |
push --delete URL branch |
remove branch name remotelly |
checkout |
|
-b branch |
apparently equals to switch -c branch |
branch |
switch to branch as it is done with switch command. if there is a repository in github that is not in the local repository, download and switch to it. It also works to goback to the most recent commit in a branch. For instance, if you goback 5 commits in the branch main, git branch main makes you goback to its most recent commit. |
hash |
switch to a specific hash. It is created a detached branch for this test. If you want to save the commits made use the command git switch -c new to create a new branch. If you don't wanna to save anything, just go back to the previous branch (git checkout -) and this detached branch will desappear. |
restore --source=another_branch path/to/archive |
pull the file or dir from another branch to the current |
status |
show status of repository |
log |
list commits history |
--author="name" |
search by author name |
--graph |
show evolition of reporitoy in a graph form |
foo bar ^baz |
list all the commits which are reachable from foo or bar, but not from baz |
-- |
Show only commits that are enough to explain how the files that match the specified paths came to be |
file |
show commits that touch the specified |
shortlog |
shotlist commits history |
-s |
list just name and quantity of commits |
show hash |
show details of a hash |
--name-only |
|
ls-files |
show information about files in the index and the working tree |
--ignored --exclude=patterns |
show only ignored files from patterns |
--ignored --exclude-from=file |
show only ignored files from file |
tag |
see all tags |
tag -a version |
create a version tag |
-m "message" |
add a message to it |
tag -d version |
delete the tag version locally |
git push URL branch --tags |
push the tag |
git push URL :version |
delete the tag version |
remote -v |
get all URL and names |
remote get-url name |
get URL of name name |
remote set-url name URL |
set URL of a existing name |
remote add name URL |
add a new name with URL URL |
remote rename old-name new-name |
rename from old-name to new-name |
remote remove name |
remove name |
rebase branch |
rebase commits from branch to current branch |
merge branch |
merge commits from branch to current branch |
| Git LFS, which stands for "Large File Storage," is an extension for Git that allows for efficient handling of large files in a Git repository. The core idea behind Git LFS is to replace large files in a repository with tiny pointer files while storing the actual large files on a separate server. This helps to keep the repository size manageable and speeds up cloning and fetching operations. Every account using Git Large File Storage receives 1 GiB of free storage and 1 GiB a month of free bandwidth. If the bandwidth and storage quotas are not enough, you can choose to purchase an additional quota for Git LFS. Unused bandwidth doesn't roll over month-to-month.
Here are the basic functionalities of Git LFS:
|
|
lfs install |
Initialize git lfs in your local repository (it modifies the local config file ./.git/config). |
lfs track pattern-or-file |
Track pattern-or-file. It writes the ./.gitattributes file. In order to track the file, you should first push `.gitattributes` to the remote repository, then you push the lfs-tracked file. |
lfs untrack pattern-or-file |
Untrack pattern-or-file. When you stop tracking a file means that subsequent changes to that file will not be tracked by Git LFS, but the existing history and data for that file in the Git LFS storage will still be present. In other words, it doesn't free up space in your Git LFS storage. |
lfs ls-files [pattern] |
Echo the lfs-tracked files [filter for pattern]. |
Git-annex is another Git tool that also addresses the issue of handling large files in Git repositories. Unlike Git LFS, git-annex does not rely on a central server for storage. Rather, it adopts a decentralized approach to manage large files. You can use either a git- or non-git-based repository to store you data. In the latter case, such repositories are called "special repositories". Google Drive is an example of a special repository. The storage limit is therefore determined by the available space on your special repository. This flexibility comes at the cost of complexity, when compared with git LFS. For a gentle introduction to git-annex, see here.
You have some options to config Google Drive as a git-annex remote. I am currently using git-annex-remote-rclone, which in turn uses rclone to interact storaged files on Google Drive.
Here is a basic step-by-step you can follow to use Google Drive as a git-annex remote
git-annex usage can be divided into three parts: Initialization, pushing files, and pulling files.
You only need to do this step once in a repository. In the root directory of a brand new git repo, run:
|
|
annex info [git-annex-remote] |
Get information (name, UUID, annex keys, etc) from all git-annex remotes [Get information only from git-annex-remote]. |
annex find [--in=git-annex-remote] |
Find all annexed files [find annexed files only in git-annex-remote]. |
annex dead git-annex-remote-or-uuid |
Remove git-annex-remote-or-uuid. |
- Commands Syntax of the Git documentation
- Commits syntax:
- Rules
- https://www.youtube.com/watch?v=OJqUWvmf4gg
- Description of all types
.gitignoregenerator
- https://www.youtube.com/watch?v=6bmlB3vb444
- https://www.youtube.com/watch?v=mFFXuXjVgkU
- Look at this github file for more details about the
ylmfile structure - Important continuous integration tools:
- https://www.guru99.com/jenkin-continuous-integration.html
OBS:
- Workspace is also called working directory or working tree
- Index is also called Staging area, which is the file
./.git/index - Local repository is also called ".git repository" (because the local repository lives is
./.git/folder). - In this folder, we have the
./.git/objects/that gather all the older versions of your repo
- Difference among the restore, reset and revert commands
- checkout vs. switch
- raw.github ↔ github.com
- How to find the created date of a repository project on GitHub?
https://api.github.com/repos/{:owner}/{:repository} - How to use the index as checkpoint
- What is tree-ish
- How to retieve a deleted file from old commits
.gitignoresyntax
Sign up for free
to join this conversation on GitHub.
Already have an account?
Sign in to comment