When the Content + UX community started requiring salary disclosure in job postings shared to our #job-openings channel, we also automated the posting process. This gist captures the process we use, which can be adapted to any Slack community. It's easy to set up and requires almost no maintenance.
Only the free tier is needed for each of these:
- AirTable
- Zapier
- Slack
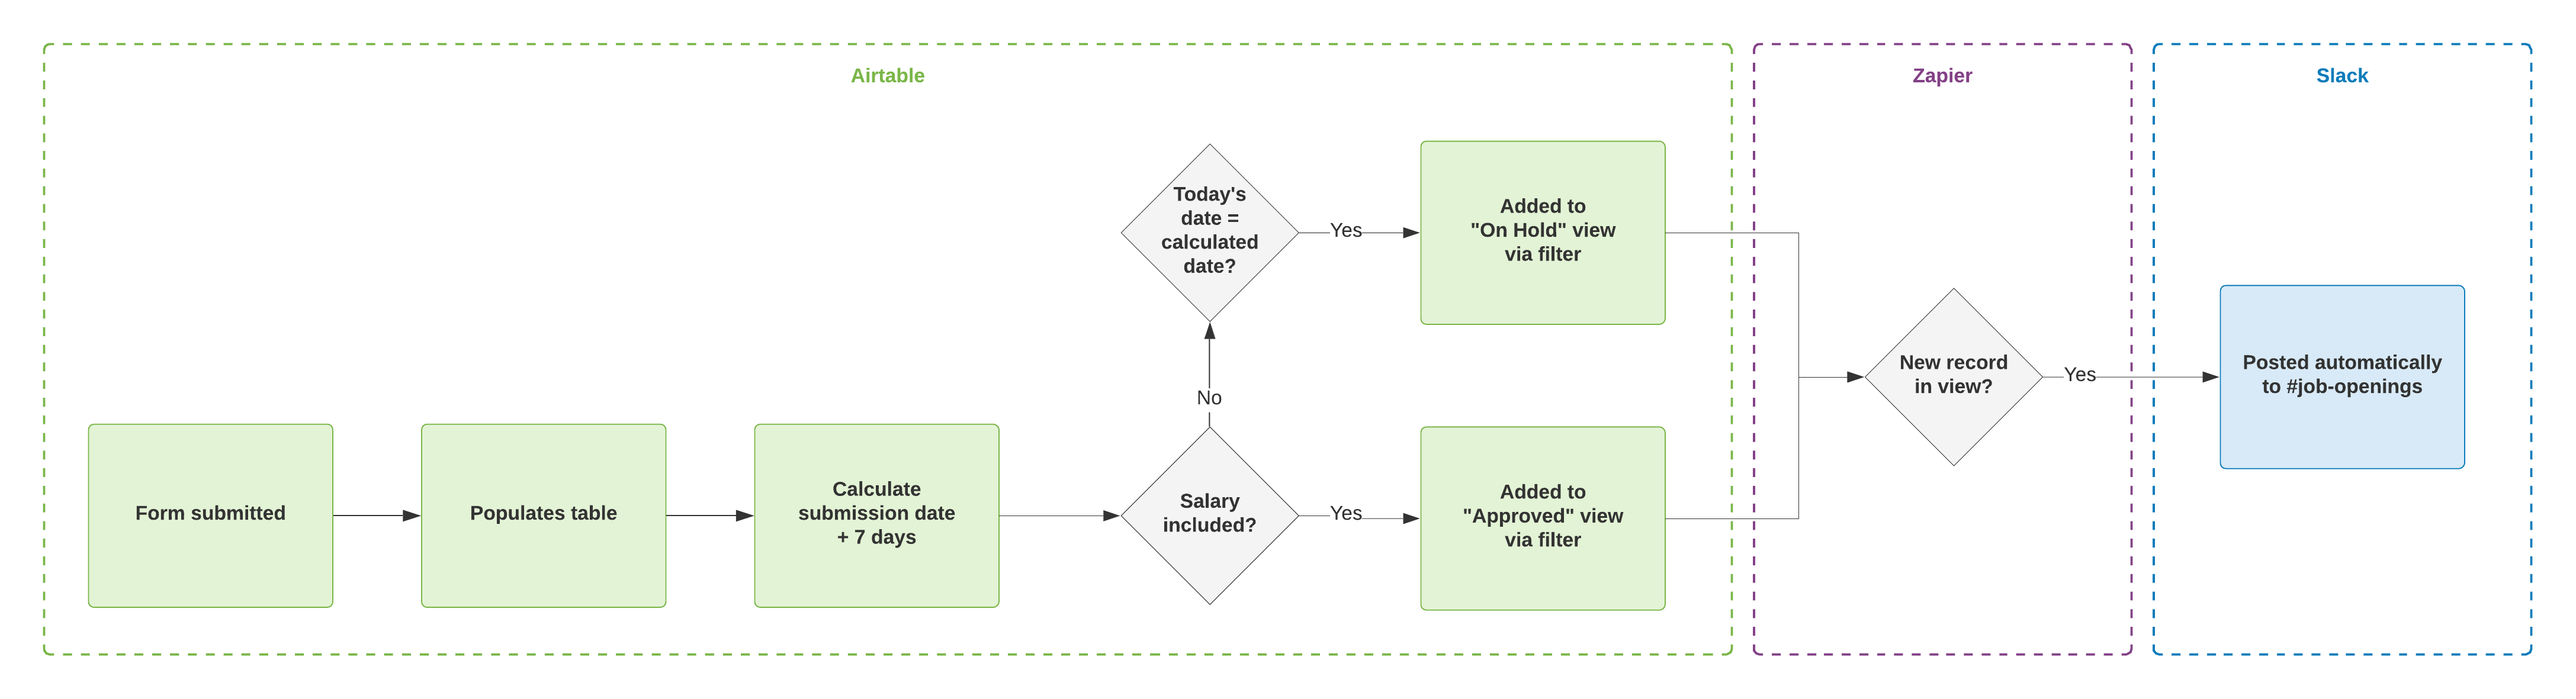 This diagram shows a flow that posts submissions with salary details immediately and delays submissions without salary details. The process outlined below, however, describes how to automate a Slack post immediately. For delays, see Alternative approaches at the end.
- Create a new AirTable base.
- In the original grid view, create a column for each of the form fields you want to collect.
- In the upper left corner of your table, select the drop-down and create a new Form view (not a new table).
- Customize your form content and behavior.
- Test your form by completing it. Your submission should post a new record in your grid view. Leave the record there for now.
- Create a new Zap.
- Under When this happens…, choose AirTable for your first app.
- Under Choose trigger event, select "New record in view."
- Under Choose account, add and authorize the AirTable account that houses your form.
- Under Customize record, select the base that houses your form and responses.
- Under Table, make sure the correct table is selected.
- Under View, select the grid view (your form responses).
- Select Find data. You should see the placeholder record you created in AirTable. Select it.
- Move on to Do this... and select Slack from the app options.
- Under Choose Action Event, select "Send Channel Message in Slack."
- Under Choose account, add and authorize your Slack account.
- Under Customize channel message, choose the channel you want the form submission to post to.
- In the Message text field, you can format the post to your heart's content. Ours looks like this:
New Job Opening
Job title: {{Job title}} at {{Company}}
Location: {{Location}}
International candidates OK? {{Int'l OK?}}
Remote OK? {{Remote OK?}}
Salary/budget: {{Salary or budget details}}
Benefits/perks: {{Benefits/perks}}
Type of role: {{Role type}}Description:
{{Job description}}Application deadline: {{Application deadline}}
Listing: {{Listing URL}}
Submitted by: {{Slack user name}} ({{Relationship}})Remember to let the employer know you found the opening through Content + UX. Thanks!`
- You can configure the rest of the options as you see fit.
- I prefer to send submissions as a bot, for example, so it's clear the process is automated. You can even upload an icon to serve as your bot's avatar.
- You can select "yes" under Link Usernames And Channel Names? and add @channel mention in your message formatting to send everyone in the Slack channel a notification when the bot posts a new submission (just remember, this can get annoying for your members, so use it carefully).
- Under send data, you can test your new set-up. Zapier will send attempt to send the placeholder record you used to populate the message field to the specified Slack channel.
- Assuming everything goes smoothly, turn your zap on, sit back, and relax!
- You should now see your test post appear in the designated Slack channel.
Use other data collection tools:
- You could replace the AirTable components with a Google Form that publishes submissions to a Google Sheet.
- If you prefer something like TypeForm to collect data, you could extend the Zap to move data from Typeform to a Google Sheet. However, multiple steps like this may force you into Zapier's paid tier.
Post to different channels depending on the respondent's form submission:
- In AirTable, create an additional view for each response option (e.g. Yes on Question 2, No on Question 2)
- Name each view appropriately so you can distinguish them in Zapier.
- Add a filter to each view: "Where {{form field}} is {{response}}"
- In Zapier, create one zap that sends new records in AirTable View 1 to Slack channel A and a second zap that sends new records in AirTable View 2 to Slack channel B. Now when someone submits the form, their submission will appear in the appropriate channel based on their response.
Delay postings
- The diagram at the beginning of this post shows a flow in which posts without salary details are delayed by a week. The set-up is very similar to what you'd do when posting to different channels, above.
- In your main submissions view in AirTable, add a formula field named "Date created," using the simple formula
CREATED_TIME(). - Add another formula field named "Delay until" with the following formula:
DATEADD({Date submitted},7,'days')(this adds a 1-week delay; you can adjust according to your needs). - Now create two additional views, one named "Immediate submissions" and one named "Delayed submissions."
- In the "Immediate submissions" view, apply the following filters:
Where {{Desired response}} is {{Response option}}Where {{Date submitted}} is {{today}}
- In the "Delayed submissions" view, add the following filters:
Where {{Desired response}} is {{Response option that triggers the delay}}Where {{Delay until}} is {{today}}
- In Zapier, create two zaps, one tied to each view. AirTable will filter the responses into the appropriate view, and Zapier will grab them as they come in.
Note: If you want a record of which submissions were delayed, select "Color" in the main submissions view's toolbar, and assign red where {{Submission response}} is {{Response option that triggers the delay}}.
Feel free to email me at jess@contentandux.org. I can't offer much tech support for this but I'm happy to do what I can.