About scientist
scientist gemはgithub社が作ったテストツール(=新ロジックの実験ができるツール)です。
Let's pretend you're changing the way you handle permissions in a large web app. Tests can help guide your refactoring, but you really want to compare the current and refactored behaviors under load.
気持ちとしては
テストはリファクタリングした結果、動作に問題ないことを認識するときに非常に役立つが、本当に現行とリファクタ後の振る舞いが変っていないか比較することはできない。
痛いほど分かる。
February 03, 2016にScientist 1.0 リリースに伴うポスト http://githubengineering.com/scientist/
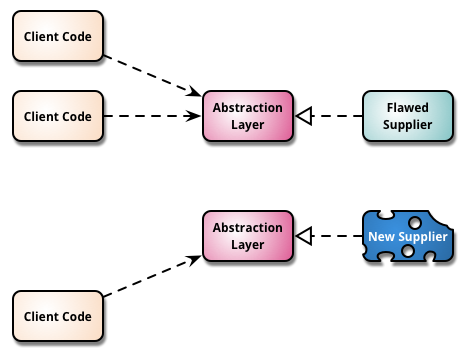
大規模リファクタするためにはBranch by Abstraction いいよね。でも、Abstraction layerいれると、code pathが本来と異なるのでrefactor後とその前の振る舞いを試験する方法として固くない。
- 例えば、予想外のところから呼ばれるとabstraction layer通らないじゃん?
テストがなんで十分じゃないか
- 十分に複雑なシステムではテストケース網羅すること出来ないよね。網羅しようとするとテスト量が多くなって開発速度メッチャ落ちる
- そもそも既存のデータ品質に問題があるかもしれない。そんなデータにぶつかったときの振る舞いなんてわからない。
だからproduction dataとUserで試験が必要なんだ。
code pathを変えないでproduction dataでの振る舞いを試験できる。
新機能の試験するとしたらこんな感じがハッピー:

Sample Code: https://github.com/threetreeslight/rails-lab/tree/scientist
以下の関係を持つRailsアプリをサンプルに解説します
Author 1-* Book
また、scientistを試すmethodは以下に成ります。
class Author < ApplicationRecord
  def luckey_number
    id
  end
end
old way(既存実装)とnew way(リファクタ後の実装)
class Author < ApplicationRecord
  def luckey_number
    experiment = Scientist::Default.new "book.lucky_number"
    experiment.context author: id, name: name

    experiment.use { id } # old way
    experiment.try { rand(10) } # new way

    experiment.run
  end
end
luckey_numberでは、use blockとtry blockの両方が実行されます。 こうすることで、新実装との返り値の違いを検証することが可能です。
また、experimentは必ずuse blockの実行結果がreturnされます。
Scientist::Defaultは、tryの実行制御やcompare結果の配信を行います。
Scientist::Default classは Scientist::Experiment用のInterfaceの仮実装になるので、実際には何も制御・送信されません。
https://github.com/github/scientist/blob/master/lib/scientist/default.rb
そのため、専用のexperimentを作ります。
class MyExperiment < Scientist::Default
  def publish(result)
    # Store the timing for the control value,
    StatsD.measure "science.#{name}.control", result.control.duration
    # for the candidate (only the first, see "Breaking the rules" below,
    StatsD.measure "science.#{name}.candidate", result.candidates.first.duration

    # and counts for match/ignore/mismatch:
    if result.matched?
      StatsD.increment "science.#{name}.matched"
    elsif result.ignored?
      StatsD.increment "science.#{name}.ignored"
    else
      StatsD.increment "science.#{name}.mismatched"
      # Finally, store mismatches in redis so they can be retrieved and examined
      # later on, for debugging and research.
      store_mismatch_data(result)
    end
  end

  def store_mismatch_data(result)
    payload = {
      :name            => name,
      :context         => context,
      :control         => observation_payload(result.control),
      :candidate       => observation_payload(result.candidates.first),
      :execution_order => result.observations.map(&:name)
    }

    key = "science.#{name}.mismatch"

    Rails.logger.warn "#{key}: #{payload}"

    REDIS.lpush key, payload
    REDIS.ltrim key, 0, 1000
  end

  def observation_payload(observation)
    if observation.raised?
      {
        :exception => observation.exception.class,
        :message   => observation.exception.message,
        :backtrace => observation.exception.backtrace
      }
    else
      {
        # see "Keeping it clean" below
        :value => observation.cleaned_value
      }
    end
  end
end
ここでは以下の内容を計測しています。
- 実行時間をgraphiteに送り込む
- mismatch, matchの発生回数をgraphiteに送り込む
- mismatchが発生したときに、その細かい情報をredisに蓄積する
- mismatchが発生したときに、その細かい情報をlogに吐き出す
$ vim config/initialize/redis.rb

require 'redis'

REDIS = Redis.new(url: ENV['REDIS_URL'])
Github社のSampleではmetricをgraphiteに放り込んでいるそうです。
metricの受け口はstatsd互換の brubeckを利用しているそうですが、今回はstatsdでいきます。
設定が面倒なので、graphiteとstatsdの設定が面倒なのでこのイメージを使いました。 https://github.com/hopsoft/docker-graphite-statsd
rails -> statusDへの流し込みは、Shopify/statsd-instrumentを使いました。
$ vim config/initialize/status_d.rb

require 'statsd-instrument'

# Sets up a UDP backend. First argument is the UDP address to send StatsD packets to,
# second argument specifies the protocol variant (i.e. `:statsd`, `:statsite`, or `:datadog`).
StatsD.backend = StatsD::Instrument::Backends::UDPBackend.new(ENV['STATSD_URL'], :statsite)
ref graphiteの良さ Mackerelを支える時系列データベース技術
class Author < ApplicationRecord
  has_many :books

  def luckey_number
+   experiment = Scientist::Experiment.new "book.lucky_number"
    experiment.context author: id, name: name

    experiment.use { id } # old way
    experiment.try { rand(10) } # new way

    experiment.run
  end
end

+ module Scientist::Experiment
+  def self.new(name)
+     MyExperiment.new(name)
+   end
+ end$ docker-compose up --build -d app
$ docker-compose exec app bash
> rails c
> 100.times{ Author.first.luckey_number }
Author Load (2.5ms) SELECT "authors".* FROM "authors" ORDER BY "authors"."id" ASC LIMIT ? [["LIMIT", 1]]
{:name=>{:name=>"book.lucky_number"}, :context=>{:author=>1, :name=>"Chuck norris"}, :control=>{:value=>1}, :candidate=>{:value=>6},:execution_order=>["control", "candidate"]}
=> 1
$ open http://`dinghy ip`:8080/dashboard
こんなのがみれる

$ docker-compose exec app bash
> radis-cli -h redis

redis:6379> KEYS science.*
1) "science.book.lucky_number.mismatch"
redis:6379> LRANGE science.book.lucky_number.mismatch 0 -1
1) "{:name=>\"book.lucky_number\", :context=>{:author=>1, :name=>\"Chuck norris\"}, :control=>{:value=>1}, :candidate=>{:value=>8}, :execution_order=>[\"control\", \"candidate\"]}"
2) "{:name=>\"book.lucky_number\", :context=>{:author=>1, :name=>\"Chuck norris\"}, :control=>{:value=>1}, :candidate=>{:value=>7}, :execution_order=>[\"candidate\", \"control\"]}"
3) "{:name=>\"book.lucky_number\", :context=>{:author=>1, :name=>\"Chuck norris\"}, :control=>{:value=>1}, :candidate=>{:value=>0}, :execution_order=>[\"candidate\", \"control\"]}"
個人的に考える使い所は以下です。
- 影響範囲が大きすぎてテストしきれないようなところ
- 変更が多く積み重なって、過去のデータも含め整合性が保てているか心配なところ
この手のものはものは本番で踏み荒らすしかないよねってほんと思う。
更に
- 特定のユーザーだけtry項を実行させる
- 特定の確立でtry項を実行させる
など新ロジックの実行を制御することも可能。使い勝手良い。
├── scientist
│   ├── default.rb
│   ├── errors.rb
│   ├── experiment.rb
│   ├── observation.rb
│   ├── result.rb
│   └── version.rb
└── scientist.rb
line数は大したことはない。 動きとしてもとてもシンプルです。
- Scientist::Experiment interfaceを実装した実験実行計画( defaultだと
Scientist::Default)を作成 - Scientist::Experiment.run にて実行し、比較結果や例外情報などを
Scientist::Resultに格納 - 1で作成した実行計画に設定された情報に乗っ取り、
Scientist::Resultの情報を配信