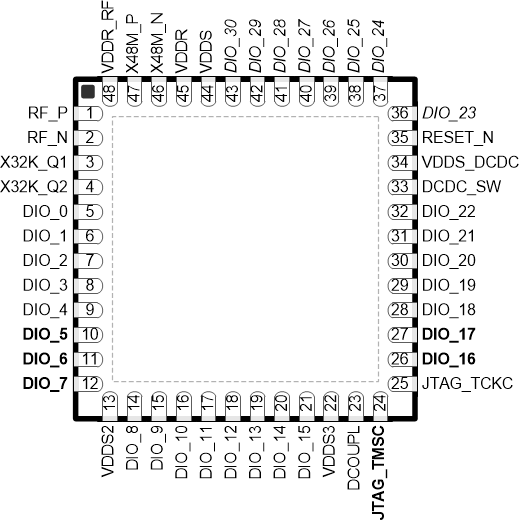
I was a bit quick when flashing my generic CC2652R and ended up dowloading and flashing firmware for CC2652P.. Since it was the wrong firmware, the bootloader also didn't work anymore, making me unable to flash the correct firmware with the integrated USB serial programmer.
Luckily the module has a cJTAG debugging interface, that should make it possible to flash directly onto the chip without the bootloader. But I don't have any serial debuggers, so I have had to come up withj my own from various limited information I could find.
Using OpenOCD we can use a Raspberry Pi as a JTAG debugger. It does not support cJTAG for debugging, so it will instead send a signal to make the CC2652 switch to normal JTAG. We will then have to connect a few additional cables to the TDO and TDI pins for a full 4-pin JTAG connection.
Using telnet to connect to OpenOCD, we can then send debugging commands to the chip to flash the correct firmware.
I imagine this approach should be easily adoptable to other CC2xxx based modules.
- cJTAG breakout cable (5-pin JST-SH to female dupont)
- 2x male-female dupont cables
- Raspberry Pi
- Raspberry OS installed on RPi
- Correct firmware file (e.g. Koenkk's Z-stack coordinator firmware)
- OpenOCD
- a telnet client
Using the following chart, connect the CC2652 with the Raspberry Pi's GPIO pins:
| Name | RPi GPIO# | RPi Pin | CC2652P Pin Name |
|---|---|---|---|
| 3v3 Power | N/A | 17 | VDD (cJTAG) |
| JTAG_TDI | 10 | 19 | DIO_17 |
| JTAG_TDO | 9 | 21 | DIO_16 |
| JTAG_TMSC | 25 | 22 | TMS (cJTAG) |
| JTAG_TCKC | 11 | 23 | CLK (cJTAG) |
| GND | N/A | 25 | GND (cJTAG) |
Note: The TDI and TDO pins of the CC2652P are specified in the datasheet. If you are trying this guide on another chip, you should look up its datasheet to make sure you connect it correctly.
You can check out pinout.xyz to easily find the correct GPIO pins.
It is possible to use different pins on the Raspberry. You will then just have to change the interface configuration file of OpenOCD.
From the cJTAG breakout cable, connect 3v3, GND, TMS, and CLK. Leave the RST pin unconnected.
Use the two single dupont cables to connect to the through-hole soldering points. There should be a bit of resistance, which will ensure a reasonable connection.
We need to install OpenOCD and a telnet client on the Raspberry Pi
sudo apt update
sudo apt install openocd telnet
Now copy the preconfigured cc26x2 launchpad file for OpenOCD to your home directory
cp /usr/share/openocd/scripts/board/ti_cc26x2_launchpad.cfg openocd.cfgWe will need to change it a bit to use the Raspberry's GPIO as the JTAG interface, so change
source [find interface/xds110.cfg]
adapter speed 5500
to
source [find interface/raspberrypi2-native.cfg]
adapter speed 1000
If you are using a Raspberry Pi 1, then replace raspberrypi2-native.cfg with raspberrypi-native.cfg
The contents of ~/openocd.cfg should then be
#
# TI CC26x2 LaunchPad Evaluation Kit
#
source [find interface/raspberrypi2-native.cfg]
adapter speed 1000
transport select jtag
source [find target/ti_cc26x2.cfg]
You can connect the cables to different GPIO pins on the Raspberry Pi, edit /usr/share/openocd/scripts/interface/raspberrypi2-native.cfg and set the used GPIO numbers (NOT pin numbers) on the line
bcm2835gpio_jtag_nums 11 25 10 9
This has to be the GPIO number, e.g. where GPIO 11 is on pin 23. See pinout.xyz for a reference guide.
Download the correct firmware. For reference, I am using Koenkk's compiled Z-stack coordinator firmware. Make sure to get the correct one this time! (that mistake is the reason I have had to do this, and I guess a similar reason as to why you are here too 😅)
wget https://github.com/Koenkk/Z-Stack-firmware/raw/develop/coordinator/Z-Stack_3.x.0/bin/CC2652R_coordinator_20221102.zip
unzip CC2652R_coordinator_20221102.zipNow simply run openocd. It will load the config located at ~/openocd.cfg automatically.
If you see
Info : JTAG tap: cc26x2.jrc tap/device found: 0x3bb4102f (mfg: 0x017 (Texas Instruments), part: 0xbb41, ver: 0x3)
Info : JTAG tap: cc26x2.cpu enabled
Info : cc26x2.cpu: hardware has 6 breakpoints, 4 watchpoints
in the output, the configuration should be loaded correctly
In a new terminal, run
telnet localhost 4444
You should now be able to run the following commands in the telnet console to flash the firmware
init
reset
halt
flash write_image erase CC2652R_coordinator_20221102.hex
flash verify_image CC2652R_coordinator_20221102.hex
Hopefully you end up with a successful verification telling you that it is successfully flashed:
verified 179184 bytes from file CC2652R_coordinator_20221102.hex in 0.635823s (275.209 KiB/s)
This guide has been made by combining bits and pieces from the following places


@SureshKarthik I don't have much more experience with this, other than what I wrote in this guide, but I would first suggest making sure that the pins are connected properly to the correct GPIO pins.
I don't know how your custom board is labeled, so make sure that you are actually connecting to DIO_16 and DIO_17 which are on pin 26 and 27 respectively:

https://www.ti.com/document-viewer/CC2652R7/datasheet/GUID-CE58ED55-ABD3-487D-B537-987838E6157F#TITLE-SWRS192SWRS1921062
Another thing is, if the DIO_16 and DIO_17 are used for something else on your board, you will probably not be able to use the standard four-wire JTAG. In that case you will have to get a debugger which supports the two-wire cJTAG, which OpenOCD does not support.