Huffman encoding is an algorithm devised by David A. Huffman of MIT in 1952 for compressing text data to make a file occupy a smaller number of bytes. This relatively simple compression algorithm is powerful enough that variations of it are still used today in computer networks, fax machines, modems, HDTV, and other areas. This challenge involves implementing a function that performs Huffman encoding, and one that performs Huffman decoding.
Normally text data is stored in a standard format of 8 bits per character using an encoding called ASCII that maps every character to a binary integer value from 0-255. The idea of Huffman encoding is to abandon the rigid 8-bits-percharacter requirement and use different-length binary encodings for different characters. The advantage of doing this is that if a character occurs frequently in the file, such as the common letter 'e', it could be given a shorter encoding (fewer bits), making the file smaller. The tradeoff is that some characters may need to use encodings that are longer than 8 bits, but this is reserved for characters that occur infrequently, so the extra cost is worth it.
The steps involved in Huffman encoding a given text source text into a destination compressed text are:
- Count frequencies: Examine the source file's contents and count the number of occurrences of each character.
- Build encoding tree: Build a binary tree with a particular structure, where each node represents a character and its count of occurrences in the source file. A priority queue is used to help build the tree along the way.
- Build encoding map: Traverse the binary tree to discover the binary encodings of each character
- Encode data: Re-examine the source file's contents, and for each character, output the encoded binary version of that character to the destination file.
As an example, suppose we have a file named example.txt whose contents are: ab ab cab. In the original file, this text occupies 10 bytes (80 bits) of data. The 10th is a special "end-of-file" (EOF) byte.

In Step 1 of Huffman's algorithm, a count of each character is computed. The counts can be represented as a map/dict:
{
	' ': 2,
	'a': 3,
	'b': 3,
	'c': 1,
	EOF: 1
}
Step 2 of Huffman's algorithm places our counts into binary tree nodes, with each node storing a character and a count of its occurrences. The nodes are then put into a priority queue, which keeps them in prioritized order with smaller counts having higher priority, so that characters with lower counts will come out of the queue sooner. (The priority queue is somewhat arbitrary in how it breaks ties, such as 'c' being before EOF and 'a' being before 'b').

Now, the algorithm:
- Repeatedly removes the two nodes from the front of the queue (the two with the smallest frequencies) and joins them into a new node whose frequency is their sum.
- The two nodes are placed as children of the new node; the first removed becomes the left child, and the second the right.
- The new node is re-inserted into the queue in sorted order.
- This process is repeated until the queue contains only one binary tree node with all the others as its children. This will be the root of our finished Huffman tree.
The following diagram shows this process. Notice that the nodes with low frequencies end up far down in the tree, and nodes with high frequencies end up near the root of the tree. This structure can be used to create an efficient encoding in the next step.

The Huffman code for each character is derived from your binary tree by thinking of each left branch as a bit value of 0 and each right branch as a bit value of 1, as shown in the diagram below:
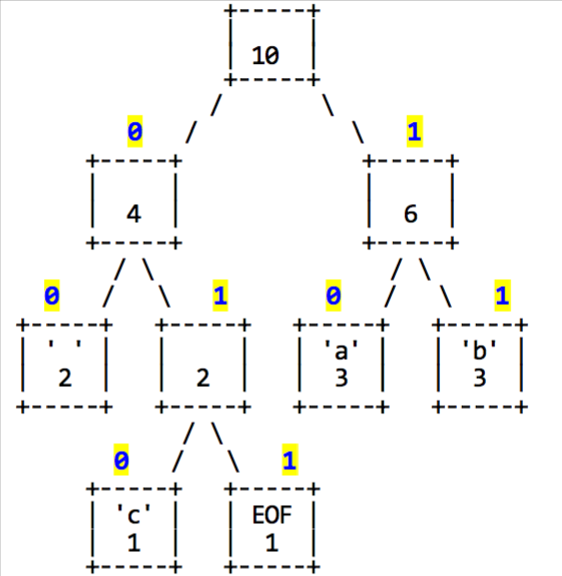
The code for each character can be determined by traversing the tree.
To reach ' ' (space) we go left twice from the root, so the code for ' ' is 00 (left, left). The code for 'c' is 010 (left, right, left), the code for EOF is 011, the code for 'a' is 10 and the code for 'b' is 11. By traversing the tree, we can produce a map from characters to their binary representations. Though the binary representations are integers, since they consist of binary digits and can be arbitrary length, we will store them as strings. For this tree, it would be:
{
	' ': "00",
	'a': "10",
	'b': "11",
	'c': "010",
	EOF: "011"
}Using the encoding map, we can encode the file's text into a shorter binary representation. Using the preceding encoding map, the text "ab ab cab" would be encoded as:
1011001011000101011011
The following table details the char-to-binary mapping in more detail. The overall encoded contents of the file require only 22 bits, or under 3 bytes, compared to the original file of 10 bytes.

Since the character encodings have different lengths, often the length of a Huffman-encoded file does not come out to an exact multiple of 8 bits. Files are stored as sequences of whole bytes, so in cases like this the remaining digits of the last bit are filled with 0s.

It might worry you that the characters are stored without any delimiters between them, since their encodings can be different lengths and characters can cross byte boundaries, as with 'a' at the end of the second byte. But this will not cause problems in decoding the file, because Huffman encodings by definition have a useful prefix property where no character's encoding can ever occur as the start of another's encoding.
You can use a Huffman tree to decode text that was previously encoded with its binary patterns. The decoding algorithm is to read each bit from the file, one at a time, and use this bit to traverse the Huffman tree. If the bit is a 0, you move left in the tree. If the bit is 1, you move right. You do this until you hit a leaf node. Leaf nodes represent characters, so once you reach a leaf, you output that character.
For example, suppose we are given the same encoding tree above, and we are asked to decode a file containing the following bits:
1110010001001010011
Using the Huffman tree, we walk from the root until we find characters, then output them and go back to the root.
- We read a
1(right), then a1(right). We reach'b'and outputb. Back to the root. - We read a
1(right), then a0(left). We reach'a'and outputa. Back to root. - We read a
0(left), then a1(right), then a0(left). We reach'c'and outputc. - We read a
0(left), then a0(left). We reach' 'and output a space. - We read a
1(right), then a0(left). We reach'a'and outputa. - We read a
0(left), then a1(right), then a0(left). We reach'c'and outputc. - We read a
1(right), then a0(left). We reach'a'and outputa. - We read a
0, 1, 1. This is our EOF encoding pattern, so we stop. The overall decoded text is "bac aca".
The functions above implement Huffman's algorithm, but they have one big flaw. The decoding process requires the encoding tree to be known. Without the encoding tree, you don't know the mappings from bit patterns to characters, so you can't successfully decode the file.
We will work around this by writing the encodings into the compressed file, as a header. The idea is that when opening our compressed file later, the first several bytes will store our encoding information, and then those bytes are immediately followed by the compressed binary bits that we compressed earlier. It's actually easier to store the character frequency table, the map from Step 1 of the encoding process, and we can generate the encoding tree from that. For our ab ab cab example, the frequency table stores the following:
{ ' ': 2, 'a': 3, 'b': 3, 'c': 1, EOF: 1 }We will write this map at the beginning of the output file using the JSON format (ECMA-404). For the map above, the string written to the beginning of the file would be:
{" ": 2, "a": 3, "b": 3, "c": 1, "EOF": 1}Note: All messages will contain only letters and spaces.
The header will be followed by a newline character for more easy reading. Therefore, a compressed file will have the structure:
<json header>(newline)
[compressed data bits...]
Therefore, you can read the file using something like the following pseudocode:
inputFile = open(inputPath)
header = inputFile.readLine()	// First line - header
data = inputFile.readLine()		// Second line - rest of file
Here are some helpful resources:
- How to JSON in Python
- How to JSON in JS
- JSON library for C++
- How to parse JSON in Java
- How to parse JSON in pretty much any language
I have provided test case files in a .zip archive attached to this week's challenge email.
In this challenge, you will implement a program capable of encoding or decoding text files. Your program will provide two functions, one that encodes a file to a destination file, and another that decodes a file to a destination file. For example, these two functions could have the following signatures:
void encodeFile(String sourceFilePath, String destFilePath) { ... }
void decodeFile(String sourceFilePath, String destFilePath) { ... }
The test cases will be a set of .txt files and .huff files. The .txt files will contain uncompressed English text, and the .huff files will contain the compressed versions of those files. To test your program, your main function should:
- For each
.txtfile:- Call your
encodeFilefunction on that file, withdestFilePathas a new file with a different name. Then, make sure the contents of your encoded file and the provided encoded file are identical.- For example, the folder will contain
test1.txtandtest1.huff. Yourmainshould callencodeFile("test1.txt", "test1-enc.huff")and then make sure that the contents oftest1-enc.huff(generated by you) andtest1.huff(provided) are identical.
- For example, the folder will contain
- Call your
- For each
.hufffile:- Call your
decodeFilefunction on that file, withdestFilePathas a new file with a different name. Then, make sure the contents of your decoded file and the provided decoded file are identical.- For example, the folder will contain
test1.txtandtest1.huff. Yourmainshould calldecodeFile("test1.huff", "test1-dec.txt")and then make sure that the contents oftest1-dec.txt(generated by you) andtest1.txt(provided) are identical.
- For example, the folder will contain
- Call your
Your encoding function should write both the header and the data to the file, separated by a newline. Your decoding function should read the header, build the map from it, and then decode the file.
Repl.it allows you to use data files alongside your program. You can use the buttons to upload files to the workspace, as well as create and edit multiple files.
I should be able to test your entire program against all the test cases by clicking the Run button in Repl.it, and it should output something like:
Encoding:
test1.txt --> test1-enc.huff; test1-enc.huff == test1.huff -> true
test2.txt --> test2-enc.huff; test2-enc.huff == test2.huff -> true
...
Decoding:
test1.huff --> test1-dec.txt; test1-dec.txt == test1.txt -> true
test2.huff --> test2-dec.txt; test2-dec.txt == test2.txt -> true
...
Good luck, and have fun!