Last active
December 15, 2021 14:41
-
-
Save verttex/619eb489872c6e15ae3b41128d6682f8 to your computer and use it in GitHub Desktop.
Drivedroid Post
This file contains bidirectional Unicode text that may be interpreted or compiled differently than what appears below. To review, open the file in an editor that reveals hidden Unicode characters.
Learn more about bidirectional Unicode characters
| --- | |
| date: 2016-09-19T05:48:00 | |
| title: Getting Around School Proxies Using Drivedroid | |
| --- | |
| I've been trying to get around my school's internet filter for awhile. While using web hosted proxies like [Glype](https://www.glype.com/) or [phproxy](http://sourceforge.net/projects/poxy/) sometimes worked, they were not as stable as I would have liked them to be. So I started researching different solutions. | |
| Most VPN applications don't work because either I can't get them to download or without admin permissions they can't interfere with the network preferences. That is why applications like [TOR](https://www.torproject.org/) don't work. | |
| So with one final last ditch effort, I kept fiddling around with the computers. After my home computer blue screened on me a few weeks ago, I had to use a Linux Live CD to continue to use it while I diagnosed the problems. For those who don't know, a Linux Live CD is basically a CD or a USB drive that has a special kind of operating system on it that runs straight from the medium it's on instead of the HDD that's in the computer. What's cool about this is that basically you can run this OS on ANY computer. | |
| I had a eureka moment today while turning on one of the schools computers. All Dell machines, during POST, allow you to ptess F-12 to open up boot options or mess with BIOS configurations. It seems that someone slipped up in the IT department. Not only is this dangerous since I could basically fry the computer by messing with the BIOS, but it also allows me to tell the computer to boot from a USB drive. | |
| So here is what you need to do to run Linux on any machine. | |
| ###Required Tools: | |
| - Linux .ISO (I will be using [ElementaryOS](http://elementaryos.org/), but there are others including [PuppyLinux](http://puppylinux.org/) which are quite small. | |
| - USB / Rooted Supported Android Device | |
| - [DriveDroid](https://play.google.com/store/apps/details?id=com.softwarebakery.drivedroid&hl=en) | |
| ####Optional: | |
| - USB Cord | |
| - [unetbootin](http://sourceforge.net/projects/unetbootin) when using a USB drive | |
| - VPN (I will be using [PrivateInternetAccess](https://www.privateinternetaccess.com/)) | |
| ###Instructions for using DriveDroid: | |
| 1\. Install DriveDroid on you phone and run through the setup proceedure. This will make sure your phone is supported. You might need to turn on USB debugging in the Android Developer options. | |
| 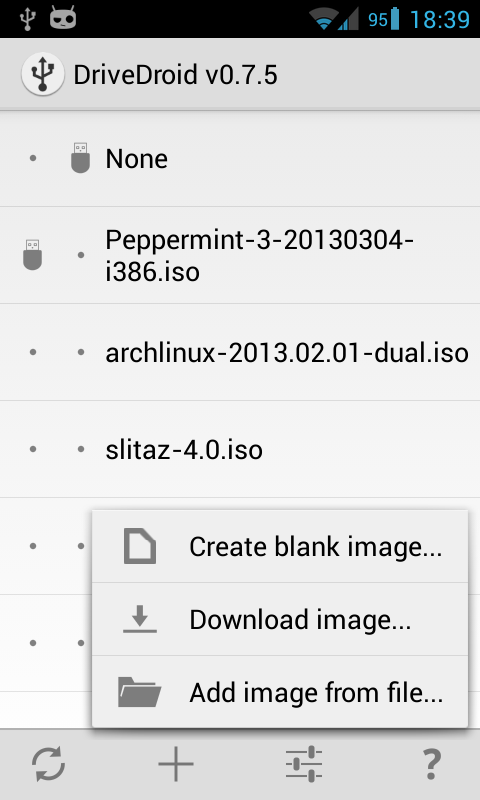 | |
| 2\. Press the + button and either press the 'Download Image' or 'Add Image from File' | |
| 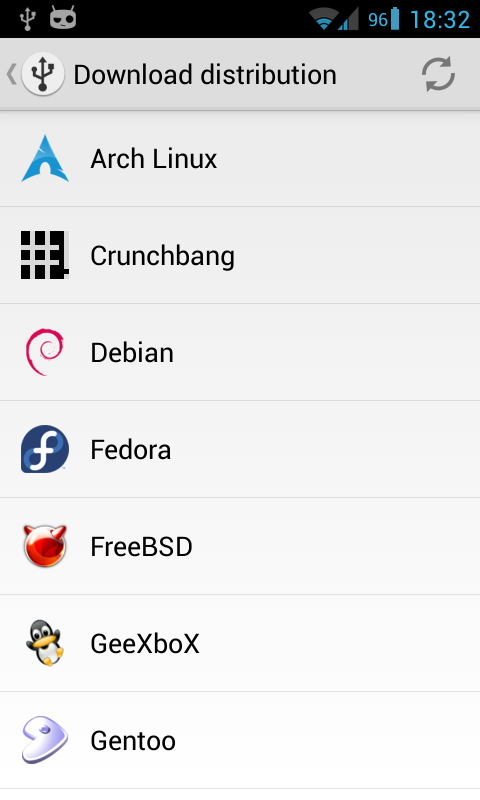 | |
| 3\. Select the Operating System you would like to use. (There might be multiple versions. Look for the most recently updated and the i363 version. For some computers, you can use the AMD64 however. | |
| 4\. Plug in your phone to the computer you would like to use. | |
|  | |
| 5\. Once the .ISO is downloaded, when you press on it in the DriveDroid list, it will ask whether you want to boot it as a writable USB or a read-only. You of course should use writable. | |
| Note: Some of the ISOs you might have used might be LIVE versions of Linux. That means they won't save after you shutdown and disconnect your phone. You can actually install linux to a blank image on your phone, but it's a bit more advanced. | |
| 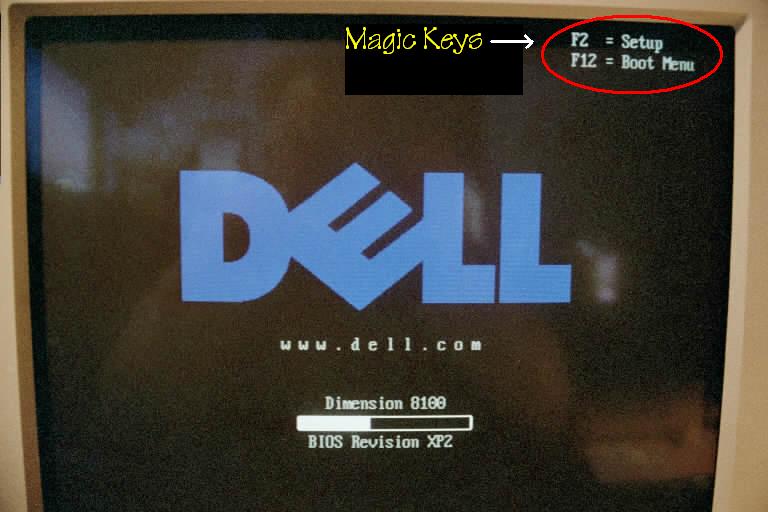 | |
| 6\. Turn on the computer. When it says DELL, press F12. It will load up a menu that basically chooses what the computer will boot from. Make sure to choose USB Storage Device. | |
| 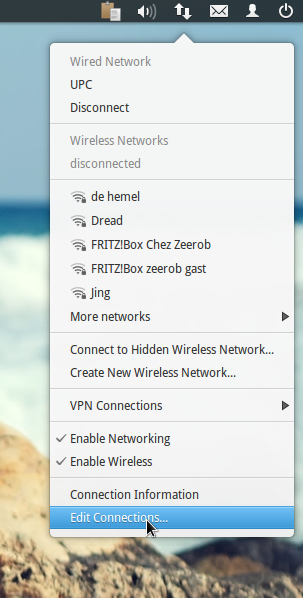 | |
| 7\. If everything went okay, you are now in a custom OS on a foreign computer. The next few steps vary from OS to OS. You are going to want to find the VPN Connections/Network configuration. | |
| 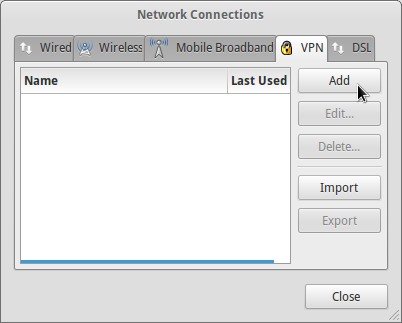 | |
| 8\. Add a VPN connection. | |
| 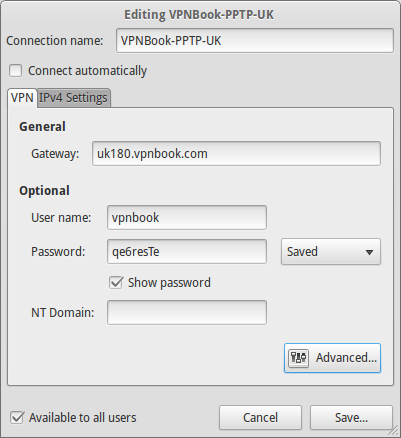 | |
| 9\. Fill out the information that your VPN provider gives you to and make sure to check Use Point-to-Point encryption. It's probably in Advanced settings. You can also check your VPN providers install page. | |
| 10\. Go to a blocked website and check to see if it works. If it does, go ahead and let me know. Send me an email [here](mailto:jack@verttex.com) about your experiences with it. | |
| ###Instructions for uNetbootin: | |
|  | |
| 1\. Open up uNetbootin and select what distribution you want to use, or use your own. Then select the USB Drive you want to use. Make sure not to install to a hard drive, or you might wipe your drive! | |
| 2\. Follow steps 6-10 in the previous list. | |
| ######<span style="color:red;">Note: This was all found out without actually using a computer that I did not own. This is purely for educational purposes. I am simply pointing out a mistake in the computer infrastructure that we use.</span> | |
| Hope this helped! |
Sign up for free
to join this conversation on GitHub.
Already have an account?
Sign in to comment