PostedJanuary 8, 2016495.7kviewsSECURITYUBUNTU
-
[
Michael Holley
](https://www.digitalocean.com/community/users/michaelholley)

Sometimes you're on a network that's insecure or has an overly restrictive firewall, and you need to access a website. You want to make sure no one in the middle is watching the traffic.
One solution is aVPN, but many VPNs require special client software on your machine, which you may not have rights to install.
If all you need to secure is your web browsing, there is a simple alternative: a SOCKS 5 proxy tunnel.
A SOCKS proxy is basically an SSH tunnel in which specific applications forward their traffic down the tunnel to the server, and then on the server end, the proxy forwards the traffic out to the general Internet. Unlike a VPN, a SOCKS proxy has to be configured on an app by app basis on the client machine, but can be set up without any specialty client agents.
As long as you have a Droplet with SSH access, you can use it as a SOCKS proxy end point. In this tutorial we'll use a Ubuntu 14.04 Droplet as the proxy, and the Firefox web browser as the client application. By the end of this tutorial you should be able to browse websites securely through the tunnel.
As mentioned above, the first thing needed is a server running any flavor of Linux, like Ubuntu 14.04, withSSH access.
- Deploy a server (this example uses Ubuntu 14.04)
A little more setup is required on your own local machine. For this you'll need to download one or two pieces of software.
Firefox allows you to set the proxy for just Firefox instead of setting a system-wide proxy.
PuTTY is used to set up the proxy tunnel for Windows users. Users of Mac OS X or Linux have the tools to set up the tunnel pre-installed.
On yourlocal computer, create anSSH key. If you already have an SSH key, you can use that one.
Though it’s good practice to give your SSH key a passphrase, for this tutorial we will actually leave the passphrase blank to avoid issues later on.
As you set up the key, make sure you add it to the authorized keys for the sudo user on the server (in this example, that's thesammyuser).
Open a terminal program on your computer. On Mac OS X, this is Terminal in Applications > Utilities.
Set up the tunnel with this command:
ssh -D 8123 -f -C -q -N sammy@example.com
Explanation of arguments
-D: Tells SSH that we want a SOCKS tunnel on the specified port number (you can choose a number between 1025-65536)-f: Forks the process to the background-C: Compresses the data before sending it-q: Uses quiet mode-N: Tells SSH that no command will be sent once the tunnel is up
Be sure to replacesammy@example.comwith your own sudo user and server IP address or domain name.
Once you enter the command, you'll immediately be brought to the command prompt again with no sign of success or failure; that's normal.
Verify that the tunnel is up and running with this command:
ps aux | grep ssh
You should see a line in the output like:
Output
sammy 14345 0.0 0.0 2462228 452 ?? Ss 6:43AM 0:00.00 ssh -D 8123 -f -C -q -N sammy@example.com
You can quit your terminal application and the tunnel will stay up. That is because we used the-fargument which put the SSH session into the background.
**Note:**If you want to terminate the tunnel you'll have to grab the PID viapsand use thekillcommand, which we'll show you how to do later.
OpenPuTTY.
If you haven't installed it yet, download PuTTY and save it where you like. PuTTY doesn't require admin rights to install; just download the.exeand run it.
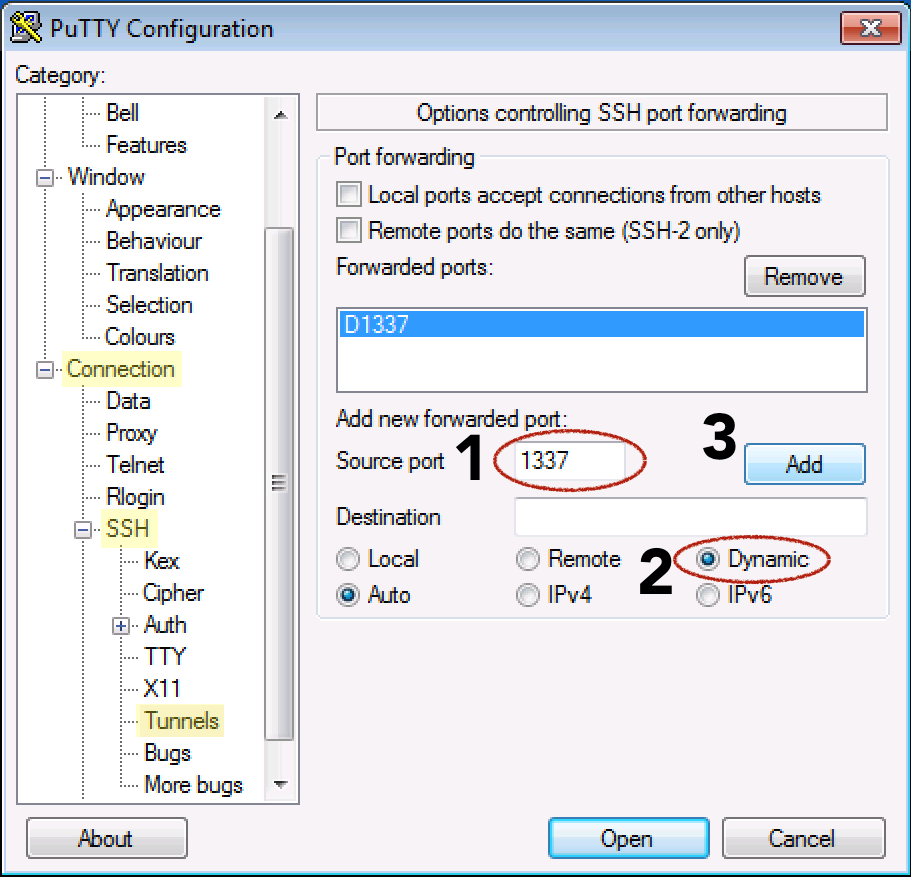
Complete the following steps to set up the tunnel:
- From theSessionsection, add theHost Name (or IP address)of your server, and the SSHPort(typically 22)
- On the left, navigate to:Connection > SSH > Tunnels
- Enter anySource portnumber between 1025-65536. In this example we've used port1337
- Select theDynamicradio button
- Click theAddbutton
- Go back toSessionon the left
- Add a name underSaved Sessionsand click theSavebutton
- Now click theOpenbutton to make the connection
- Enter your sudo username and server password to log in

You can minimize the PuTTY window now, but don't close it. Your SSH connection should be open.
**Tip:**You can save your sudo username (sammy) and SSH key for this same session by following thePuTTY SSH Key instructions. Then you won't have to enter your username and password every time you open the connection.
Now that you have an SSH tunnel, it's time to configure Firefox to use that tunnel. Remember that for a SOCKS 5 tunnel to work, you have to use a local application that can take advantage of the tunnel; Firefox does the trick.
This step is the same for Windows, Mac OS X, and Linux.
Make sure you have theport numberthat you used in your SSH command or in PuTTY noted for this example. We've used8123in the OS X / Linux example, and1337in the Windows example so far, or you may have used a different port.
(The following steps were performed with Firefox version 39 but should work on other versions, though the locations of the options may be different.)
- In the upper right hand corner, click on the hamburger icon to access Firefox's menu:
- Click on thePreferencesorOptionsicon
- Navigate to theAdvancedsection
- Click on theNetworktab
- Click on theSettingsbutton under theConnectionheading. A new window will open
- Select the radio button forManual proxy configuration:
- Enterlocalhostfor theSOCKS Host
- Enter the samePortnumber from your SSH connection; in the image you can see we have entered1337to match the Windows instructions
- Click theOKbutton to save and close your configuration


Now, open another tab in Firefox and start browsing the web! You should be all set for secure browsing through your SSH tunnel.
Optional:To verify that you are using the proxy, go back to theNetworksettings in Firefox. Try entering a different port number. ClickOKto save the settings. Now if you try to browse the web, you should get an error messageThe proxy server is refusing connections. This proves that Firefox is using the proxy and not just the default connection. Revert to the correct port number, and you should be able to browse again.
Reverting to normal unsecured browsing in Firefox:
When you are done needing the privacy of the SSH tunnel, go back to theNetworkproxy settings (Preferences > Advanced > Network > Settings) in Firefox.
Click on the radio button forUse system proxy settingsand clickOK. Firefox will now browse over your normal connection settings, which are likely unsecured.
If you are done using the tunnel you'll have to terminate the tunnel as well, which we cover in the next section.
If you plan on using the tunnel often you can leave it open for later use, but note that it might terminate on its own if it’s idle for too long, or if your computer goes to sleep or powers off.
Closing the tunnel will stop Firefox's ability to browse over the proxy.
The tunnel we created earlier on our local machine was sent to the background, so closing the terminal window you used to open the tunnel won't terminate it.
To terminate the tunnel we need to identify the process ID (PID) using thepscommand, and then kill it using thekillcommand.
Let's search for all activesshprocesses on our machine:
ps aux |grep ssh
Find the line that looks like the command you entered earlier to create the tunnel. Here's some sample output:
Output
sammy 14345 0.0 0.0 2462228 452 ?? Ss 6:43AM 0:00.00 ssh -D 8123 -f -C -q -N sammy@example.com
From the beginning of the line, in one of the first two columns, is a 3-5 digit number. This is the PID. Above, the sample PID of14345is highlighted.
Now that you know what the PID is, you can use thekillcommand to bring the tunnel down. Use your own PID when you kill the process.
sudo kill 14345
Now, if you'd like to automate the connection process, go to Step 4.
Closing the tunnel will stop Firefox's ability to browse over the proxy.
Close the PuTTY window you used to create the tunnel. That's it!
In Windows there isn't an easy way to automate the connection process, but both PuTTY and Firefox can save the settings you've previously entered, so just open the connections again to use the tunnel again.
For OS X or Linux systems, we can make an alias or create a script to quickly create the tunnel for us. The following are two ways to automate the tunnel process.
Note: These shortcut methods both require passwordless/passphraseless SSH key authentication to the server!
If you want an icon to double click and the tunnel just starts, we can create a simple BASH script to do the job.
We make the script set up the tunnel and launch Firefox, although you’ll still need to add the proxy settings manually in Firefox the first time.
On OS X, the Firefox binary that we can launch from the command line is insideFirefox.app. Assuming the app is in the Applications folder, the binary will be found at/Applications/Firefox.app/Contents/MacOS/firefox.
On Linux systems, if you installed Firefox via a repo or it's pre-installed, then its location should be/usr/bin/firefox. You can always use thewhich firefoxcommand to find out where it is on your system.
In the script below replace the path to Firefox with the one that is appropriate for your system.
Using a text editor likenanocreate a new file:
nano ~/socks5.sh
Add the following lines:
socks5.sh
#!/bin/bash
ssh -D 8123 -f -C -q -N sammy@example.com
/Applications/Firefox.app/Contents/MacOS/firefox &
- Replace
8123with your desired port number (it should match what you put in Firefox) - Replace
sammy@example.comwith your SSH user and hostname or IP - Replace
/Applications/Firefox.app/Contents/MacOS/firefoxwith the path to Firefox's binary
Save your script. For nano, typeCONTROL + o, and then to quit, typeCONTROL + x.
Make the script executable, so that when you double click on it, it will execute. From the command line, enter this command to add execute permissions, using your own script path:
chmod +x /path/to/socks5.sh
On OS X, you may have to perform an additional step to tell Mac OS X that a.shfile should be executed like a program and not be opened in an editor.
To do this, right click on yoursocks5.shfile and selectGet Info.
Locate the section**Open with:**and if the disclosure triangle isn’t pointing down, click on it so you can see the dropdown menu. Xcode might be set as the default app.

Change it toTerminal.app. If Terminal.app isn’t listed, chooseOther, and then navigate toApplications > Utilities > Terminal.app.
To open your SOCKS proxy now, just double click on thesocks.shfile.
(After executing, the script won’t prompt for a password, and so it will silently fail if you previously set up your SSH key to require a passphrase.)
The script will open a terminal window, start the SSH connection, and launch Firefox. Feel free to close the terminal window. As long as you kept the proxy settings in Firefox, you can start browsing over your secure connection.
If you find yourself on the command line frequently and want to bring up the tunnel, you can create a BASH alias to do the job for you.
The hardest part of creating an alias is figuring out where to save the alias command.
Different Linux distributions and OS X releases save aliases in different places. The best bet is to look for one of the following files and search foraliasto see where other aliases are currently being saved. Possibilities include
~/.bashrc~/.bash_aliases~/.bash_profile~/.profile
Once you've located the correct file, add this alias below any you already have, or just at the end of the file.
.bashrc
alias socks5='ssh -D 8123 -f -C -q -N sammy@example.com && /Applications/Firefox.app/Contents/MacOS/firefox &'
- Replace
8123with your desired port number (it should match what you put in Firefox) - Replace
sammy@example.comwith your SSH user and hostname or IP - Replace
/Applications/Firefox.app/Contents/MacOS/firefoxwith the path to Firefox's binary
Your aliases are only loaded when you start a new shell, so close your terminal session and start a new one.
Now when you type:
socks5
This alias sets up your tunnel, then launches Firefox for you and returns you to the command prompt.
Make sure Firefox is still set to use the proxy. You can now browse securely!
If your connection is working, you are good to go and can stop reading.
However, if you've discovered that you can't make an SSH connection out due to a restrictive firewall, then it's likely that port 22, which is required to create the tunnel, is being blocked.
If you can control the proxy server's SSH settings (with superuser access to a DigitalOcean Droplet, you will be able to do this), you can set SSH to listen on a port other than 22.
Which port can you use that isn't being blocked?
Aside from the questionable plan of running port scans with a tool likeShieldsUP!(questionable since your local network may view this as an attack), it's best to try ports that are commonly left open.
Ports that are often open include80(general web traffic) and443(SSL web traffic).
If your SSH server isn't serving web content, we can tell SSH to use one of these web ports to communicate over instead of the default port 22.443is the best choice since it's expected to have encrypted traffic on this port, and our SSH traffic will be encrypted.
From a non-firewalled location, SSH in to the DigitalOcean Droplet you are using for the proxy. (Or, use the built inconsolefrom the control panel, but you may not want to do this if you're afraid your web traffic is being watched.)
Edit the server's SSH settings:
sudo nano /etc/ssh/sshd_config
Look for the linePort 22.
We can either replace22entirely (which is a good SSH hardening technique anyway), or add a second port for SSH to listen on.
We'll choose to have SSH listen on multiple ports, so we'll add a new line underPort 22that readsPort 443. Here is an example:
sshd_config
. . .

Port 22
Port 443

. . .
Restart SSH so it will reload the SSH configuration you just edited.
Depending on your distribution, the name of the SSH server daemon may be different, but it's likely to besshorsshd. If one doesn't work try the other.
sudo service ssh restart
To verify that your new SSH port works, open a new shell (don't close the current one yet, just in case you accidentally locked yourself out) and SSH in using the new port.
ssh sammy@example.com -p 443
If you are successful, you can now log out of both shells and open your SSH tunnel using the new port.
ssh -D 8123 -f -C -q -N sammy@example.com -p 443
That's it! The Firefox settings will be exactly the same since they don't depend on the SSH port, just the tunnel port (8123above).
Open a SOCKS 5 tunnel to browse through a secure SSH tunnel whenever you need a lightweight way to access the web safe from prying eyes.