HubotをHerokuで動かしてSlackと連携する手順
以下の環境でNode.jsやらをインストールして開発環境を構築した
| 名前 | バージョン | 備考 | |
|---|---|---|---|
| ホストOS | Mac OS X | 10.8.5 | 作業端末。VirtualBoxやVagrantはここにインストールされている |
| ゲストOS | CentOS | 6.4 | 今回使用するVM |
| 仮想化ソフトウェア | VirtualBox | 4.2.18 | 参考:VirtualBoxの導入からOSインストールまでのチュートリアル解説 / Groove Labo |
| VirtualBox関連ツール | Vagrant | 1.3.2 | 参考:Vagrant開発者 Mitchell Hashimoto氏に聞いた:「Vagrant」って何ぞ?(・o・) - @IT |
[vagrant@vagrant-centos65 ~]$ sudo yum install nodejs --enablerepo=epel

[vagrant@vagrant-centos65 ~]$ node --version
v0.10.29

[vagrant@vagrant-centos65 ~]$ sudo yum install npm --enablerepo=epel

[vagrant@vagrant-centos65 ~]$ npm --version
1.3.6[vagrant@vagrant-centos65 ~]$ sudo npm install -g inherits
inherits@2.0.1 /usr/lib/node_modules/inherits
[vagrant@vagrant-centos65 ~]$ sudo npm install -g hubot coffee-script
/usr/bin/hubot -> /usr/lib/node_modules/hubot/bin/hubot
coffee-script@1.8.0 /usr/lib/node_modules/coffee-script
└── mkdirp@0.3.5
hubot@2.8.1 /usr/lib/node_modules/hubot
├── optparse@1.0.4
├── log@1.4.0
├── scoped-http-client@0.9.8
├── coffee-script@1.6.3
└── express@3.3.4 (methods@0.0.1, fresh@0.1.0, range-parser@0.0.4, cookie-signature@1.0.1, buffer-crc32@0.2.1, cookie@0.1.0, mkdirp@0.3.5, commander@1.2.0, debug@2.0.0, send@0.1.3, connect@2.8.4)
[vagrant@vagrant-centos65 ~]$ hubot -v
2.8.1remiリポジトリからredisをインストール
[vagrant@vagrant-centos65 maki]$ wget http://rpms.famillecollet.com/enterprise/remi-release-6.rpm

[vagrant@vagrant-centos65 maki]$ sudo rpm -ivh remi-release-6.rpm

[vagrant@vagrant-centos65 maki]$ sudo yum --enablerepo=remi install redis

[vagrant@vagrant-centos65 maki]$ sudo yum --enablerepo=remi install jemalloc

[vagrant@vagrant-centos65 maki]$ sudo redis-server -v
Redis server v=2.8.14 sha=00000000:0 malloc=jemalloc-3.6.0 bits=64 build=934c53b7b278eb71

[vagrant@vagrant-centos65 maki]$ sudo service redis start
Starting redis-server: [ OK ][vagrant@vagrant-centos65 ~]$ hubot --create maki
Creating a hubot install at maki
[vagrant@vagrant-centos65 ~]$ cd maki/
[vagrant@vagrant-centos65 maki]$ ls
bin hubot-scripts.json Procfile scripts
external-scripts.json package.json README.mdPINGしてみる
[vagrant@vagrant-centos65 maki]$ bin/hubot
Hubot> [Wed Sep 10 2014 13:46:28 GMT+0000 (UTC)] INFO Initializing new data for hubot brain

Hubot> hubot ping
Hubot> PONG
PINGの反応文を書き換える
[vagrant@vagrant-centos65 maki]$ vi scripts/ping.coffee
[vagrant@vagrant-centos65 maki]$ head -15 scripts/ping.coffee
# Description:
#   Utility commands surrounding Hubot uptime.
#
# Commands:
#   hubot ping - Reply with pong
#   hubot echo <text> - Reply back with <text>
#   hubot time - Reply with current time
#   hubot die - End hubot process

module.exports = (robot) ->
  robot.respond /PING$/i, (msg) ->
msg.send "何ですか?"HubotくんにHerokuへの出向を命じるよ
Hubotコネクタのインストール
[vagrant@vagrant-centos65 maki]$ sudo npm install hubot-slack --save

[vagrant@vagrant-centos65 maki]$ echo "web: bin/hubot --adapter slack" >> Procfile
[vagrant@vagrant-centos65 maki]$ cat Procfile
web: bin/hubot -a campfire -n Hubot
web: bin/hubot --adapter slack
# キーペアの作成
$ ssh-keygen -t rsa -C "your_email_address@example.com"
# パスコードを設定した場合は以下のコマンドを実行するとパスコードの入力を省略可能
$ ssh-add ~/.ssh/id_rsa
# 出力結果をGitHubに登録
$ cat ~/.ssh/id_rsa.pub
[vagrant@vagrant-centos65 maki]$ git init
Initialized empty Git repository in /home/vagrant/maki/.git/
[vagrant@vagrant-centos65 maki]$ git add .
[vagrant@vagrant-centos65 maki]$ git commit -m "first commit"
[vagrant@vagrant-centos65 maki]$ git remote add origin git@github.com:waday/maki.git
[vagrant@vagrant-centos65 maki]$ git push -u origin masterherokuコマンドでRubyが必要なので準備
[vagrant@vagrant-centos65 ~]$ git clone https://github.com/sstephenson/rbenv.git ~/.rbenv

# rbenvコマンドのパスを指定
echo 'export PATH="$HOME/.rbenv/bin:$PATH"' >> ~/.bash_profile

# ターミナル起動時にrbenv initを実行
[vagrant@vagrant-centos65 ~]$ echo 'eval "$(rbenv init -)"' >> ~/.bash_profile

[vagrant@vagrant-centos65 ~]$ source .bash_profile

# バージョン確認
[vagrant@vagrant-centos65 ~]$ rbenv
rbenv 0.4.0-98-g13a474c

# インストール可能なRubyのバージョン確認
[vagrant@vagrant-centos65 ~]$ rbenv install -l

# 最新版の2.1.2をインストールしてみる(2014/9/10現在)
[vagrant@vagrant-centos65 ~]$ rbenv install 2.1.2

# デフォルト設定
[vagrant@vagrant-centos65 ~]$ rbenv global 2.1.2

# バージョン確認
[vagrant@vagrant-centos65 ~]$ ruby -v
ruby 2.1.2p95 (2014-05-08 revision 45877) [x86_64-linux]

# 自動rehash
[vagrant@vagrant-centos65 ~]$ gem i rbenv-rehash

# herokuで使うのでインストール
[vagrant@vagrant-centos65 ~]$ gem i rb-readline

# お好みで・・
$ gem install bundlerまずはHerokuのアカウントを取得すること
クレジットカード情報も登録しないとアドオン機能が使えないかも
[vagrant@vagrant-centos65 ~]$ sudo wget -qO- https://toolbelt.heroku.com/install.sh | sh
This script requires superuser access to install software.
You will be prompted for your password by sudo.
Add the Heroku CLI to your PATH using:
$ echo 'PATH="/usr/local/heroku/bin:$PATH"' >> ~/.profile
Installation complete

[vagrant@vagrant-centos65 ~]$ vi .bash_profile
[vagrant@vagrant-centos65 ~]$ cat .bash_profile
PATH=$PATH:$HOME/bin
PATH="/usr/local/heroku/bin:$PATH"
export PATH
アプリ一覧を確認してみる
# 初回アクセスは認証情報を確認される
[vagrant@vagrant-centos65 ~]$ heroku apps
Enter your Heroku credentials.
Email: hogehoge@gmail.com
Password (typing will be hidden):
=== My Apps
vast-scrubland-6552
waday-md2inao
waday-wercker-test
botアプリの登録
# デフォルトstackのbambooはRubyしか動かないようなので明示的に変更する
[vagrant@vagrant-centos65 ~]$ heroku create maki-bot --stack cedar
Creating maki-bot... done, stack is cedar
http://maki-bot.herokuapp.com/ | git@heroku.com:maki-bot.git
アドオンとしてrediscloudを追加する
[vagrant@vagrant-centos65 ~]$ heroku addons:add rediscloud --app maki-bot
Adding rediscloud on maki-bot... done, v3 (free)
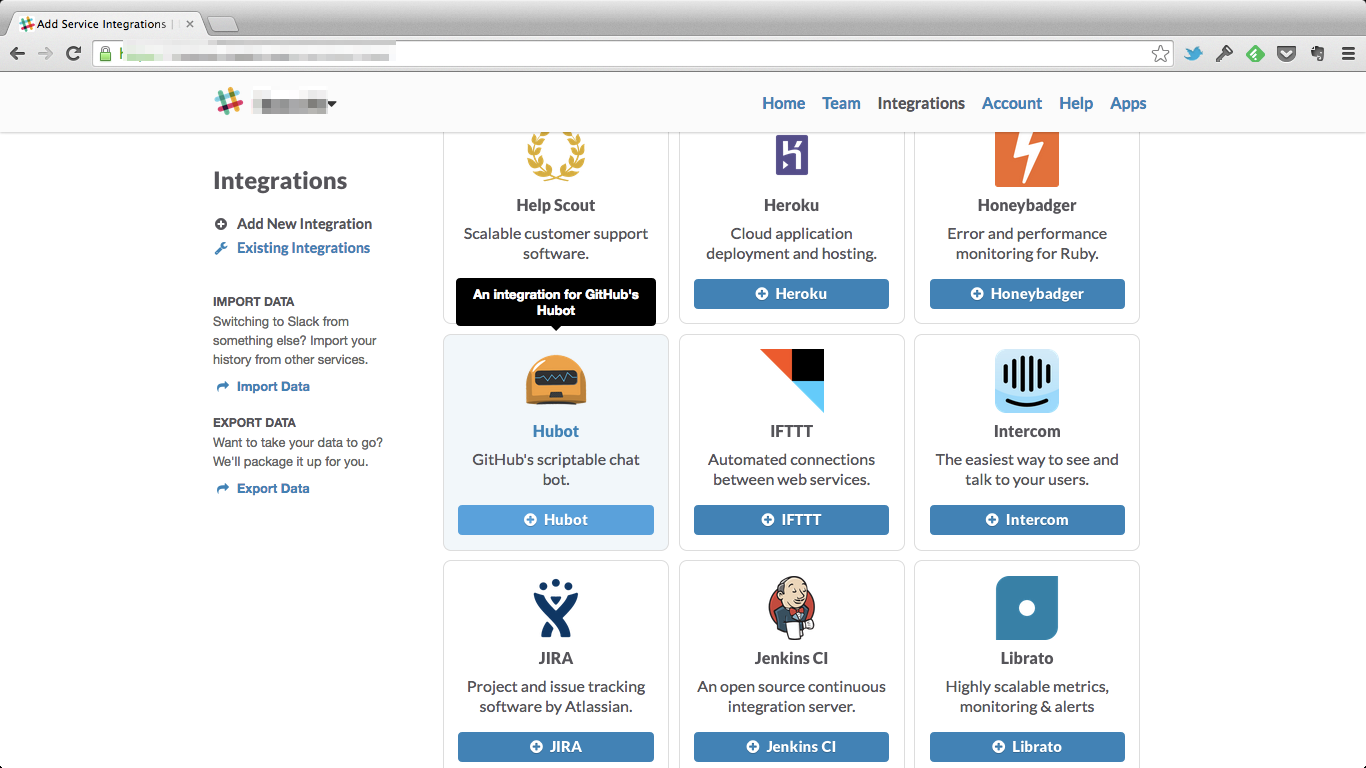
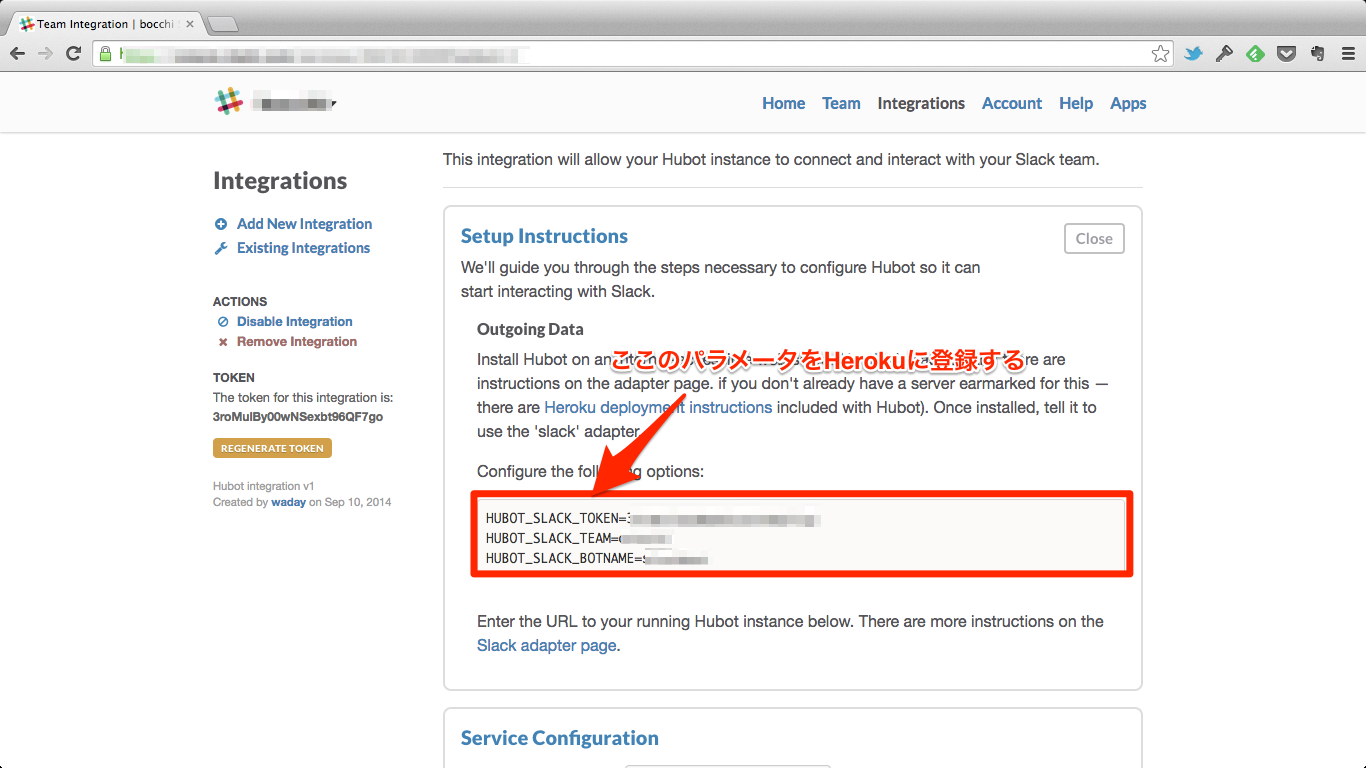
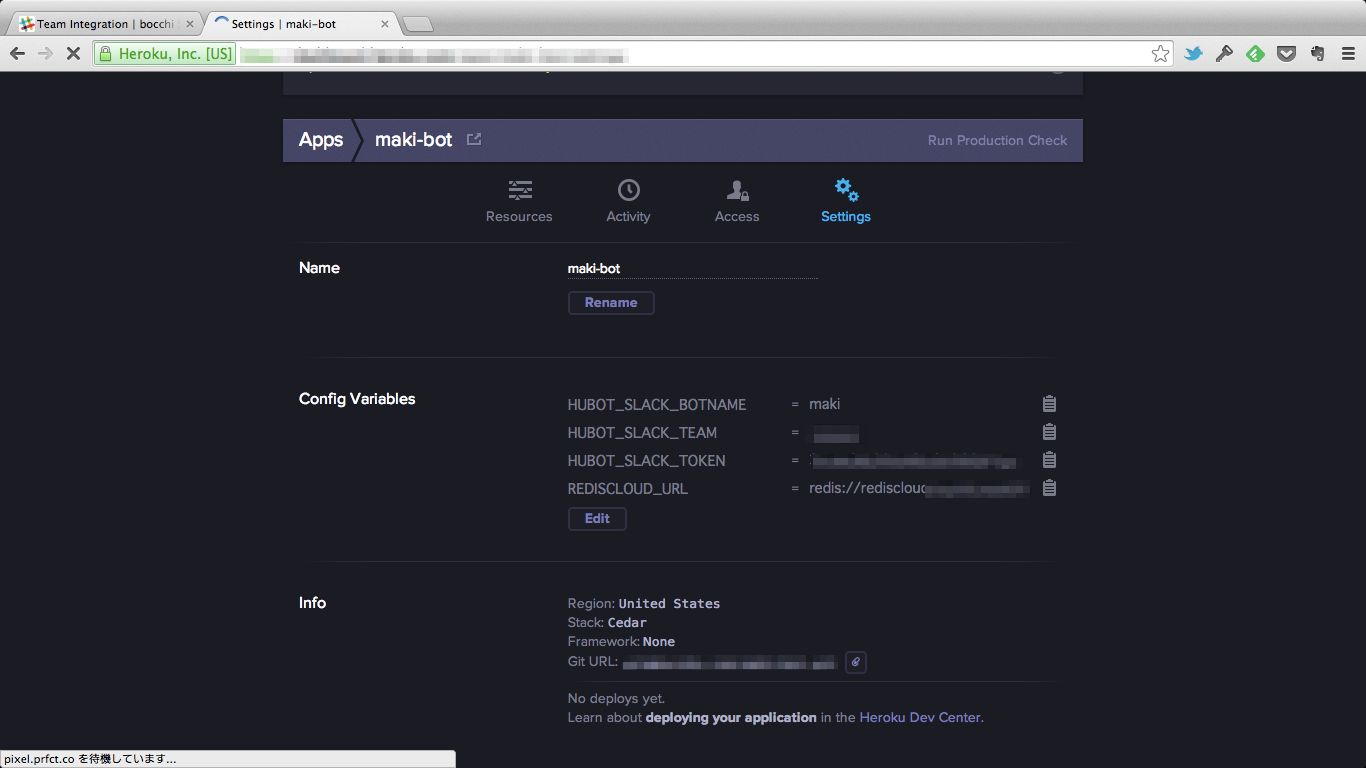
Use `heroku addons:docs rediscloud` to view documentation.SlackのHubot設定を行い、表示されたパラメータをHerokuコマンドで登録する
heroku config:add HUBOT_SLACK_BOTNAME=maki
heroku config:add HUBOT_SLACK_TEAM=hogehoge
heroku config:add HUBOT_SLACK_TOKEN=hogehogehogehoge
もちろんブラウザからも設定可能
Herokuのgitをremote登録 ※事前に先ほど作成したSSH公開鍵をHerokuのAccount > SSH Keysに登録しておくこと
[vagrant@vagrant-centos65 maki]$ git remote add heroku git@heroku.com:maki-bot.gitHerokuにpush
[vagrant@vagrant-centos65 maki]$ git push heroku master
Initializing repository, done.
Counting objects: 25, done.
Compressing objects: 100% (21/21), done.
Writing objects: 100% (25/25), 10.90 KiB, done.
Total 25 (delta 0), reused 0 (delta 0)

-----> Node.js app detected

       PRO TIP: Avoid using semver ranges starting with '>' in engines.node
       See https://devcenter.heroku.com/articles/nodejs-support

-----> Requested node range:  >= 0.8.x
-----> Resolved node version: 0.10.31
-----> Downloading and installing node
-----> Exporting config vars to environment
-----> Installing dependencies
       hubot-slack@2.2.0 node_modules/hubot-slack

       hubot@2.8.1 node_modules/hubot
       ├── optparse@1.0.4
       ├── log@1.4.0
       ├── scoped-http-client@0.9.8
       ├── coffee-script@1.6.3
       └── express@3.3.4 (methods@0.0.1, fresh@0.1.0, range-parser@0.0.4, cookie-signature@1.0.1, buffer-crc32@0.2.1, cookie@0.1.0, mkdirp@0.3.5, debug@2.0.0, commander@1.2.0, send@0.1.3, connect@2.8.4)

       hubot-scripts@2.5.16 node_modules/hubot-scripts
       └── redis@0.8.4
-----> Caching node_modules directory for future builds
-----> Cleaning up node-gyp and npm artifacts
-----> Building runtime environment
-----> Discovering process types
       Procfile declares types -> web

-----> Compressing... done, 6.1MB
-----> Launching... done, v6
       http://maki-bot.herokuapp.com/ deployed to Heroku

To git@heroku.com:maki-bot.git
 * [new branch]      master -> master
最後の設定はSlack側で行う
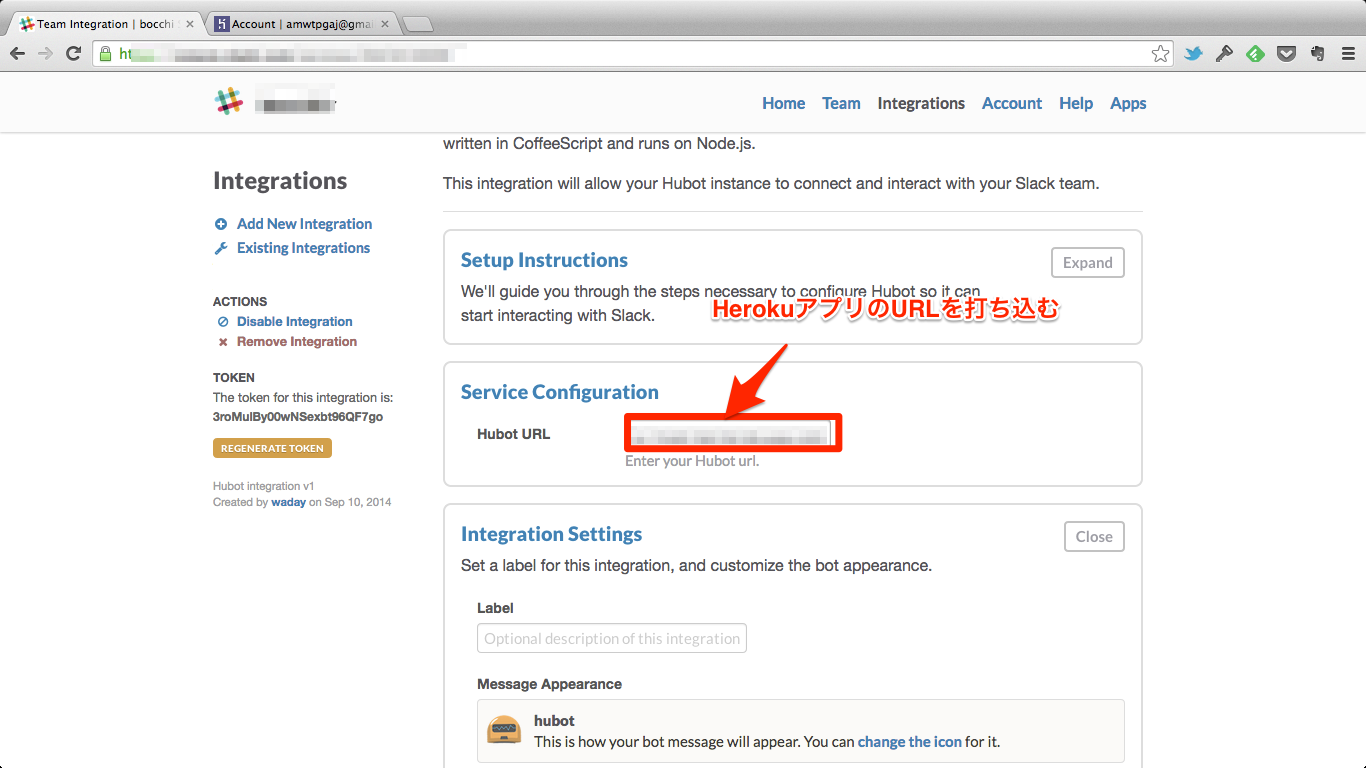
HerokuのHubotアプリ用のURLをSlackのExisting Integrations項目から登録する
GitHubでHubot連携用のアカウントを作り、Personal access tokensを生成する。
GitHub連携用のモジュールをインストール
[vagrant@vagrant-centos65 scripts]$ npm install githubot --save
環境変数(Personal access tokens)を設定 (bin/hubotファイルに直接記載してもいい)
[vagrant@vagrant-centos65 maki]$ heroku config:set HUBOT_GITHUB_TOKEN=""
スクリプト作成
[vagrant@vagrant-centos65 maki]$ vi scripts/github-create-pull.coffee
Herokuに変更内容を適用
git add .
git commit -m "install githubot & add github-create-pull scripts"
git push heroku master
まずはGitHubアカウントでSign Upする https://circleci.com/
Add Projectでテスト対象のプロジェクトを選択する
この時点ではテストの定義ファイルがないのでテストの実行に失敗する
テストをとりあえず成功させるためにリポジトリ直下に以下のテスト定義ファイルを作成する。
$ vi circle.yml
$ cat circle.yml
test:
  override:
    - ./dummy_test_script.sh
ダミーのスクリプトも準備する
$ vi dummy_test_script.sh
$ chmod 755 dummy_test_script.sh
$ cat dummy_test_script.sh
#!/bin/bash
echo "Hello World"
exit 0
変更をコミットし、GitHubにプッシュする
$ vi circle.yml
$ git add .
$ git commit -m "add Circle CI config"
[feature_circleci 34f9501] add Circle CI config
 3 files changed, 35 insertions(+), 0 deletions(-)
 create mode 100644 circle.yml
 create mode 100755 dummy_test_script.sh
$ git push origin feature_circleci
まずは、CircleCI > project settings > HerokuでHeoku API Keyを登録する
同画面でCircleCIのアカウントとHeroku SSH Keyの連携を行う
circleci.ymlにデプロイ設定を入れる
deployment:
  staging:
    branch: master
    heroku:
appname: foo-bar-123以下のURLにアクセスしてSlackのTokenを生成する https://api.slack.com/
CirclrCI > project settings > Tweaks > Environment variables
$ mkdir test
$ mkdir test/sbin
$ vi test/sbin/post_slack.sh
$ cat test/sbin/post_slack.sh
$ cat test/sbin/post_slack.sh
#/bin/bash

CMD=$1
export GIT_BRANCH=${CIRCLE_BRANCH}
export GIT_REPO=${GIT_REPO}
export SLACK_CHANNEL=${SLACK_CHANNEL}
export SALCK_USER=${SALCK_USER}

test_start() {
    curl https://slack.com/api/chat.postMessage -X POST -d "channel=#${SLACK_CHANNEL}" -d "text=${GIT_REPO}のテストを開始します。" -d "username=${SLACK_USER}" -d "token=${SLACK_TOKEN}"
}

test_end() {
    curl https://slack.com/api/chat.postMessage -X POST -d "channel=#${SLACK_CHANNEL}" -d "text=${GIT_REPO}(${GIT_BRANCH})のテストが終わりました。 https://circleci.com/gh/${CIRCLE_USERNAME}/${GIT_REPO}/${CIRCLE_BUILD_NUM}" -d "username=${SLACK_USER}" -d "token=${SLACK_TOKEN}"
}

case $CMD in
    test_start )
        test_start
        ;;
    test_end )
        test_end
        ;;
    * )
        echo "invalid argument"
        ;;
esac

exit 0
CircleCI > project settings > Notifications > Chatrooms > Slack
CircleCI Integrationをクリックすると、SlackのCircleCIに関する設定画面を開くことができ、デフォルトの通知チャンネルや、アイコン、bot名を変更できる
ちなみに、chatroom一覧にないサービスにも対応できたりする
notify:
  webhooks:
    # A list of hook hashes, containing the url field
    - url: https://example.com/hooks/circle
https://circleci.com/docs/configuration
# pngスタイル(デフォルトブランチ)
https://circleci.com/gh/:owner/:repo.png?circle-token=:circle-token
# pngスタイル(ブランチ指定)
https://circleci.com/gh/:owner/:repo/tree/:branch.png?circle-token=:circle-token

# shiedldスタイル(デフォルトブランチ)
https://circleci.com/gh/:owner/:repo.svg?style=shield&circle-token=:circle-token
# shiedldスタイル(ブランチ指定)
https://circleci.com/gh/:owner/:repo/tree/:branch.svg?style=shield&circle-token=:circle-token
https://circleci.com/docs/status-badges


