This guide is targetted at intermediate or expert users who want low-level control over their Python environments.
When you're working on multiple coding projects, you might want a couple different version of Python and/or modules installed. This helps keep each workflow in its own sandbox instead of trying to juggle multiple projects (each with different dependencies) on your system's version of Python. The guide here covers one way to handle multiple Python versions and Python environments on your own (i.e., without a package manager like conda). See the Using the workflow section to view the end result.
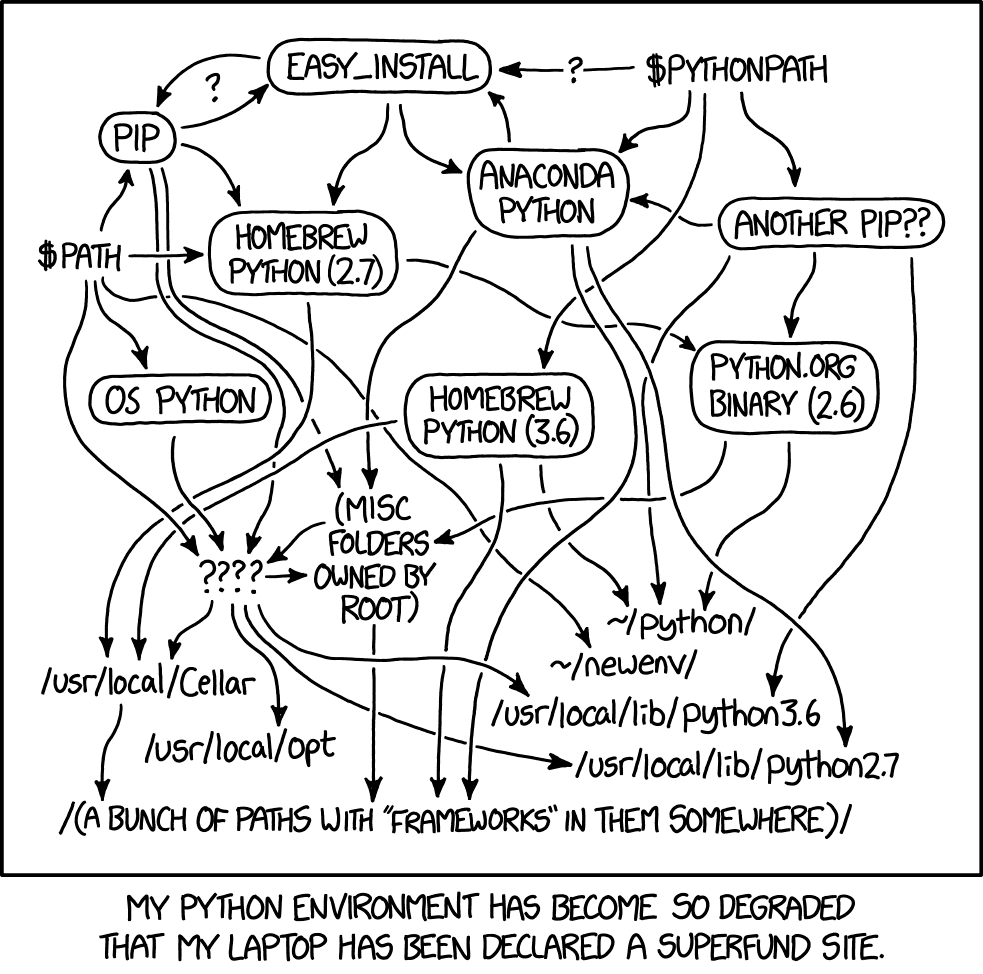
h/t @sharkinsspatial for linking me to the perfect cartoon
- Working on 2+ python projects that each have their own dependencies; e.g., a Python 3.6 project and a Python 3.8 project, or developing/testing a module that needs to work across multiple versions of Python. It's not reasonable to uninstall/reinstall Python modules every time you want to switch projects.
- If you want to execute code on the cloud, you can set up a Python environment that mirrors the relevant cloud instance. For example, your favorite Amazon EC2 deep learning instance may run Python 3.6, and you could hit obstacles if you developed locally with Python 3.8.
- You might have some working Python code and want to make sure everything stays frozen so that it'll still work in the future. Without virtual environments, upgrading Python modules could unintentionally break that year-old project. Going back to determine the correct version for each dependency would be a huge pain.
This guide shows how to solve these issues with pyenv and virtualenv (along with virtualenvwrapper). It illustrates how to obtain lower-level control of your development environment (compared to Anaconda/conda, for example). It's tedious to setup, but very easy exert a high level of control on your Python environments after that. This is intended for MacOS, but all the tools work on Unix-like systems -- you'll just have to make use of apt-get instead of brew and detour through the original installation guides in some spots.
For comparison to Anaconda, see note below
-
pyenv: Short for "Python environment." Pyenv manages which version of Python is visible to your computer (and temporarily hides other versions). With pyenv, you can install multiple versions of Python and quickly switch between the "activated" version (i.e., the version your computer will use to execute code).
Installation/use: From, pyenv's install instructions,
brew install pyenvon Mac. See the docs for installation viagit cloneon other other systems.Then you can list and install new Python versions like:
pyenv install 3.7.7  # Install Python version
pyenv install 3.6.3
pyenv versions       # List Python versions

# Later, we will switch version with something like `pyenv global 3.7.3`, but don't do this yet
Also install pyenv-virtualenv like
brew install pyenv-virtualenv, which we'll need later.Technical details: When you execute a Python script or use pip, pyenv intercepts that command and sends it to the Python environment that is activated. It does this using shims on the
PATHenvironment variable, which allow Python-related commands to be dynamically rerouted. We'll set thePATHshims later in this guide. -
Confirm python version
Make sure you have an up to date version of python at the system level (and not from pyenv). You can check and fix (if required) using the below code.
python --version # Should be a python 3 version # If the above gives python 2 and not python 3: brew install python brew info python # See where the unversioned symlinks live. Likely `/usr/local/opt/python/libexec/bin` # Update your PATH so the unversioned python/pip aliases are used. Run the below line to accomplish this. # Update the command if the unversioned symlinks live in a different location or if you use .bashrc/.profile # instead of a ~/.zshrc echo 'export PATH=/usr/local/opt/python/libexec/bin:$PATH' >> ~/.zshrc -
virtualenv: Short for "virtual environment." This tool allows manages separate directories for each environment so you can install modules (e.g., with
pip) to each environment individually.Installation:
pip install virtualenvin your terminalUse: It's possible to use virtualenv directly as (as described here), but we'll use virtualenvwrapper instead.
Technical details:
virtualenvkeeps each environment (and its installed modules) in separate folders; therefore, each is like a silo that doesn't interact with any other virtual environment. By default, the exact file location is defined by the user, but we will use virtualenvwrapper to manage these locations for us. -
virtualenvwrapper. This helps
pyenvandvirtualenvgel like PB&J. With it, you witch between environments using a single command (where each environment has it's own version of Python and own installed modules).Installation:
pip install virtualenvwrapperand thenbrew install pyenv-virtualenvwrapperto extend pyenv. Then you'll need to do some one-time setup; in your .zshrc/.bashrc/.bash_profile, add the following:# Setup virtualenv home export WORKON_HOME=$HOME/.virtualenvs source /usr/local/bin/virtualenvwrapper.sh # Tell pyenv-virtualenvwrapper to use pyenv when creating new Python environments export PYENV_VIRTUALENVWRAPPER_PREFER_PYVENV="true" # Set the pyenv shims to initialize if command -v pyenv 1>/dev/null 2>&1; then eval "$(pyenv init -)" fiMake sure that the directory you define for
WORKON_HOMEactually exists (or usemkdir ~/.virtualenvs), and then restart your terminal.See Troubleshooting if your system has issues finding
virtualenvwrapper.sh. Full virtualenvwrapper installation instructions here.
We're all ready to use this in the terminal! As shown below, we'll first set the Python environment with pyenv, and then make a couple virtual environments with virtualenvwrapper. Then we'll use the workon command to switch between them.
pyenv global 3.6.3           # Set your system's Python version with pyenv
mkvirtualenv my_legacy_proj  # Create a new virtual environment using virtualenvwrapper; it'll be tied to Python 3.6.3
pip install numpy scipy      # Install the packages you want in this environment

pyenv global 3.8.2         # Set your system's Python version with pyenv
mkvirtualenv new_web_proj  # Create and switch to a new virtual environment with a newer version of python
pip install flask boto

workon                 # List the environments available
workon my_legacy_proj  # Use virtualenvwrapper to switch back to the original project
-
If you're on MacOS and have issues with pyenv like:
zipimport.ZipImportError: can't decompress data; zlib not available
make: *** [install] Error 1
pyenv: version `3.5.0' is not installed
Make sure you have newest version of XCode CLI installed by running:
xcode-select --install -
If you have file not found issues with pyenv's
virtualenvwrapper.sh, you should be able to check where it lives withpyenv which virtualenvwrapper.sh. Substitute in this path in your .zshrc/.bashrc/.bash_profile. -
If on MacOS you're having issues with pip installs and getting an error like:
Error in sitecustomize; set PYTHONVERBOSE for traceback:
KeyError: 'PYTHONPATH'
try deleting homebrew's link to python by deleting the
~/.localfolder. -
If you're upgrading to a new version of python and having issues using
mkvirtualenvgiving getting an error like:pyenv: virtualenv: command not found The `virtualenv' command exists in these Python versions: 2.7.14 3.6.3make sure you've set the desired version of python and enter on the command line
pyenv virtualenvwrapperbefore trying to create a new virtual environment with themkvirtualenvcommand. -
If you're upgrading to a new version of python and having issues with
virtualenvwrappergiving getting an error like:/usr/local/opt/python/bin/python3.7: Error while finding module specification for 'virtualenvwrapper.hook_loader' (ModuleNotFoundError: No module named 'virtualenvwrapper') virtualenvwrapper.sh: There was a problem running the initialization hooks. If Python could not import the module virtualenvwrapper.hook_loader, check that virtualenvwrapper has been installed for VIRTUALENVWRAPPER_PYTHON=/usr/local/opt/python/libexec/bin/python and that PATH is set properly.First, make sure the underlying tools are installed with
pip install virtualenv virtualenvwrapper. If that still doesn't work,pipmight be referring to a default version of python when you want to install it for a different version. You can explicitly call the version of python to refer to with something like/usr/local/bin/pip3.7 install virtualenv virtualenvwrapper. If that still doesn't work, try executingpyenv virtualenvwrapperas in Troubleshooting item 4.
-
Anaconda does have functionality to handle some of the problems outlined above. Generally, it provides a lower bar for entry to Python development because the Anaconda software distribution contains both the
condapackage manager as well as many useful python modules, which is great for new Python users. Anaconda is also a good choice for Windows users as getting all Python packages to play nicely together is a challenge on Windows. However, there are some downsides to Anaconda/conda:- Any package that can't be installed via the
condapackage manager must be installed with pip or some other method; at that point, you're managing two install streams. For more advanced development, this can get messy. - You aren't always going to be using the most up-to-date version of modules because Continuum must repackage each one into their own system before calling
conda updatewill actually provide the newest version of that module's code. - Different versions of Python will not always have the latest module updates -- Continuum focuses its resources on certain versions of python, and you're relying on their team to incorporate all package updates to those version as well as the less-popular versions (like 3.4 and 3.5).
- Because the Anaconda software distribution is a large self-contained install, it'll install many packages that you might not need. Miniconda solves this to some degree as it only contains the
condapackage manager and its dependencies.
That aside, a good discussion of Anaconda's benefits, and some counter-arguements are here.
- Any package that can't be installed via the
-
Virtual environment prefix on source prompt
If you want your command prompt to show the virtual environment you're currently working with, add this to you .bashrc/.bash_profile:
# Prefix source prompt with virtualenvwrapper environment
if which pyenv > /dev/null; then eval "$(pyenv init -)"; fi
eval "$(pyenv virtualenv-init -)"
Your terminal command prompt will now look something like
(my_project_py3) Mark@Marks-MBP:~/Builds/ $ -
Directory scheme
This is my own personal preference, but when setting up my Python environment, I also tend to store modules I'm developing in a
Buildsdirectory (i.e.,/Users/wronk/Builds). Similarly, I put data in/Users/wronk/Data. Then, I'll define an environment variable in my .bashrc/.bash_profile (e.g., namedBUILDS_DIRandDATA_DIR) so that writing scripts/Python code is more agnostic of the exact machine I'm using.For example, any shell scripts can traverse directories from the
BUILDS_DIRenvironment variable instead of a hard-coded path, and I'll use something likemy_data_dir = os.environ['DATA_DIR']in Python code so it'll work on any machine that mirrors my directory scheme. That tends to look cleaner in code and is easier for getting the same code running locally and on the cloud (or another computer).
This is great! Thanks!