主要使用spring batch+quartz进行批量的处理与控制
(运行时的元数据储存在jobRepository中)。
JobRepository: 提供之所有持久机制。提供对于JobLauncher, Job, Step的CRUD。@EnableBatchProcessing 将会自动提供JobRepository。
JobLauncher: 是一个简单的接口,其中的run方法接受Job, JobParameters作为参数,用于启动批量。
ItemReader: 提供Step中业务数据的输入。
ItemWriter: 提供Step中业务数据的输出。
ItemProcessor: 提供Step中业务数据的转换。
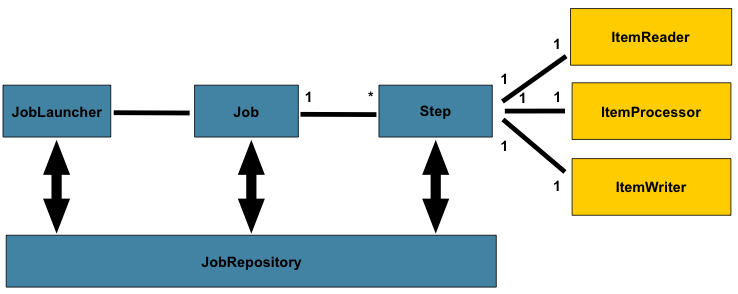
Job: 一种批量任务。
JobInstance: 该种批量任务的一个逻辑实例,比如一种每天运行的批量任务,那每天就是一个实例,由JobParameter区分不同的实例。
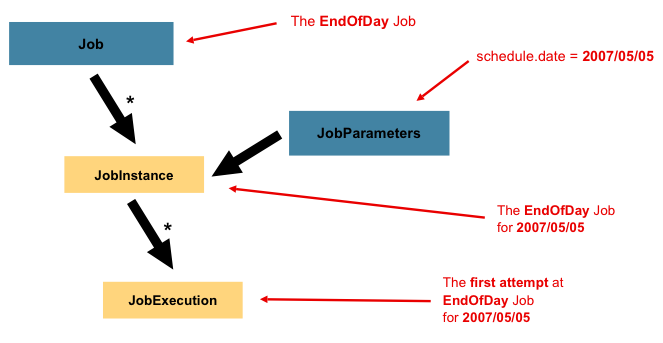
参数完全相同的job 会被认为是同一个jobInstance。如果上一次执行失败,下一次会从fail的step开始续跑。如果上一次成功则会抛出异常。
JobExecution: 真正运行的一次任务实例,同一个JobInstance可以有多个JobExecution(因为第一个失败,就会有第二个JobExecution)。
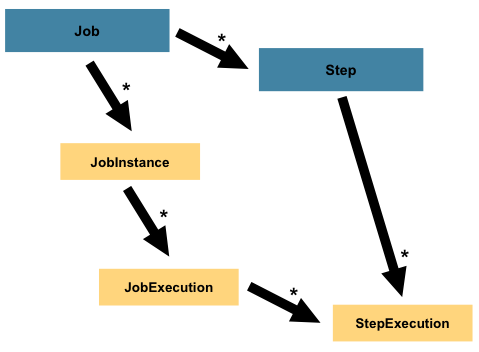
一个Job由一个或多个Step组成。
StepExecution代表对Step的一次运行。
StepExecution中包含本次Step、JobExecution、和事务相关数据的引用以及一个ExecutionContext(即本次执行的所有上下文),其中包含任何批量运行时所需要的持久数据(KV)。
StepExecution的ExecutionContext在每个commit点进行保存。JobExecution的ExecutionContext在每个Step间进行保存。
@EnableBatchProcessing会自动创建以下bean,注解在有 BatchConfigurer配置的类上:
JobRepository - bean name "jobRepository"
JobLauncher - bean name "jobLauncher"
JobRegistry - bean name "jobRegistry"
PlatformTransactionManager - bean name "transactionManager"
JobBuilderFactory - bean name "jobBuilders"
StepBuilderFactory - bean name "stepBuilders"
以上所有设置都在 BatchConfigurer 中,可以继承DefaultBatchConfigurer或者直接实现BatchConfigurer接口来实现自己的设置(这里不展开)
@Configuration
@EnableBatchProcessing
//@Import(DataSourceConfiguration.class) 自定义的BatchConfigurer类
public class AppConfig {

    @Autowired
    private JobBuilderFactory jobs;

    @Autowired
    private StepBuilderFactory steps;

    @Bean
    public Job job(@Qualifier("step1") Step step1, @Qualifier("step2") Step step2) {
        return jobs.get("myJob")//该job的名字
            .preventRestart() //该批量任务不允许重拉
            .validator((? extends  DefaultJobParametersValidator))) //对jobparameter等属性进行校验
            .listener(<? implements JobExecutionListener>) //增加监听器
            .start(step1)//第一个step
            .next(step2)//第二个step
            .end()//最后一个step
            .build();
    }
}
step主要有两种类型,一种是基于chunk的、一种是基于tasklet的。
Chunk:循环的调用ItemReader读入数据(read())、ItemProcessor(process)处理整合数据。当调用数据达到commit interval,通过ItemWriter写出数据并提交事务。
这三者都有多种实现可以直接使用,详情参考自己需要的输入输出源对应的类。其中mybatis对应的处理类在mybatis-spring中,而不在spring中,属于第三方实现需要注意。
默认情况下,ItemReader中的异常不会造成回滚,而ItemWriter中的异常会造成回滚
    @Bean
    public Step step1(ItemReader<Person> reader,
                         ItemProcessor<Person, Person> processor,
                         ItemWriter<Person> writer) {
        return steps.get("step1") //step名字
            .<Person, Person> chunk(10) //commit interval
            .reader(reader)
            .processor(processor) //可以省略
            .writer(writer)
            .startLimit(1) //允许重跑的次数
            .allowStartIfComplete(true) //一个step如果成功,状态会是COMPLETED而不会重跑。
                                        //如果重拉一个失败的JobExecution,需要永远重跑该step就需要这样设置
                                        //(比如清理工工作空间,校验参数等)
            .faultTolerant() // 以下都要先启用容错!
            .skipLimit(10) // 允许跳过整个step中的异常次数
            .skip(FlatFileParseException.class) //允许跳过的异常类型

            .skip(Exception.class)
            .noSkip(FileNotFoundException.class) //或者不允许跳过的类型

            .retryLimit(3)//重新尝试次数
            .retry(DeadlockLoserDataAccessException.class)//例如资源暂时被锁住,retry可能恢复成功的错误类型。

            .noRollback(ValidationException.class)//默认出现异常都会回滚,可以指定不回滚的异常类型。
            .readerIsTransactionalQueue() //如果ItemReader是有事务的队列,需要ItemReader也是事务的
            .listener)() //增加监听器 有step、chunk、reader、processor、writer、tasklet、skip多种实现,用于进行before和after等操作。

            .build();
    }
Tasklet
Tasklet里面只有一个方法execute。只有在返回RepeatStatus.FINISHED或者抛出明确失败时,才会停止循环执行。
    @Bean
    protected Step step2(MyTasklet tasklet) {
        return steps.get("step2")
            .tasklet(tasklet)
            .build();
    }

    @Bean
    public class MyTasklet implements Tasklet {

        @Override
        public RepeatStatus execute(StepContribution contribution,
                                ChunkContext chunkContext) throws Exception {
    }
}
启动:
jobLauncher.run(job, new JobParameters());
更多对于元数据的使用可以参考 JobExplorer、JobRegistry、JobOperator
通过每个Step的ExitStatus的值判断之后该执行哪个Step,如果模糊匹配只能使用?和*。ExitStatus可以使用listener进行设置
@Bean
public Job job() {
        return this.jobBuilderFactory.get("job")
                                .start(stepA())
                                .on("*").to(stepB())
                                .from(stepA()).on("FAILED").to(stepC())
                                 from(stepA()).on("COMPLETED WITH SKIPS").to(errorPrint1())
                                .from(stepA()).on("*").to(stepD())
                                .end()
                                .build();
}
对于一些参数需要从起批参数中获取的可以使用晚绑定。 注意@StepScope 注解 必须先有@EnableBatchProcessing 才能使用。
@StepScope
@Bean
public FlatFileItemReader flatFileItemReader(@Value("#{jobParameters['input.file.name']}") String name) {
        return new FlatFileItemReaderBuilder<Foo>()
                        .name("flatFileItemReader")
                        .resource(new FileSystemResource(name))
                        ...
}
/* 以下两种也可以使用
#{jobExecutionContext['input.file.name']}
#{stepExecutionContext['input.file.name']}
*/
有三种方式可以干涉批量间的数据。
1、获得起批参数:
@Value("#{jobParameters[endTime]}")
String endTime
2、使用上下文:Springbatch提供了以下两种上下文
javax.batch.runtime.context.JobContext 、javax.batch.runtime.context.StepContext
可以在代码中注入,或是在各种listener的入参中获得。
@Inject
JobContext jobContext;//注意这里不支持@Autowired
JobContext和StepContext分别包装了JobExecution和StepExecution。
通过StepContext#setPersistentUserData(Serializable data)存储的数据被保存在StepExecution#executionContext中。
3、是一个dataHolder Bean。
当数量大比较大的时候建议使用这个。但是这会明显加强耦合性,并且需要注意scope等。
构建JobExplorer
它是一个包含数个只读函数的接口,用于获取Job和Step的instance和execution,是一个只读版本的jobRepository。
通过JobExplorerFactoryBean获取。
.setDataSource() 传入数据源。
.getObject() 返回JobExplorer。
构建JobRegistry
以及它的父接口JobLocator,并不是强制的,用于集中追踪查看在不同上下文中的job。
通过重写jobRegistry()返回一个jobRegistry的实现,例如new MapJobRegistry()。
通过JobRegistryBeanPostProcessor 或 AutomaticJobRegistra 来使用。
构建JobOperator
JobOperator是一个接口用于提供,停止、继续、汇总批量等功能。
通过new SimpleJobOperator()获取。
.setJobExplorer(jobExplorer) 传入jobExplorer。
.setJobRepository(jobRepository) 传入jobRepository。
.setJobRegistry(jobRegistry) 传入jobRegistry。
.setJobLauncher(jobLauncher) 传入jobLauncher。
startNextInstance()方法用于创建一个新的jobInstance,它会使用JobParametersIncrementer接口去绑定一个job。
JobParametersIncrementer中的getNext()方法,可以创建自己的参数改变规则。
增加spring.batch.job.enabled=false 使spring容器不会在启动服务时,自动启动批量。
quartz,提供了一套建表语句,用来匹配其源码的sql语句。
源码中对应的数据表名前缀可以在resource下的properties中设置,一般为QRTZ_。
QuartzJobBean抽象类是整合springbatch与quartz的核心。其中主要是抽象方法executeInternal(JobExecutionContext var1)。 在该抽象方法中,进行实际的批量任务启动。
(关键代码) 添加批量任务:
JobDetail job = JobBuilder.newJob(QuartzJobLauncher.class) //QuartzJobLauncher是QuartzJobBean的子类
    .withIdentity(new JobKey(jobName, appName)) //实际由Jobkey区分不同Job,入库时储存其hash值
    .requestRecovery(false)
    .setJobData(params) //设置起批参数
    .build();
Trigger trigger = (Trigger) TriggerBuilder.newTrigger()
		.withIdentity(jobName, appName) //绑定对应的job
		.withSchedule(builder)
		.startAt(new Date())//第一次触发的事件
		.build();
/*上述的builder主要分三种 SimpleSchedule,CronSchedule,DeamonSchedlue,常用的是前两种。*/

//配置具体的计划任务规则,例如:
SimpleScheduleBuilder builder = SimpleScheduleBuilder.repeatHourlyForTotalCount(repeatCount, interval);
SimpleScheduleBuilder builder = SimpleScheduleBuilder.repeatHourlyForever(interval);
//配置misfire时的错误处理,例如:
builder.withMisfireHandlingInstructionNextWithRemainingCount();
builder.withMisfireHandlingInstructionNowWithExistingCount();

//配置具体的计划任务规则,例如:
CronScheduleBuilder builder = CronScheduleBuilder.cronSchedule(cronExpression);
//配置misfire时的错误处理,例如:
builder.withMisfireHandlingInstructionDoNothing();
builder.withMisfireHandlingInstructionFireAndProceed();
scheduler.scheduleJob(job, trigger);
删除批量任务
scheduler.deleteJob(new JobKey(jobName, appName));
修改批量任务
scheduler.rescheduleJob(new TriggerKey(jobName, appName),Trigger);
手动触发任务
JobDataMap data = scheduler.getJobDetail(key).getJobDataMap();
//修改data中的部分数据
scheduler.triggerJob(new JobKey(jobName, appName),data);
其余方法类似,见上文。其信息都会被入库。
当设定的时间到了,就会触发一开始所说的QuartzJobBean的executeInternal(JobExecutionContext var1)方法,在其中使用路由,路由到各批量服务,将JobExecutionContext中的起批参数转换后传输过去。
JobDetail jobDetail = context.getJobDetail();
JobDataMap jobDataMap = jobDetail.getJobDataMap();
在各批量服务中最终的目的是组装成一个个Job bean。 在executeInternal的远程调用的服务函数中有:
Job job = (Job)context.getAutowireCapableBeanFactory().getBean(jobDataMap.getJobName());//在spring容器中获得这个Job的bean
JobParametersBuilder builder=new JobParametersBuilder();
//将JobDataMap中的参数放入JobParametersBuilder。。。
JobExecution jobExecution = launcher.run(job, builder.toJobParameters()); 真正执行批量任务