This is the follow up to a post I wrote recently called From Require.js to Webpack - Party 1 (the why) which was published in my personal blog.
In that post I talked about 3 main reasons for moving from require.js to webpack:
- Common JS support
- NPM support
- a healthy loader/plugin ecosystem.
Here I'll instead talk about some of the technical challenges that we faced during the migration. Despite the clear benefits in developer experience (DX) the setup was fairly difficult and I'd like to cover some of the challanges we faced to make the transition a bit easier.
The first thing you do when you're converting from require.js to webpack is you take your whole require.js configuration file and convert it to a webpack.config.js file.
In practice for us this meant addressing three areas:
- Tell webpack where you keep your JS files
- The enormous
pathslist in our require.js config - All of the
shimconfig
The first thing you need to do is tell webpack where your JS files are. Require.js could usually infer this based on the <script> tag you used to set it up or you might have configured it using the baseUrl option.
This is super easy to setup in webpack by adding the following to your config:
{
	resolve: {
		modulesDirectories: ['public/js']
	}
}
If you forget to set this webpack will probably assume node_modules.
Initially the conversion process is really straight forward.
Start with a config like this:
requirejs.config({
    paths: {
        "backbone": "lib/backbone-1.1.0",
        "jquery": "lib/jquery-1.10.2",
        "underscore": "lib/lodash.underscore-2.3.0",
        "jqueryUI": "lib/jquery-ui.min"
    }
});
And it translates very straightforwardly into a webpack config of the following:
module.exports = {
	resolve: {
		alias: {
        		"backbone": "lib/backbone-1.1.0",
        		"jquery": "lib/jquery-1.10.2",
        		"underscore": "lib/lodash.underscore-2.3.0",
		        "jqueryUI": "lib/jquery-ui.min"
		}
	}
}
Hey that was pretty easy!
More info:
- http://requirejs.org/docs/api.html#config-paths
- http://webpack.github.io/docs/configuration.html#resolve-alias
The next thing, which took some special care, was fixing up our shim config. This was slightly harder than it looked, because it's easy to forget what the shim's are actually doing. Let's revisit that for a moment.
A require.js shim takes modules that are not AMD-compatible and makes them AMD comptible by wrapping them in a little bit of code which will pull in the appropriate dependencies.
Let'e examine exactly how that works with the follow simple example:
{
    shim: {
        "underscore": {
            exports: "_"
        },
        "backbone": {
            deps: ["jquery", "underscore"],
            exports: "Backbone"
        }
    }
}
Here we are applying shims for both underscore and backbone*. For underscore the shim will wrap the library and then return the value of the _ variable for any scripts using it as a dependency. The backbone case is slightly more complicated:
- It wraps the library and exports the value of the
Backbonevariable. - It makes sure that when evaluated backbone has access to both
jqueryandunderscore
Let's see how we would get the same setup using webpack loaders:
{
  module: {
    loaders: [
      { test: /underscore/, loader: 'exports?_' }
      { test: /backbone/, loader: 'exports?Backbone!imports?underscore,jquery' }
    ]
  }
}
A few things to note:
- The
testis a regular expression which matches against the full file path, so be careful to be specific! - In order to use these loaders you need to install them
npm install exports-loader imports-loader
Pretty much all of the common use cases you might bump into are covered in the webpack guide to shimming modules.
So now that you've migrated all of your shim and paths config, let me suggest something: delete it.
Now go to NPM and install underscore, jquery, backbone, react. Whatever else you're using is probably there and probably
will work out of the box without any special loaders or aliasing.
That's the magic of webpack.
If you get your dependencies from NPM you don't need any of that. They will just work and you can go on building great apps not spending time carefully maintaining each dependency in your config files.
To add support for NPM to webpack, just make sure this is included in your webpack config:
{
	resolve: {
		modulesDirectories: ['public/js', 'node_modules']
	}
}The heart of our app is this fancy router. When a new route comes in we would dynamically pull in the view associated with that path, instantiate it and re-render the main app view with the new page. It works pretty well. The main nav and everything are part of the main app, but each tab in the navbar had its own separate JS bundle and we'd only pull that in on an as-needed basis*.
This was by far the most challenging piece, mostly because my misunderstanding of how different the splitting/bundling technique is between webpack and require.js.
* This has changed for us somewhat recently, but hopefully the lesson will still be valuable for you!
So we've talked a lot about our require.js config. Now we're going to talk about our r.js config. All of the special information needed to create our r.js build. Here's the bulk of it:
{
	baseUrl: 'public/js',
	mainConfigFile: 'public/js/config.js',
	dir: '.build/js',
	modules: [
		{ name: 'config' },
		{ name: 'view/summary/index', exclude: ['config'] },
		{ name: 'view/activity/index', exclude: ['config'] },
		{ name: 'view/transfer/index', exclude: ['config'] },
		{ name: 'view/wallet/index', exclude: ['config'] },
		{ name: 'view/settings/index', exclude: ['config'] },
	]
}
The bulk of this file was concerned with all of the different bundles we were making. With webpack that all goes away (mostly).
At first my instict was to replace this with the webpack entry concept. I spent a lot of time going down the wrong path worrying about entries.
There is another approach that worked better for us:
- Using async
require()to create split points in our app and then letting webpack create the bundles automatically.
Here is the gist of the old require.js code:
function handleRouteChange(path) {
    require(['/views/' + path], function(PageView) {
        app.setView(new PageView());
    });
}
The first thing I tried to do when moving this to webpack was just leaving it. It seemed to work! The problem is that it only created a single bundle for all of the views. This means a signicantly larger payload for the browser.
Here's our improved webpack solution:
function loadPage(PageView) {
    app.setView(new PageView());
}
function handleRouteChange(path) {
    switch (path) {
        case 'settings':
            require(['/views/settings'], loadPage);
            break;
        case 'transfer':
            require(['/views/transfer'], loadPage);
            break;
        case 'wallet':
            require(['/views/wallet'], loadPage);
            break;
	default:
	    // you could either require everything here as a last resort or just leave it...
    }
}
Each time you use the AMD-style require([]) or require.ensure() webpack will see what you passed in there and go and create a bundle with every possible match. That works great if you pass in a single file, but when you use a variable, it might end up bundling up your entire view folder. That's why you need to use something like a switch statement to make sure that you declare your split points on a route-by-route basis.
You should probably grumble about this a bit, but just remember because you do this you don't need any module or entry logic in your config. It will create all the bundles you need automatically, mostly automatically anyway :)
Let me do my best to explain when you want an entry and when you want to rely on webpack to do the splitting for you:
- Use an
entryif you want to include a new<script>tag in a page. - Use
require.ensure()or another form of async require if you want webpack to dynamically pull in additional modules.
I recommend reading Pete Hunt's excellent webpack how-to on the subject of async loading for more information.
One of the last things that got us was our CDN. Everything worked fine in local development mode, but when we got to our live testing environments we noticed that it was trying to pull additional bundles off of the webserver by default and not the CDN where our JS actually lives in production. require.js handles this automatically by parsing the URL from the <script> on the page. Webpack doesn't have this magic. If you have a non-standard place where you want it to pull down additional dynamic bundles you need to tell it:
__webpack_public_path__ = document.body.getAttribute('data-js-path') + '/apps/';
More info can be found here: https://github.com/webpack/docs/wiki/configuration#outputpublicpath
If we'd used webpack to handle our total build process we could let webpack apply the hash automatically, but since we're still only using it for our JS build, we need to handle this programmatically. Probably one of my least favorite things about the setup. Not terribly hard, just hard to remember and definitely threw us for a pretty big loop.
At this point we were pretty excited about everything, now that it was basically all working, but we noticed that the file sizes were a bit higher, maybe even a lot higher than our old require.js builds.
webpack --display-reasons is the most helpful things ever.
Run webpack with that flag and you'll see:
- Every module that was added to your bundle
- How much space it's taking up
- The filename and module format that included it
Here is the partial output from a recent build:
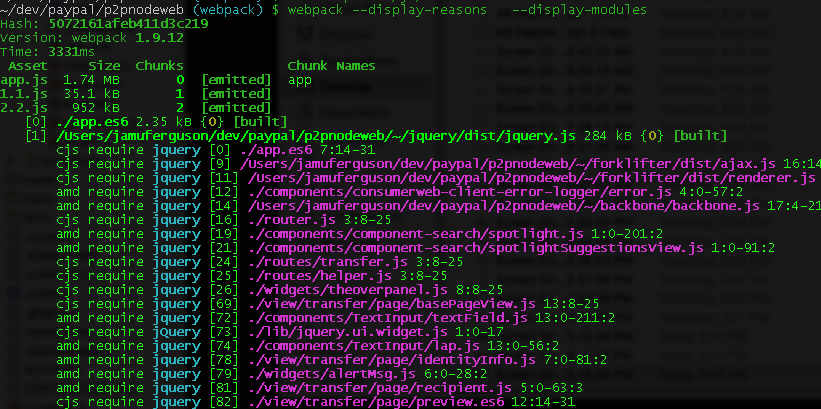
This is a goldmine of information. Which modules took up the most space? How did that get included in this bundle? All answered with this information!
Note: By default all of the files in NPM are excluded from the output. If you want to add that simply add the --display-modules flag to your query (as above) and now you can see exactly every file that requires jquery (node_modules is shortened to ~). It's pretty awesome and it helped us find a little issue with moment.js.
When we first started this process we noticed moment.js was pulling in 900kb of files. In the minified output it was still around 100kb. After poking around a bit we came across this stackoverflow article: How to prevent Moment.js from Loading Locales with Webpack.
Becuase you're now in a CommonJS environment Moment thinks it's safe to load all of its locale information. How should it know you're targetting someone's Windows XP box? Thankfully there's a webpack plugin that will strip out those extra requests prety easily.
{
	plugins: [
		new webpack.IgnorePlugin(/^\.\/locale$/, [/moment$/]), // saves ~100k from build
	]
}These can cause your builds to appear huge. They are great and can really help with debugging, but make sure you know what you're doing with them and make sure you're not counting them against your total bundle size. Most browsers only download these if the developer console is open, so they don't affect your customers.
However, if you set your source-map type to eval or eval-source-map the source-maps are bundled directly into your JS. Do not use this type of source map in your production build.
More info here: http://webpack.github.io/docs/configuration.html#devtool
To add minification all you need to do is add this config:
{
    plugins: [
        new webpack.optimize.UglifyJsPlugin({minimize: true})
    ]
}Webpack has been great to work with and I think the whole team basically loves it now. I hope this little guide helps your team avoid the hurldes we ran into. If you need any help feel free to leave a note or checkout the excellent webpack chat room on gitter.
-- Jamund
I am currently porting an old backbone web application that uses RequireJS to Webpack. Thank you 👍