Apache Falcon simplifies the configuration of data motion with: replication; lifecycle management; lineage and traceability. This provides data governance consistency across Hadoop components.
In this tutorial we will walk through a scenario where email data gets processed on multiple HDP 2.2 clusters around the country then gets backed up hourly on a cloud hosted cluster . In our example:
- This cluster is hosted on Windows Azure.
- Data arrives from all the West Coast production servers. The input data feeds are often late for up to 4 hrs.
The goal is to clean the raw data to remove sensitive information like credit card numbers and make it available to our marketing data science team for customer churn analysis.
To simulate this scenario, we have a pig script grabbing the freely available Enron emails from the internet and feeding it into the pipeline.

- A cluster with Apache Hadoop 2.2 configured
- A cluster with Apache Falcon configured
The easiest way to meet the above prerequisites is to download the HDP Sandbox
After downloading the environment, confirm that Apache Falcon is running. Below are the steps to validate that:
Navigate to Ambari at http://127.0.0.1:8080, login with username and password of admin and admin respectively. Then check if Falcon is running.
If Falcon is not running, start Falcon:
- Create cluster specification XML file
- Create feed (aka dataset) specification XML file
- Reference cluster specification
- Create the process specification XML file
- Reference cluster specification – defines where the process runs
- Reference feed specification – defines the datasets that the process manipulates
We have already created the necessary xml files. In this step we are going to download the specifications and use them to define the topology and submit the storm job.
In this step we will stage the pig script and the necessary folder structure for inbound and outbound feeds on the HDFS:
First download this zip file called falcon.zip to your local host machine.
wget http://hortonassets.s3.amazonaws.com/tutorial/falcon/falcon.zip
Now, we will unzip the zip file
unzip falcon.zip
upload the content of the unzipped falcon.zip which is now the folder "demo" to /user/ambari-qa/falcon.
hadoop fs -put demo /user/ambari-qa/falcon/
Login to the Windows Azure portal at http://manage.windowsazure.com

Create a storage account

Wait for the storage account to be provisioned

Copy the access key and the account name in a text document.
We will use the access key and the account name in later steps

The other information you will want to note down is the blob endpoint of the storage account we just created.
Click on the storage name and select Dashboard from the top menu bar.

Click on the Containers tab from the top menu bar and create a new container called myfirstcontainer.

Login to Ambari – http://127.0.0.1:8080 with the credentials admin and admin.

Then click on HDFS from the bar on the left and then select the Configs tab.
Click on Advanced to see more config settings, scroll down to the Custom hdfs-site section and click on Add property...
In the Add Property dialog, the key name will start with fs.azure.account.key. followed by your blob endpoint that you noted down in a previous step. The value will be the Azure storage key that you noted down in a previous step. Once you have filled in the values click the Add button:

Once you are back out of the new key dialog you will have to Save it by clicking on the green Save button:

Then restart all the service by clicking on the orange Restart button:

Wait for all the restart to complete

Now let’s test if we can access our container on the Azure Blob Store.
SSH in to the VM:
ssh root@127.0.0.1 -p 22
The password is hadoop
hdfs dfs -ls -R wasb://myfirstcontainer@{YOUR_BLOB}/
e.g.
hdfs dfs -ls -R wasb://myfirstcontainer@saptak.blob.core.windows.net/
Issue the command from our cluster on the SSH’d terminal
Lets' download the topology, feed and process definitions, too.
http://hortonassets.s3.amazonaws.com/tutorial/falcon/falconDemo.zip
Unzip the file and change Directory to the folder created: falconChurnDemo
Now let’s modify the cleansedEmailFeed.xml to point the backup cluster to our Azure Blob Store container.
You can use vi to edit the file:
vi cleansedEmailFeed.xml
to look like this:
wasb://myfirstcontainer@{YOUR_BLOB}/${YEAR}-${MONTH}-${DAY}-${HOUR}
Then save it and quit vi.
Cluster Specification
Cluster specification is one per cluster.
See below for a sample cluster specification file.

Back to our scenario. First we have to create the following directory as superuser falcon.
exit;
su falcon;
Lets create the directories.
hdfs dfs -mkdir -p /apps/falcon/primaryCluster/staging
hdfs dfs -mkdir -p /apps/falcon/primaryCluster/working
hdfs dfs -mkdir -p /apps/falcon/backupCluster/working
hdfs dfs -mkdir -p /apps/falcon/backupCluster/staging
The working directories should have the permission rwxr-xr-x (755) and the staging directories rwxrwxrwx (777).
Therefore execute the following commands:
  hadoop fs -chmod 755 /apps/falcon/primaryCluster/working
  hadoop fs -chmod 777 /apps/falcon/primaryCluster/staging
  hadoop fs -chmod 755 /apps/falcon/backupCluster/working
  hadoop fs -chmod 777 /apps/falcon/backupCluster/staging
Next step, we open the Falcon User Interface which uses the port 150000.
Navigate to 127.0.0.1:15000 and login as user falcon.
After that, lets submit the ‘oregon cluster’ entity to Falcon. This signifies the primary Hadoop cluster located in the Oregon data center.
Click the Browse for the XML file and select the oregonCluster.xml from the falconChurnDemo folder.
Repeat this for the virginiaCluster.
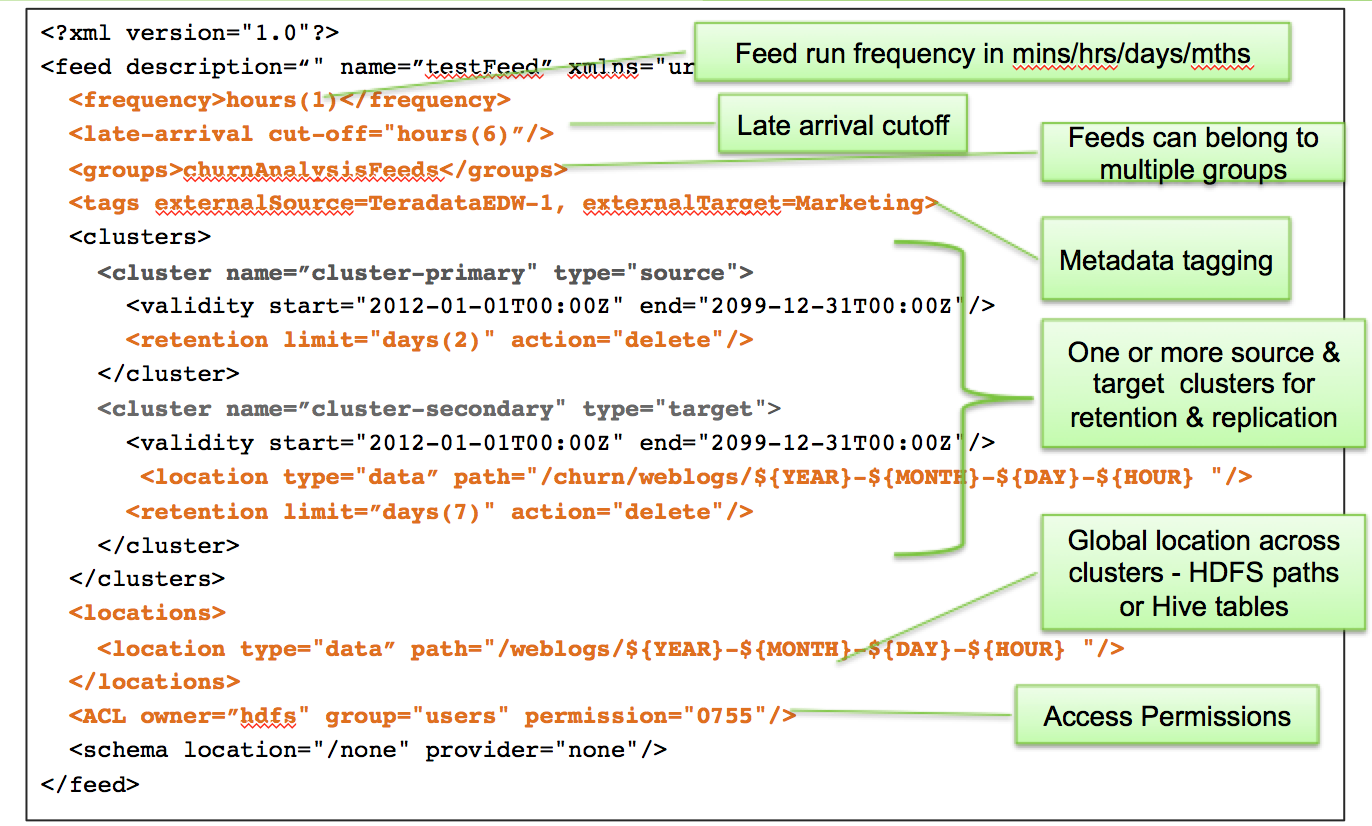
Feed Specification
A feed (a.k.a dataset) signifies a location of data and its associated replication policy and late arrival cut-off time.
See below for a sample feed (a.k.a dataset) specification file.
Back to our scenario, let’s submit the source of the raw email feed. This feed signifies the raw emails that are being downloaded into the Hadoop cluster. These emails will be used by the email cleansing process.
First we browse for the rawEmailFeed.xml by clicking on "Browse XML file".
Now let’s define the feed entity which will handle the end of the pipeline to store the cleansed email. This feed signifies the emails produced by the cleanse email process. It also takes care of replicating the cleansed email dataset to the backup cluster (virginia cluster)
Browse for the cleansedEmailFeed.xml
Type * in the search box and execute. You will see the two Feeds we added before.
Process
A process defines configuration for a workflow. A workflow is a directed acyclic graph(DAG) which defines the job for the workflow engine. A process definition defines the configurations required to run the workflow job. For example, process defines the frequency at which the workflow should run, the clusters on which the workflow should run, the inputs and outputs for the workflow, how the workflow failures should be handled, how the late inputs should be handled and so on.
Here is an example of what a process specification looks like:

Back to our scenario, let’s submit the ingest and the cleanse process respectively:
The ingest process is responsible for calling the Oozie workflow that downloads the raw emails from the web into the primary Hadoop cluster under the location specified in the rawEmailFeed.xml It also takes care of handling late data arrivals
Like before we browse fo the emailIngestProcess.xml
The cleanse process is responsible for calling the pig script that cleans the raw emails and produces the clean emails that are then replicated to the backup Hadoop cluster
For the last time we browse for another xml file, the cleanseEmailProcess.xml.
Type again * in the search box. Now you can see the processes as well.
So, all that is left now is to schedule the feeds and processes to get it going.
Ingest the feed
Mark the rawEmailFeed and the rawEmailIngestProcess and click on schedule.
Cleanse the emails
Now, mark the clensedEmailFeed and the cleanseEmailProcess and schedule it, too.
In a few seconds you should notice that that Falcon has started ingesting files from the internet and dumping them to new folders like below on HDFS:
hadoop fs -ls /user/ambari-qa/falcon/demo/primary/input/enron/2014-02-00
In a couple of minutes you should notice a new folder called processed under which the files processed through the data pipeline are being emitted:
hadoop fs -ls /user/ambari-qa/falcon/demo/primary/processed/enron/2014-02-00
We just created an end-to-end data pipeline to process data. The power of the Apache Falcon framework is its flexibility to work with pretty much any open source or proprietary data processing products out there.