Last active
July 16, 2021 06:56
-
-
Save yngkody/7fc1fb64698c1867d43bace17c9455bf to your computer and use it in GitHub Desktop.
A simple anime dating app - Curriculum Developer Writing Sample

- Downloading XCode
- Unboxing the application
- Navigating the IDE
- Toolbars and ribbons
- Tools and Shortcuts
- Project file organization
- Introduction to MVC
- Naming conventions
- What are Cocoa Pods?
- Firebase Terminal Installation
- Models and Firebase JSONs
- Creating the Views
- Creating the Controllers
- Connect Views to Controllers
- Create Users in Firebase
The concept of concurrency in general and in computing terms is quite simple: multiple tasks occurring simulataneously.
When a set of processes or methods is asynchronous it is said to be concurrent because two or more processes can occur at the same time independent of the other where synchronization implies dependence between two or more methods.
In mobile development, an example of concurrency is seen quite often on mobile apps that have multiple users interacting with each other. User A can send messages to Users B, C, and D without having to wait for either respective message to finish sending. Asynchrony allows programs to manage and complete tasks as they come in instead of waiting for them to finish sequentially (synchronously).

If we were coding in Swift, we would like to be able to asynchronously send messages between users in the example above. This means no matter the order or sequence the messages were sent (where the letters correspond to the order each message was sent in this example), we still want to be able to send and receive messages as they come. This describes asynchrony.
If we were to wait until User A’s message finished sending to User B in order to send User A’s messages to Users C and D, then this would lead to deadlock. Deadlock or bottleneck is the idea of methods being interdependent causing the whole program to come to a halt until the synchronous methods are completed. This, for obvious reasons, is not ideal for most programs.
- It handles operations or methods serially and saves on memory.
- It manages methods asynchronously discouraging deadlock.
- Improves overall program performance by handling methods synchronously.
- A waiter taking orders and bringing them out as they are completed.
- A tower waiting to send TV broadcast signal until an episode is done airing.
- A set of clients waiting in line for a haircut from a single barber.
Now that you have successfully written and read the users’ names, locations, and descriptions from the Firebase Database we created in the previous lesson, I will now show you how to retrieve more complicated data like URLs.
It is important to understand that when building mobile applications that handling front facing server-side data (i.e. profile pictures, videos, and gifs) that we represent that data in realtime to encourage and maintain user engagement.

Most end users in 2021 expect a fast and responsive UI/UX experience.
We can ensure the best user experience by creating responsive and fluid UI/UX's.
When downloading media (images, gifs, videos, location data) server side (Firebase, generic DB), we want to handle that data concurrently because we do not want to wait for a process to finish in order to update the UI with new information that the end user is waiting for.
-
In this lesson, we want to download images from Firebase Storage, but we don’t want the methods to be interrupted later on when we add to this project.
-
Google and Swift generously give us methods to create faster response times concurrently.
-
If this is your first time opening the project, you will need to complete a few steps first.
- Objectives
- Queues
- Grand Central Dispatch
- Completion handlers
- Async await
- Throwing errors
- Implement concurrent methods
- Error Handling
- Project management and file organization
- Understand concurrency
- Download images from Firebase
- Open Safari or Chrome and go to GitHub.
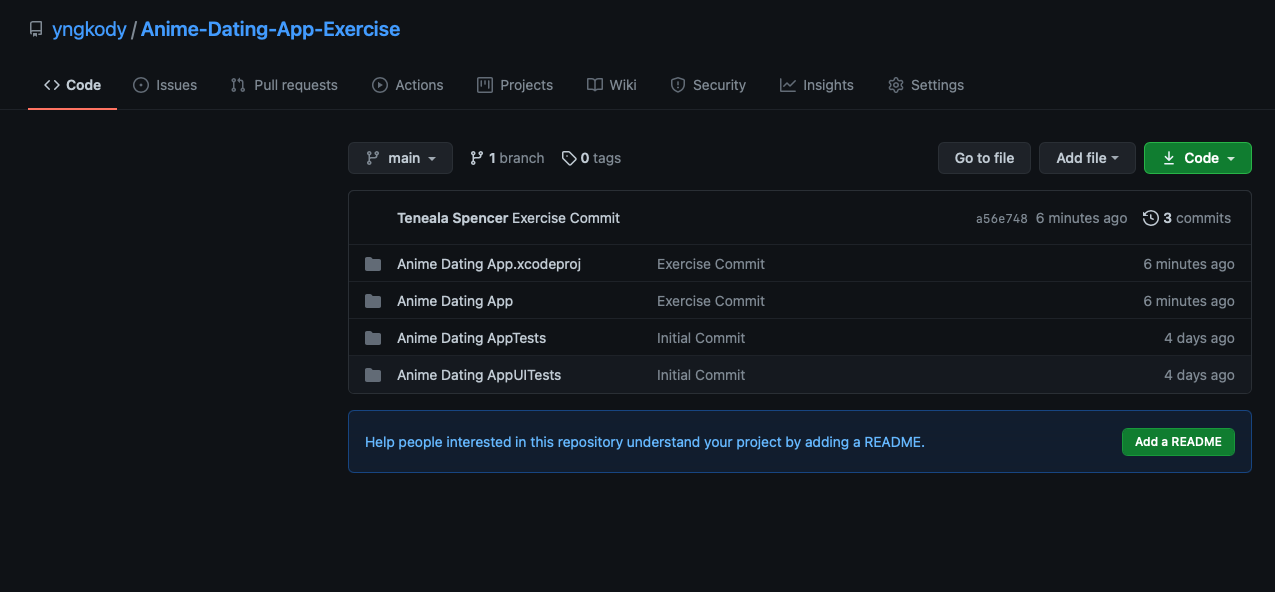
- Once you have successfully signed into GitHub, follow this link where you will find Lesson 9.
Following this link will take you to this view.
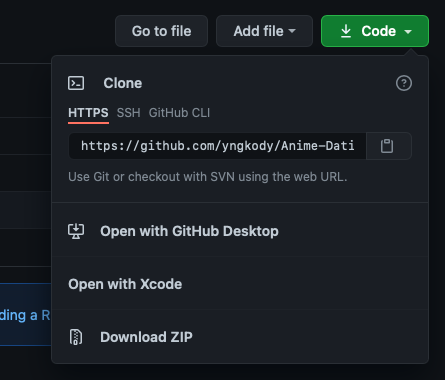
- Click on 'Code' and a drop down menu will appear.

- Select 'Open with XCode' I, personally, like this method of cloning repositories. It’s visual and direct.
- Once you’ve clicked 'Open with XCode', XCode should prompt you like such:
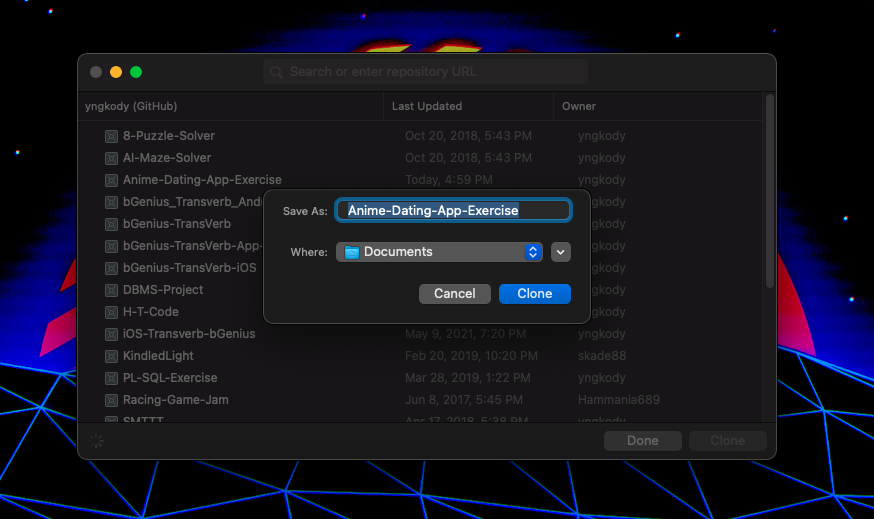
- Choose where you want to save the project. Click on 'Clone'.
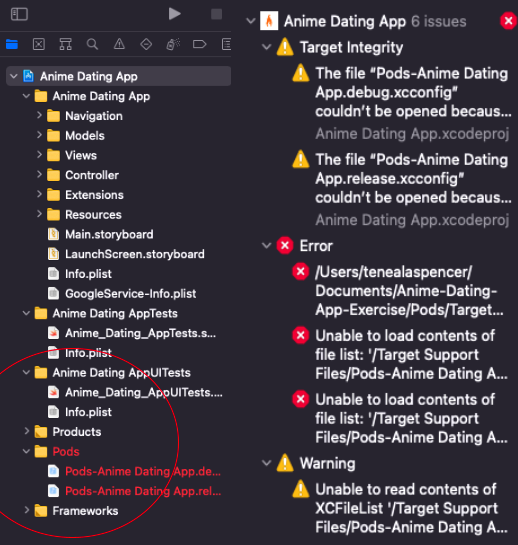
You’ll notice 3 errors appear in the project navigator. The issue is related to Pods. Pods are native and third-party libraries. We are technically working out of an XCode Project which is different from an XCode Workspace as explained in Lesson Four - CocoaPods. Please skip this part of the exercise if you have taken this lesson. If you don’t want to take the prerequisites, please feel free to follow along with the next part as I guide you through installing CocoaPods. Keep in mind that understanding their role and terminologies surrounding CocoaPods is an important step in becoming an iOS app developer.
-
Open MacOS Terminal
-
If your Terminal is not set to use bash, copy this command
chsh -s /bin/bash -
In the terminal, type
sudo gem install cocoapods -
Now, navigate to the folder where your project is stored. If you don’t know how, copy the following command line prompt into terminal according to your project file path
-
cd Documents/'Anime-Dating-App-Exercise'

-
Typing
pwdwill allow you to check if you’re in the right folder. -
Use the
pod initcommand to create the Podfile. -
Once that is finished, a podfile will be created.
-
Navigate to the project folder and open the Podfile.
-
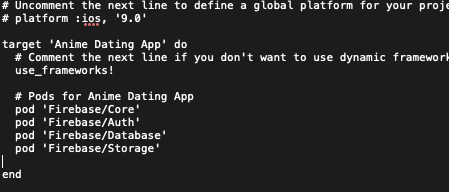
Inside of the podfile, write the following lines of code:
  pod 'Firebase/Core'
  pod 'Firebase/Auth'
  pod 'Firebase/Database'
  pod 'Firebase/Storage'
Once your done, your podfile should look like this:
- Now in the same Terminal window, type
pod install. This will install all the necessary Firebase pods for this course.

At the bottom of the Terminal window, you should see that the pods were successfully installed.
- Close the XCode Project and navigate to the XCode Workspace (Anime Dating App.xcworkspace)
-
Click in the project panel, navigate to the Controllers folder and select the Dating-Card-Controller underneath the project folder.
-
When writing code, we should consider that it could fail in the case that the data, or in our case image, doesn’t exist.
-
We can catch these cases by creating default values we know should exist.
-
I’ve created a default profile picture (pfp) inside of Firebase Storage. This URL cannot be altered by the end user whereas their pfp URL can be.
-
Copy and paste the following code into the
DatingCardController.swiftlet defaultPFP = "https://firebasestorage.googleapis.com/v0/b/anime-dating-app-sample.appspot.com/o/tumblr_c843e1050f9f2264a84c8240bd4a3fc5_3cc42568_1280.jpg?alt=media&token=0d443e5f-83e8-4cd5-a3a9-a46377131b2e"- Now we want to create a function that we will call:
func fetchUser() -> [User]-
This function will return an array of Users from our Firebase Database instance.
-
In order to access the Firebase Instance, we must create a reference to the instance.
let reference = Database.database().reference()- Next, we want to observe changes in our database. We want to use Firebase’s .childAdded here because it will alert the application that a change has occurred when a new user is added to the database.
reference.observe( .childAdded, with: { snapshot in- Next, we need to create a dictionary to prepare to receive the response from our server. In Swift, a dictionary is a data structure that stores key-value pairs as seen in JSONs.
if let dictionary = snapshot.value as? [String: AnyObject]{This allows us to safely declare and unwrap the value of the snapshot ( our JSON data ). We do not want to coerce or force unwrap dynamic data, or in our case user information from our server, because changes in data can cause this line to fail.
if let Now we need to create the user object which allow us to temporarily hold user information per key-value pair that comes in. In this case our key-values are defined by
String to AnyObject where
AnyObject allows the data we are casting to the dictionary to be read as a generic type.
let user = User()- We want to cast the values we inserted into our dictionary into the User model as well as append that data locally to our users array.
user.setValuesForKeys(dictionary)
self.users.append(user)- The following line allows us to access the application’s main queue in order to update the UICollectionView data source. We need to do this in a function that updates based on observed server side ( Firebase ) changes.
This event is triggered once for each existing child and then again every time a new child is added to the specified path. The listener is passed a snapshot containing the new child's data.
Imagine waiting to see the next user in the queue after hitting the like button because you are waiting for the application to complete whatever method that was before the change!
DispatchQueue.main.async {- This next line updates the UI to reflect the changes in the data in realtime.
self.collectionView?.reloadData()- The complete function is:
func fetchUser(){
        let reference = Database.database().reference()
        reference.observe( .childAdded, with: { snapshot in
            if let dictionary = snapshot.value as? [String: AnyObject]{
                let user = User()
                user.setValuesForKeys(dictionary)
                self.users.append(user)
                DispatchQueue.main.async {
                   self.collectionView?.reloadData()
                                 }
                        }
                })
}- Now we need to implement the method inside the UIViewController. Go to viewDidLoad in the Dating-Card-Controller and call the method.
override func view.DidLoad(){
        super.viewDidLoad
fetchUser()In mobile development, modularity is great for Unit Testing and Quality Assurance, but also project navigation.
I like to create modular code personally because it makes finding things in code easier for me. Like anything, too much modularity isn’t good, but that definitely doesn’t stop me from getting particular 😎.
-
Let’s start by navigating to the project’s Extensions folder and clicking the
Swift-Extensions.swiftfile. -
We are going to start by creating an UIImageView extension. I like to do this for the sake of brevity in code.
-
This object will be used to house the data we receive from our URL response.
let imageCache = NSCache<AnyObject, AnyObject>()- In the future, if you want to extend a class in Swift copy this line of code and replace the UIImageView class with your desired class.
extension UIImageView{-
After declaring our function name and parameters, we need to safely cast the native UIImageView.image to UIImageView.customImage.
-
In the line below, you’ll notice that we are saying that for the key inside of the UIImageView object, we want to display a custom image. The key is unique because it is the URL String.
if let cachedImage = imageCache.object(forKey: urlString as AnyObject) as?
  UIImage{
    self.image = cachedImage
    return
}- Next, we will safely unwrap the string and cast it into the Swift type URL.
if let url = URL(string: urlString){Then we will use Swift’s navitve URL function to unload the data, response, and any errors from the server. The data is the image data, the response is a code the server gives us to let us know what state it’s in, and the error is a built-in error handling method that will return to us in plain English why an issue occurred.
We want to do all of this inside of a completion handler. Swift has a very robust way of handling asynchronous operations that need to be handled synchronously.
Swift Firebase methods make calls to server side data asynchronously in code meaning it executes per the programs instructions and in no particular order.
So when we write the following code, we want to make sure that the response, data, and error have all been populated before trying to read them. Completion handlers are mad important to handling asynchronous information and methods because it tells the program "Hey bro, don’t execute this line of code until you've gotten everything you need from the server.” Which one might say, “Waitttttt, I thought we want asynchrony? I thought we were on async time?"
Which to I will reply, "The entirety of an application cannot be asynchronous as dependence within any mobile app should be expected."
The program has to wait for a server response in order to move forward. This is where completion handlers and synchronization come into play.
- Now that we are past that, copy the following code into:
loadImagesUsingCacheWithUrlStringURLSession.shared.dataTask(with: url , completionHandler: {( data, response, error) in
// is the data variable empty and is there an error?
if error != nil && data == nil{
print(error)
}In exercise one, we discussed the idea of new users being inserted into the database and how Firebase will observe that change. - Here, we want to access the main queue to to download the image from the server concurrently. Keep in mind that these images can be received in realtime because Firebase is a Realtime Database.
We don’t want our users waiting around for data. They’ll get irritated because they will think the app is moving slow when in reality it isn’t moving slowly, it’s moving synchronously 🤌.
- Safely unwrapping the data, we can finally assign a value to that key we created inside the UIImageView object earlier. Next, we’ll add contrast to the image so the username, description, and location appear in white more clearly.
DispatchQueue.main.async {
  if let downloadedImage = UIImage(data: data!){
    imageCache.setObject(downloadedImage, forKey: (urlString as AnyObject))
    self.image = self.addContrast(originalImage: UIImage(data: data!)!)
                        }
                    }
                }
            }).resume()
}- The entire function:
 func loadImagesUsingCacheWithUrlString(urlString: String){

        if let cachedImage = imageCache.object(forKey: urlString as AnyObject) as?

            UIImage{

            self.image = cachedImage

            return

        }

        if let url = URL(string: urlString){

            URLSession.shared.dataTask(with: url , completionHandler: {( data, response, error) in

                if error != nil && data == nil{
                    print(error)
                }

                else{
                    DispatchQueue.main.async {
                        if let downloadedImage = UIImage(data: data!){
                            imageCache.setObject(downloadedImage, forKey: (urlString as AnyObject))
                            self.image = self.addContrast(originalImage: UIImage(data: data!)!)
                        }
                    }
                }
            }).resume()
        }
}-
Now we need to implement this method so that that the image we just fetched reflects in the Dating-Card-Controller's UICollectionView.
-
Click on the
Dating-Card-Controller.swiftfile and navigate to thecellForItemAt method. Inside this method we are able to manipulate data inside of individual cells and sections. -
Here, we need to use the backend data that we fetched from Firebase inside of the
fetchUsermethod to reflect on the frontend (UICollectionView) asynchronously.
This process has to be asynchronous. Users want their frontend experience to be seamless and a system prone to deadlock isn’t great for mobile app development.
        cell.userLabel.text = user.username
        cell.locationLabel.text = user.location
        cell.descriptionLabel.text = user.pfDescription
cell.profileImageView.loadImagesUsingCacheWithUrlString(urlString: user.profilePictureURL ?? defaultPFP)- We are now able to update a single cell in our UICollectionView in realtime because of our asynchronous Firebase and Swift methods!
-
For this next exercise, we need to reflect changes in the UICollectionView when a user decides to dislike, like, or superlike another user. Here, I will demonstrate how to use native Swift client side methods to reflect changes in the UI asynchronously.
-
Inside of the
cellForItemAtfunction copy the following code which assigns a key-value pair to each button we want to interact with in order to keep track of which cell index we are interacting with or in this case the active cell. -
We want to add handlers to our buttons for this event which we created inside of a separate file called
Dating-Card-Controller Extensions.
        cell.dislikeButton.layer.setValue(indexPath.row, forKey: "index")
        cell.heartButton.layer.setValue(indexPath.row, forKey: "index")
        cell.superLikeButton.layer.setValue(indexPath.row, forKey: "index")
        cell.superLikeButton.addTarget(self, action: #selector(handleRemoveUser), for: .touchUpInside)
        cell.dislikeButton.addTarget(self, action: #selector(handleRemoveUser), for: .touchUpInside)
cell.heartButton.addTarget(self, action: #selector(handleRemoveUser), for: .touchUpInside)- Navigate to the file and add the following line. Here we are declaring the method.
@objc func handleRemoveUser(sender:UIButton) {-
In order to add methods to buttons programmatically, they have to be declared as
@objc funcper Apple’s requirements. -
We need to pass a button in as a parameter to this function so that we may access it’s cell index.
let i : Int = (sender.layer.value(forKey: "index")) as! Int- Next, we need to remove the user from the user array which we have access to because this is an extension of the
DatingCardControllerclass.
users.remove(at: i)- Now, we must assign an operation to each button we want to interact with on the client. Here we are declaring an image to take on the value of the sender’s image to determine which button in the cell was pressed.
let image = sender.currentBackgroundImage- Then we’ll perform a simple switch case statement changing the color of the collectionview depending on which button was pressed. The color change is just a simple visual way to alert the end user that they successfully pressed the right button.
        switch image {
        case UIImage(systemName: "x.circle"):
            collectionView.backgroundColor =  #colorLiteral(red: 1, green: 0.4658900501, blue: 0.4695877058, alpha: 1)
        case UIImage(systemName: "heart.circle"):
            collectionView.backgroundColor =  #colorLiteral(red: 0.5843137503, green: 0.8235294223, blue: 0.4196078479, alpha: 1)
        case UIImage(systemName: "star.circle"):
            collectionView.backgroundColor =  #colorLiteral(red: 0.5246224994, green: 0.6817301461, blue: 1, alpha: 1)
        default:
            print("default")
}-
We don’t want the collectionView to remain either color as they are to reflect temporary changes on the UI.
-
The following line allows us to dispatch the main queue asynchronously for 0.25 seconds.
DispatchQueue.main.asyncAfter(deadline: .now() + 0.25) { [self] in- Now we can reset the color of the collectionView back to its original color as well as refresh the it’s view to reflect the changes in its data source which is the user array. When we deleted the user out of the array, it will now be able to be visually reflected in the collectionView by using the following lines of code.
            self.collectionView.backgroundColor =  #colorLiteral(red: 0.8932988646, green: 0.9063715309, blue: 0.8802261983, alpha: 1)
            self.collectionView.performBatchUpdates({
                                let indexSet = IndexSet(integersIn: 0...0)
                                self.collectionView.reloadSections(indexSet)
}, completion: nil)- The complete function is as follows:
@objc func handleRemoveUser(sender:UIButton) {

        let i : Int = (sender.layer.value(forKey: "index")) as! Int
        users.remove(at: i)

        let image = sender.currentBackgroundImage

        switch image {
        case UIImage(systemName: "x.circle"):
            collectionView.backgroundColor =  #colorLiteral(red: 1, green: 0.4658900501, blue: 0.4695877058, alpha: 1)
        case UIImage(systemName: "heart.circle"):
            collectionView.backgroundColor =  #colorLiteral(red: 0.5843137503, green: 0.8235294223, blue: 0.4196078479, alpha: 1)
        case UIImage(systemName: "star.circle"):
            collectionView.backgroundColor =  #colorLiteral(red: 0.5246224994, green: 0.6817301461, blue: 1, alpha: 1)
        default:
            print("Enjoy your day!")
        }

        DispatchQueue.main.asyncAfter(deadline: .now() + 0.25) { [self] in
            self.collectionView.backgroundColor =  #colorLiteral(red: 0.8932988646, green: 0.9063715309, blue: 0.8802261983, alpha: 1)
            self.collectionView.performBatchUpdates({
                                let indexSet = IndexSet(integersIn: 0...0)
                                self.collectionView.reloadSections(indexSet)
                            }, completion: nil)
        }

        if users.isEmpty{
            collectionView.addSubview(emptyListLabel)
            emptyListLabel.centerXAnchor.constraint(equalTo: view.centerXAnchor).isActive = true
            emptyListLabel.centerYAnchor.constraint(equalTo: view.centerYAnchor).isActive = true
        }
    }
Now, you should be able to run the code and watch how the view is populated with all the data we pulled from Firebase asynchronously (concurrently)!
This file contains bidirectional Unicode text that may be interpreted or compiled differently than what appears below. To review, open the file in an editor that reveals hidden Unicode characters.
Learn more about bidirectional Unicode characters
| // | |
| // Dating-Card-Controller.swift | |
| // Anime Dating | |
| // | |
| // | |
| // | |
| import Foundation | |
| import UIKit | |
| import SpriteKit | |
| import GameplayKit | |
| import Firebase | |
| final class DatingCardController: UIViewController, UICollectionViewDelegate, UICollectionViewDataSource, UICollectionViewDelegateFlowLayout{ | |
| public static let shared = DatingCardController() | |
| var previousUser = User() | |
| let reuseIdentifier: String = "cellID" | |
| var users = [User]() | |
| var collectionView: UICollectionView! | |
| let defaultPFP = "https://firebasestorage.googleapis.com/v0/b/anime-dating-app-sample.appspot.com/o/tumblr_c843e1050f9f2264a84c8240bd4a3fc5_3cc42568_1280.jpg?alt=media&token=0d443e5f-83e8-4cd5-a3a9-a46377131b2e" | |
| lazy var emptyListLabel: UILabel = { | |
| let tv = UILabel() | |
| tv.text = "Match line empty..." | |
| tv.font = UIFont(name:"HelveticaNeue-BoldItalic",size:23) | |
| tv.textColor = UIColor.gray | |
| tv.translatesAutoresizingMaskIntoConstraints = false | |
| return tv | |
| }() | |
| func fetchUser() -> [User]{ | |
| let ref = Database.database().reference() | |
| ref.observe( .childAdded, with: { snapshot in | |
| if let dictionary = snapshot.value as? [String: AnyObject]{ | |
| let user = User() | |
| user.setValuesForKeys(dictionary) | |
| self.users.append(user) | |
| DispatchQueue.main.async { | |
| self.collectionView?.reloadData() | |
| } | |
| } | |
| }) | |
| return users | |
| } | |
| override func viewDidLoad() { | |
| users = fetchUser() | |
| navigationController?.navigationBar.isHidden = true | |
| let layout: UICollectionViewFlowLayout = UICollectionViewFlowLayout() | |
| layout.itemSize = CGSize(width: view.frame.width, height: view.frame.height - view.frame.height / 8) | |
| layout.sectionInset = UIEdgeInsets(top: 0, left: 0, bottom: 0, right: 0) | |
| layout.scrollDirection = .horizontal | |
| collectionView = UICollectionView(frame: self.view.frame, collectionViewLayout: layout) | |
| collectionView.register(DatingCardCell.self, forCellWithReuseIdentifier: reuseIdentifier) | |
| collectionView.dataSource = self | |
| collectionView.delegate = self | |
| collectionView.backgroundColor = #colorLiteral(red: 0.8932988646, green: 0.9063715309, blue: 0.8802261983, alpha: 1) | |
| collectionView.isScrollEnabled = false | |
| view.addSubview(collectionView) | |
| } | |
| func collectionView(_ collectionView: UICollectionView, cellForItemAt indexPath: IndexPath) -> UICollectionViewCell { | |
| let cell = collectionView.dequeueReusableCell(withReuseIdentifier: reuseIdentifier, for: indexPath) as! DatingCardCell | |
| let user = users[indexPath.row] | |
| cell.userLabel.text = user.username | |
| cell.locationLabel.text = user.location | |
| cell.descriptionLabel.text = user.pfDescription | |
| cell.profileImageView.loadImagesUsingCacheWithUrlString(urlString: user.profilePictureURL ?? defaultPFP) | |
| cell.dislikeButton.layer.setValue(indexPath.row, forKey: "index") | |
| cell.heartButton.layer.setValue(indexPath.row, forKey: "index") | |
| cell.superLikeButton.layer.setValue(indexPath.row, forKey: "index") | |
| cell.superLikeButton.addTarget(self, action: #selector(handleRemoveUser), for: .touchUpInside) | |
| cell.dislikeButton.addTarget(self, action: #selector(handleRemoveUser), for: .touchUpInside) | |
| cell.heartButton.addTarget(self, action: #selector(handleRemoveUser), for: .touchUpInside) | |
| return cell | |
| } | |
| func collectionView(_ collectionView: UICollectionView, didEndDisplaying cell: UICollectionViewCell, forItemAt indexPath: IndexPath) { | |
| let cell = collectionView.dequeueReusableCell(withReuseIdentifier: reuseIdentifier, for: indexPath) as! DatingCardCell | |
| cell.profileImageView.image = nil | |
| } | |
| func collectionView(_ collectionView: UICollectionView, numberOfItemsInSection section: Int) -> Int { | |
| return users.count | |
| } | |
| func collectionView(_ collectionView: UICollectionView, layout collectionViewLayout: UICollectionViewLayout, minimumLineSpacingForSectionAt section: Int) -> CGFloat{ | |
| return 5 | |
| } | |
| } |
This file contains bidirectional Unicode text that may be interpreted or compiled differently than what appears below. To review, open the file in an editor that reveals hidden Unicode characters.
Learn more about bidirectional Unicode characters
| // | |
| // Dating-Controller-Methods.swift | |
| // Anime Dating App | |
| // | |
| // | |
| // | |
| import Foundation | |
| import UIKit | |
| import Firebase | |
| extension DatingCardController{ | |
| @objc func handleRemoveUser(sender:UIButton) { | |
| let i : Int = (sender.layer.value(forKey: "index")) as! Int | |
| users.remove(at: i) | |
| let image = sender.currentBackgroundImage | |
| switch image { | |
| case UIImage(systemName: "x.circle"): | |
| collectionView.backgroundColor = #colorLiteral(red: 1, green: 0.4658900501, blue: 0.4695877058, alpha: 1) | |
| case UIImage(systemName: "heart.circle"): | |
| collectionView.backgroundColor = #colorLiteral(red: 0.5843137503, green: 0.8235294223, blue: 0.4196078479, alpha: 1) | |
| case UIImage(systemName: "star.circle"): | |
| collectionView.backgroundColor = #colorLiteral(red: 0.5246224994, green: 0.6817301461, blue: 1, alpha: 1) | |
| default: | |
| print("Enjoy your day!") | |
| } | |
| DispatchQueue.main.asyncAfter(deadline: .now() + 0.25) { [self] in | |
| self.collectionView.backgroundColor = #colorLiteral(red: 0.8932988646, green: 0.9063715309, blue: 0.8802261983, alpha: 1) | |
| self.collectionView.performBatchUpdates({ | |
| let indexSet = IndexSet(integersIn: 0...0) | |
| self.collectionView.reloadSections(indexSet) | |
| }, completion: nil) | |
| } | |
| if users.isEmpty{ | |
| collectionView.addSubview(emptyListLabel) | |
| emptyListLabel.centerXAnchor.constraint(equalTo: view.centerXAnchor).isActive = true | |
| emptyListLabel.centerYAnchor.constraint(equalTo: view.centerYAnchor).isActive = true | |
| } | |
| } | |
| } |
This file contains bidirectional Unicode text that may be interpreted or compiled differently than what appears below. To review, open the file in an editor that reveals hidden Unicode characters.
Learn more about bidirectional Unicode characters
| // | |
| // Swift-Extensions.swift | |
| // Anime Dating App | |
| // | |
| // Created by Teneala Spencer on 6/9/21. | |
| // | |
| import Foundation | |
| import UIKit | |
| let imageCache = NSCache<AnyObject, AnyObject>() | |
| extension UIImageView{ | |
| func loadImagesUsingCacheWithUrlString(urlString: String){ | |
| if let cachedImage = imageCache.object(forKey: urlString as AnyObject) as? | |
| UIImage{ | |
| self.image = cachedImage | |
| return | |
| } | |
| if let url = URL(string: urlString){ | |
| URLSession.shared.dataTask(with: url , completionHandler: {( data, response, error) in | |
| if error != nil && data == nil{ | |
| print(error) | |
| } | |
| else{ | |
| DispatchQueue.main.async { | |
| if let downloadedImage = UIImage(data: data!){ | |
| imageCache.setObject(downloadedImage, forKey: (urlString as AnyObject)) | |
| self.image = self.addContrast(originalImage: UIImage(data: data!)!) | |
| } | |
| } | |
| } | |
| }).resume() | |
| } | |
| } | |
| func addContrast(originalImage: UIImage) -> UIImage { | |
| guard let inputImage = CIImage(image: originalImage), | |
| let filter = CIFilter(name: "CIExposureAdjust") else { return originalImage} | |
| // The inputEV value on the CIFilter adjusts exposure (negative values darken, positive values brighten) | |
| filter.setValue(inputImage, forKey: "inputImage") | |
| filter.setValue(-1.5, forKey: "inputEV") | |
| // Break early if the filter was not a success (.outputImage is optional in Swift) | |
| guard let filteredImage = filter.outputImage else { return originalImage } | |
| let context = CIContext(options: nil) | |
| let outputImage = UIImage(cgImage: context.createCGImage(filteredImage, from: filteredImage.extent)!) | |
| return outputImage // use the filtered UIImage as required. | |
| } | |
| } |
I asked, "Dr. Khol, when would I ever use an application of multivariate calculus as it relates to finding volumes using 3 dimensional integrals?"
She went on to explain some pretty weird applications, but I remember looking at my calculus professor unsatisified with her answer.
I thought maybe this would be a great physics application, but most students that were in my class that day would probably never use multivariate calculus in their day to day programming position. ( I know how stereotypical to think nevertheless the truth )
I didn't care though. I liked math. I love math actually. That's really the only reason I remember that day. I was adamant about how I could use this beautiful math theorm to create. That was it. I just wanted to create, to make it applicable, and to make it tangible. I wanted to feel the math.
That's how I approach teaching for my tech startup, bGenius, and that's how I've always approached tutoring while in undergrad. It makes sense to me to give learners something they can show their friends. Yes, concurrency is very computationally scientific, but I don't believe the idea should be diluted in the science, but brought to light in the application.
Anime is a wave right now. It just is. Gen Z and young millenials brought into the main, main mainstream with social media. The tutorial would catch their eye, and cause a spike in user engagmenet because of the clout surrounding Anime. The more clicks, the more views, the more learners I am able to impact in a real tangible way. At the end of the day, a business is a business. I would love to impact numbers here as well because I believe in the ways that I teach, and I think I could make a difference.
I went to school for computer science not software engineering. Back in 2016 when I started teaching myself mobile dev, I knew nothing about it. I just knew how to program in a lot of different languages at the time. I really wanted to show people what coding could look like and be, and that I didn't learn a bunch of theorms and code to write automation scripts for the next 30 years.
Most of my professors were researchers at the time so I didn't have a mentor to teach me. I used YouTube and Stack Overflow to learn. I spent a lot of countless hours trying to become great. I wanna reduce my experience into minutes not hours.
I was still in school in '16 so in 2019, a year after I graduated, I felt confident enough to start my own company and teach my colleague from uni at the time how to make apps. In 2 years under my tenure as a supervisor (he had never made an app ever), he was able to grow into the developer he is today. Today, he works for Nike as an Android Engineer, and honestly that's a huge flex for both of us! Together, we were able to make Transverb iOS and Transverb Android ( to be updated ... )!
- Queues
- Grand Central Dispatch
- Completion handlers
- async await
- Throwing errors
These choices were the most obvious when dealing with server-side information. Honestly, I've worked with concurrency a lot inside of Transverb and these words are now embedded into my brain. I had to use XCode's Profiler just to get a better understanding of how to make my app faster through concurrency so the vibe for this assignment was honestly perfect.
I feel like the approaches are pretty similar with maybe my exercises not being so immediate. I feel like Codeacademy's concept teaching and exercise instruction is bit more entwined whereas my approach is concept first then practice.
Stating these differences doesn't take away from either approach. I emmulated the way you guys instruct exercises to explain my code.
Unlike aysnc methods, I am a very serial, quite literal person. I love lists and doing things in the order that makes the most sense to me though I'm not opposed to new ways!
In my mind, I see the forrest. Then, I identify the trees. I want to understand something conceptually, it's application, and then I create. So with Jazz music for example, I always study theory, scales, chords in the progression of that scale, songs in that scale, then after that I take the time to actually write a song. See, sequential 😅
In high school, I was voted Wittiest. My teachers liked my humor because they said it's never overt. I like adding small things in my lesson to make my learners smile. You can relax more when you're happy.
I already know I can be long winded. I like to give complete answers. I don't like to leave readers or listeners with assumptions, but sometimes it's a bit of overkill for me so please let me know if this lesson is too long or explanatory.
Do I present my ideas clearly. I'm bilingual (English first, Spanish second) so sometimes my sentence structure is a bit around the way as in unnecessary prepositional phrases due to the lack of apostrophes in Spanish.
I want to know if there are parts that just don't make sense objectively. I really hated learning certain computer science concepts because of how ill-explained they were to me in the beginning. Programming can be made easy with the right teacher. I swear.
Is it visually pleasing to look at? I will not take a tutorial if the font is ugly, colors are off, bulleting and spacing is weird, or if it looks like there's more text than instruction which brings me back to the point of brevity.
Is the information being presented in a consistent manner?
Honestly, am I low-key funny? Is my story telling good? "That doens't stop me from getting particular 😎 " is an example of a joke that I think is mad low key haha.
Did I make the right choice? Do you think users will find value in what I created? Do you guys like what I did? Would you ever use this project?
Sign up for free
to join this conversation on GitHub.
Already have an account?
Sign in to comment