-
-
Save HardenedArray/31915e3d73a4ae45adc0efa9ba458b07 to your computer and use it in GitHub Desktop.
| # OBJECTIVE: Install Arch Linux with encrypted root and swap filesystems and boot from UEFI. | |
| # Note this encrypted installation method, while perfectly correct and highly secure, CANNOT support encrypted /boot and | |
| # also CANNOT be subsequently converted to support an encrypted /boot!!! A CLEAN INSTALL will be required! | |
| # Therefore, if you want to have an encrypted /boot or will want an encrypted /boot system at some point in the future, | |
| # please ONLY follow my encrypted /boot installation guide, which lives here: | |
| https://gist.github.com/HardenedArray/ee3041c04165926fca02deca675effe1 | |
| # My encrypted /boot guide varies in several different, critically important, ways from the correct and secure encrypted | |
| # root / and swap installation process I have outlined below. | |
| # Note: This method supports both dedicated Arch installs and those who wish to install Arch on a multi-OS-UEFI booting system. | |
| # External USB HDD/SSD Installers Notes: Encrypted Arch installs can be booted and run from an external USB HDD or SSD, but | |
| # only when the installation is correctly set up. There are several necessary changes to my standard procedure you'll want | |
| # to make during the install process. Read my External USB HDD/SSD Installation section below before proceeding. | |
| # VirtualBox Installers Notes: This installation method can also be used to install Arch Linux as an UEFI-booting | |
| # Guest system in VirtualBox. You must have UEFI-booting enabled in VBox's Guest System Settings prior to installation. | |
| # I have written a separate guide dedicated to the specifics of achieving an encrypted Arch Linux VirtualBox installation. | |
| # My Arch Linux VirtualBox Guest installation guide is available at: | |
| https://gist.github.com/HardenedArray/d5b70681eca1d4e7cfb88df32cc4c7e6 | |
| # The official Arch installation guide contains details that you should refer to during this installation process. | |
| # That guide resides at: https://wiki.archlinux.org/index.php/Installation_Guide | |
| # Download the archlinux-*.iso image from https://www.archlinux.org/download/ and its GnuPG signature. | |
| # Use gpg --verify to ensure your archlinux-*.iso is exactly what the Arch developers intended. For example: | |
| $ gpg -v archlinux-2019.11.01-x86_64.iso.sig | |
| gpg: WARNING: no command supplied. Trying to guess what you mean ... | |
| gpg: assuming signed data in 'archlinux-2019.11.01-x86_64.iso' | |
| gpg: Signature made Fri Nov 1 16:34:35 2019 UTC | |
| gpg: using RSA key 4AA4767BBC9C4B1D18AE28B77F2D434B9741E8AC | |
| gpg: using pgp trust model | |
| gpg: Good signature from "Pierre Schmitz <pierre@archlinux.de>" [unknown] | |
| gpg: WARNING: This key is not certified with a trusted signature! | |
| gpg: There is no indication that the signature belongs to the owner. | |
| Primary key fingerprint: 4AA4 767B BC9C 4B1D 18AE 28B7 7F2D 434B 9741 E8AC | |
| gpg: binary signature, digest algorithm SHA256, key algorithm rsa2048 | |
| # Burn the archlinux-*.iso to a 1+ Gb USB stick. On linux, do something like: | |
| dd bs=4M if=archlinux-*.iso of=/dev/sdX status=progress oflag=sync | |
| # If running Windows, use Rufus to burn the archlinux-*.iso to your USB stick in DD mode. | |
| # Also, if you are running BitLocker to encrypt your Windows system, read my BitLocker notes below, before proceeding. | |
| # UEFI-Boot from your USB stick. If your USB stick fails to boot, ensure that Secure Boot is disabled in your UEFI configuration. | |
| # Set your keymap only if not you are not using the default English language. | |
| # It is typically wiser to be hard wired to the Net during installation. However, Arch supports WiFi-only installs. Also | |
| # note that in mid-2020 the Arch devs deprecrated the use of `wifi-menu`. The current installation images support `iwd`, | |
| # which provides `iwctl`. Carefully note that `iwd` will NOT be installed on your new system. If you will require WiFi | |
| # access following reboot, we install `iwd` in the pacstrap command and then enable it after we enter arch-chroot, below. | |
| # Connect to WiFi using: | |
| iwctl | |
| # then to connect to your WiFi station; do something like: | |
| station <wlan device name> connect <wifi-station-name tab-auto-complete> | |
| # then enter your wifi station's passphrase | |
| # It is possible to access this guide from within your Arch installation environment using the built-in elinks text browser. | |
| # For those interested, open a new terminal at tty2 using ctrl-alt-f2, then use elinks to search for 'HardenedArray Gists' | |
| # which should return the URL of my Arch installation guides: | |
| https://gist.github.com/HardenedArray/31915e3d73a4ae45adc0efa9ba458b07 | |
| # You can then return to your installation terminal using ctrl-alt-f1. | |
| # Create and size partitions appropriate to your goals using gdisk. | |
| # Carefully Note: Multi-OS booters who have an existing EFI partition on their drive should NOT create a new EFI partition. | |
| # Instead, we will append Arch as another OS to your existing EFI partition. See my Multi-OS-Booting Notes, below. | |
| gdisk /dev/sdX | |
| # Create the partitions you need: | |
| Partition X = 100 MiB EFI partition # Hex code EF00 | |
| Partition Y = 250 MiB Boot partition # Hex code 8300 | |
| Partition Z = Choose a reasonable size for your encrypted root and swap system partition, or just size it to the | |
| last sector of your drive. # Hex code 8300. | |
| # Review your partitions with 'p'. | |
| # Write your gdisk changes with 'w'. | |
| # Reboot, if necessary, so the kernel reads your new partition structure. | |
| , | |
| # I strongly recommend you zero-out each of of your new partitions prior to creating filesystems on them. Obviously, multi-OS | |
| # booters should NEVER zero-out an existing EFI partition. You can either use the Arch installer's ddrescue or, if you don't | |
| # mind not having a progress indicator, it's more efficient to run: | |
| cat /dev/zero > /dev/sdXY followed by | |
| cat /dev/zero > /dev/sdXZ | |
| # Create filesystems for /boot/efi and /boot | |
| mkfs.vfat -F 32 /dev/sdXX | |
| mkfs.ext2 /dev/sdXY # Note that ext4 or btrfs are also fine choices for your /boot partition. | |
| # Encrypt and open your system partition | |
| cryptsetup -c aes-xts-plain64 -h sha512 -s 512 --use-random luksFormat /dev/sdXZ | |
| cryptsetup luksOpen /dev/sdXZ 2016-Global-OpSec-Champion-LyingHillary # (or use any word or phrase you're fond of) | |
| # Create encrypted LVM partitions | |
| # These steps create a required root partition and an optional partition for swap. Note that using a swap file with BTRFS is | |
| # a very poor idea. Swap partitions are not controlled by BTRFS so they work fine. Read the BTRFS ArchWiki before proceeding. | |
| # Also note that BTRFS fully supports, detects, and properly configures settings for all modern SSDs, which is the drive type | |
| # almost everyone should be running when installing ArchLinux! HDDs are only useful for infrequently accessed data, and | |
| # for storing your SSD's critical directories as encrypted backups. | |
| # Modify this structure only if you need additional, separate partitions. The sizes used below are only suggestions. | |
| # The VG and LV labels 'Arch, root and swap' can be changed to anything memorable to you. Use your labels consistently, below! | |
| pvcreate /dev/mapper/2016-Global-OpSec-Champion-LyingHillary | |
| vgcreate Arch /dev/mapper/2016-Global-OpSec-Champion-LyingHillary | |
| lvcreate -L +512M Arch -n swap | |
| lvcreate -l +100%FREE Arch -n root | |
| # Create filesystems on your encrypted partitions | |
| mkswap /dev/mapper/Arch-swap | |
| mkfs.ext4 /dev/mapper/Arch-root | |
| # Note that Arch Linux fully supports btrfs, and btrfs is also an excellent filesystem choice for your encrypted root. | |
| # If you want a btrfs filesystem on your root logical volume, instead of 'mkfs.ext4 /dev/mapper/Arch-root', do this: | |
| mkfs.btrfs /dev/mapper/Arch-root | |
| # If you've created a btrfs root filesystem, do not forget to append 'btrfs-progs' to the pacstrap installation command | |
| # we use immediately after correctly mounting our partitions below. | |
| # Mount the new system | |
| mount /dev/mapper/Arch-root /mnt | |
| swapon /dev/mapper/Arch-swap | |
| mkdir /mnt/boot | |
| mount /dev/sdXY /mnt/boot | |
| mkdir /mnt/boot/efi | |
| mount /dev/sdXX /mnt/boot/efi | |
| # Optional - Edit the Mirrorlist To Optimize Package Download Speeds | |
| nano /etc/pacman.d/mirrorlist | |
| # Copy one or two mirrors near your physical location to the top of the mirrorlist. | |
| # Install your Arch system | |
| # If you read the contents of https://www.archlinux.org/ you would know the Arch developers made significant | |
| # changes to the 'base' package in October 2019. | |
| # The new base-metapackage does not contain a kernel nor an editor and several other important packages. | |
| # We will be addressing those issues in our pacstrap command below. | |
| # This installation command provides a decent set of basic system programs which will also support WiFi through | |
| # iwd's `iwctl` after initially booting into your Arch system. Having WiFi following installation is particularly | |
| # critical for anyone running a modern ultrabook, as most are equipped with WiFi-only access to the Net. Recommended, yet | |
| # optional: make and enjoy some fresh java while the following command completes. Once completed, you'll only | |
| # be a few minutes away from putting your new system to serious work! | |
| pacstrap /mnt base base-devel grub efibootmgr dialog wpa_supplicant linux linux-headers nano dhcpcd | |
| iwd lvm2 linux-firmware man-pages | |
| # Create and review FSTAB | |
| genfstab -U /mnt >> /mnt/etc/fstab # The -U option pulls in all the correct UUIDs for your mounted filesystems. | |
| cat /mnt/etc/fstab # Check your fstab carefully, and modify it, if required. | |
| # Enter the new system | |
| arch-chroot /mnt /bin/bash | |
| # Set the system clock | |
| ln -s /usr/share/zoneinfo/UTC /etc/localtime # This will harmlessly fail if your system's CMOS clock is already set to UTC. | |
| hwclock --systohc --utc | |
| # If you require WiFi access following reboot, enable iwd: | |
| systemctl enable iwd | |
| # Assign your hostname | |
| echo MyHostName > /etc/hostname | |
| # Set or update your locale | |
| # If English is your native language, you need to edit exactly two lines to correctly configure your locale language settings: | |
| a. In /etc/locale.gen **uncomment only**: en_US.UTF-8 UTF-8 | |
| b. In /etc/locale.conf, you should **only** have this line: LANG=en_US.UTF-8 | |
| # Now run: | |
| locale-gen | |
| # Set your root password | |
| passwd | |
| # Create a User, assign appropriate Group membership, and set a User password. 'Wheel' is just one important Group. | |
| useradd -m -G wheel -s /bin/bash MyUserName | |
| passwd MyUserName | |
| # Configure mkinitcpio with the correct HOOKS required for your initrd image | |
| nano /etc/mkinitcpio.conf | |
| # Use this HOOKS statement: | |
| HOOKS="base udev autodetect modconf block keymap encrypt lvm2 resume filesystems keyboard fsck" | |
| # Note that recent ArchLinux installation images have shipped with a new version of /etc/mkinitcpio.conf. The | |
| # only difference is that the new version uses '(' and ')' instead of dual double quotation marks: ' " " '. Therefore, | |
| # the current HOOKS statement should be: | |
| HOOKS=(base udev autodetect modconf block keymap encrypt lvm2 resume filesystems keyboard fsck) | |
| # You do not need or want 'resume' in your HOOKS statement if you are not using swap. | |
| # Generate your initrd image | |
| mkinitcpio -p linux | |
| # Install and Configure Grub-EFI | |
| # The correct way to install grub on an UEFI computer, irrespective of your use of a HDD or SSD, and whether you are | |
| # installing dedicated Arch, or multi-OS booting, is: | |
| grub-install --target=x86_64-efi --efi-directory=/boot/efi --bootloader-id=ArchLinux | |
| # Edit /etc/default/grub so it includes a statement like this: | |
| GRUB_CMDLINE_LINUX="cryptdevice=/dev/sdYZ:MyDevMapperMountpoint resume=/dev/mapper/MyVolGroupName-MyLVSwapName" | |
| # Maintaining consistency with the examples provided above, you would use something like: | |
| GRUB_CMDLINE_LINUX="cryptdevice=/dev/sdXZ:2016-Global-OpSec-Champion-LyingHillary resume=/dev/mapper/Arch-swap" | |
| # If you are not using swap, eliminate the 'resume' statement above. | |
| # I have also noticed that recent releases of grub2 now offer this new option within /etc/default/grub: | |
| # Uncomment to enable booting from LUKS encrypted devices | |
| # GRUB_ENABLE_CRYPTODISK=y | |
| # Note that you do NOT need to enable that cryptodisk statement to boot your LUKS encrypted / and swap ArchLinux system, | |
| # assuming you are **NOT** trying to decrypt an encrypted /boot. If you want to encrypt /boot, read my encrypted boot | |
| # installation guide, which requires an entirely different, and incompatiable, installation procedure. | |
| # Generate Your Final Grub Configuration: | |
| grub-mkconfig -o /boot/grub/grub.cfg | |
| # Exit Your New Arch System | |
| exit | |
| # Unmount all partitions | |
| umount -R /mnt | |
| swapoff -a | |
| # Reboot and Enjoy Your Encrypted Arch Linux System! | |
| reboot | |
| # After you are satisfied that your Arch system is running well, if you are like most people not running an Arch server, | |
| # you'll want a Desktop Environment so you can begin using your new system productively. See my: 'Installing a | |
| # Plasma-KDE Desktop Post Arch Install' section below for some ideas and an efficient DE installation process. | |
| __________________________ | |
| If you ever get dropped to the EFI Shell prompt when powering up Arch Linux, which I most often notice within | |
| VirtualBox when running Arch Linux as UEFI-enabled Guest System, do the following: | |
| At the Shell prompt, type the following entries, as indicated (also remember we used --bootloader-id=ArchLinux, above): | |
| Shell> fs0: | |
| fs0:> \EFI\ArchLinux\grubx64.efi | |
| Hit Enter and now you should see your graphical grub Arch Linux menu. Note my atypical use of backslashes. | |
| To prevent being dropped to the EFI Shell prompt in the future, enter your Arch Linux system, become root, and do: | |
| # nano /boot/efi/startup.nsh | |
| In your startup.nsh file, add these two lines: | |
| fs0: | |
| \EFI\ArchLinux\grubx64.efi | |
| Save and exit nano. To test that you will no longer be dropped to the EFI Shell prompt, poweroff, not reboot, and fire up | |
| your Arch Linux system again. | |
| If you simply cannot bear the agony of the EFI Shell's five second wait prior to its loading of startup.nsh, hit any key, | |
| except for 'esc', and you should be immediately directed to your (hopefully, beautifully configured) grub graphical | |
| Arch Linux boot screen. | |
| This solution also works when you have installed Arch Linux as an UEFI-enabled Guest system within VirtualBox. | |
| __________________________ | |
| External USB HDD/SSD Encrypted Arch Installation: | |
| Almost all of my standard Arch install procedure can be followed without modification when installing Arch to an external device. | |
| However, if you already have an encrypted Arch installation on a system HDD/SSD, you must ensure the names assigned to your | |
| PV, VG and LVs are different than whatever you used on your system drive's Arch installation. Failure to use different names | |
| will cause major udev and therefore, /dev/mapper, assignment problems for you, especially when you try to mount your | |
| multiple encrypted Arch drives! | |
| Additionally, we don't want to instruct grub to use standard device names as these are very likely to change when using an | |
| external USB drive. For example, our external SSD may be assigned /dev/sdc by udev during installation, but when we try to | |
| initially boot from it, udev may assign that external SSD to /dev/sdb, resulting in an unbootable system. | |
| The solution is to use PARTUUID, as opposed to a standard device name, in the cryptdevice statement in /etc/default/grub. | |
| Therefore, instead of using this example from above: | |
| GRUB_CMDLINE_LINUX="cryptdevice=/dev/sdXZ:2016-Global-OpSec-Champion-LyingHillary resume=/dev/mapper/Arch-swap" | |
| Run 'blkid' as root, and find the correct PARTUUID for your external device's encrypted partition. | |
| N.B.: PARTUUIDs are completely unrelated to UUIDs. | |
| Substitute the correct PARTUUID for the standard device name. You should end up with a statement that looks similar to this: | |
| GRUB_CMDLINE_LINUX="cryptdevice=PARTUUID=4d2aed94-92d4-7b5e-b8df-81d7554495cf4:ArchUSBSSD resume=/dev/mapper/ArchSSD-swap" | |
| Now regardless of the device name assigned by udev to your external drive, the kernel will be able to find the | |
| correct cryptdevice. | |
| All other parts of my installation procedure should be followed without modification. | |
| __________________________ | |
| Multi-OS-Booting Notes: | |
| I UEFI boot and run more than five operating systems from my SSD. | |
| All of my OSes UEFI boot from my single, 100 MiB, EFI partition. | |
| All of my OSes have encrypted root and swap, utilizing my SSD's native hardware-based AES-256-bit encryption support | |
| with BitLocker or Linux's software-based LUKS on LVM encryption to secure my data, when at rest. | |
| My Arch Linux install is just another encrypted Linux OS installation that happens to reside on my SSD. | |
| If you multi-boot, ensure you mount Arch's /boot/efi at your existing ESP partition. | |
| If you installed Windows 10 first, your EFI partition is likely to be /dev/sda2. | |
| In all cases, /boot, /boot/efi, and '/' partitions, at a minimum, are required to be mounted during Arch installation. | |
| As an example, an EFI-addicted, multi-OS booter might be doing something like: | |
| mount /dev/mapper/Arch-root /mnt | |
| swapon /dev/mapper/Arch-swap | |
| mkdir /mnt/boot | |
| mount /dev/sda17 /mnt/boot | |
| mkdir /mnt/boot/efi | |
| mount /dev/sda2 /mnt/boot/efi | |
| In this example, the user is likely to be using /dev/sda18 as the physical drive partition where their encrypted | |
| Arch root and swap filesystems will reside. Note the user's re-use of their existing EFI partition which resides | |
| at /dev/sda2. | |
| Adapt, as necessary, for your drive's partition structure. | |
| Following successful Arch system installation, the path to your Arch-EFI boot file should be: | |
| /boot/efi/EFI/ArchLinux/grubx64.efi | |
| When you are multi-OS booting correctly, you should have one directory per operating system, each residing at: | |
| /boot/efi/EFI/ | |
| __________________________ | |
| BitLocker Users on Windows Notes: | |
| If you are running hardware-based BitLocker encryption on Windows, I recommend you Turn Off BitLocker encryption prior to | |
| installing Arch, or any other operating system. | |
| As I don't use software-based BitLocker, I cannot say whether leaving it enabled during Arch installation will cause problems. | |
| Obviously, if you experience issues, you could turn BitLocker off temporarily. | |
| You can tell if you are using AES-256 bit hardware-based BitLocker encryption when you run from within PowerShell, | |
| as an Administrator: | |
| PS C:\WINDOWS\system32> manage-bde -status | |
| You see this line: | |
| Encryption Method: Hardware Encryption - 1.3.111.2.1619.0.1.2 | |
| Also note that hardware-based BitLocker can either encrypt, or decrypt, a multi-hundred GiB drive in less than 3 seconds. | |
| You can re-enable BitLocker after your new encrypted Arch system is UEFI booting correctly and running smoothly. | |
| __________________________ | |
| Installing a Plasma-KDE Desktop Post Arch Install | |
| After you have rebooted into your new Arch system, and are satisfied that every aspect of your system is running correctly, | |
| if you're like most people not running an Arch server, you will likely want to install a desktop so you can utilize your new | |
| Arch system productively. | |
| Your choice of desktop environment is entirely up to you. Personally, I have tried them all. It is my opinion that if | |
| you are running a modern, reasonably powered PC or laptop you are doing yourself a significant disservice by running any | |
| of the 'lightweight desktops.' I also think the Gnome DE is best suited for children, or unskilled users. Keep in mind | |
| that you can install multiple desktops, and then choose which one to fire up at each login, but that is beyond the scope | |
| of this guide. | |
| I prefer the Plasma5-KDE environment over all the others. If you would like to efficiently install a full Plasma5-KDE | |
| environment, do the following, in this order: | |
| # Log in as root, and not as a user | |
| # Fully update your Arch system: | |
| pacman -Syu # If a new kernel becomes available and is now installed, reboot, before proceeding. | |
| # If you don't have network connectivity in your Arch system, run: | |
| systemctl start dhcpcd <ethernet or wlan interface name> | |
| # Now that you have an updated system, do: | |
| pacman -S linux-headers | |
| pacman -S dkms # This will automatically rebuild your kernel modules as new upstream kernels are released. | |
| pacman -S xorg # This will install a mandatory X server. | |
| pacman -S xorg-apps | |
| reboot | |
| __________________________ | |
| # Log in as root, and not as a user, and do: | |
| pacman -S plasma-meta # This large package set will also provide us with sddm, the recommended Plasma5 login manager. | |
| systemctl enable sddm | |
| systemctl enable NetworkManager # After your next reboot you will have full, correct, networking support from boot. | |
| pacman -S kde-applications-meta | |
| pacman -S xdg-user-dirs | |
| # If you want full (US English) spelling support for all of your applications, do: | |
| pacman -S hunspell-en_US hyphen-en libmythes mythes-en aspell-en | |
| # Everyone has their own font preferences, but I agree with Arch's initial ttf-font recommendations because they look great!: | |
| pacman -S ttf-dejavu ttf-liberation | |
| reboot | |
| __________________________ | |
| # Log in to sddm's GUI as your user | |
| # Your first stop is System Settings. Tweak 'all the things' into full compliance with 'your way.' | |
| # Go ROCK your fully enabled Plasma DE, and your properly encrypted Arch Linux system!!! | |
| __________________________ |
Hi bmanturner,
It's obviously beyond the scope of this guide to troubleshoot individual use cases. That, of course, is the reason the forums exist.
However, I did take a very quick look at your setup, and I did not notice any glaring errors. I also noted that you have updated your reddit, and stated that your customization works.
That's obviously a good thing, and I am glad you found my guide useful as a framework to support your desired outcome.
If you believe your approach would be helpful to others in pursuit of a similar outcome, please consider creating your own Gist.
Thank you for your comments.
Cheers,
HardenedArray
Hey, i forgot to thank you for the earlier reply.
As stated, the warnings didn't show after the installation was complete. Thanks
Hi Xel,
Thank you for your polite follow-up and confirmation. Demonstrating proper etiquette never goes unnoticed, and is always appreciated.
In case you are interested, I've written a similar guide dedicated to the specifics of installing encrypted Arch within VirtualBox. That procedure also demonstrates how to properly install a fully enabled Plasma5/KDE system on top of Arch in VBox.
My encrypted Arch Guest VBox installation guide resides at:
https://gist.github.com/HardenedArray/d5b70681eca1d4e7cfb88df32cc4c7e6
If you follow my Arch Guest VBox installation procedure, you will find the lvmetad warning also occurs within the VBox Arch installation environment after running grub-mkconfig. As we also observe on Arch bare metal installs, the lvmetad warning only appears during initial base system installation. This fact adds more evidence to my belief that this warning is solely driven by the arch-chroot environment we use during initial base system installation.
As a final thought which applies to a much wider audience than just you, Xel, if you keep your important data continuously backed up, and encrypted, to at least two physically separate locations, and practice installing Arch Linux (VBox is ideal for this), you'll be much better prepared than most to quickly and seamlessly recover your entire computing life when some type of data-threatening disaster inevitably strikes.
There are only two types of hard drives in this world: those that have failed, and those that have not, yet. Another way to think about the same quite common problem of people ranting about unexpectedly and instantly losing access to most, or all, of their digital lives:
Be prepared, or be prepared to get hurt very badly!
Cheers and best of luck Xel,
HardenedArray
Hi HardenedArray
Thank you very much indeed for this superb document. I was able to get my Dell Precision M7510 dual booting successfully on the first attempt based on the instructions here. My only deviation from the above was to use LUKS on LVM so that I could use both NVME and SSD disks in one volume. A massive time saver!
Many thanks for the guide.
Big help getting me up on an old Thinkpad.
Hi oldlance and manadart,
I am pleased to learn that each of you found my guide useful. I've personally used both old ThinkPad and Dell laptops for years and I hope each of your machines deliver the same wonderful user experiences I was able to enjoy.
Cheers,
HardenedArray
Hi Xel,
This follow-up is for you and others interested in understanding the lvmetad warning discussed above.
I was able to track down the definitive cause behind the lvmetad warning we only see within our chrooted Arch installation environment.
This lvmetad warning is generated solely due to the fact that /run is not available in a chroot environment. Obviously /run again becomes available once we exit chroot and boot into Arch. This explains why we never see the lvmetad warning when running our operating system normally and subsequently updating our Grub2 configuration.
This issue is documented within the ArchWiki covering Grub, which can be directly accessed here:
https://wiki.archlinux.org/index.php/GRUB#Warning_when_installing_in_chroot
Thanks again Xel for initiating the discussion of this topic.
Cheers,
HardenedArray
Great gist.
I would add a step before the pacstrap that check and modifies /etc/pacman.d/mirrorlist. As of right now the first entry on the list is for a server in Poland and that may not be desirable for most of the world.
Hi tjcim,
Thank you for your compliment!
Personally, I have never experienced an issue with unacceptably slow pacstrap download speeds. Of course, package download speeds vary widely between individuals, and are dependent on a large number of factors.
That being said, it makes sense for every Arch installer and user to employ a pacman mirrorlist file optimized for their location.
Therefore, I have added a step entitled 'Optional - Edit the Mirrorlist To Optimize Package Download Speeds' prior to running the pacstrap download and installation command.
Thank you for your feedback tjcim.
Cheers,
HardenedArray
This is brilliant. Thank you for taking the time and posting. Not only did this work, I was able to use this in combination with the official Arch install documentation and save a bunch of time learning how to do the install. Thanks again!
Hi wildersan72,
Thank you for your kind feedback. Your reaction to my guide precisely matches my original intention during composition.
Cheers,
HardenedArray
Hi, HardenedArray.
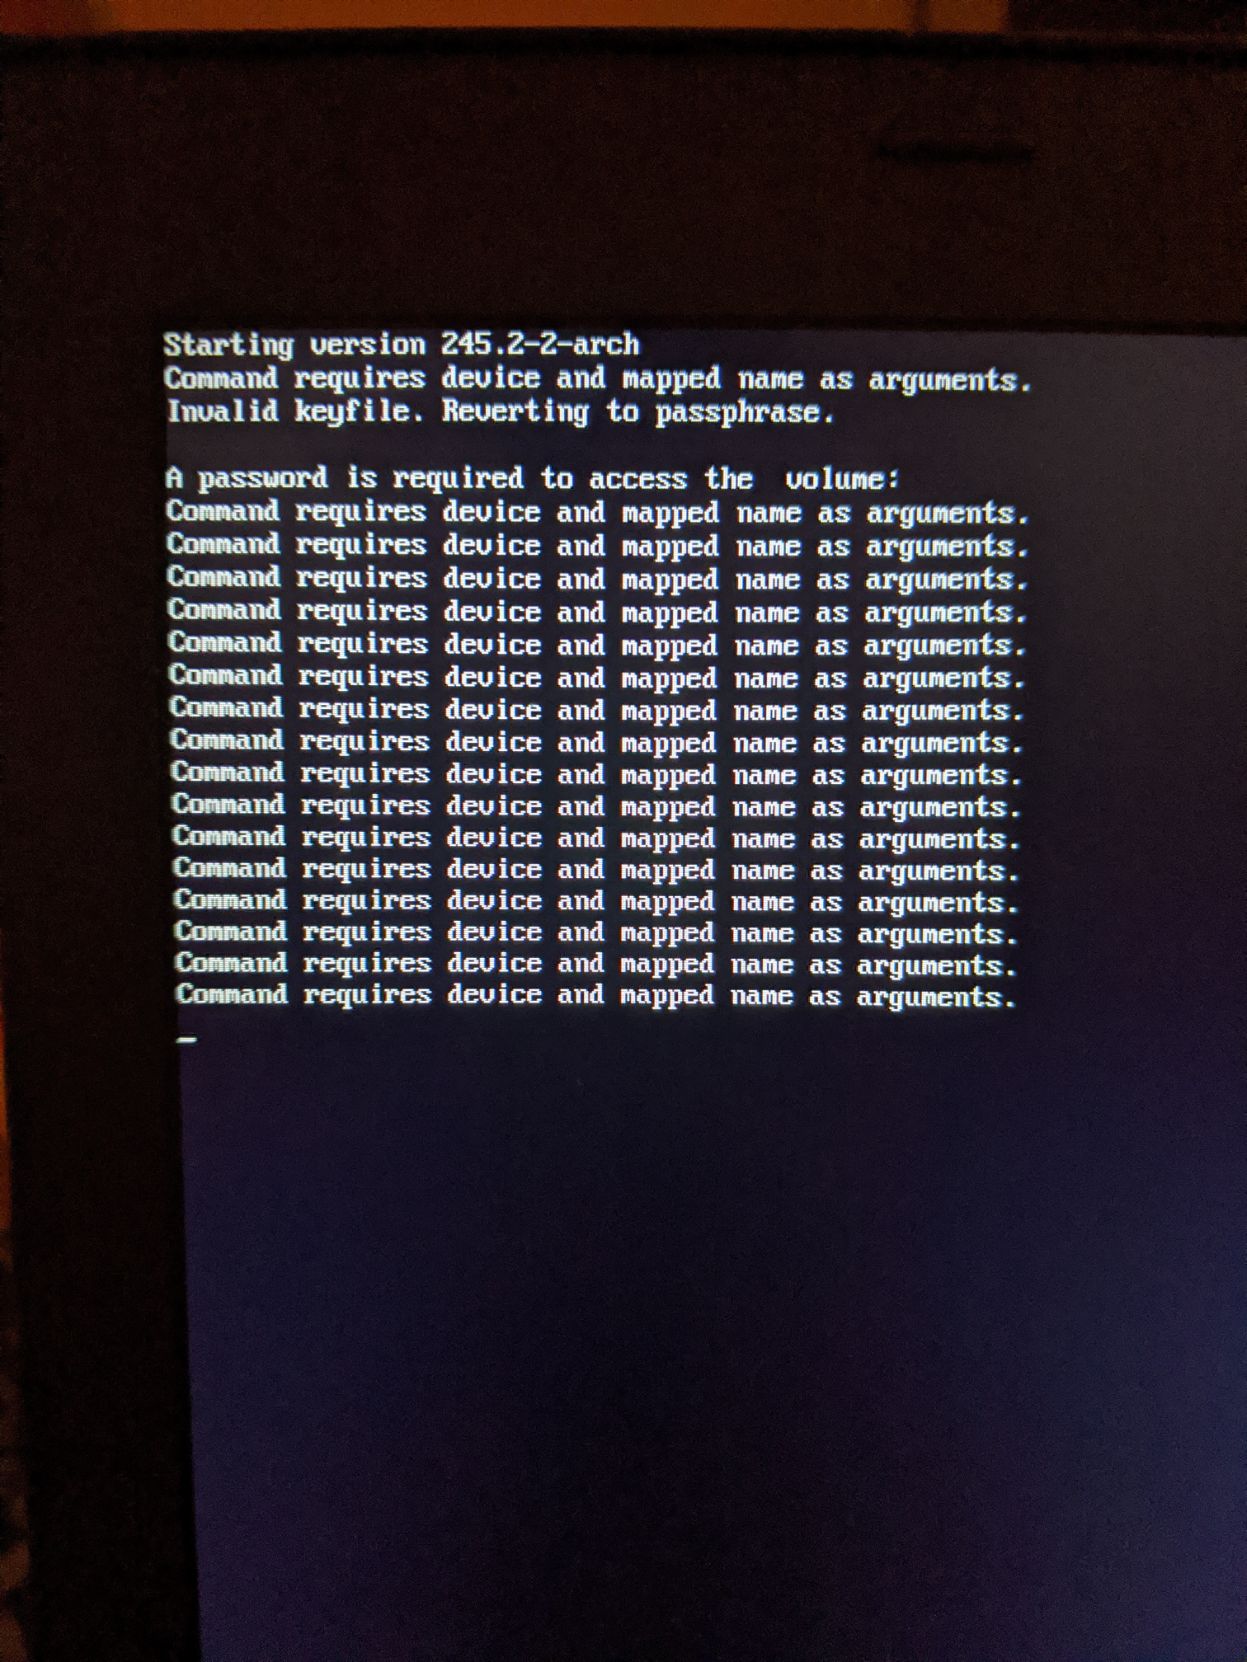
After I enter the command cryptsetup luksOpen /dev/sda3 tsundoku, /dev/mapper/tsundoku does not become available.
ls /dev/mapper lists /dev/mapper/control alone, and not also /dev/mapper/tsundoku as I would expect.
The following error message appears upon cryptsetup luksOpen /dev/sda3 tsundoku --verbose --debug:
"Trying to read ... LUKS2 header at offset .... LUKS header read failed (-22). Command failed with code -1 (wrong or missing parameters)."
I've tried to research the matter online, but so far, my google-fu has proven unsuccessful.
Would you perhaps have any suggestions so that I might continue following your guide where I left off?
Thanks much.
If you're gonna do an ecrypted installation, don't you want to encrypt as much as possible? So, why a separate partition for /boot? You already created an ESP partition, so it might be a good decision to keep /boot (where kernel images, initramfs images (maybe with embedded encryption keys), grub settings reside) on encrypted LVM, and mount your ESP into /boot/efi.
Hi soraismus,
As I mentioned earlier, it is beyond the scope of this guide to provide individual user support. However, the cryptsetup commands I've published above are correct, and do work properly when followed with precision.
Since it seems you got stuck at the beginning of the process, I would suggest re-creating a complete set of new partitions, rebooting if advised to do so. then zero-out each new partition and finally use cryptsetup to encrypt your intended system partition.
Best of luck,
HardenedArray
Hi Progman-DT,
Thank you for your input concerning also achieving an encrypted /boot during installation.
While I continue to believe there is not a whole lot of 'actionable intelligence' a sophisticated attacker could gain by perusing the contents of an unencrypted /boot, for those users who face intense, invasive, potential security threats, adding an additional layer of security does make sense.
I spent quite a few hours with a Senior Arch Developer discussing the entire gamut of issues involved with encrypted /boot.
Following these discussions, and after testing on both Arch VMs and production rigs, we know this encrypted /boot procedure works.
Therefore, I have included an optional sub-procedure in all my Arch installation guides to address the needs of those who desire to have the additional layer of security provided by correctly configuring and installing an encrypted /boot.
Cheers,
HardenedArray
Hi HardenedArray,
First of all, I'd like to extend my appreciation for this guide. Really!
I have Arch as the single OS and this time around went the extra mile and tried to encrypt /boot, as per your guide.
However, after inserting my LUKS password, an error is thrown:
[FAILED] Failed to start Cryptography Setup for EncryptedBOOT.
The system still boots successfully, though.
Using systemctl status for the systemd-cryptosetup service, I'm presented with the following:
arch systemd[1]: Starting Cryptography Setup for encryptedBOOT..,
arch systemd-cryptsetup[546]: Failed to load LUKS superblock on device /dev/disk/by-uuid/**MY-BOOT-UUID**: Invalid argument
arch systemd[1]: systemd-cryptsetup@encryptedBOOT.service: Main process exited, code=exited, status=1/FAILURE
arch systemd[1]: systemd-cryptsetup@encryptedBOOT.service: Failed with result 'exit-code'.
arch systemd[1]: Failed to start Cryptography Setup for encryptedBOOT
ls - l /dev/disk/by-uuid/MY-BOOT-UUID returns my boot partition successfully.
It looks like I'm missing something, but still haven't figured out what.
Thanks a lot in advance
Update: It seems that the LUKS partitions are being setup without the passphrase. Any password/empty will allow me to boot. I've gone the steps quite a few times and so far haven't figured out what went wrong.
Hi exah-io,
Thank you very much for your kind words and important feedback!
Yes, I saw the exact same error set you pasted above. It took me many hours of deep dives into many Archwikis to figure out why the /boot encryption was failing. The senior Arch dev I had been working with on support for encrypted /boot has largely disappeared of late, so finding the solution was all on me!
It turns out there are two major issues occurring, and they involve Grub and how we use LUKS to encrypt our root /, swap and /boot filesystems.
I have come to learn that Grub ONLY supports decrypting an encrypted /boot if the root / filesystem is initially encrypted using LUKS Type 1 encryption, whereas the default encryption used by LUKS is Type 2, which IS EXACTLY why both of our encrypted /boots failed to properly encrypt or decrypt /boot.
So others are not led astray, I have removed the Optional Encrypted /Boot section from all of my guides. As you can also see, I have changed the opening paragraphs of this guide, above.
I have created a new dedicated encrypted /boot installation guide, which I now have working properly on two laptops.
That new, and correct, encrypted /boot installation guide lives here:
https://gist.github.com/HardenedArray/ee3041c04165926fca02deca675effe1
I have also warned installers, above, that it is NOT POSSIBLE to convert an existing system with encrypted root / and swap into an encrypted /boot system!!
Sorry to tell you this, exah-io, but that statement also applies to you!! A clean install will be necessary if you want a properly working encrypted /boot system!
As always, NEVER INSTALL ARCH on a production rig without first VERIFYING you have clean, compressed. encrypted, and RESTORABLE backups, PRIOR TO PROCEEDING!!! I ONLY use duplicity from my terminal to ensure my backups are done correctly.
To me, a correct backup MUST BE compressed, encrypted and restorable!! Read all of the excellent examples in man duplicity. I highly recommend you immediately deploy duplicity for all your backup needs!
If you don't have time for a clean install at the moment, let me at least show you how to get back to a secure encrypted / and swap system:
Become root, then:
nano /etc/mkinitcpio.conf
Comment out your FILES statement and save it, then:
rm /crypto_keyfile.bin
rm /etc/crypttab
mkinitcpio -P linux
Now, re-run grub:
grub-mkconfig -o /boot/grub/grub.cfg
reboot
And you will back to booting from a secure encrypted / and swap system.
Feel free to leave me additional feedback either here, or under the Comments for my new encrypted /boot guide!
Cheers,
HardenedArray
Thank you very much for this tutorial!
Would you be able to help me install/configure systemd-boot instead of Grub?
Thanks,
ssean
Hi ssean,
Please accept my apologies for the delay in my reply.
You are quite welcome for the tutorial and I am glad it helped you.
I am sorry ssean, but I cannot do individual support via GitHub.
For any ArchLinux support you need, please join our very active support forum on Freenode at the '#archlinux' channel.
Cheers,
HardenedArray
Dear HardenedArray,
First, I would like to say thank you for this wonderful guide. Using it, I managed to go from having zero knowledge of Arch to complete installations on two computers.
I wonder, is there a chance you could put this resource on the Arch wiki, or at least a link to it? An encrypted installation should be the default these days, but the instructions there regarding encryption are not very beginner friendly.
In any case, during those installations, I came across the following points, which you might consider including in the guide if you find them to be of wide enough interest. I include them as comments here in case they can help anyone else.
-
Regarding installing the bootloader on removable media, there are two things I would like to point out. First, it might be good to use the
--removableflag withgrub-installto avoid creating an entry on the host system's NVRAM. (I first tried this installation procedure on an external SSD via personal laptop as an experiment, hoping that installing to an external drive would avoid writing anything to my laptop and hence the possibility of data loss or corruption. I was quite surprised when I found I wrote something to it anyway.) Second, perhaps a note about booting from external media on Macs would be appropriate. A small modification of the usual procedure is required; this is covered in detail in the Arch wiki. -
Regarding setting the time, it might be good to explain how to set timezones other than UTC. Further, after I followed these instructions, my clock was not synchronized with an external reference clock. Perhaps adding
timedatectl set-ntp trueto the instructions would fix this. -
On my second installation, I couldn't install grub and got the error message
EFI variables are not supported on this system. The fix for this is to make sure you are booting in UEFI mode, not legacy mode. I think this requires disabling the legacy compatibility mode in the BIOS. On ASRock motherboards, this means disabling the "CSM" option; this is what worked for me. -
As you note, the rankmirrors scripts takes quite a long time. Further, with only 6 mirrors, I eventually reached a point where they were all not accessible and pacman wouldn't download anything. I found it more convenient to use the
reflectorpackage as described in the wiki. You can use it search to search and rank all mirrors in your home country (and surrounding ones, if need be). This goes more quickly and provides more mirrors for reliability.
Best wishes, and thanks again.
One more note: it may be good to include a step where the LUKS header and LVM configs are backed up. As the system is currently set up by this guide, corruption of either of these will render it unusable.
There is a guide here, which suggests putting this information on the boot partition.
Hi horus-dot,
I am pleased to learn you found my guide useful for installing encrypted Arch on two computers.
Thank you for your feedback and suggestions.
Regarding appending a link to my guides on the official Arch Linux Installation wiki, I am in frequent contact with Senior Arch developers, and I know they are highly protective of their Installation wiki. They refuse to offer support to any installation process other than their own. Therefore, adding a link to my guides is not feasible, and in my view, unnecessary.
Regarding your other points:
-
This guide has long included a sub-section entitled: External USB HDD/SSD Encrypted Arch Installation which covers your query.
-
People are free to set any timezone they want during the install. Like every step in this guide, people are installing their own customized version of Arch Linux, not necessarily mine.
-
The very first line of this guide states: OBJECTIVE: Install Arch Linux with encrypted root and swap filesystems and boot from UEFI. If that was not clear enough, a few more lines down, I state: UEFI-Boot from your USB stick. If your USB stick fails to boot, ensure that Secure Boot is disabled in your UEFI configuration.
-
I agree that rankmirrors has outlived its usefulness, particularly as more folks now access the Net via fiber optic connections. I have removed all references to rankmirrors from my guides. I have for a long time told folks: Optional - Edit the Mirrorlist To Optimize Package Download Speeds before the pacstrap step. I think that editing your mirrorlist is sufficient to ensure fast mirrors are used.
On your final point, post-installation maintenance activities such as backing up luks headers are beyond the scope of my guides. Interested folks should read: man cryptsetup.
Thanks again for your feedback.
Cheers,
HardenedArray
I have no idea what is going on! I installed on a usb, and followed those instructions. I also followed the directions for the cryptfile
UPDATED : I managed to fix the problem! when I put my PartUUID in I didn't put the name at the end! ex- DopeSetup
Hi rjahrj,
This guide has long included a section entitled: External USB HDD/SSD Encrypted Arch Installation.
The partuuid instructions, and the example provided in that section are both correct.
Glad to learn you fixed the problem.
Cheers,
HardenedArray
Can u also guide on using other bootloaders than grub?
I only boot with grub because of its superb encryption and multi-OS booting support. I have ZERO desire to change a very important tool that I know works flawlessly!
Cheers,
HardenedArray
Hi Array.
Ive made one instalation following this steps. If I want to multi boot now, should i use same boot and boot/efi or a diffrent boot for this new instalation? Should i install grub or just config grub whit this new instalation?
Hi Array,
Guide's working flawless, but I ran into a regular "real world problem". When my laptop is off, and I somehow unluckily hit the power button, or if my children, somehow without me seeing it, lifts the lid and closes it -> the laptop will turn on (ofc), and wait for password to be entered to decrypt the boot folder. There is no timeout , so the laptop will be on until the battery is drained and if it's in the bag it will get warm :)
Yes, real life problem ;)
Is there any way to add a timeout to the password prompt?
Snapshot is added.

i think that using sedutil is better approach
You're obviously very knowledgable about this, HardenedArray. Would you mind taking a quick glance at the following configuration? It is based partially on your work above, which was a great help.
https://www.reddit.com/r/archlinux/comments/64ynyh/can_i_get_someone_to_glance_this_over_raid1/