Heads up:
- Dual boot FreeBSD 13.0 RELEASE and Windows 10 was tested in a VirtualBox virtual Machine (VM).
- Only works with legacy BIOS boot and MBR partition scheme.
- UEFI boot and/or GPT partition scheme not tested.
2021-09-25 Jackie
Modified from an answer by Trond Endrestøl in the freebsd-questions mail list: Dualboot and ZFS, answer post 13
- Dual boot FreeBSD and Windows on a single hard disk;
- Legacy BIOS boot and MBR partition scheme;
- FreeBSD in a slice with a swap partition and a RootOnZFS filesystem.
Download DISC or DVD iso file from freebsd.org, FreeBSD-13.0-RELEASE-amd64-disc1.iso for example. Burn it into CD/DVD/flash driver if you intend to install on real hardware. If you plan to try out with a VM, simply iso files are fine. If you're sure Internet is accessible during install, bootonly.iso or memstick.img can also be used as installation media. Below I'll cover only a VM case with DISC or DVD iso as installation media.
Create a new VM with one hard disk and our FreeBSD-13.0-RELEASE-amd64-disc1.iso file as CD. Here I create a new 24G hard disk for it. Start the machine and choose CD-rom as boot media. In VirtualBox, press F12 at boot and you'll be able to choose which boot media to use. After that, FreeBSD will start to boot , choose Boot Multiuser Mode or just press Enter to continue. Choose Live CD mode when a window prompts asking to go Install, Shell or Live CD. At the login prompt, type root and Enter and we're in as root user now.
This is optional but I'll leave it here as a memo: I prefer to set up sshd service and connect to the machine over ssh so copy-paste commands are convenient.
# first start network service, interface name from output of ifconfig command
dhclient le0

# set up sshd in LiveCD mode requires to change `sshd` config file
# so we first have to mount /etc at /tmp/etc because the LiveCD mode was
# mounted read-only and config files were thus read-only

mkdir /tmp/etc
mount_unionfs /tmp/etc /etc
echo "PermitRootLogin yes" >> /etc/ssh/sshd_config
service sshd onestart

# now set password for root so we can login from ssh connect
passwd root
Now regrardless of you're in ssh session or still in VBox, follow the steps below.
Since it's a new VM with a newly created hard disk (We'll assume it's ada0, check with gpart list or camcontrol devlist), We'll run
gpart destroy -F ada0
gpart create -s mbr ada0
first to create MBR partition scheme on the disk.
CAUTION: THIS ERASES ALL EXISTING DATA ON THE DISK!
change the command line prompt for better visual(optional)
set prompt="(%l)[%{\033[36m%}`whoami`@%{\033[1;30m%}%m:%{\033[0;32m%}%~%{\033[0m%}]%# "At any time we can check disk partition layout gpart show -p ada0. For the purpose of installing FreeBSD in a MBR slice and testing dual boot Windows. We first create two NTFS partitions (slices).
gpart add -t ntfs -s 1G ada0
gpart add -t ntfs -s 2G ada0
If you're to install Windows and dual boot FreeBSD. Now it's the time to install Windows in ada0s1 or ada0s2. We'll skip it here and pretend Windows is installed in one of the two partiotions and we'd like to keep them the way they're now.
All the left space on the disk are allocated to a BSD slice:
gpart add -t freebsd ada0
gpart show ada0
In this single slice, we'll create two partitions, one for swap and one for ZFS filesystem.
( assuming the partition (or slice) to install BSD is ada0s3 here)
gpart create -s BSD ada0s3
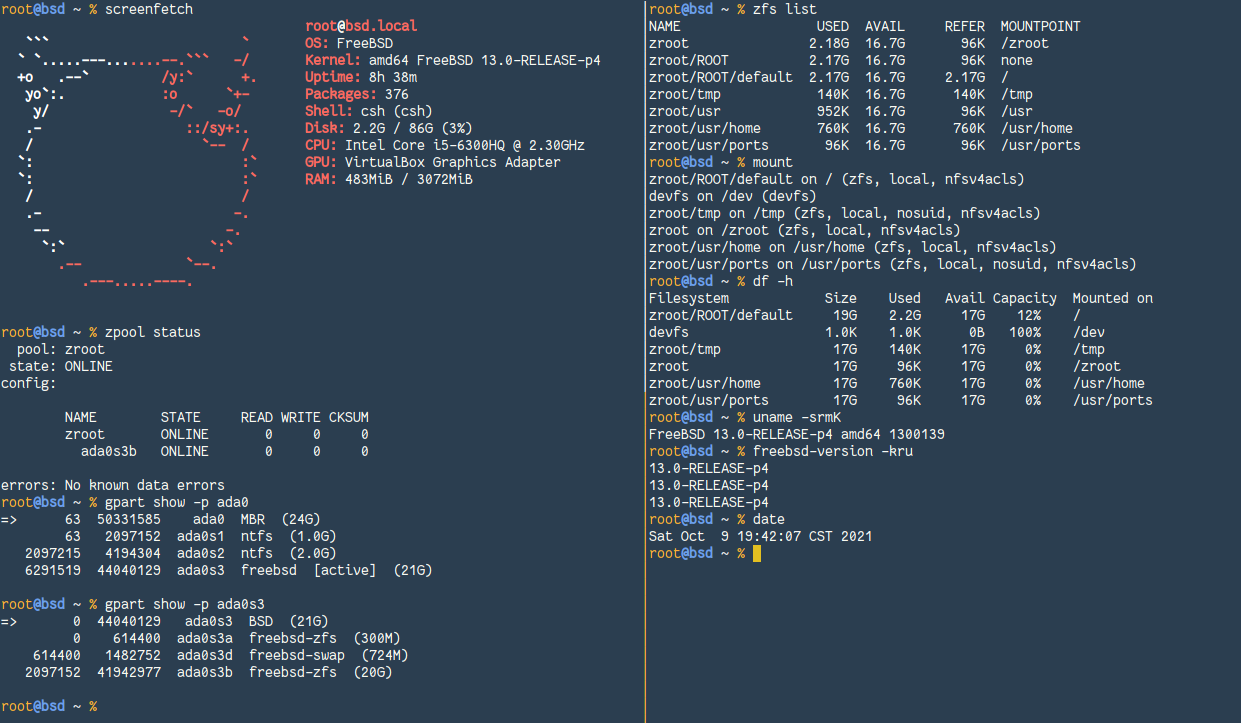
gpart show ada0
gpart show ada0s3
gpart add -t freebsd-zfs -s 20G ada0s3
gpart add -t freebsd-swap ada0s3Remember now, ada0s3a for ZFS an ada0s3b for swap.
Then we create the ZFS filesystem in ada0s3a and mount it at /mnt. zroot is the name we use for the pool, which of course can be changed if you want to.
kldload zfs
sysctl vfs.zfs.min_auto_ashift=12

mount -t tmpfs tmpfs /mnt
zpool create -o altroot=/mnt zroot /dev/ada0s3a
zfs set compress=zstd zroot
zfs create -o mountpoint=none zroot/ROOT
zfs create -o mountpoint=/ -o canmount=noauto zroot/ROOT/default
mount -t zfs zroot/ROOT/default /mnt
zfs create -o mountpoint=/tmp -o exec=on -o setuid=off zroot/tmp
zfs create -o canmount=off -o mountpoint=/usr zroot/usr
zfs create zroot/usr/home
#zfs create -o exec=off -o setuid=off zroot/usr/src
#zfs create zroot/usr/obj
zfs create -o mountpoint=/usr/ports -o setuid=off zroot/usr/ports
#zfs create -o exec=off -o setuid=off zroot/usr/ports/distfiles
#zfs create -o exec=off -o setuid=off zroot/usr/ports/packages
#zfs create -o canmount=off -o mountpoint=/var zroot/var
#zfs create -o exec=off -o setuid=off zroot/var/audit
#zfs create -o exec=off -o setuid=off zroot/var/crash
#zfs create -o exec=off -o setuid=off zroot/var/log
#zfs create -o atime=on -o exec=off -o setuid=off zroot/var/mail
# zfs create -o exec=on -o setuid=off zroot/var/tmp
ln -s /usr/home /mnt/home
#chmod 1777 /mnt/var/tmp
chmod 1777 /mnt/tmp
zpool set bootfs=zroot/ROOT/default zroot
(There are lines commented out because creation of ZFS filesystems can be highly customized and this is just a simple example here I provide.)
It's recommeded to run df -ah first to double check the our newly created ZFS filesystems are correctly mounted now.
If everything is OK, we install FreeBSD system in the zroot pool. Here I'll only choose base and kernel to be installed. As we're using DISC/DVD, they're all in /usr/freebsd-dist.
cd /mnt
tar -xzf /usr/freebsd-dist/base.txz
tar -xzf /usr/freebsd-dist/kernel.txz
That's it. The fresh new system is now installed. But it's not yet bootable because boot loader is not set.
To set up the bootloader, it's safer if the disk and partitions are not currently in use or mounted. But before umount the disk, there are a few neccessary tweaks we might as well add now. The most important thing here is to make sure ZFS support during boot.
echo 'zfs_load="YES"' >> boot/loader.conf
echo 'zfs_enable="YES"' > etc/rc.conf
echo '/dev/ada0s3b none swap sw 0 0' >> etc/fstab
# not really vital but a good choice
echo 'autoboot_delay="5"' >> boot/loader.confNow it's time to umount and install boot loader. Ensure first cd / to be out of the filesystem to be umounted, otherwise umount will fail.
cd /
zfs unmount -a
zpool set bootfs=zroot/ROOT/default zroot
zpool export zroot

# here run `mount` and `df -ah` again to make sure ZFS filesystems are not mounted anymore
mount
df -ah

# if we don't see any zpool/zfs filesystems mounted, go ahead and install boot
gpart bootcode -b /boot/boot0 /dev/ada0
dd if=/boot/zfsboot of=/tmp/zfsboot1 count=1
gpart bootcode -b /tmp/zfsboot1 /dev/ada0s3

# `/dev/ada0s3a` is the 1st partition in BSD slice, regardless of
# whether it is swap or zfs part.
dd if=/boot/zfsboot of=/dev/ada0s3a skip=1 seek=1024All done now. We can safely exit and reboot into the newly installed system.
exit
poweroff
Happy BSDing!
- JJBA blog post: FreeBSD Root on ZFS - Partitions
- FreeBSDWiki: Installing FreeBSD Root on ZFS using FreeBSD-ZFS partition in a FreeBSD MBR Slice
- Disk Setup On FreeBSD
- Installing_FreeBSD_Root_on_ZFS_using_FreeBSD-ZFS_partition_in_a_FreeBSD_MBR_Slice.txt
- Migrate FreeBSD root on UFS to ZFS
- FreeBSD Handbook
- FreeBSD manual: zfsboot
- FreeBSD manual: gpart
In
ada0s3there are two partitions,ZFSandswap. If usingada0s3aasswap, it's possisble that the partition will get cleaned upon shutdown/reboot thus losing bootcode in it, making system unbootable and hang at bootloader screen like this:Still need to be confirmed.