Skip to content

Instantly share code, notes, and snippets.

@L422Y
Last active March 22, 2024 13:44
Star You must be signed in to star a gist
Save L422Y/8697518 to your computer and use it in GitHub Desktop.
Automounting NFS share in OS X into /Volumes

I have spent quite a bit of time figuring out automounts of NFS shares in OS X...

Somewhere along the line, Apple decided allowing mounts directly into /Volumes should not be possible:

/etc/auto_master (see last line):

#
# Automounter master map
#
+auto_master		# Use directory service
/net			-hosts		-nobrowse,hidefromfinder,nosuid
/home			auto_home	-nobrowse,hidefromfinder
/Network/Servers	-fstab
/-			-static
/-			auto_nfs	-nobrowse,nosuid

/etc/auto_nfs (this is all one line):

/Volumes/my_mount    -fstype=nfs,noowners,nolockd,noresvport,hard,bg,intr,rw,tcp,nfc nfs://192.168.1.1:/exports/my_share

Make sure you:

sudo chmod 644 /etc/auto_nfs

Otherwise the automounter will not be able to read the config and fail with a ... parse_entry: getmapent for map failed... error in /var/log/messages

This will not work (anymore!) though it "should".

$ sudo automount -cv
...
automount: /Volumes/my_mount: mountpoint unavailable

Note that, if you manually create the mount point using mkdir, it will mount. But, upon restart, OS X removes the mount point, and automounting will fail.

What's the solution?

It's so easy my jaw dropped when I figured it out. Basically, we trick OS X into thinking we're mounting somewhere else.

When you're talking about paths in just about any environment, the root folder is the highest path you can reach, whether it's C:\ (windows) or / (*nix)

When you're at this path, attempting to reach the parent path, via .. will keep you at the root path.

For example: /../../../../ is still just /

By now, a few of you have already figured it out.

TL;DR / Solution:

Change your /etc/auto_nfs config from (this is all one line):

/Volumes/my_mount    -fstype=nfs,noowners,nolockd,noresvport,hard,bg,intr,rw,tcp,nfc nfs://192.168.1.1:/exports/my_share

For pre-Catalina: To (this is all one line)

/../Volumes/my_mount    -fstype=nfs,noowners,nolockd,noresvport,hard,bg,intr,rw,tcp,nfc nfs://192.168.1.1:/exports/my_share

For Catalina and up: To (this is all one line)

/System/Volumes/Data/../Data/Volumes/my_mount    -fstype=nfs,noowners,nolockd,noresvport,hard,bg,intr,rw,tcp,nfc nfs://192.168.1.1:/exports/my_share

And re-run the automounter:

$ sudo automount -cv
...
automount: /Volumes/my_mount: mounted

..... there you go! Technically /../Volumes is still /Volumes, but the automounter does not see things that way ;)

This configuration persists the mount across restarts, and creates the mountpoint automatically.

I KNOW, RIGHT?

Feel free to send me large checks and/or high five the screen. hitmeup@l422y.com
@lordmorgul
Copy link

“ I found that using /../Volumes was not working for me on Catalina”

The .. means parent. So, if your Mount point was Data/../Volumes then it would be wrong It needs to be either Data/./Volumes (as you discovered) or Data/../Data/Volumes.

Sorry that's a lazy typo in my reply, yes, it would be necessary to have Data listed twice but that does not work on my system, mount refuses to use it (corrected as you mentioned). Whereas, the single dot self-reference does work (in that case not duplicating Data).

I've abandoned NFS mount on OSX Catalina due to the issues with continuous disconnect and re-mount that results in multiple listings for active mounts of the same path. It creates many until the system crashes, and if you try to unmount them you have to unmount -f each one until no more mounts of that path exist before you can clean up the folders in Volumes. So I'm not using NFS or automount at all.

Instead I'm using SMB and a user mount to the Volumes location by a registered launch agent. I'd been doing that for years for a local cloud drive and just trying to make NFS work properly for an automated backup system change (just because) and had to give up on it.

I use these files, with appropriate changes to try to use the NFS or SMB format if someone wanted to, and the local wifi names, paths, usernames, and SMB passwords as necessary. This way when I grab the system and leave, it just unmounts for me, and when I'm home it remounts.

https://gist.github.com/lordmorgul/50f20697cf2390e343a17e59b9457764

@apwelsh
Copy link

apwelsh commented Dec 8, 2019

Whatever works is really what this comes down to. But I can confirm I use multiple users in my Mac, and it does not exhibit the auto-disconnect behavior. NFS is the only
Viable option for me, because SMB does not allow multiple users to mount the same share to the same folder. And in my system, I specifically need this. The one key thing for me is that my NFS server is also a Mac running Catalina.

@xaqpuyrthnbg
Copy link

I can mount this drive to my desktop and hide it and this works on the most current Catalina update.

The /etc/auto_master file is overwritten after every new update. You must re-add this line to the file after each update:

/- auto_nfs -nobrowse,nosuid

This is currently working as of today in my /etc/auto_nfs config file:

/System/Volumes/Data/Users/"myusername"/Desktop/data4 -fstype=nfs,nodev,noresvport,hard,bg,intr,rw,tcp,nfc "some_IP_Address":/export/mnt/media/data4

@apwelsh
Copy link

apwelsh commented Dec 14, 2019

If you are mounting in your home directory, I would recommend considering AFP or SMB as both are more modern than NFS and may better suite your needs. NFS is better suited as the only solution when you need more than one user to mount the share on the same local path at the same time — but still be accessing the volume as separate users.

@L422Y
Copy link
Author

L422Y commented Dec 14, 2019

If you are mounting in your home directory, I would recommend considering AFP or SMB as both are more modern than NFS and may better suite your needs. NFS is better suited as the only solution when you need more than one user to mount the share on the same local path at the same time — but still be accessing the volume as separate users.

NFS is faster, has less overhead, and puts less load on the server. YMMV depending on the environment, but in all of my real world use cases, with an abundance of testing, NFS has always come out on top – I only use AFP or SMB in environments where NFS is not acceptable to use... when things need to be easy.

@Michelasso
Copy link

Michelasso commented Feb 19, 2020

Also with SMB it worked just fine as before Catalina, thanks!! Not sure what to make out of that "/../" thingy, though. It makes no sense to me. But well.. Now it works!

@L422Y
Copy link
Author

L422Y commented Feb 19, 2020

Not sure what to make out of that "/../" thingy

When navigating filesystems, a single period . refers to the current directory, and .. refers to the parent directory – just a way to trick the system into thinking we were mounting not inside /Volumes – I'm fairly certain it was hard-coded to be blocked, so /Volumes triggered the block but /../Volumes did not.... maybe :)

@Michelasso
Copy link

@ L422Y yeah, I suppose so. Although I also tried with /../System/Volumes/Data/Volumes/NAS326 and that didn't work. "automount -cv" reported
automount: /System/Volumes/Data/../System/Volumes/Data/Volumes/NAS326: Operation not permitted

Also other combinations gave similar error message. Not sure why Apple had to break it on purpose.

Anyway, is there an option to make the drive folder appearing in Finder?

@apwelsh
Copy link

apwelsh commented Feb 23, 2020

The auto-mount path you used is entered wrong. Based on the error, I would suggest you make the line look like:

For NFS

/System/Volumes/Data/./Volumes/Videos -fstype=nfs,noresvport,soft,bg,rw nfs://192.168.0.100:/volume1/Videos

For AFP

/System/Volumes/Data/./Volumes/Shared -fstype=afp,rw afp://192.168.0.100:/Shared

Now, my Videos are mounted to /Volumes/Videos. The NFS share on my Synology is on volume 1, and and the share is called Videos. For AFP and SMB, the share name is all you need, and the volume is ignored.

Assuming you have that part right, and I suspect you do since your error is in regards to the mount point, the mount point should look like mine do. put the full path in, then after data add the /./ path reference. if you want to you /../ you can, but there would be more typing: Here is my AFP share with /../

/System/Volumes/Data/Volumes/../Volumes/Shared -fstype=afp,rw afp://192.168.0.100:/Shared
The Idea is that your relative path reference should occur under the Data path to trick the parser into allowing the path. But also because the Data volume is where your writable data is actually at.

Some key points, make sure you also use the IP address of your NAS, and that your NAS get assigned a reserved IP address, or you will have mount issue at boot up.

How to auto mount drive on desktop
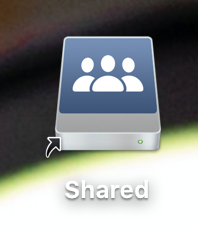
You can't. An automount drive is an extension of the filesystem. The best you can do is create a symbolic link on your desktop that points to the mount point.

To do this, from the Terminal:

ln -s /Volumes/Shared ~/Desktop/Shared

Then in my Desktop, I see a Link that looks similar to the share.
image

This is not the same thing though. You cannot eject this drive. If you want to mount the drive automatically in a way that behaves exactly like the drives you mount manually, then you don't want to use autmout. Instead you should use a script to mount the drive, and run that script at login. For that method, look at this: Automatically Connect to a Network Drive. on Mac OS X Startupp and Login. This method is uses the scripting engine on your Mac to automated he. mounting.

autofs and automount are technologies that integrate into your drive to mount remote shares into any folder when the folder is accessed and to make it appear as part of the local file-system. I do not think this is what you want. I think you want to use the mounting script to make use of the system's drive mounter instead.

@Michelasso
Copy link

Thanks for the extensive reply! I'll test it wiyh the "/./" in the path. Still just one thing:

This is not the same thing though. You cannot eject this drive. If you want to mount the drive automatically in a way that behaves exactly like the drives you mount manually, then you don't want to use autmout. Instead you should use a script to mount the drive, and run that script at login. For that method, look at this: Automatically Connect to a Network Drive. on Mac OS X Startupp and Login. This method is uses the scripting engine on your Mac to automated he. mounting.

The issue is that I need to automount the share because I'm using it from my MacBook Pro. Which I take to work and when I come back I want it to automatically reconnect (as it does) to my NAS. So I am guessing it isn't possible to get the drive icon only when it's (auto)mounted, like, for example, an USB drive.

Oh well, it isn't a big issue. It would have been just cool. Thanks!

@apwelsh
Copy link

apwelsh commented Feb 24, 2020

There are a couple issues with your scenario. The first is that you will need to make sure the mount is a soft mount, or else you risk the filesystem locking up from what I have experienced. When you leave home, and the suddenly disappears, the NFS automounter will go out to lunch waiting for the NAS to come back online. The second issue is that of the drive icon. You could certainly create an automatic script that monitors the folder for change, and when detected, runs to create or delete the symbolic link on the desktop. This can be difficult to code, but once you get it right, it should work.

The easy solution for your issue is to use a utility to handle the mounts for you. I have used Expandrive for this. Since this is not a multi-user situation, you don’t need NFS, so I would use an AFP share or an SMBv3 share (as these are the fastest) but they are limited to single user access to the mount, unless you make them accessible by the guest/ anonymous user account (not recommended). Expandrive can mount all your NAS drive resources on demand, as well as many cloud drive services, and even SFTP/SSH paths as mountable resources. There are other mounting utilities as well, and you can surely do this with Automator scripts. But this autofs solution probably isn’t the right tool for this. At least, I would not use it for your situation. This is exactly what I use Expandrive for on my MacBook. Expandrive is not free, and they make you pay for every major version upgrade.

@jefro108
Copy link

@Michelasso I suggest using the free app ConnectMeNow, which will auto-mount on start and on network change, so may do what you want, and for free! It is so much easier to set up and doesn't have the drawback of needing to re-edit /etc/auto_master after a system update - plus you see the server mounted on the desktop 😊

@apwelsh
Copy link

apwelsh commented Feb 24, 2020

Great alternative!

@Michelasso
Copy link

@jefro108 Ok, so I gave it a try at ConnectMeNow and.. it works! It's a bit not very intuitive to set it up (and one must go into the advanced settings to enable the automount after a network change), still it's only a matter of few minutes if one knows what he's doing. Also it's probably better than rewriting /etc/auto_master after each macOS update indeed.. I have disabled the SMB mounts for automount and I am starting using this instead. Lets' see how it goes!

PS: @apwelsh, yeah, I knew about the soft option for NFS. But NFS on my NAS is a nightmare (very slow) so I just use SMB. Still, thanks to both! 😀

@AdamCBernstein
Copy link

AdamCBernstein commented Jul 10, 2020

My "struggle" with getting MacOS Catalina NAS NFS shares was quite simple, once I got the right information. Configuration files.

/etc/auto_master:

#
# Automounter master map
#
# Literal mount point for filesystems described in "auto_resources"
#
/System/Volumes/Data/Volumes auto_resources
+auto_master		# Use directory service
    ... the rest is just boiler plate...

/etc/auto resources:

share1 -fstype=nfs,resvport,locallocks,soft,intr,rw,rsize=16384,wsize=16384,fnc 192.168.10.12:/mnt/share1
share2 -fstype=nfs,resvport,locallocks,soft,intr,rw,rsize=16384,wsize=16384,fnc 192.168.10.12:/mnt/share2

Afterwards: sudo automount -vc

One point: Make sure you can manually mount your NFS shares, and have proper access to the mounted filesystem before configuring automount.

@dmlane
Copy link

dmlane commented Aug 23, 2020

Does anyone have a solution to /etc/auto_master being overwritten on Catalina updates>

@Michelasso
Copy link

Does anyone have a solution to /etc/auto_master being overwritten on Catalina updates>

Make a copy and copy it over the new /etc/auto_master after each update. Or restore it from a backup (Time Machine or else) after the update. That's what I used to do, nothing automatic I'm afraid.

@dmlane
Copy link

dmlane commented Aug 24, 2020

Does anyone have a solution to /etc/auto_master being overwritten on Catalina updates>

Make a copy and copy it over the new /etc/auto_master after each update. Or restore it from a backup (Time Machine or else) after the update. That's what I used to do, nothing automatic I'm afraid.

Thanks - that's what I do, but it's really annoying if there's an automatic update while I'm away as I have some jobs which will fail.
Debian has a autofs.master.d folder which allows custom config to be included which doesn't get clobbered - it's a shame there's nothing similar on Catalina.

@tIsGoud
Copy link

tIsGoud commented Oct 28, 2020

I struggled with the same "overwritten" problem but found a solution. My first attempt was rewriting auto_master with launchd. Works fine but it feels like a workaround. My "proper" solution is by using vifs and fstab.

The solution is described in "Persistent NFS Mountpoints on macOS".

@dmlane
Copy link

dmlane commented Oct 28, 2020

I struggled with the same "overwritten" problem but found a solution. My first attempt was rewriting auto_master with launchd. Works fine but it feels like a workaround. My "proper" solution is by using vifs and fstab.

The solution is described in "Persistent NFS Mountpoints on macOS".

Thank you - that's really useful - I didn't know about vifs.
On Linux systems, fstab mounts the entries permanently on reboot. I saw that fstab is referenced in auto_master but it hadn't clicked that it was only used by automount on Catalina. Thanks again - I'll do some tests.

@albertovm
Copy link

albertovm commented Sep 27, 2023

Do you still using NFS with Monterey? It was working fine to me until latest 12.7 update. Regards.

It was working fine with:

/etc/auto_master:
#
# Automounter master map
#
+auto_master        # Use directory service
#/net           -hosts      -nobrowse,hidefromfinder,nosuid
/home           auto_home   -nobrowse,hidefromfinder
/Network/Servers    -fstab
/-          -static
/Users/Share        auto_nfs
/etc/auto_nfs:
mntp    -noowners,nolockd,noresvport,hard,bg,intr,rw,tcp,nfc server:/share

@L422Y
Copy link
Author

L422Y commented Sep 27, 2023

Honestly I haven't used NFS in probably five or six years :)

@homonto
Copy link

homonto commented Oct 18, 2023

for the latest OS - Sonoma - the command in /etc/auto_nfs that works for me is:
/System/Volumes/Data/../Data/Volumes/truenasnfs -fstype=nfs,noowners,nolockd,hard,bg,intr,rw,tcp,nfc,resvport nfs://192.168.100.4:/mnt/pool/truenasnfs

without "resvport" it was:
ls: /Volumes/truenasnfs: Operation not permitted

@L422Y
Copy link
Author

L422Y commented Oct 23, 2023

without "resvport" it was:

Interesting, I wonder if it's (inadvertently?) using the privileged access it needs for the privileged port (resvport) to access the filesystem as well

@albertovm
Copy link

for the latest OS - Sonoma - the command in /etc/auto_nfs that works for me is: /System/Volumes/Data/../Data/Volumes/truenasnfs -fstype=nfs,noowners,nolockd,hard,bg,intr,rw,tcp,nfc,resvport nfs://192.168.100.4:/mnt/pool/truenasnfs

without "resvport" it was: ls: /Volumes/truenasnfs: Operation not permitted

Unfortunately... not working for MacOS 12.7. Not yet.
/System/Volumes/Data/Users/Share/SSD -fstype=nfs,noowners,nolockd,hard,bg,intr,rw,tcp,nfc,resvport nfs://iomega-nas.local:/SSD

This works:
sudo mount -o resvport,soft,intr,rsize=8192,wsize=8192 iomega-nas.local:/SSD /Users/Share/SSD

@RJVB
Copy link

RJVB commented Oct 24, 2023 via email

Sign up for free to join this conversation on GitHub. Already have an account? Sign in to comment