-
-
Save Prasad9/28f6a2df8e8d463c6ddd040f4f6a028a to your computer and use it in GitHub Desktop.
| import cv2 | |
| def add_gaussian_noise(X_imgs): | |
| gaussian_noise_imgs = [] | |
| row, col, _ = X_imgs[0].shape | |
| # Gaussian distribution parameters | |
| mean = 0 | |
| var = 0.1 | |
| sigma = var ** 0.5 | |
| for X_img in X_imgs: | |
| gaussian = np.random.random((row, col, 1)).astype(np.float32) | |
| gaussian = np.concatenate((gaussian, gaussian, gaussian), axis = 2) | |
| gaussian_img = cv2.addWeighted(X_img, 0.75, 0.25 * gaussian, 0.25, 0) | |
| gaussian_noise_imgs.append(gaussian_img) | |
| gaussian_noise_imgs = np.array(gaussian_noise_imgs, dtype = np.float32) | |
| return gaussian_noise_imgs | |
| gaussian_noise_imgs = add_gaussian_noise(X_imgs) |
xvdp
commented
Jun 1, 2020
via email
I have an issue in line 5..
'str' object has no attribute 'shape'
how can i solve this issue?
I have an issue in line 5..
'str' object has no attribute 'shape'
Appears like the parameter you have sent is a string.
You can try reading an image file by using cv2.imread() and send that to the function
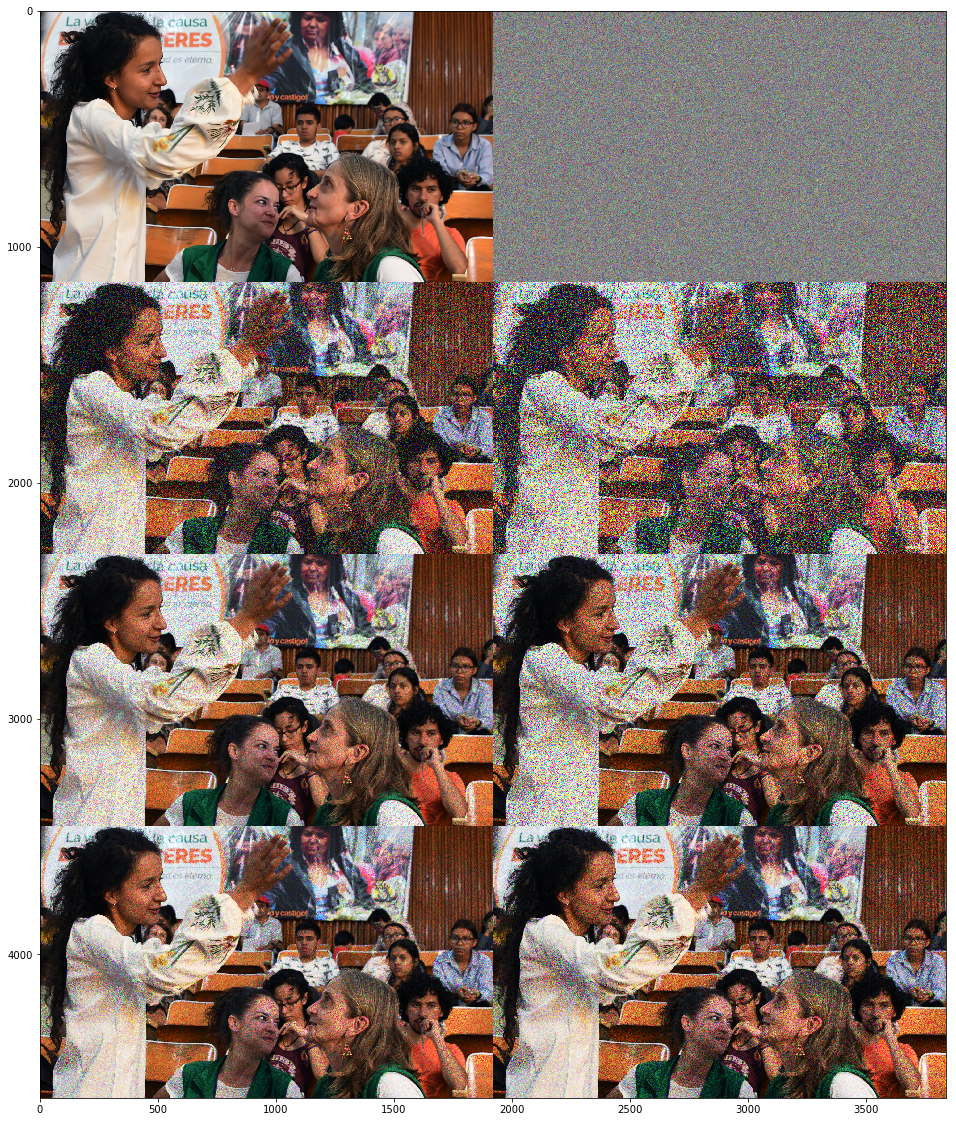
Depends what your goal is: 3 examples,
* gaussian noise added over image: noise is spread throughout

* gaussian noise multiplied then added over image: noise increases with image value

* image folded over and gaussian noise multipled and added to it: peak noise affects mid values, white and black receiving little noise
  in every case i blend in 0.2 and 0.4 of the image
import numpy as np import cv2 import matplotlib.pyplot as plt img = cv2.imread(img_path)[...,::-1]/255.0 noise = np.random.normal(loc=0, scale=1, size=img.shape) # noise overlaid over image noisy = np.clip((img + noise*0.2),0,1) noisy2 = np.clip((img + noise*0.4),0,1) # noise multiplied by image: # whites can go to black but blacks cannot go to white noisy2mul = np.clip((img*(1 + noise*0.2)),0,1) noisy4mul = np.clip((img*(1 + noise*0.4)),0,1) noisy2mul = np.clip((img*(1 + noise*0.2)),0,1) noisy4mul = np.clip((img*(1 + noise*0.4)),0,1) # noise multiplied by bottom and top half images, # whites stay white blacks black, noise is added to center img2 = img*2 n2 = np.clip(np.where(img2 <= 1, (img2*(1 + noise*0.2)), (1-img2+1)*(1 + noise*0.2)*-1 + 2)/2, 0,1) n4 = np.clip(np.where(img2 <= 1, (img2*(1 + noise*0.4)), (1-img2+1)*(1 + noise*0.4)*-1 + 2)/2, 0,1) # norm noise for viz only noise2 = (noise - noise.min())/(noise.max()-noise.min()) plt.figure(figsize=(20,20)) plt.imshow(np.vstack((np.hstack((img, noise2)), np.hstack((noisy, noisy2)), np.hstack((noisy2mul, noisy4mul)), np.hstack((n2, n4))))) plt.show() plt.hist(noise.ravel(), bins=100) plt.show()
img = cv2.imread(img_path)[...,::-1]/255.0 in this line what why [...,-1]/255.0] is used? please explain this !!!
I have an issue in line 5.. 'str' object has no attribute 'shape' how can i solve this issue?
bro, could you explain this line, img = cv2.imread(img_path)[...,::-1]/255.0 in this line what why [...,-1]/255.0] is used?
Hi, Santykish,
- img[...,::-1] simply reverses the channel order from cv2 BGR to RGB, so it can be shown by matplotlib which is RGB
theres many ways that can be done, that one is simply an indexing shortcut. You could use the cv2.cvtColor(img, cv2.COLOR_BGR2RGB) or you could open it with PIL.Image.open(), or you could display it with cv2 and never convert the colors. - /255 - you want a float.
There are a ton of ways in which one can 'add noise', in fact the topic of noise is much greater than what this gist covers.
Do you need to maintain moments of the data? Do you want to denoise a sensor? or generate data from a distribution.
Having a hard time trying to adapt it to a similar problem. I'm firstly testing this noise function to add later a sepia effect, so this looks more like a vintage image, but did not manage to plot it properly yet. Code goes as follows
def old_photo(file_nm):
    img = cv2.imread("HT.jpg")[...,::-1]/255.0
    noise =  np.random.normal(loc=0, scale=1, size=img.shape)

    noised_img = np.clip((img*(1 + noise*0.4)),0,1)
    plt.imshow(noised_img)

if __name__ == "__main__":
    print(old_photo("HT.jpg"))
Do you know what can be going wrong here? I'm missing a point I guess
Your old_photo function is returning None. You need to do it in a jupyter notebook. Or you can save the noised_image. How come you're trying to print it? Even if you output the results, it'll be a numpy array.