An inline image version of Matt Walker's translation of CEDEC 2017 talks by Nintendo. (I've added italic content.)
Covers four talks:
- Field Level Design in "The Legend of Zelda: Breath of the Wild" ~ Hydral Earth Created
- The Aim of BotW’s UI — Immersive, Impressionable UI
- The Open Air Sound Playing a Massive, Breathing World
- BotW Project Management — Seamless from Prototype to Final Product!
This is a reposting of my Twitter thread summarizing articles written about the CEDEC BotW dev talks. You can find the original thread here


Got around to reading some of the BotW CEDEC articles (original article here. Interesting fact — They managed all of their tasks by integrating their management tools with the game, so you wouldn’t get people doing the same work twice.)
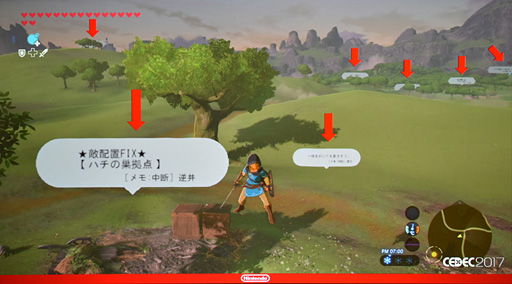
A task could be created by setting up a sign in the world, and then all related specs and meeting details related to it could be readily available by clicking on that sign.
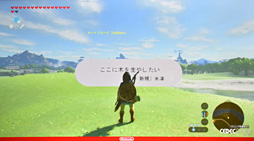

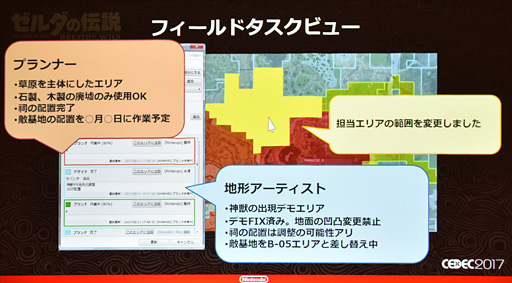
There’s also a “field task view” that was set up for higher level items.
It was apparently a great way for multiple devs to bounce ideas off of each other in regards to the task.
From a field design standpoint they discuss the “Triangle Rule”. They explain that using triangles carries out 2 objectives- gives players a choice as to whether to go straight over the triangle, or around, and it obscures the player’s view, so designers can utilize them to surprise players, make them wonder what they’ll find on the other side.
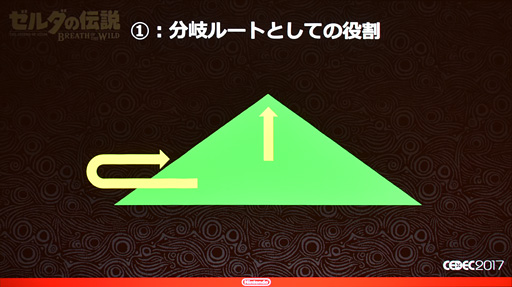
There’s also variations that can be more visually interesting, to perk the player’s interest. Korok seeds are usually found in these instances.
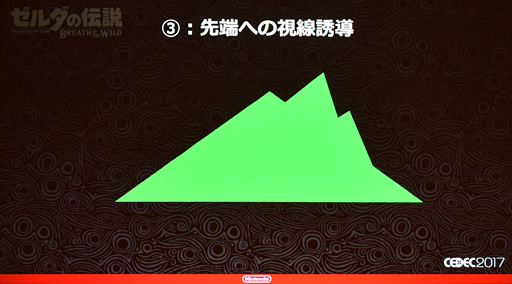
They have 3 different scales that they utilize this principle with as shown here — all to achieve different objectives.
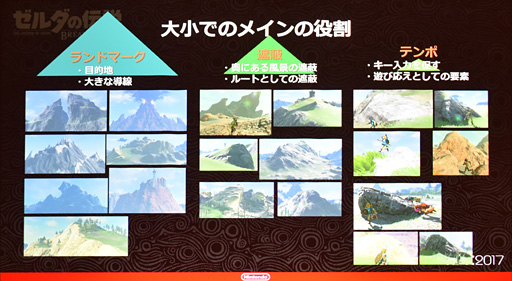
The slide notes that each different size plays a different role: the largest are landmarks that serve as visual markers, the medium sized triangles serve to obstruct the player’s view — whatever is behind them and the smallest triangles serve the tempo — be it to change whatever buttons the player is pressing or for more concrete play.
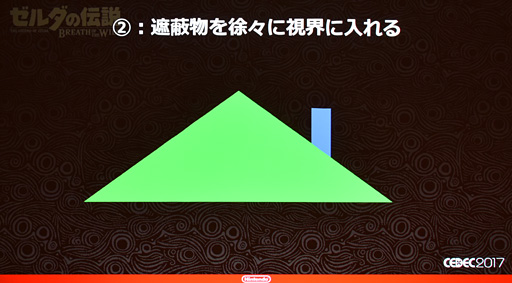
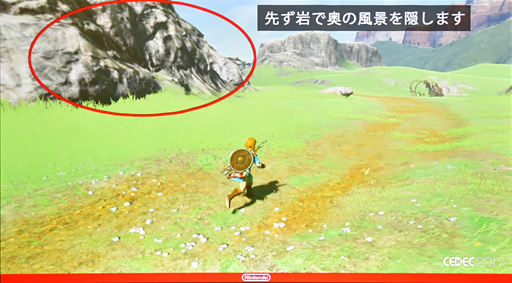
They also used rectangles as shown here. Instead of gradually revealing something, rects are good for completely hiding something from sight.
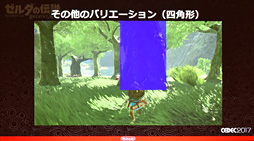
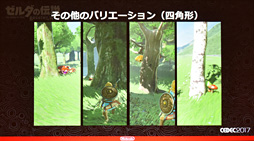
You can get an idea for just how widely this concept was applied in this image.

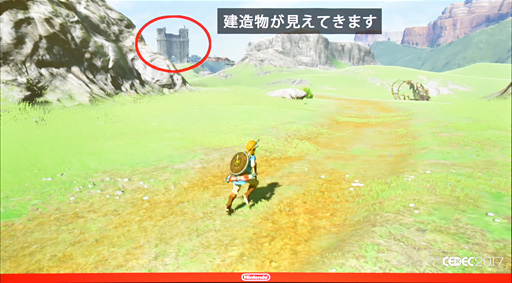
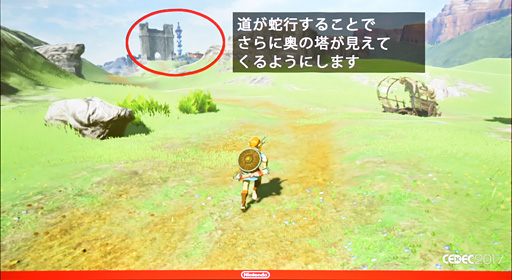
They give an example of how the design was applied in action in these images. Note how the structure in the distance is slowly revealed.
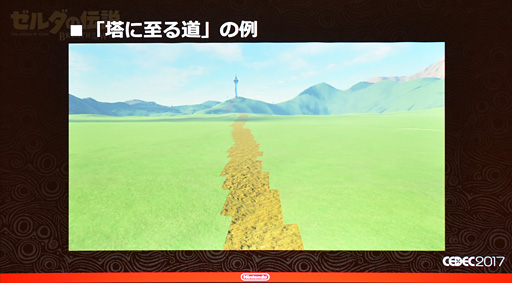
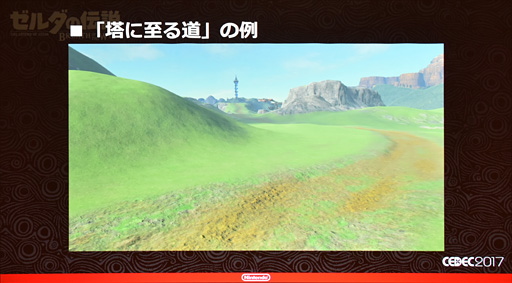
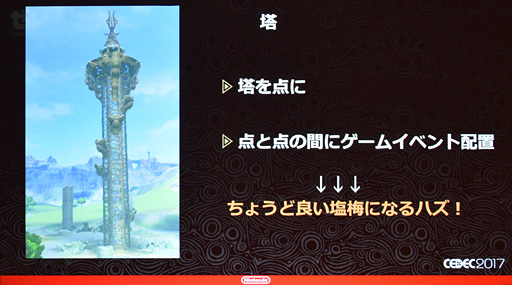
Finally, the structure hides the tower in the back, so there’s this chain of interest — hill -> bridge structure -> tower.
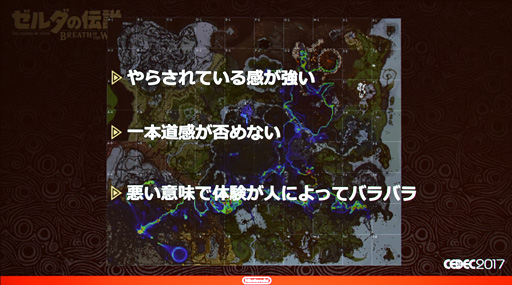
The beginning of the presentation discusses what specific changes they made in order to make the game more enjoyable. The first map images show 2 heat maps — showing what paths players originally traversed in playthroughs, and then the second map showing how much more well distributed that became after they made this specific change.
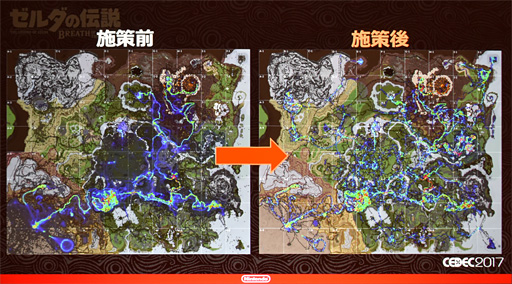
Their initial assumption was that they could spread the towers throughout the map, and place game events in between, but they found that approach didn’t feel appealing to players.
Players felt they were being guided, that the game was too linear, and people were having completely different experiences, in a bad way.
They realized they could solve these problems with the concept they called “gravity”- placing structures of varying visibility/importance in different places, leading players in different directions and allowing to get sidetracked.
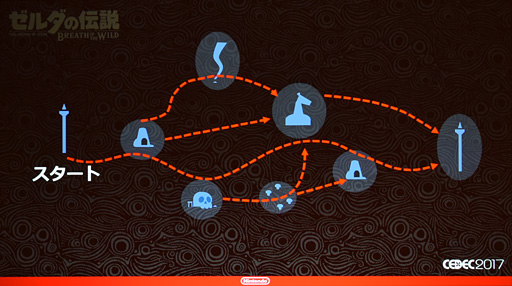
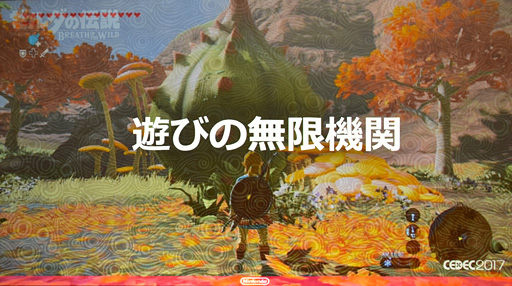
This became a catalyst for “infinite play” — going back and forth between different structures.
You can see in this image how the different structures rank in visibility — naturally drawing player’s attention, and in “objective”.
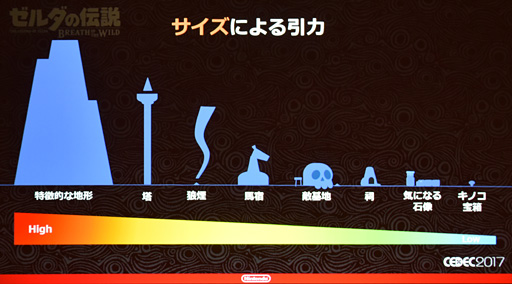

The objective order changes depending on how the player likes to play-if they’re aggressive, they’ll go after enemy camps to get better gear.
FYI — I found all these summaries here. The Japanese internet notes that devs were in awe, stating things like “only NCL knows how to really make games”)
From [IGN Japan on debugging] (https://t.co/iHiMeYWv9r). One guy foresaw that the game would be too complex to leave debugging till the end, so he had the foresight to champion for new practices — proactively fix bugs blocking programmers and bugs specifically requested for fixing. Also to implement a tool for easy bug reports, merging the tools for managing bugs with tasks, and implementing a system in the game for bug finding called #ZELDA_ERROR.
This is a reposting of my Twitter thread summarizing articles of the BotW CEDEC talks, which can be found here
Thanks to @Nibellion and tonyh24613 from Gaf I’ve been alerted to articles based on the other BotW CEDEC talks — so how bout a new thread?

Next up is the talk, “The Aim of BotW’s UI — Immersive, Impressionable UI” (original article here. Being that their aim for BotW was to reconsider Zelda conventions from the ground up, they discussed how they achieved their goal of creating UI that is instantly recognizable as a change, but seamlessly integrates with the game world in 4 categories — graphics, font, design and animation. Their overall concept being, “only essential UI”.)
Graphics — goal was to be understated so nothing would stand out in a negative way, coalescing information so there wouldn’t be as many places players would have to look.

For the title menu they chose to make proper use of empty space instead of making the selections large.

(余白 means empty space, just like keikaku means plan.)
To help unify the UI they adopted a color they called “Zelda White”, which has a bit of yellow. This was used in the package and logo as well!

(Image shows pure white vs Zelda white)
Font — they prioritized borderless, simply colored text with zero frills. The overseas fonts were custom made, but for Japanese they used “Logo G Black” for Katakana and “Raglan Punch” for Kanji — intending for the Japanese text to be both powerful and nostalgic, italicizing to make it easier to read. They applied this to the logo font for a cohesive feel.


(Note how the in-game fonts match with the logos for both Japanese and international versions.)
UI Design — direction was to only display information when necessary, which gives the screen more breathing room.

The Pro HUD was actually created because NoA/NoE asked to clean up the screen and get rid of even more UI elements -which lead to a heightened sense of immersion.

They designed the Sheikah Slate in tandem with the artists and chose to differentiate its design and give itan ancient feel by adding more decoration.

They acknowledge that the lack of a tutorial was intentional to strengthen immersion, and only display minimal UI elements so players wouldn’t feel guided by the hand. They applied different animations to the UI in order to make things more noticeable after decreasing noticeability by making UI and fonts smaller.

One example — hearts light up white when you’ve taken damage. Their method — “Display simple UI and make it appear high quality”.
They created a tool they could use to capture textures and modify as necessary for this.

(Image shows an example of how the capture tool was used for animation — first they captured the Game Over text, then they applied a distortion texture and animated, the result as shown on the bottom.)
They only had 2 UI designers who wouldn’t be able to handle everything alone, so they worked with the programmers to implement little tricks. Expanding on NCL’s proprietary “LayoutEditor” tool in a “data driven” fashion, allowing designers to place and animate screen nodes, and giving programmers control over them. Up until BotW designers needed programmers in order to implement data into the game, so with BotW it was changed so that the game screens could be previewed on top of each other, over the running game.

The game map was split into 120 sections that could be dynamically loaded, with 4 levels of zoom. This included distinguishing non-open areas with separate colors, so they needed to create 2,344 different screens, which would have been impossible manually, so the map was procedurally generated, textures would be generated for each section every night.

(This slide shows how their workflow changed. Previously they would have to create an asset, check it in a viewer, pass into the build and then finally check in-game. In BotW they would create, then preview in-game, then finally implement.)

Finally, they give examples of how they utilized their “screen capture” technology to add filters & color adjustments to create UI. Image shows how they composed the gear select screen, capturing the environment, masking and redrawing.

This is a reposting of my Twitter thread summarizing the BotW CEDEC talk on sound design, which can be found here
This thread is for the CEDEC sound session: “BotW — The Open Air Sound Playing a Massive, Breathing World”. Link.

They required the kind of sound design that would heighten the immersion of being in Hyrule, relaying the rules of the world and the material of the objects located within, and the sense of air flowing through that world. It was something the sound director couldn’t explain with words, so he chose to make a concept video during production to help explain this and shared it with the composers, sound designers, programmers, planners and artists.
To heighten this immersion they chose to express that which could not be seen through sound — separating into several categories: environmental sounds, base noise, water sounds like rivers and waterfalls, birds chirping, grass bristling, insects, the wind, footsteps, etc. Wind sounds were created using noise as a base, spawning 3 different sound sources to twirl around the player, eventually adding footstep noises — which were recorded on site in Kyoto.
The base noise — the foundation for all environmental noise is a faint air sound which changes depending on whether you’re indoors or out, or near water, and also changing base on nearby plant life, time, organic activity or rain.
For music, they started with the idea to restructure what music really means for a Zelda game. So they first chose not to play a looping song on the over-world. This meant that they’d place an emphasis on the environmental sounds — those being the only thing you would always hear. With this they found that they were missing something — nothing to accent certain moments, that feeling of arriving somewhere special. So they chose to play music at special places, and to play random phrases occasionally to break up the monotony. In doing this it’s less apparent that the music has looped over a long period of time.
This still felt too simple, so they chose to play music in places like villages. They made these songs dense, made them all unique, and placed them as emitters on specific areas of the map to make it feel like you were in just one place of a vast world. These emitters were made so as not to feature any special progression, then change from this environmental music in stages as you proceed into the area, which also expands the role of the field’s design.
All the different music and sound effects were each given a priority and volume to help decide what should take precedence and when — note how environmental sound effects stop momentarily while in battle.
Next they go into their development environment. Normally the sound team takes orders from game designers and artists and creates sound based on those, but for this title they worked proactively. So normally that would mean they would get an order for “shield surfing” for instance, including all of the little details such as the change in sound based on speed, playing a different sound for the edge as it turns, etc. That style requires specialists that will be able to pick out the finest details to achieve something of high quality, which it does, but that requires that they also have an complete understanding of the whole project design spec and schedule, or else spec changes could be costly.
They realized this would be devastating to the project, so to avoid that they improved their workflows, using tools, libraries, working between sections so as not to burden the sound team with work they wouldn’t have to do.
They introduced 3 tools into the mix: SLink, allowing designers to click an actor in game with their mouse and bring up a sound table where they could then specify their sound and test it out — which also worked for animation. AssetBinder, their asset manager tool with search, filter, single and batch volume adjustment, automatic conversion and version control.
They also decided to “leave it up to machine” in regards to tasks to minimize necessary work, using Jenkins to randomly place sound emitters for the environmental sounds throughout the field. This allowed for various parameters such as only placing bird chirping around trees, but not small trees, stumps or dead trees. Finally, they made it so that non-sound members could set sounds as well — so allowing the scenario writers to set cutscene voice, for instance.
The final BotW CEDEC session (as far as I know), is from the engineers — [“BotW Project Management — Seamless from Prototype to Final Product!”] (http://game.watch.impress.co.jp/docs/news/1078888.html)

This session focused on 3 topics: project management, dev pipelines- using TA’s as an example and QA. First focus was on their new tool coined the “Zelda Editor” — the kernel of project operations.


They adopted the “Framework Approach” to development — first setting guidelines and then adding on from there. They relate their milestone definitions to running on a track — for the first lap they’d set up the framework and create a proper, fun prototype, for the second lap they would run through full production, and for the 3rd lap they would polish the product as much as possible.
They also established restrictions for what wouldn’t be allowed for each “lap”. For the first lap — no implementing anything that wasn’t core to the game, for the second they focused solely on producing and getting together all necessary assets — no polish. As such, they used assets from previous games such as villages and NPCs — including enemies and bosses during the prototype lap.

This meant that artists were focused on planning what they would create, and validating their implementation methods during the first phase. In the second phase there was a large volume of assets that needed to be managed, and they found that their conventional task tools couldn’t cut the mustard, so they gave Zelda Editor the ability to attach tasks to data within the editor, putting effort in to ensuring that they wouldn’t end up with any “lost tasks”.

This meant that all temporary data would see proper progress. Conventionally project management would be done manually, but now tasks were being aggregated and automatically updated — ensuring correct information, management and a relatively accurate project burn down chart by the end.


The final lap focused on brushing all data up to final quality. Bugs were managed as tasks for this project, using Zelda Editor for quick bug reporting in-world. Model and texture size validation was done automatically, though things like how items burned or whether weapons were floating in water as they should, were checked manually.
Next, one of their TA’s (Technical Artists) discussed pipelines. They begin by explaining that at Nintendo, above all else the most important thing is the fun. This needs to be first and foremost in everyone’s mind, regardless of occupation, and they have to tune until the very end to ensure it. “I am certain that it’s this persistence that leads to the highest quality.” The challenge the TA’s took on, then, was creating a new development style that would be able to produce that quality given the massive number of assets, and knowing full well assets would have to be done and redone.
Their focus would be on ensuring a stable DCC environment. Assets were created in Maya and Photoshop, with many different plugins being used by many artists — so if something didn’t sync up it could block a large number of devs. They created a dedicated software launcher for all the artists to ensure that they were running the same dev environment — syncing Maya preferences and running automatic tool tests. Errors reported at an artist’s terminal would be automatically sensed and reported for quick handling.


They chose Havoc for their physics engine, and expected this to be a key component of the fun, and also knew that there would be a large amount of physics data that would have to be dealt with — even then, they chose not to have any artists that would specialize just in physics. So they decided that multiple artists would have to be able to stably mass produce physics data. Their solution was to ensure that their Havok environment wasn’t accessible — instead it would be funneled through DCC tool plugins to simplify the physics data workflow. They also made checks to ensure that no dangerous physics data could make its way into the ROM.

They automated LOD creation, knowing that assets would experience spec changes and retakes. In terms of automation they give the shrines as an example — automating the merging process for model parts creation and placement, allowing them to polish until the very end. In terms of animation — when software versions were raised models, rigs and animation data updates were automated.
They then shift gears to talk about how they managed versioning in order to ensure smooth build workflows. Especially considering that theyhad partner companies helping out, they set it up so that executables and resource versions would match up at download time, and gave devs the ability to select from multiple ROMs- so if they were having trouble they could recover from a different ROM.
In terms of resource pipeline they knew that resources always needed to be correct and able to be passed off to the next dev. While a dev is loading a patch for an asset the dev could use a temporary resource, which would be cleaned up during conversion by Jenkins. They also had a difference table for packaged assets, prioritizing individual resources when a difference is detected. This meant that artists only had to upload individual resources at any given time. In the interest of stability, however, they automated conversion with Jenkins, regardless of the resource.
There were 3 things they needed from the build pipeline: speed, frequency and stability. For speed — resources could be loaded from the local PC, copying just the executables and taking down the version number during build. For frequency- main ROMs were built once every 5 minutes, building different targets for different platforms at different frequencies as necessary (debug versions would be built more frequently). For stability- build error notifications would be sent to specific personnel, so you’d avoid a situation where “someone needs to take care of it” — the person in question would get right on it. They’d run smoke tests on hardware, and if something failed they’d remove the ROM and specify who needed to fix what over chat.
They needed the ROM pipeline to couple with tasks so that devs would know which ROM their work was reflected in, and they needed devs to get notifications when a ROM was created. Jenkins would automatically update task statuses so that the tasks themselves would serve as ROM build notifications. In the end, the number of manual submits from the staff was 52%, while from Jenkins it was 48%.
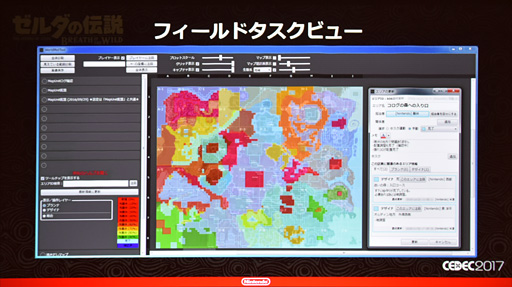
The final topic was QA, their starting point being that not only should the build be bug free, but should also be fun. So QA’s role was to ensure that the devs could perform as many reiteration loops as possible. So they focused on reducing the amount of time it would take for devs to find things, and kept a database of information for data, tools, tasks and devs. Queries were designed to be easily performed by anyone, and information relating to the game field would be plotted on the game map with the field task view — so it was easy to get a look at overall completion rates for the game.
They had a “Game Over View” that showed where players experienced game over the most, and chose to implement auto saves. Devs could also share queries with the database viewer. Data experiencing problems could automatically generate a task. Here they once again go in to the idea that they chose to debug from the start — when they had their first test play they experienced 617 freezes in the span of 2 days. This is when they realized they’d need to nip the problem of a massive bug count in the bud, even though the natural reaction from members of the team initially was that if they had the time to debug, they should focus on furthering implementation instead.


They merged their bug management and task management systems into the Zelda Editor and held a team wide meeting to explain how to use it. They also implemented a function they called “ZELDA_ERROR” to make problems more noticeable. The programmers originally created this function in the interest of preventing freezes, and in the end they had 6000 different ZELDA_ERRORs strewn throughout the game. They also implemented hot reload so data could be fixed on the fly. Being able to report bugs from the game was a great help for debugging, and would automatically log the player’s coordinates, scene switches, event and dungeon information. Based on that info the person who found the bug could figure out who they should send the bug to.

The final two images here are notable — the first showing bug count graphs for comparison. The graph on the left shows the bug count for a past Zelda title (maybe Skyward Sword?), indicating the first spike being the E3 build, and then the second spike being the final debug phase. The graph for BotW is shown on the right.


This final images shows percentage of bugs and bug counts per source: red being from debug testers, geren from automatic tests and blue reported by the dev staff themselves.