| Driver: | |
| -Write the code according to the navigator's specification | |
| -Listen intently to the navigators instructions | |
| -Ask questions wherever there is a lack of clarity | |
| -Offer alternative solutions if you disagree with the navigator | |
| -Where there is disagreement, defer to the navigator. If their idea fails, get to failure quickly and move on | |
| -Make sure code is clean | |
| -Own the computer / keyboard | |
| -Ignore larger issues and focus on the task at hand | |
| -Trust the navigator - ultimately the navigator has the final say in what is written |
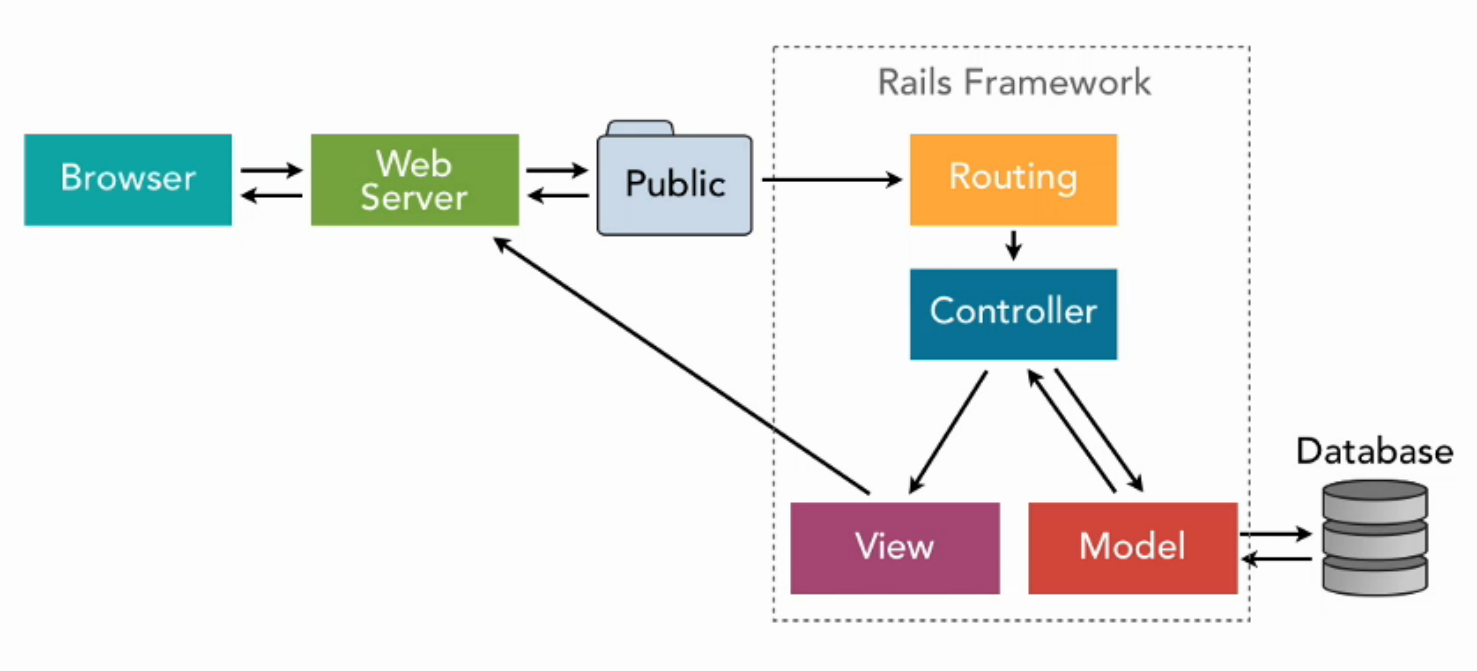
#Simple Authentication with Bcrypt
This tutorial is for adding authentication to a vanilla Ruby on Rails app using Bcrypt and has_secure_password.
The steps below are based on Ryan Bates's approach from Railscast #250 Authentication from Scratch (revised).
You can see the final source code here: repo. I began with a stock rails app using rails new gif_vault
##Steps
Sequelize is a powerful library in Javascript that makes it easy to manage a SQL database. Sequelize can layer over different protocols, but here we'll use PostgreSQL. At its core, Sequelize is an Object-Relational Mapper – meaning that it maps an object syntax onto our database schemas. Sequelize uses Node.JS and Javascript's object syntax to accomplish its mapping.
Under the hood, Sequelize used with PostgreSQL is several layers removed from our actual database:
- First, we write our Sequelize, using Javascript objects to mimic the structure of our database tables.
- Sequelize creates a SQL string and passes it to a lower-level library called
pg(PostgreSQL). pgconnects to your PostgreSQL database and queries it or transforms its data.pgpasses the data back to Sequelize, which parses and returns that data as a Javascript object.
First, Create a folder inside of lib called seeds
Put your CSV file example.csv into the lib/seeds folder. In the example below, the file is called real_estate_transactions.csv
Make sure you've created a resource with the appropriate columns to match your seed data. The names don't have to match up.
- Fork the repo that you're working on into your own account.
- Clone down the fork
- Create a new branch in the fork using
git branch [branch_name]replacing[branch_name]with a short phrase describing the feature your'e working on - Check the current status of your branches by using
git branch. You should see all the branches you have access to. Your current branch will have an*next to it - Check out the new branch using
git checkout [branch_name] - Make your changes in the code
- Add and commit your changes
- Pull down any changes from the original repo:
- Add the original repo as an upstream remote with
git remote add upstream https://github.com/ORIGINAL_OWNER/ORIGINAL_REPOSITORY.git. Make sure to use the actual owner and repository names. - Pull changes into your branch from the upstream remote with
git pull upstream master
- Create a branch with
git branch [your_branch_name] - Checkout the branch with
git checkout [your_branch_name] - Publish your branch with
git push origin [your_branch_name] - Do some work, commit your changes
- When your branch is done, checkout master with
git checkout master - Pull down any changes from master with
git pull - Checkout your branch again and make sure it is up to date with master using
git merge master - If there are any conflicts, fix them. If not, you may need to exit the Vim text editor using
:wq
The popular open-source contract for web designers and developers by Stuff & Nonsense
- Originally published: 23rd December 2008
- Revised date: October 8th 2015
- Original post