Skip to content

Instantly share code, notes, and snippets.

@en4rab
Last active April 16, 2024 22:18
Show Gist options
  • Star 45 You must be signed in to star a gist
  • Fork 10 You must be signed in to fork a gist
  • Save en4rab/550880c099b5194fbbf3039e3c8ab6fd to your computer and use it in GitHub Desktop.
Save en4rab/550880c099b5194fbbf3039e3c8ab6fd to your computer and use it in GitHub Desktop.
Recovering the BIOS password from a Panasonic CF-U1 mk2 (AMI Aptio UEFI)

Recovering the BIOS password from a Panasonic CF-U1 mk2 (AMI Aptio UEFI)

A mess of my own making

While messing with a CF-U1 handheld PC that I bought off ebay I managed to mess up the BIOS and it seems it reverted to previous settings which included an unknown BIOS password, it would however still boot into windows. Since I could still boot windows I was able to dump the bios flash using AFUWINGUI.EXE the version I used was 3.09.03.1462 which is available here:
https://ami.com/en/?Aptio_4_AMI_Firmware_Update_Utility.zip

There may be a more appropriate version to use as this seemed to have trouble checking the bios version when flashing but did work if you selected "Do Not Check ROM ID" but flashing isnt needed to get the password.

Dumping the flash

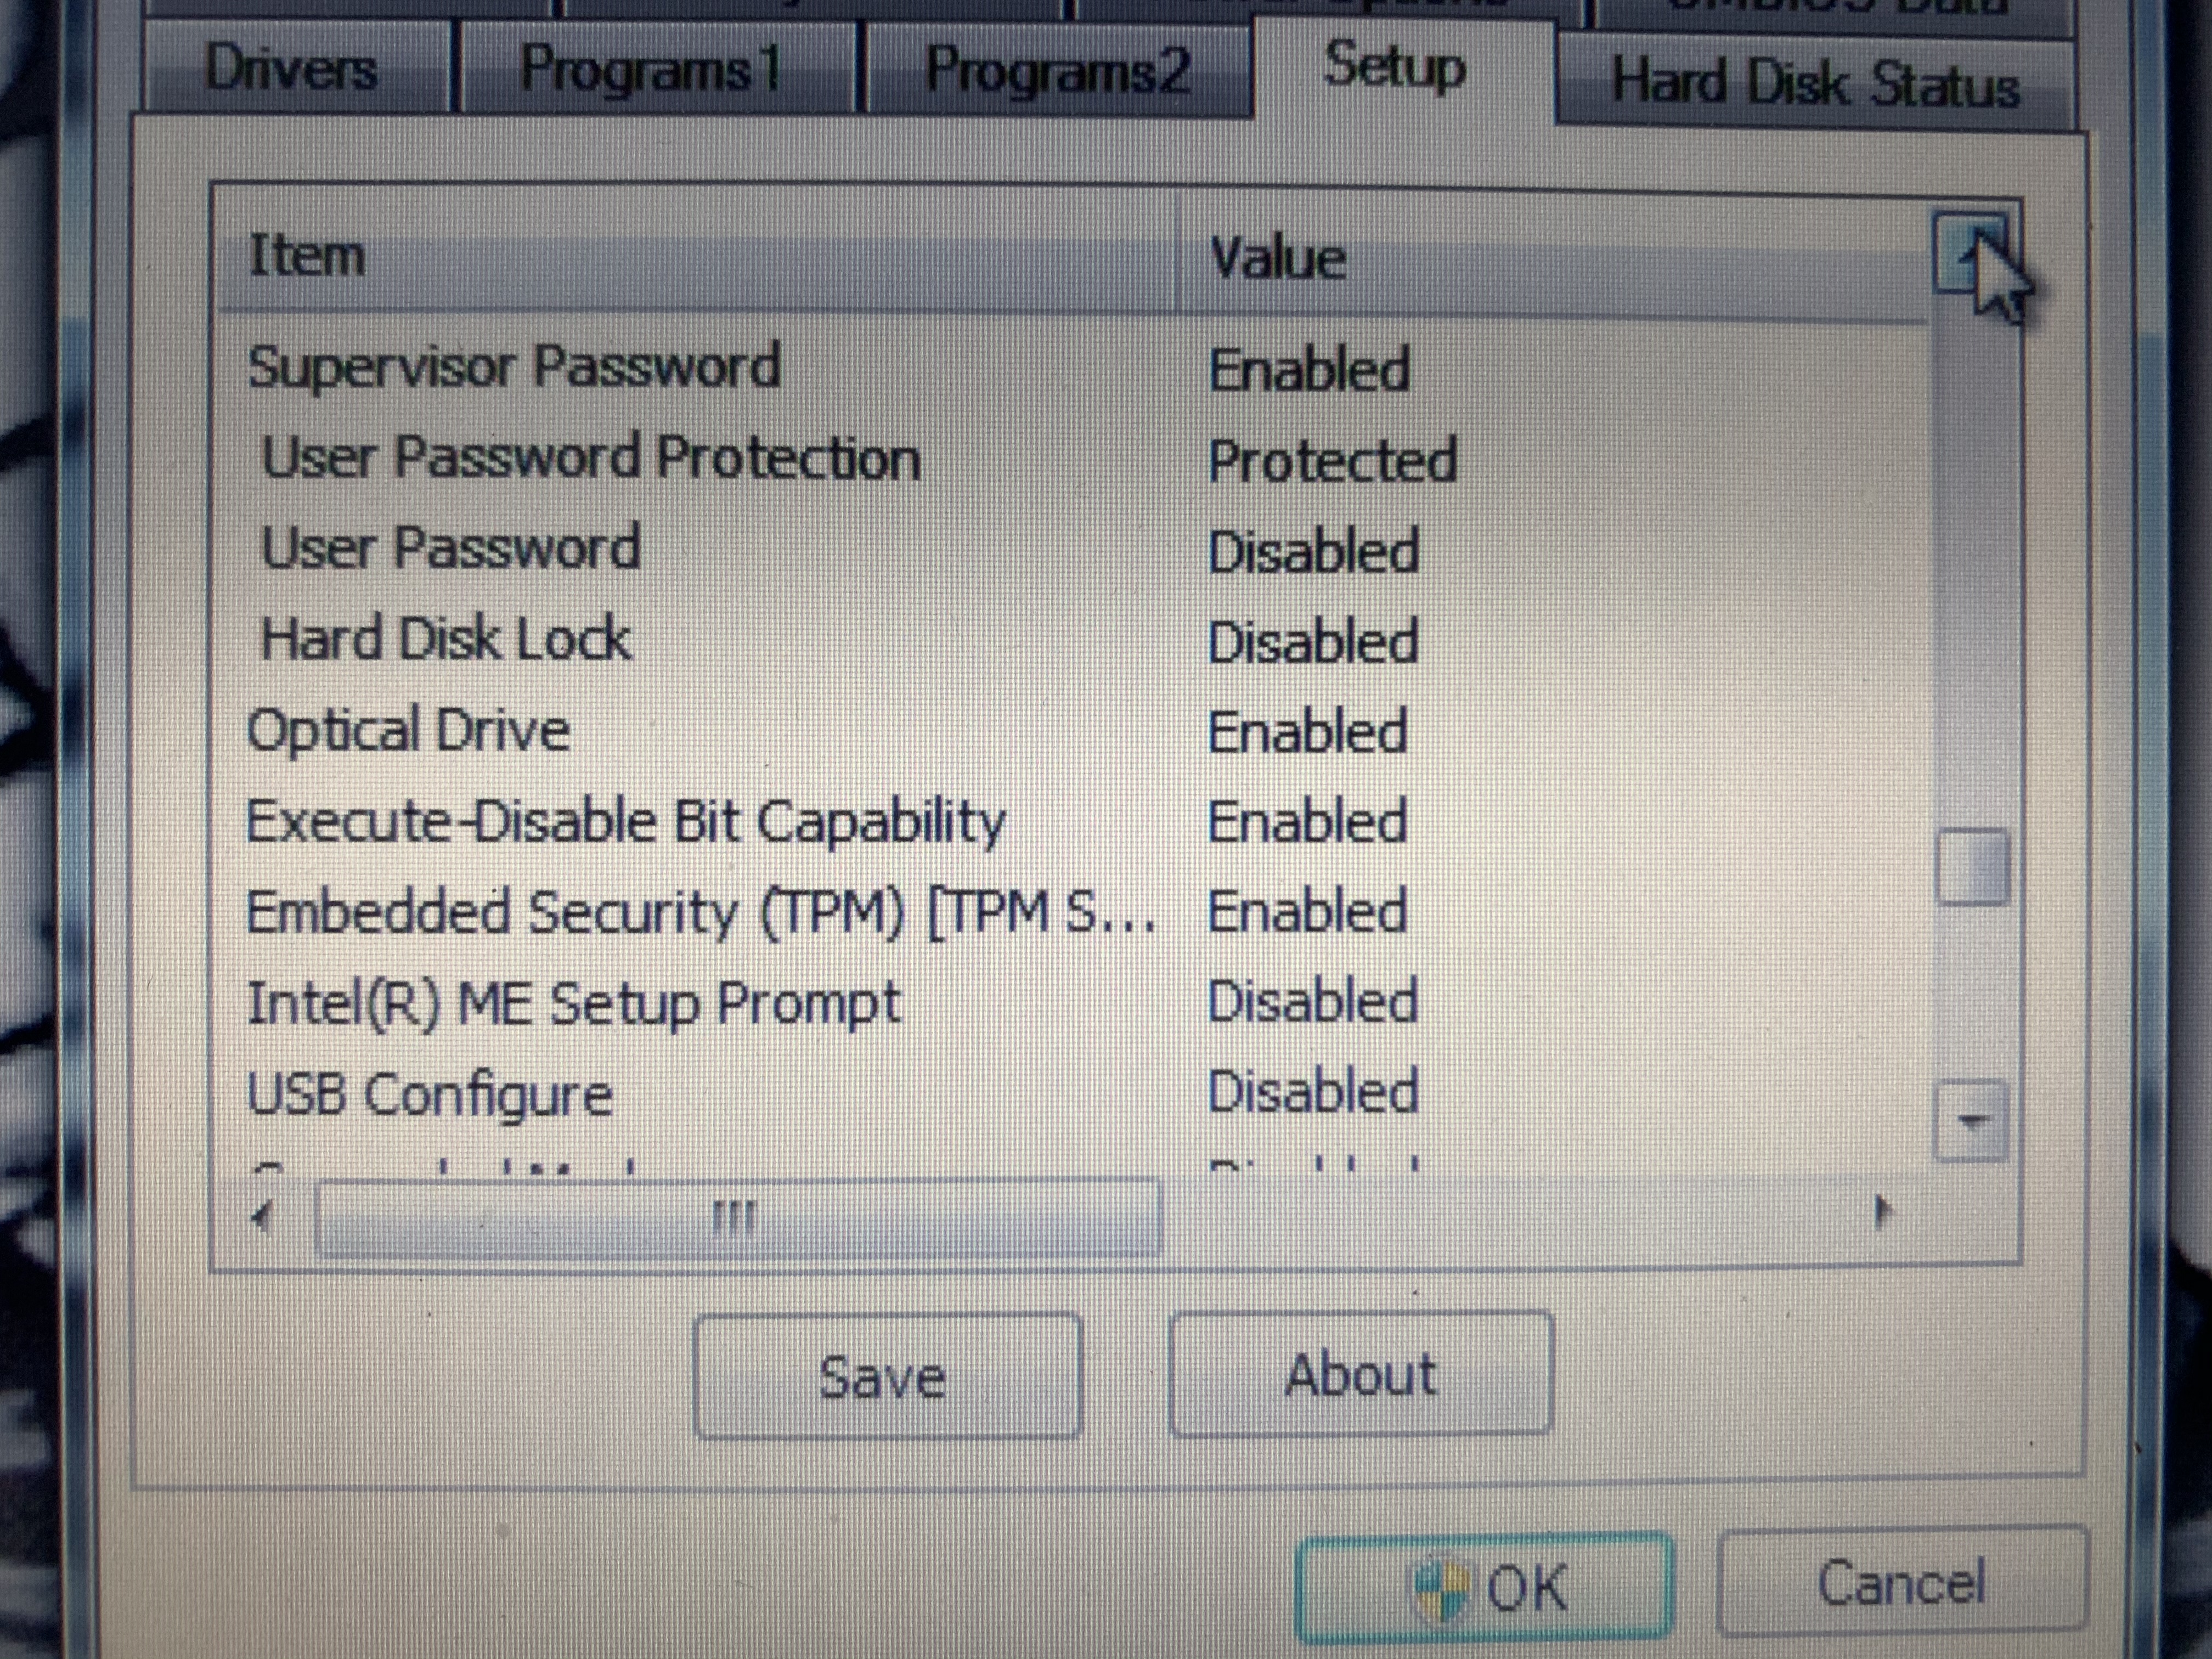
alt text
Run AFUWINGUI.EXE and at the bottom of the "Information" tab click the save button to make a backup of your bios, the default name is afuwin.rom Now open this saved image with UEFITool_NE available here:
https://github.com/LongSoft/UEFITool/releases

I used UEFITool_NE_A51_win32.zip later versions should work fine. The new engine (NE) verson seems to deal with AMI's odd nvram format better.

alt text

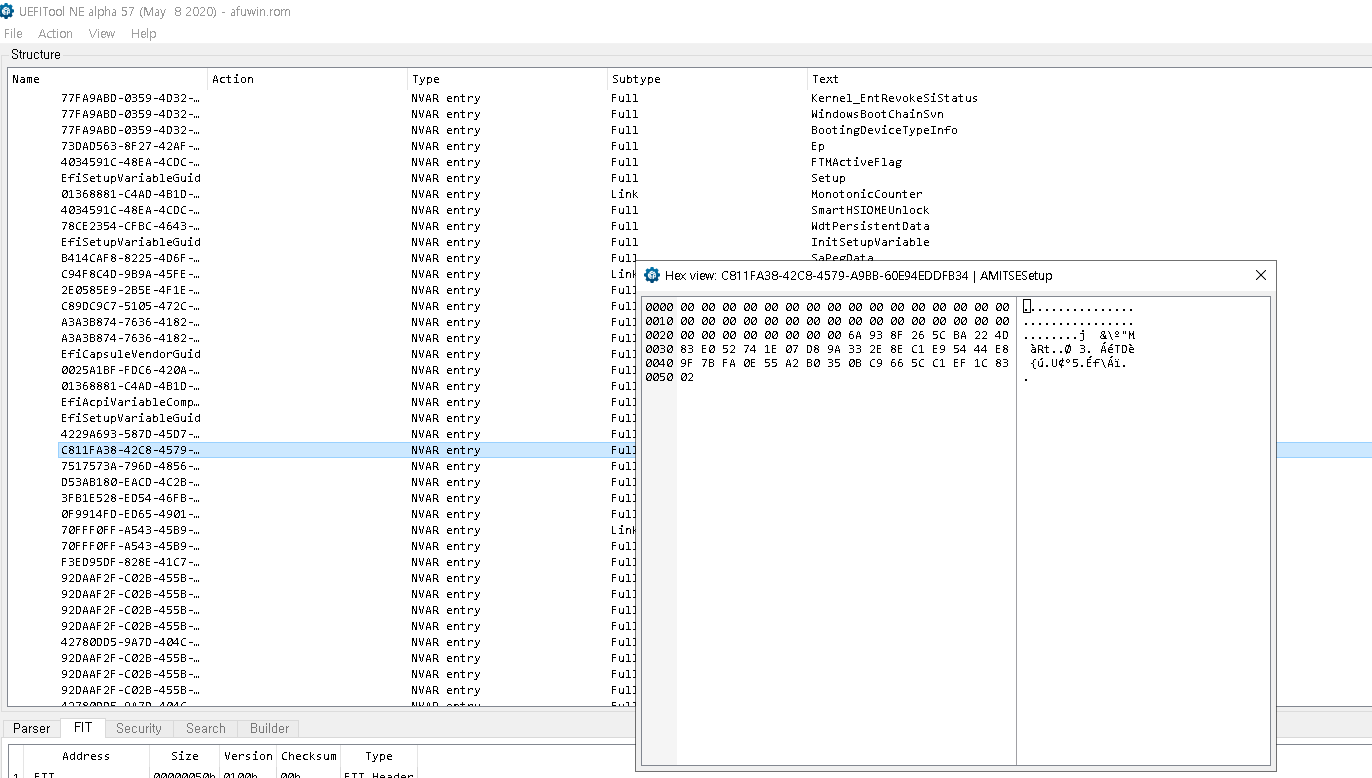
Expand the first EfiFirmwareFilesystemGuid >> NVRAM dropdown tree and look for the GUID
C811FA38-42C8-4579-A9BB-60E94EDDFB34 (AMITSESetup)
with subtype Data there will be others with subtype Link which are older no longer valid entrys because of the odd way AMI nvram works, if you find one of these right click on it and select "Go to data" and it will take you to the actual data entry.
Now right click and select "Body hex view" and you should see something like:

0000  00 00 00 00 00 00 00 00 00 00 00 00 00 00 00 00  ................
0010  00 00 00 00 00 00 00 00 00 00 00 00 00 00 00 00  ................
0020  00 00 00 00 00 00 00 00 00 00 00 00 00 00 00 00  ................
0030  00 00 00 00 00 00 00 00 00 00 00 00 00 00 00 00  ................
0040  7B 13 94 A6 07 3A 29 CD D2 60 1A F4 5C 87 ED 1A  {.”¦.:)ÍÒ`.ô\‡í.
0050  07 AE AE 41 DC D4 0A 68 AB FB FA 0E 55 A2 B0 35  .®®AÜÔ.h«ûú.U¢°5
0060  0B C9 66 5C C1 EF 1C 83 77 16 D2 A9 2D 3D 88 D0  .Éf\Áï.ƒw.Ò©-=ˆÐ
0070  E3 63 3E F7 99 8A F4 1D 4F B1 AA 44 05 D8 60 6B  ãc>÷™Šô.O±ªD.Ø`k
0080  01

In this the bytes from 0x00 to 0x3F are the currently unset user password, 0x40 to 0x7F are the obfuscated administrator password and 0x80 is the quiet boot flag.

1337 encryption

The password is obfuscated using super secure xor

VOID PasswordEncode( CHAR16 *Password, UINTN MaxSize)
{
    UINTN	ii;
    unsigned int key = 0x935b;

#if SETUP_PASSWORD_NON_CASE_SENSITIVE
    for ( ii = 0; ii < MaxSize; ii++ )
        Password[ii] = ((Password[ii]>=L'a')&&(Password[ii]<=L'z'))?(Password[ii]+L'A'-L'a'):Password[ii];
#endif

    // Encode the password..
    for ( ii = 1; ii <= MaxSize/2; ii++ )
        Password[ii-1] = (CHAR16)(Password[ii-1] ^ (key*ii));
}

So Xoring the above encoded password:

7B 13 94 A6 07 3A 29 CD D2 60 1A F4 5C 87 ED 1A 07 AE AE 41 DC D4 0A 68 AB FB FA 0E 55 A2 B0 35 
0B C9 66 5C C1 EF 1C 83 77 16 D2 A9 2D 3D 88 D0 E3 63 3E F7 99 8A F4 1D 4F B1 AA 44 05 D8 60 6B

with

5B 93 B6 26 11 BA 6C 4D C7 E0 22 74 7D 07 D8 9A 33 2E 8E C1 E9 54 44 E8 9F 7B FA 0E 55 A2 B0 35 
0B C9 66 5C C1 EF 1C 83 77 16 D2 A9 2D 3D 88 D0 E3 63 3E F7 99 8A F4 1D 4F B1 AA 44 05 D8 60 6B

gives

20 80 22 80 16 80 45 80 15 80 38 80 21 80 35 80 34 80 20 80 35 80 4e 80 34 80 00 00 00 00 00 00 
00 00 00 00 00 00 00 00 00 00 00 00 00 00 00 00 00 00 00 00 00 00 00 00 00 00 00 00 00 00 00 00

Each character of the password is stored as 2 bytes, and as x86 is wrong endian im guessing should be read as 0x8020 0x8022 I have no idea where the 0x80 comes from possibly its something to do with the EFI_SHIFT_STATE_VALID in this case the password was lower case, possibly uppercase status is encoded in this byte too I have no idea I havent tested uppercase passwords.

WTF scancodes how does this map to keys

From the unobfuscated data you can see the password is 13 characters long, im going to ignore the 0x80 bytes as i dont understand them :P and just look at the others:
20 22 16 45 15 38 21 35 34 20 35 4e 34
They appear to be some sort of scancodes, although while googleing this I found some AMI bioses seem to use ascii here so you can read it out directly as text, but not on this machine.
When this CF-U1 arrived from ebay it had a password which i sucessfully guessed as "toughbook" my second guess would have been "panasonic" since using text written on the front of the PC as a password saves writing it under the battery cover :P
Looking through the older link entrys for the AMITSESetup nvram I found what I thought was the data for this password which deobfuscating as above gave (ignoring the 0x80):

35 39 37 24 25 14 39 39 27
t  o  u  g  h  b  o  o  k

This seemed promising repeated characters have the same value and gives a bit of a key to the mapping Some googeling later about UEFI scancodes and i found this page:
http://wiki.phoenix.com/wiki/index.php/EFI_KEY
From this it seems the value is the offset into this enum so in the toughbook example 35 translates to EfiKeyD5 a second page I found gave the mapping from EfiKey to ascii:
https://github.com/tianocore/edk2/blob/master/MdeModulePkg/Bus/Usb/UsbKbDxe/KeyBoard.c#L36

So i made up a list of byte to ascii using these, below are just 0x10 to 0x4E to cover most values but not be too stupidly long.

Hex Char EFIkey Hex Char EFIkey
10 z EfiKeyB1 30 Tab EfiKeyTab
11 x EfiKeyB2 31 q EfiKeyD1
12 c EfiKeyB3 32 w EfiKeyD2
13 v EfiKeyB4 33 e EfiKeyD3
14 b EfiKeyB5 34 r EfiKeyD4
15 n EfiKeyB6 35 t EfiKeyD5
16 m EfiKeyB7 36 y EfiKeyD6
17 , EfiKeyB8 37 u EfiKeyD7
18 . EfiKeyB9 38 i EfiKeyD8
19 / EfiKeyB10 39 o EfiKeyD9
1A EfiKeyRShift 3A p EfiKeyD10
1B EfiKeyUpArrow 3B [ EfiKeyD11
1C 1 EfiKeyOne 3C ] EfiKeyD12
1D 2 EfiKeyTwo 3D \ EfiKeyD13
1E 3 EfiKeyThree 3E EfiKeyDel
1F EfiKeyCapsLock 3F EfiKeyEnd
20 a EfiKeyC1 40 EfiKeyPgDn
21 s EfiKeyC2 41 7 EfiKeySeven
22 d EfiKeyC3 42 8 EfiKeyEight
23 f EfiKeyC4 43 9 EfiKeyNine
24 g EfiKeyC5 44 ` EfiKeyE0
25 h EfiKeyC6 45 1 EfiKeyE1
26 j EfiKeyC7 46 2 EfiKeyE2
27 k EfiKeyC8 47 3 EfiKeyE3
28 l EfiKeyC9 48 4 EfiKeyE4
29 ; EfiKeyC10 49 5 EfiKeyE5
2A ' EfiKeyC11 4A 6 EfiKeyE6
2B | EfiKeyC12 4B 7 EfiKeyE7
2C 4 EfiKeyFour 4C 8 EfiKeyE8
2D 5 EfiKeyFive 4D 9 EfiKeyE9
2E 6 EfiKeySix 4E 0 EfiKeyE10
2F + EfiKeyPlus

So what was the password?

Using the above list and the recovered scancodes gave:

20 22 16 45 15 38 21 35 34 20 35 4e 34
a  d  m  1  n  i  s  t  r  a  t  0  r

and when i tried adm1nistrat0r it worked!
This is not complete as there are still questions about the 0x80 bytes but my guess is they encode the shift alt etc modifier keys but im back into my handheld so i'm not sure ill look further into it. This may also apply to other Aptio bioses as well as the Panasonic CF-U1, and if the machine isnt bootable you may be able to use a cheap spi adapter to dump the bios, in the case of the CF-U1 it uses an LPC flash which I don't think you can get cheap clips and readers for and its buried in the machine so a nuisance to get to.

@Ftmmsch
Copy link

Ftmmsch commented Jun 3, 2020

Please click on my profile!
Then you will see my email address!
The conversation via github is very annoying!
Then I can work directly via Outlook!
You're welcome ! Click on "Profile" = email address.
Send me the file by email - done.
Thank you :-)

@userx14
Copy link

userx14 commented Jun 3, 2020

Hi @FoRcEdOnLiNe,
your modification of the rom file looks good to me, as @Ftmmsche already noted the problem seems to be your settings of afuwingui. Can you share your current settings and the precise wordig of the error?
If you can't get it to work with the windows utility there is an option to use a freedos usb stick to flash the bios. But the windoss utility is probably easyer to use.
Be carefull, flashing an invalid rom image might softbrick your device.

Greetings
Benjamin

Copy link

ghost commented Jun 3, 2020

I’ve tried checking nvram and do no check rom id, checking main bios image and do not check rom id, checking everything, and all of these with unchecking do not check rom id. I can remember of hand the exact message but I believe it was a problem with writing and 3 squares remained white. I’m using windows 10 64bit and 64bit of the afuwingui.. the message also reads don’t restart the computer until a successful flash is done but it appears there no actual effect to the computer

@userx14
Copy link

userx14 commented Jun 4, 2020

Some stuff you could try:
Have you checked if your modified bios has the same number of bytes as your modifyed image?
Does wirting back the original unaltered image work?
And I forgot to ask, which laptop model do you have?

Copy link

ghost commented Jun 4, 2020

I tried the original file and received the same error, CF-31 MK3, I don’t know what you are referring to regarding the comparison.

@userx14
Copy link

userx14 commented Jun 4, 2020

The comparison would only be interesting if flashing the original image would have worked. Just to check that you have not accidentally altered the length of the file.

Have you tried only writing the nvram section/block? I would guess, because the password is in the category nvram variables, that writing back only this sectiom should be sufficient. But I have to admit, that I have not tested that myself.

Or if that fails too you could look up the procedure for flashing ami bioses with freedos and try it that way.

Copy link

ghost commented Jun 4, 2020

D04153D1-2997-4F0D-A3E2-CFC7E5765C04

@userx14
Copy link

userx14 commented Jun 4, 2020

Well, it looks like it can't properly erase the flash, so i would recommend you try either the afudos or afuefi.

Option 1 afudos:
For the first one you need a freedos usb stick, your bios and the afudos utility.
for freedos usb stick see here
I'm not sure if you can still download the afudos.exe from ami directly, but there are probably a lot of rehosts out there.
for a commans reference of afudos see here

Option 2 would be afuefi, but in order to use that your bios must offer a boot option called efi-shell. I'm not sure if the CF-31 mk3 already supports that.

If one searches for this error, then it is caused either by some write protection or it is a software problem which is normaly fixed by using the dos version. I would guess that Afudos would at least report a more detailled error message, if write protection would be in place.

@Ftmmsch
Copy link

Ftmmsch commented Jun 4, 2020

Hi,
There were other sections.
If it is not a single section, these are immediately after the first part.

The UEFI tool is actually not required.

Attention! To be on the safe side, make a copy BEFORE editing the ROM file!

  • for yourself - or for others!

1.) Open the ROM file with the HEX Editor.
2.) set the file so that it is at the beginning.
3.) In the search: Enter "AMITSESetup"
4.) Search direction: "All"
5.) Search
6.) Search further

Does the area look as if there are two almost identical sections in a row:
BOTH zeros.
From the beginning of the first part: bracket "["
By the end of the second part: "k"
! Let .NVAR stand!

Have fun with the now accessible BIOS :-)

P.S.

@Ftmmsch
Copy link

Ftmmsch commented Jun 4, 2020

Sorry - I have "wrongly" judged the last case here!
Sectons were still present that were not "zeroed", but this should NOT lead to the flash process failing ...

That would have to flash - only the BIOS would still be locked

P.S.
Sorry for my "misjudgment"

The following also applies to me:
"Those who can read have a clear advantage"

Copy link

ghost commented Jun 4, 2020

How do I proceed with the dos version? I created the usb stick

Copy link

ghost commented Jun 4, 2020 via email

@Ftmmsch
Copy link

Ftmmsch commented Jun 4, 2020

Did you got my message? - about flashing via USB ?
https://www.win-raid.com/t286f16-Guide-Deprecated-Flashing-modified-AMI-Aptio-UEFI-using-AFU.html
In there, he warned about using Aptio 4 - don't know if it could be the reason for Error 43....

and my advice, to try it with Aptio 5 (V) ? You did it with 4 ?

Here my link to the original AMI 3 + 4 + 5 + HEX
https://drive.google.com/file/d/1pSgb0q7STpvHuc4lBXjWz4ULIO9oa5RR/view?usp=sharing

You could try my edited file for a last time - using Aptio 5 (V)

Copy link

ghost commented Jun 4, 2020 via email

@Ftmmsch
Copy link

Ftmmsch commented Jun 4, 2020

@FoRcEdOnLiNe

what exactly do you mean with:
"I haven’t tried I don’t know how to proceed that way"

@Ftmmsch
Copy link

Ftmmsch commented Jun 4, 2020

@FoRcEdOnLiNe

which version of Aptio - AfuwinGUI.exe - did you use ?

@Ftmmsch
Copy link

Ftmmsch commented Jun 4, 2020

@FoRcEdOnLiNe
Does your PC support both? legacy BIOS mode and UEFI mode?
I don't know much about that, because, i don't know anything about Windows 10.
Anyway: to find out:

On Windows, “System Information” in Start panel and under BIOS Mode, you can find the boot mode. If it says Legacy, your system has BIOS. If it says UEFI, well it's UEFI. Alternative: If you using Windows 10, you can check whether you are using UEFI or BIOS by opening File Explorer and navigating to C:\Windows\Panther

When you tried to flash:
Did You:
run from an administrator account?
exit antivirus?
Stop all network connections?
Set the "UAC" (User Account Control) to the lowest / deapest setting?

Copy link

ghost commented Jun 4, 2020 via email

Copy link

ghost commented Jun 4, 2020 via email

Copy link

ghost commented Jun 4, 2020 via email

@userx14
Copy link

userx14 commented Jun 4, 2020

dos/freedos is only 16/32bit, but win7 can't run dos executables. So chose your windows version based on your processor and if it supports x64.

How do I proceed with the dos version?
Download afudos and put it inside a folder on your freedos usb stick, also copy the bios file there.
Start your CF31 and boot from your usb key.
Change your current working directory to the folder where afudos.exe and your rom file reside (cd Path\to\Folder).
Flash with the commands from the commands reference i posted earlier.

There are some tutorials out there, search for "afudos flash bios", or ask here if you get stuck.
Please try both versions of afudos (4.40 and 5.05.x) since I'm not sure which bios version you have.

@userx14
Copy link

userx14 commented Jun 4, 2020

And first try running the windows version with administrative priviledges if you have not done that so far.

Copy link

ghost commented Jun 4, 2020

I created the Rufus USB stick using the link you gave,do I just put the afudos and bios file on the USB stick?

@Ftmmsch
Copy link

Ftmmsch commented Jun 4, 2020

@FoRcEdOnLiNe
Does your PC support both? legacy BIOS mode and UEFI mode?
I don't know much about that, because, i don't know anything about Windows 10.
Anyway: to find out:

On Windows, “System Information” in Start panel and under BIOS Mode, you can find the boot mode. If it says Legacy, your system has BIOS. If it says UEFI, well it's UEFI. Alternative: If you using Windows 10, you can check whether you are using UEFI or BIOS by opening File Explorer and navigating to C:\Windows\Panther

Did you try it with the AfuwinGUI.exe from Aptio 5 / V - x 64 ?

@Ftmmsch
Copy link

Ftmmsch commented Jun 4, 2020

https://docs.microsoft.com/en-us/windows-hardware/manufacture/desktop/boot-to-uefi-mode-or-legacy-bios-mode

commandline:

reg query HKLM\System\CurrentControlSet\Control /v PEFirmwareTyp

Return code Firmware mode
0x1 BIOS

0x2 UEFI

I think, you could just run regedit and search for the Key: HKLM\System\CurrentControlSet\Control /v PEFirmwareTyp

@userx14
Copy link

userx14 commented Jun 4, 2020

I created the Rufus USB stick using the link you gave,do I just put the afudos and bios file on the USB stick?

Yes, it should be that simple. Just make sure that your bios file and the folder you can optionally create do not have a strange name, like special characters or commas etc.

@Ftmmsch
Copy link

Ftmmsch commented Jun 5, 2020

Found USB flash files in my chaos.
HP tool and usbdos.zip.
Should go relatively easily.
I translated the old description (PDF) into English.
The files are in the AMI folder.
For the sake of simplicity, I stuffed EVERYTHING from AMI and shortened the names - would be too long. The Panasonic WMI tool is also included and a folder with files to start an OS from the USB stick.
Here the link - is big - 43MB.

https://drive.google.com/file/d/1tBySiSj74hu62RRhWvWFMHsi9CLHzg1G/view?usp=sharing

@Ftmmsch
Copy link

Ftmmsch commented Jun 5, 2020

Btw: the Panasonic WMI Tool is a nice feature - but useless, if the supervisor password is unknown :-)

@Ftmmsch
Copy link

Ftmmsch commented Jun 5, 2020

Notice - as in the pdf from the usb bios flash folder described, the files (usbdos.zip), which are copied with the hp tool to the usb drive,
are "unvisible" (hidden) :-)
So don't delete them by accident :-)

Just read - and have fun

@Ftmmsch
Copy link

Ftmmsch commented Jun 5, 2020

So - i better go in bed for a few ours......

Good Night

Copy link

ghost commented Jun 5, 2020

The computer didn’t boot from the dos usb

Copy link

ghost commented Jun 5, 2020

7C22776E-6B02-4210-959D-42AD452AC280
And I got this message from aptio 5

Copy link

ghost commented Jun 5, 2020

The google link didn’t work for me either

@userx14
Copy link

userx14 commented Jun 5, 2020

The computer didn’t boot from the dos usb

Have you already tested if the stick is bootable with a different pc?
I'm not sure which features your bios has and if you are able to change them without a Admin password, but here are some options to check:
-disble Secure Boot
-enable CSM, sometimes called legacy boot
-obviously change the boot order

So please let me know if it works on a different pc and if you are able to change those settings.

AFUWINGUI seems to indicate your bios is an Aptio 4 one, so try afudos 5.05.X first.

@Ftmmsch
Copy link

Ftmmsch commented Jun 5, 2020

A note regarding my "USB BIOS Flash" in my AMI folder:
The HP format tool is NOT compatible with Windows 10!

@Ftmmsch
Copy link

Ftmmsch commented Jun 5, 2020

Btw:
What i have in my folder, is exactly the same software as from Here;
https://www.biosflash.com/e/bios-boot-usb-stick.htm
This site is in english and german

@Ftmmsch
Copy link

Ftmmsch commented Jun 5, 2020

Whereby I am now wondering how the flashing should work via USB stick ...
If due to the locked BIOS no boot order can be made ....

@userx14
Copy link

userx14 commented Jun 5, 2020

if you have nothing of importance on your hdd, or if you got a spare one, you could hook it up to another pc and install freedos there. You probably have to bypass some sanity checks of rufus, which will obviously try to save you from overwriting a hdd.

The last option would be to use an hardware flasher like a ch314a chich you can get for ca 10$, but this is always more risky than doing it the software way. And such a bios flasher from china might take a while i the current situation.

@userx14
Copy link

userx14 commented Jun 5, 2020

It would be a bigger problem if you can not disable secureboot or enable csm, as freedos still relies on legacy bios features and will not start with efi or uefi.

Copy link

ghost commented Jun 5, 2020

The usb works but bios is locked there for I cannot boot from usb because that requires it being selected in the bios. Afudos installs but doesn’t open on any of my systems which leads me to believe it was intended for usb flash. If others here have a CF-31 mk3 or higher and where able to do it then I should to it’s a matter of me figuring out why it’s not working

Copy link

ghost commented Jun 5, 2020

Could a DOS HDD Work?

@Ftmmsch
Copy link

Ftmmsch commented Jun 6, 2020

You got my last mail.

But: befor you try anything else:

Did you try to find out about your settings? "Systeminformation" ? "Ms32Info.exe" ?

At least, to find out about BIOS, EFI ect.
You didn't answer about that.

Copy link

ghost commented Jun 6, 2020 via email

@userx14
Copy link

userx14 commented Jun 6, 2020

The usb works but bios is locked there for I cannot boot from usb because that requires it being selected in the bios. Afudos installs but doesn’t open on any of my systems which leads me to believe it was intended for usb flash. If others here have a CF-31 mk3 or higher and where able to do it then I should to it’s a matter of me figuring out why it’s not working

Afudos will not work on anything other than dos, freedos, win3.1, win95, win98.
With Windows 2000 Microsoft switched to Windows NT as a kernel, hence dos applications will not run at all on newer systems (win2000, win xp, win vista, win7, win8/8.1 win10).

Could a DOS HDD Work?

Yes, see: https://gist.github.com/en4rab/550880c099b5194fbbf3039e3c8ab6fd#gistcomment-3331221 .
Rufus will hide you internal hard drives, because it wants to save you from wiping your windows install or other important data.
But there is a way to bypass that: https://superuser.com/questions/1337415/make-rufus-show-internal-hard-drives .
Please tripple check when you install freedos that you have selected the right HDD.
Alternateiveley you can probably use the usb stick you created for that, and install freedos on the hdd from there see: http://web.uflib.ufl.edu/libsys/Liaisons/InstallingFreeDOS.html .

But before you spend time installing freedos to hdd please check if you can enable csm (legacy boot) or if there is this option.
Because freedos can't be booted from efi/uefi.

Copy link

ghost commented Jun 6, 2020

0359EDE0-9D8A-4876-9442-E18CD0FEAA21

Copy link

ghost commented Jun 6, 2020

46DA06CE-BB8B-402F-9E21-AA9B0A48974A

Copy link

ghost commented Jun 6, 2020

95A93659-CAC3-475A-AF77-DCD2EDC40564

@Ftmmsch
Copy link

Ftmmsch commented Jun 6, 2020

shame shame....

all the time, i forget about the PC informaton viewer.... sorry

Copy link

ghost commented Jun 6, 2020

Does anyone know to get afuwingui64 to open on windows 7

@Ftmmsch
Copy link

Ftmmsch commented Jun 6, 2020 via email

Copy link

ghost commented Jun 6, 2020

7x64 aptio 4 it’s a mk3 aptio 5 is for the mk5

@userx14
Copy link

userx14 commented Jun 6, 2020

95A93659-CAC3-475A-AF77-DCD2EDC40564

Seems ok, boot mode is set to compatible, which is csm enabled.

@userx14
Copy link

userx14 commented Jun 6, 2020

Does anyone know to get afuwingui64 to open on windows 7

Haven't you said you installed win7 32bit? Then you will be unable to open any 64 bit application, which afuwingui64 obviousely is.

Copy link

ghost commented Jun 6, 2020

I switched to win7 64 because I had no luck with win7 32

Copy link

ghost commented Jun 7, 2020

It will boot from windows recovery CD and windows 10 usb downloaded from the Microsoft website(but I get BSOD) so either it doesn’t recognize the dos or I didn’t create a proper bootable usb...It appears the boot order is CD, HDD the USB

@userx14
Copy link

userx14 commented Jun 7, 2020

Just checked with my pc (desktop), installed with rufus portable, freedos launches, but only when csm is enabled.
Can you test the stick with another pc? That way you could rule out the stick as the problem.

@Ftmmsch
Copy link

Ftmmsch commented Jun 7, 2020

Btw: AufuwinGUI.exe not running:
I just did a self-test on my CF-31 because I wanted to check something.
I noticed that my AfuwinGUI.exe suddenly could not be run anymore!
I deleted it and completely packed the folder where it was in on the desktop.
Now it was suddenly.
When I took the AfuwinGUI.exe out of the folder one by one, it didn't work ...
Now that I have selected the whole folder, I was able to flash easily.

@Ftmmsch
Copy link

Ftmmsch commented Jun 7, 2020

@FoRcEdOnLiNe:

Something is strange about the failed flash attempts ...
Could it be that you have NOT used the AMI tool: "AfuwinGUI.exe" to save the ROM file?
Instead, a tool such as "BIOS Backup ToolKit" ???
I am surprised that your ROM file is twice as big as the ROM file from MY CF-31!
If you actually used a tool like the "BIOS Backup ToolKit", that would be NORMAL!
This tool makes a FULL BackUp!
Therefore a back-up of - par example: "BIOS Backup ToolKit" twice as big!

If I'm FULLY wrong,
I would like to be enlightened!

@userx14
Copy link

userx14 commented Jun 7, 2020

Btw: AufuwinGUI.exe not running:
I just did a self-test on my CF-31 because I wanted to check something.
I noticed that my AfuwinGUI.exe suddenly could not be run anymore!
I deleted it and completely packed the folder where it was in on the desktop.
Now it was suddenly.
When I took the AfuwinGUI.exe out of the folder one by one, it didn't work ...
Now that I have selected the whole folder, I was able to flash easily.

Are you talking about the afuwin64.zip file?
AFUWINGUIx64.EXE probably depends on AFUWINx64.EXE and amifldrv64.sys to be present in the folder in which you try to run it.
With some unzip tools running the programm directly from the archive works, because they create a temporary folder with all the contents of the archive while unzipping and start the exe in there.

@Ftmmsch
Copy link

Ftmmsch commented Jun 8, 2020

Thanks for your explanations.
Keeping that in mind will definitely help me :-)

Do you know if "FoRcEdOnLiNe" has found a solution by now? He wrote nothing more.
Also I still don't know if he got the ROM file
actually saved with AfuwinGUI.exe, or took another program.
OK - normally he will have done it with AFU,
But as I said: it makes me wonder that his BIOS ROM file is twice as big as mine.
And I also have a CF-31.
OK - I have CF-31 mk2 he has mk3.
But: can the difference be so big?
Unfortunately I have no idea whether that could be due to Winows 10.
Now he has Windows 7 on it.
Would be nice if he would save and send me a ROM file again.

Copy link

ghost commented Jun 9, 2020

Still haven’t unlocked it, tried a mk5 that was unlocked with aptio 5 just to see it I could flash it and it seemed to work, there were no errors it was running 8.1. I got no where on the mk3 with windows 7 because I couldn’t get pass the not signed driver menu and Windows 10 the flash failed. I was wondering it there was a problem with the bios it self. I’ve also seen a 4.48 version of afuwingui trying to find it to download and try

@Ftmmsch
Copy link

Ftmmsch commented Jun 9, 2020

Hi,
could you please tell me, which software you used to safe the ROM file?

Because, i was wondering about the size! It's twice as big as my ROM file.
Mine is about 3 MB and your's is abbout 6 MB ?
Did you try a software like: Backup Tool ?
I used that once - just to find out about differences.
But:
1.) it was twice as big as the file, i safed using AfuwinGUI.exe
2.) My Antivirus gave extrem Alarm about this "Software Tool"

I don't know about differences of my CF-31 mk2 and your CF-31 mk3.

As i told you before: If you trust me, you can let me have look on your PC - via "TeamViewer".

What did you use? AfuwinGUI.exe ?

Could you please safe a file again and send it to me ?

Copy link

ghost commented Jun 9, 2020

Afuwingui from Aptio 4 downloaded from AMI on a windows 10 x64 operating system

@Ftmmsch
Copy link

Ftmmsch commented Jun 9, 2020

Now, you are running win 7 ?

Did you safe a file again ? under Win 7 ??
If so: how big ? what is the size of the rom file, when it is safed under Win 7 ?

Copy link

ghost commented Jun 9, 2020

Afuwingui is now working on windows 7 x64, the file is the same size 5.50 mb

Copy link

ghost commented Jun 9, 2020

Still fails to flash

@userx14
Copy link

userx14 commented Jun 9, 2020

Still haven’t unlocked it, tried a mk5 that was unlocked with aptio 5 just to see it I could flash it and it seemed to work, there were no errors it was running 8.1. I got no where on the mk3 with windows 7 because I couldn’t get pass the not signed driver menu and Windows 10 the flash failed. I was wondering it there was a problem with the bios it self. I’ve also seen a 4.48 version of afuwingui trying to find it to download and try

What do you mean by "the not signed driver menu"?
Have you tried booting with F8 and selected "disable driver signature enforcement", which should disable those restrictions for the current session?

One small additional thing you could try is turning of User Account Control (UAC), as some manufacturers recommend, see page one of this pdf:
https://www.ecs.com.tw/extra/flashutl/afuwin.pdf

@Ftmmsch
Copy link

Ftmmsch commented Jun 9, 2020

told about that from the beginning on.....

allready added in my description PDF:

As:
connect via adapter - don't run from battery !
login to an administrator acccount
turn off UAC resp. set to the lowest level
stop antivirus
stop all networks
close all programs - specially Outlook ! this tiny sweet tool ! does A LOT of backgraund work !

And additional, its possibel to make a clean boot.
MsConfig --> Hide all microsoft services --> uncheck all others --> restart --> Confirm the message with OK

Try, what ever..... :-)

If everything is done: Don't forget to reset the settings

(undSoWeiterundSoWeiter....) (That seems to end in: "And the marmot greets every day" ....... - oder wie dat Murmeltier heisst...)

Copy link

ghost commented Jun 9, 2020

Ok, from the beginning I try the steps listed about it’s a CF-31SBLEB1M that was running windows 10 the password was encoded like above indicate so I tried the steps to “zero” the password but it failed will the message about “43” error erasing flash, then I tried afuwingui 5 but its for newer motherboards, so I tried the bootable usb but I was unable to get it to boot, then I changed operating systems to windows 7 32 then windows 7 64 at first the afuwingui wouldn’t load because the “driver was not signed” I was finally able to overcome that but the flash still fails “43” error erasing flash I even tried a dos cd version...no good. Currently leaning towards the notion that 1. the bootable usb was not created correctly and the boot files were not there, 2. the bios may be corrected, and 3. afuwin version 4.48 may be the version I should be using...still trying

@userx14
Copy link

userx14 commented Jun 9, 2020

I even tried a dos cd version...no good.
Was it freedos?
What happened (not recognized by bios)?

to 1.:
And have you tested the freedos stick/cd with another pc?
Since you are able to boot a windows usb stick for installation the only bios setting I can think of which could lead to the freedos stick not booting would be CSM/legacy boot.
Or the other cause could be a non working freedos usb stick.

to 2.:
Yeah, the point where it fails is the erasing of the flash cells before writing the image, so that has probably nothing to do with your bios image.

@Ftmmsch
Copy link

Ftmmsch commented Jun 9, 2020

At the risk of annoying me::

May I ask again whether the ROM file was backed up with AfuwinGUI.exe?
I have already explained why I am asking this boring question.
Or can someone explain why the CF-31 mk3's ROM file is twice the size of my backup?
Info told me that there are tools that create a file twice the size.
That is the background of my "stupid" question .....

Copy link

ghost commented Jun 9, 2020

  1. No, but i know this system will boot from the windows 10 installation usb it that is any help. I don’t know if it was freedom or dos 6.2

Copy link

ghost commented Jun 9, 2020

Backed up using afuwingui

Copy link

ghost commented Jun 10, 2020

D3009C64-B03E-4525-9936-72EBA91D6784

The flash drive was not properly created by Rufus it appears boot files are missing or maybe I was supposed to add them?

Copy link

ghost commented Jun 10, 2020

48673759-1462-4E76-A5AA-E7642E07DDA0

@userx14
Copy link

userx14 commented Jun 11, 2020

D3009C64-B03E-4525-9936-72EBA91D6784

The flash drive was not properly created by Rufus it appears boot files are missing or maybe I was supposed to add them?

You will not be able to see the if the MBR has been written correctely,
my working freedos stick looks exactely the same in windows explorer.
-LOCALE folder
-autorun.ico (does not matter)
-autorun.inf (does not matter)

The only way to find out if the stick is working, is testing it with a different pc.

Copy link

ghost commented Jun 11, 2020

With access to the bios I’m not going to be able to boot from the dos usb. I’m probably going to have to make a dos HDD

@Ftmmsch
Copy link

Ftmmsch commented Jun 11, 2020

Dear friend :-)

If it is not "to late" :-). I have a solution!

Because i was allways a Freak :-). I tested various situations. Like running my old Knoppix 5.3, which ten years ago was the only version ho gave me grandious füll access to everything on my extrem damaged laptop. But this isn't suitable, because i can't run Microsoft Software with it. I tested variuos situations. Füll read and write access on a added USB flash gave me nothing because of NO Microsoft software.
So, i was thinking about other "Life-System-Idea's". Suddenly, i remained about WinPE Builder....... I have allready a Win 10 1809 Red Oktober 2018, because this is one of the best for CF-31 mk2. Which isn't made officially or Win 10. I bought One on Ebay for my girlfriend and have to figuere out to run it With an allready installed Win 10 and install Win XP Prof as second..... I am crasy. I know. Now to the point my friend:

I created a WinPE SE with Win 10 1809 Red Oktober 32bit.

I tested it on my own Lappy :-). I knew, it,s riky. But. Scheiss drauf.

I set my CF-31 mk1 to very Bad settings!
1.) Set the Bios Password to locked
2.) Set the bootorder to:

1 HDD
2 LAN
3 Floppy
4 Internal ODD
5 USB ODD
!

And than! I Put out the HDD Caddy!

Connected my USB ODD to the Toughbook
Put in my WinPE SE Win 10 32bit

Put in my USB stick, whereon i previos expand to it my BIOS file WITH Passwort!
And AfuwinGUI.exe. But not standalone! I expand the complete folder to the stick using WinZIP.
Put in the stick.

Started the Toughbook.

Guess WHAT !

The USB ODD Started DIRECTLY ! Within Seconds!

I went to my USB stick. Opend it. Clicked on AfuwinGUI.exe. Loaded my ROM file. Flashed. And i had a locked BIOS again :)

But THIS Time, i new my password.

If you don't beleave me.....

You blame me for someone ho is telling fairytales!

The 32bit version is one point better as the 64bit. For those actions. Because the 32bit can handle on 32bit both BIOS. Legacy and UEFI and on 64bit Legacy Bios. The 64bit can only handle both on 64bit. Tommorrow more, because i ruined my Toughbook with all that Gefrickel... Trying to make a Upgrade. Because it's not possible like it was in XP to repair....

I tried to much suspicious software. Only for ONE reason. Because of the shit Microsoft Ballpoint Mouse driver. Those ho have a Toughbook no what i am talking about. I had trouble on my Creation because of this driver. If you are lucky, you can uninstall him on WinPE. But it is a life system. Next time he come back. To avoid this, i tried many many software to delete this driver....
No my Lappy is almost PLATT. Tomorrow more my friend. When my Touchy is running than......

@Ftmmsch
Copy link

Ftmmsch commented Jun 11, 2020

Sorry. Mistake. I set my BIOS to UNLOCKED. Of course

@Ftmmsch
Copy link

Ftmmsch commented Jun 11, 2020

JO. ! OHNE Scheiss. !

@Ftmmsch
Copy link

Ftmmsch commented Jun 11, 2020

So.... Finally got my Win 7 starting.... After..... never mind.
But NOW, my XP Prof is gone.... Next Project......

@userx14
Copy link

userx14 commented Jun 12, 2020

@Ftmmsch

I set my CF-31 mk1 to very Bad settings!

Was your test to help FoRcEdOnLiNe? Because I suspect that even with the Win10 PE edition, which is win10 at heart the problem with the error when erasing the flash would probably still be there.

i tried many many software to delete this driver

I have not seen a working driver uninstaller software.
Have you already tried using windows device manager and View > Show Hidden Devices and tried to uninstall the driver that way?

Well that driver uninstaller software is sometimes adware so I would consider reinstalling windows if you can spend the time.

The 32bit version is one point better as the 64bit

Are you sure about that? According to: https://docs.microsoft.com/de-de/windows-hardware/manufacture/desktop/winpe-intro

The 32-bit version of Windows PE can boot 32-bit UEFI and BIOS PCs, and 64-bit BIOS PCs.
The 64-bit version of Windows PE can boot 64-bit UEFI and BIOS PCs.

And since all processors from Intel/Amd have 64 bit support starting from the core2duo line you shouldn't need 32bit support. The 64 bit edition works on both UEFI and BIOS.

But NOW, my XP Prof is gone.

It's probably difficult to have both bootloaders installed in the MBR so when you are installing the second windows you are probably wiping the bootloader of the one you installed first. So it is probably still there, but you will not be able to boot it.

If you have not seen that already, take a look at "Option 2"/lower half on this website:
https://www.sevenforums.com/tutorials/8057-dual-boot-installation-windows-7-xp.html

They are using https://neosmart.net/EasyBCD/ to avoid the problem.

@userx14
Copy link

userx14 commented Jun 12, 2020

With access to the bios I’m not going to be able to boot from the dos usb. I’m probably going to have to make a dos HDD.

Yeah, that's a good idea 👍 , keep me posted when you have any problems / success.
If that is also not working it's probably some setting in the bios which avoids booting with non efi bootloaders, and which you probably won't be able to change. Then I would look into hardware flashing the bios chip. Maybe it is easily accessible underneath a hatch on the backside.

Copy link

ghost commented Jun 12, 2020

I picked up a CF-31 MK2 with a BIOS lock and tried, the file size was 2.56MB vs the 5.50MB on the MK3 and MK5, at first I selected Main BIOS image and Do not check ROM ID,after rebooting the password was still active, then I selected Program all blocks and Do not check ROM ID rebooted and had access to the BIOS

Copy link

ghost commented Jun 12, 2020

I’m still having trouble with the MK3, as for the post about WIN PE I didn’t understand it. I was still on the idea that AFUDOS was to eliminate Windows from the process hoping for a different result. I was able to create a FREEDOS DVD/CD using the free version of UltimateISO and FREEDOS cd ISO but was unable to figure out how Create a new iso including AFUDOS and the .ROM file. The CF-31 MK3 was able to boot from the CD into FREEDOS with no problem but that’s as far as I got. I want to try and create the FREEDOS HDD and add the files to see what happens

@Ftmmsch
Copy link

Ftmmsch commented Jun 12, 2020

@Benjaminrenz
1.)
Yes - the whole thing was meant to help FoRcEdOnLiNe.

Quotation:
"which is win10 at heart the problem with the error when erasing the flash would probably still be there"

Why not try it out?
More than "does not work" cannot happen - can it?

It goes with me! WITHOUT mistakes
and THAT with the hard drive removed and in the boot sequence, the optical USB drive is intentionally set to the last position!
Remove the password beforehand and flash the ROM with WinPE 10 with a password file!
Password was back - BIOS locked!
Why not try it?

HDD Caddy removed -> required software expanded to the USB stick - ROM file copied to the USB stick -> insert ->
Put WIN PE in the drive -> start -> flash -> done ???

2.)
that, with the "Uninstaller Software" probably a misunderstanding :-)
I may have misunderstood myself.
It's about creating the WinPE SE Win 10 ISO.
Logically, all Microsoft drivers are included in this offline image.
Since many Toughbook owners (unfortunately also I) have the problem with the mouse driver: "Microsoft Serial Ballpoint" (dirt :-), I was looking for a way to remove the driver from the offline image - the expanded ISO .
THAT is of course NOT possible via the "Device Manager" :-)
Since I had problems with DISM - or you have to enter the address / position via DISM or have to know - this did NOT work in this way.

Because I tried some DISM-GUI and got errors when mounting the created mount folder or the mount folder could not be accessed,
I tried EVERYTHING I could get somewhere in software :-)

I "smashed" something :-)

Have the Win 7 under control again - for. I find out about the mistakes :-)

As I said: It's about a way to remove the driver from the offline image - BEFORE I integrate Win 10 1809 Red October 32bit in WinBuilder WinPE SE .....

I already suspect how I can do it ...
Because ..... I now, with the Win 7 repair, had the problem that the Scheiss Ball Point driver keeps coming in.
THANK GOD :-)
Because before - and now with the repair, I was always so "smart" and uninstalled it immediately !!!!!!!!!

Last time I was so smart Gottseigdank and wrote down everything BEFORE uninstalling.
Hardware addresses, driver keys ect.

I find THIS via DISM GUI !!!!!!!

Then I can finally eliminate this dirt driver !!!!!

3.) I know what the 64bit supports.
Now that I only have the 32bit, I just wanted to say that my 32bit can also flash its 64bit - unless it was UEFI.
Actually I just wanted to say that I have a 32bit, which you can use "restricted" for 64bit - except for 64bit UEFi BIOS.

Background:
I have a Win 10 1809 Red October 32bit.
And of that I can NOT create a WinPE SE Win 10 64bit - THAT was everything.

4.)
I know how to fix the boot loader again. Now I have to completely repair Win7 :-)

@userx14
Copy link

userx14 commented Jun 12, 2020

The CF-31 MK3 was able to boot from the CD into FREEDOS with no problem but that’s as far as I got.

If you grab the live image from:
http://www.ibiblio.org/pub/micro/pc-stuff/freedos/files/distributions/1.3/previews/1.3-rc3/FD13-LiveCD.zip
extract the iso you basically have two options:
a) Use WinRar or any other tool that can modify iso files to add your bios/afudos directly into the iso and burn it
b) Use WinRar to add usb drivers http://www.georgpotthast.de/usb/ to freedos and use an usb stick for the bios file and afuwingui

If you have a rooted android phone you can avoid burning ISOs to DVDs. There is a nice tool called Drive Droid which will work on most rooted Phones and let your phone emulate an usb-dvd-drive where you can just virtually insert the iso from your phone's internal storage.
https://play.google.com/store/apps/details?id=com.softwarebakery.drivedroid
Even the free version should be able to do this, but you need a rooted android device.

@Kaluluka
Copy link

Kaluluka commented Jun 15, 2020

Hi!
I'm new to this forum, but have some experience:
Here is HEX from my CF-53 MK4 BIOS:
5B20B67C11D46C03C75A22AB7D66D817
33AE8EC7E93A44039FF0FAB55501B0BD
0BF666B6C10D1C967716D2A92D3D88D0
E3633EF7998AF41D4FB1AA4405D8606B
01

Who can help to decode password for it, please?
Thanks in advance!
Regards,

@userx14
Copy link

userx14 commented Jun 15, 2020

@Kaluluka, your password is stored as a hash, no way to get it back/decode it, only option is to overwrite it with zeros to reset it.
Check https://gist.github.com/en4rab/550880c099b5194fbbf3039e3c8ab6fd#gistcomment-3275884 for details and feel free to ask if anything is unclear.

Hi!
I'm net to this forum, but have some experience:
Here is HEX from my CF-53 MK4 BIOS:
5B20B67C11D46C03C75A22AB7D66D817
33AE8EC7E93A44039FF0FAB55501B0BD
0BF666B6C10D1C967716D2A92D3D88D0
E3633EF7998AF41D4FB1AA4405D8606B
01

Who can help to decode password for it, please?
Thanks in advance!
Regards,

@Kaluluka
Copy link

Kaluluka commented Jun 15, 2020

I read the whole thing before I wrote and asked for help.
I just wanted to see what password was there, thats all.
THANKS again for reply!
Zeroing out worked like a charm.
But after setting BIOS to default values, password is back....
I want to get rid off it.
Regards,

@Kaluluka
Copy link

Kaluluka commented Jun 15, 2020

I managed to get rid off supervisor password.
All is good now...

@userx14
Copy link

userx14 commented Jun 15, 2020

@Kaluluka

I read the whole thing before I wrote and asked for help.
I just wanted to see what password was there, thats all.

Hm, sorry I didn't meant to come off as rude, but I see two possibilities:

  • I still don't understand what you want
  • what you want is impossible (before quantum computers are a thing 😄 )

So you have the hash of your password here:
sha1: b3 5a 6e 4e ba df 61 8d 80 06 6e eb 8b bb a3 88 3f ea e2 15
But those bytes are not scancodes or you raw password, but a hash of the former.

So you will either have to brute force sha1 which might possibly be salted. You can try to brute force sha1 with the help of a gpu, but if you do not have any additional information like password length, number or position of letters, if it is salted,... you have pretty bad chances.
The "current" (2017) status for finding a collision with sha1 is that it will take you 6,500 years of CPU time. And that's just for a collision (input that procudes the same hash, which might or might not be your password). Or if you have a supercomputer at your disposual it will take considerably less time 😀 .

But after setting BIOS to default values, password is back....

I've seen that the password byte string apperars in two places in the bios, maybe the second version is the one where the settings get loaded when you press reload default values. Have not tested that yet.

Or maybe the simplest solution is:
Just don't reset your bios to default settings, normally there shouldn't be a need to do that...

Greetings
Benjamin

@Ftmmsch
Copy link

Ftmmsch commented Jun 15, 2020

@Kaluluka:
last time, i made a few changes with the password's - just for testing purpose.
After i did that, i noticed, that there where changes - the files - resp. the positions of the password area where changed!
I could NOT find them again - like i did before - using UEFI Tool!
I had a lot of work, to find it back again - Why? The UEFI Tool could NOT find all entry's !
That was alot of work - I could leave it, like it was - I new my own password :-) I did it just to find out, what's going on.

If you are interested in my help - just look at my profile - there is my second e-mail adress - an send me an e-mail - if you like to.

Regards

@Kaluluka
Copy link

Kaluluka commented Jun 15, 2020

Thanks to all for replies!
I managed to zero-it all the Password HASH-es in ORIGINAL BIOS
and after flashing it back (in win 10, with AFU tool), all the passwords age gone.....
Regards,
h t t p s://mhhauto.com/Thread-Toughbook-Hacker-v1

Copy link

ghost commented Jun 28, 2020

24966392-48FA-4559-B6E4-424AFBA3EAC2

Copy link

ghost commented Jun 28, 2020

B675C347-D777-4744-A5F0-631FB15ABFE5

@userx14
Copy link

userx14 commented Jun 28, 2020

B675C347-D777-4744-A5F0-631FB15ABFE5

Well, If even the dos version is unable to erase the flash there is probably a hardware write protection somewhere.

This can be a little microswitch on the mainboard or a jumper/test pad, which might or might not be accesible via a service hatch on the bottom of you unit. In some cases this can also be a screw making contact with something.
just to get some inspiration take a look at: https://superuser.com/questions/1245442/how-to-remove-bios-write-protect-screw-for-hp-pavilion-14-chromebook
as chromebooks makers are quiet creative in stopping users to boot other operation systems.

One possibility to find this is to first locate the 8pin bios chip and aquiere it's pinout to check which pins is the write protec (wp) pin. Then follow that trace.
see: https://wiki.gentoo.org/wiki/Sakaki%27s_EFI_Install_Guide/Disabling_the_Intel_Management_Engine#locate_chip

@Ftmmsch
Copy link

Ftmmsch commented Jul 3, 2020

@FoRcEdOnLiNe
as i can see, you didn't download my Win10PESE1809Enterprisex86 / x64 yet.
But you downloaded "Ventoy" and 7zip.

In short:
Last time, i wrote, that i had problems to expand files on the USB version. Therefore 7 zip was needed.

But, i made a mistake with my description!

Actually, you can expand the folder of your choice befor you run the USB stick.
Just expand the zip of your choice - but DON'T take out the software (exe) of your choice out the origin folder!
That's all.

Again in short:

Btw: doing it using "Ventoy" on a USB stick, is the best way - no DVD drive needed - BOTH ISO's can run on tge same stick!

Doing it with DVD:
Burn the Win10PESE1809Enterprise x86 or x64 on DVD.
Put the AMI software of your choice on the USB stick.
Shut Down the Toughbook
Take out the HDD Caddy
Put the DVD in an internal or external DVD drive
Put the USB stick into the USB slot - please DON'T do that with a HUB ! - better directly!
Start the Toughbook
On WinPESE, go to "start" --> msinfo32.exe --> take a look on the right side for legacy BIOS or UEFI Bios
Run Aptio, to safe a ROM file

Doing it with USB:

Btw: Contrary to my previous statement, the
ZIP software is NOT required!
Just make sure that NOTHING is removed from the folder after the last expansion!
Copy the complete folder to the USB stick.

  • you need 2 USB sticks! - on for the ISO ("Ventoy") and one for the Aptio software

Btw: with USB, you have ONE big + !

  • you can put BOTH ISO'S togehter on ONE USB stick!
    When you start the PC from the "Ventoy" USB stick,
    Simply select with arrow up or down -> Enter -> done!

Run "Ventoy.exe", to "install" (prepare) the desired USB stick.
Drag and drop the Win PE SE ISO'S to the "Ventoy" USB stick.
(The full path of the iso file (directories,subdirectories and file name) could NOT contain space or non-ascii characters!)

Put the AMI software of your choice on the second USB stick.
Shut Down the Toughbook
Take out the HDD Caddy
Put the "Ventoy" USB stick in the slot - please DON'T do that with a HUB ! - better directly!
Start the Toughbook ONLY ! with the "Ventoy" USB stick!
Chose x86 or x64 ISO - Please note! The Aptio of your choice has to be be the same as the ISO ! x86 or x64 !

AFTER ! startup, put the second USB stick into the USB slot - please DON'T do that with a HUB ! - better directly!

On the left, you'll see a WinPESE warning! Ignore that! You HAVE access to ALL drives!

In WinPESE, go to "start" --> msinfo32.exe --> take a look on the right side for legacy BIOS or UEFI Bios

Run Aptio, to safe a ROM file

@Ftmmsch
Copy link

Ftmmsch commented Jul 6, 2020

@Benjaminrenz
do you know about someone, ho tried ONLY to flash "NVRAM" ? no more - just ONLY NVRAM ?

I guess, that i have to play for "Versuckskaninchen" by myself again :-)

Btw: i created two Win 10 XPE 1809 Enterprise iso x86 and x64. - instead of Win PE SE.

With my Win 10 PE SE, i had - at least on USB (With "Ventoy") the problem, that i could not expand files on/from a second USB stick.
Therefore, i had to install 7 zip after startup.
With the DVD version, i did NOT have this problem.

Now, i created two Win 10 PXE 1809 Enterprise iso's and had no more problems on "Ventoy" USB.
At least for my uses - "Ventoy" is the easiest and fastest way to create a bootable life ISO.

No problems with expanding files
Keyboard Layout (Language) right on the desktop.

And for all ISO's = NO risk, like with an online Windows! NO background running apps possible!
Which is on an online Windows allways risky !

About: NVRAM: I'll test it - about flashing ONLY the NVRAM.

@Ftmmsch
Copy link

Ftmmsch commented Jul 6, 2020

Next project wil be: How to integrate parts of the Windows E WDK in an offline image - using DISM.
Until now, i could fix and add everything, i wanted - we'll see............

@Ftmmsch
Copy link

Ftmmsch commented Jul 6, 2020

P.S.
Regarding EWDK, I was probably a little hasty and took my mouth a little too full .....
I just see that the download has 12.7 GB .....

Well - I'm unemployed and (unfortunately) have the time to find out if and if so how I can integrate parts .....
DISM is now my friend :-)

It took a long time to see all things that come after XP!
Because ONLY XP is and was built logically!
 
AMEN

@Bios597407
Copy link

Bios597407 commented Jul 8, 2020

7d00ad001d00fc00ee003e005e001d00c900c10020000e001200da00e3000c003e002f001900ed000000000000000000000000000000000000000000000000

Who can help to decode password for it, please?
Thanks in advance!
Regards,

@userx14
Copy link

userx14 commented Jul 8, 2020

7d00ad001d00fc00ee003e005e001d00c900c10020000e001200da00e3000c003e002f001900ed000000000000000000000000000000000000000000000000

Who can help to decode password for it, please?
Thanks in advance!
Regards,

Hi @Bios597407,

like others your password is hashed, so there is no way to get it back. You can overwrite the section with zeros though, so there will be no password set. Check:
https://gist.github.com/en4rab/550880c099b5194fbbf3039e3c8ab6fd#gistcomment-3317525
or other posts for details.

If something is unclear feel free to ask :)

Greetings,
Benjamin

@userx14
Copy link

userx14 commented Jul 8, 2020

CF-53 mk2

5B D0 B6 7E 11 3D 6C 59 C7 63 22 34 7D F1 D8 5E 33 71 8E 0A E9 66 44 2F 9F 50 FA F1 55 F2 B0 BB 0B E1 66 2E C1 9E 1C 6A 77 16 D2 A9 2D 3D 88 D0 E3 63 3E F7 99 8A F4 1D 4F B1 AA 44 05 D8 60 6B

can you decode ???

here is a fulll block :
4E 56 41 52 98 00 FF FF FF 83 0D 41 4D 49 54 53 45 53 65 74 75 70 00 5B E2 B6 9C 11 CC 6C 0A C7 AD 22 9C 7D D1 D8 E0 33 74 8E 7D E9 6D 44 E8 9F BF FA 88 55 95 B0 66 0B 0F 66 BC C1 E5 1C C6 77 16 D2 A9 2D 3D 88 D0 E3 63 3E F7 99 8A F4 1D 4F B1 AA 44 05 D8 60 6B 5B D0 B6 7E 11 3D 6C 59 C7 63 22 34 7D F1 D8 5E 33 71 8E 0A E9 66 44 2F 9F 50 FA F1 55 F2 B0 BB 0B E1 66 2E C1 9E 1C 6A 77 16 D2 A9 2D 3D 88 D0 E3 63 3E F7 99 8A F4 1D 4F B1 AA 44 05 D8 60 6B 01

I was set whole block with 00 (zero) at 2 places int the .bin , and it give me acceess to bios , but when i make "Load BIOS defaults" ->> save and reboot , the pasword is back even i set my own.
Dumping again and at the place of AMITSESetup block - still the same ( 00 00 00 ...) , nothing stored there.
Any ideas ???

Hi @OmegaSetinell

Your password is hashed, so like Bios597407 you will not get it back. But overwriting with zeros should reset the BIOS so that no password is set.

When you "Load Bios defaults" the variables in the NVRAM probably get overwritten by their defaults which are probably hardcoded somewhere in the rom. So this behavior is everything but surprising.
If I remember correctly there are always two occurences of the password string in the bios image if you just search for the raw string. The location which is not at the offset indicated by uefi tool could be the place where the bios reads it's default values from.

But why do you even care, just don't reset your Bios to default values 😄 , you should not need to do that anyways.

Greetings,
Benjamin

@userx14
Copy link

userx14 commented Jul 8, 2020

@Benjaminrenz
do you know about someone, who tried ONLY to flash "NVRAM" ? not more - just ONLY NVRAM ?

@Ftmmsch
No, sorry did not try that, and I only had the Toughbook for repair 😞 so I'm unable to give it a shot.

@userx14
Copy link

userx14 commented Jul 8, 2020

It took a long time to see all things that come after XP!
Because ONLY XP is and was built logically!

@Ffmmsch
Well, maybe you would like ReactOs then:
https://reactos.org/what-is-reactos/
Maybe your software would work on it because it has parts of the win32 api, but I'm not sure how far they have come.

Cheers,
Benjamin

@Ftmmsch
Copy link

Ftmmsch commented Jul 9, 2020

"Kaluluka" had the problem with default settings too!

You'll have to find ALL sections, where passwords are stored!
This could be tricky! - because, after a "selftest" on one of my toughbooks, i found out, that the positions of the sections changed!

If you still have an unprocessed ROM file,
open it with the Hex editor and please memorize the appearance of the password section very well!

Under / with the setting: "Load Defaults", you save a ROM file again.

If you enter in the Hex Editor in the search: AMITSESetup / NVRAM or similar and e.g. "F3" (keep looking) you will quickly come to the end.

Maybe this is NOT the end! The Hex Editor just doesn't FIND it or can't "see" it!

Unfortunately, you have to continue searching by hand or scroll down!
This is very tedious and can sometimes take a long time!

Emboss the look of the password section and search - MORE doesn't stay!

@Ftmmsch
Copy link

Ftmmsch commented Jul 9, 2020

Just made a "Selftest" again - Just to test out about ONLY flashing NVRAM - with unchecking all others.
Didn't work - So i tested again --> unchecked all - resp: checked ONLY NVRAM and Do Not check ROM ID.
Didin't work - stucked reading - nothing happened.

So, i had to do it again like i allways did: Checked Everything and flashed.

To find again the position of the password was not easy!

@OmegaSetinell:
If you click on my profile, you'll see my e-mail adress.
Please read the following text!

The safest and easiest way is via Life DVD or Life USB! - with the caddy removed! (HDD)
Reading and flashing via Life DVD or USB eliminates the risk that Windows will do something in the background!
USB may be disabled.
In that case you take an internal or external DVD drive.

The easiest way is USB.
At the end you see the links to my software and to the USB tool "Ventoy".

There are 2 ISOs - one x64 and one x86.
Win 10 PXE 1809 Enterprise ISO.
Also the software "Ventoy" for a USB stick.
For the USB "Ventoy" variant you need 2 USB sticks.

For the DVD variant: burned DVD + 1 USB stick for the Aptio software and the ROM file.

The USB stick that you prepare with "Ventoy" can then only be used for this purpose! So: one that you have left!

(Undo the "preparation" of the stick - goes via "Diskpart"!)

I have prepared one with "Ventoy" and leave it like this - for e.g. Life access to the online Windows.

Which of course works ONLY :-) - if the BIOS is freed from the password :-).

So: just leave "Ventoy" and the ISO's on the USB stick for future use :-)

Attention! preparing with "Ventoy" ERASES EVERYTHING! on the USB stick!
So: use an EMPTY!

Simply insert the USB stick.
Run the "Ventoy exe".
Select the USB stick
Click twice on OK -> done :-)

Then you can drag and drop as many Life ISO's on it as fit on them :-)

Attention! According to Ventoy's note, please do NOT use spaces and / or abstract characters in the file path!

I tried the PXE myself several times on USB and DVD! Goes perfectly!

So:
DO NOT "free" the BIOS again! but on Default = Locked! Leave it alone!

If you have unlocked it at the moment:
PLEASE again on "Default" resp. locked!

Check the mains adapter and check the battery for safety! IF for some reason the power fails! So, you still have the battery for safety!
Power failure would be a coincidence! but it can shoot you the BIOS!

Further:
The Aptio software on the second USB stick.
(Please do NOT expand completely!
You can do THAT when the Life ISO has booted up!)

1.) Shut down
2.) Caddy OUT
3.) ONLY insert the "Ventoy" USB stick!
4.) When starting up, select the required ISO with up or down. (x64 / x86)
5.) Insert the second USB stick after it has completely started up.
6.) Save the ROM file from the LOCKED!!! BIOS to the second USB stick.

7.) send me the BIOS file.

Here are the links to the ISO's and "Ventoy":

Ventoy:
https://github.com/ventoy/Ventoy/releases/download/v1.0.15/ventoy-1.0.15-windows.zip

Windows 10 PXE 1809 Enterprise ISO - x64 + x86
x64:
https://drive.google.com/file/d/1JFvlA6MxcwWBk9fIniWjB93Kznl8QOCj/view?usp=sharing

x86:
https://drive.google.com/file/d/1r6IVgcLUoDWe-P12VfrcgPjcVR_uolWW/view?usp=sharing

Btw:
some Toughbooks have problems with a Microsoft mouse driver - usually with GPS models.
The mouse continuously wants to move to the right.
THAT problem is switched off in the ISO's!

@userx14
Copy link

userx14 commented Jul 9, 2020

Found why got a problem with this bios - its branded to a company (secret name) with a custom bios and motherboard revision.
Can somebody provide working dump ot CF-53(M)***** mk2 to try with it ?

@OmegaSetinell
Do you have a plan b if flashing such a bios bricks your device?
Panasonic has so many different moddels, I would be really carefull.

Have you searched for your password string with hxd yet? And if so have you seen two occurences?

@Ftmmsch
Copy link

Ftmmsch commented Jul 9, 2020

@Benjaminrenz

24 days ago, Kaluluka told, that the BIOS locked again - after set to Defaults.

But, after that, he told, that he was rid of the password.

This can be very tricky!

As i told before, i made a few "selftest's", to find out more.
After that, i had much problems, to find the sections again!
At least, in MY Hex editor, you can search, what you want!
Maybe one ore two results! But NOT the sections, i needed!

Therefore, i had to search manually for it ! This take a lot of time!

But ´, i found it !

Btw: I tried to flash ONLY the NVRAM - nada !! did not work.

With these settings:
ONLY Check: NVRAM Nothing resp. failed
Check: NVRAM and Check: "Do not Check ROM ID" failed - resp: stopped reading.........

So, i did it again - as usual.

As you can see in my previous post, i offered OmegaSetinell my help.
He should set his BIOS explicite to LOCKED resp: Defaults and send me the file.

Doing this using my offered versions with USB or DVD is an easy and safe way.
In this life windows, there can't run anything to demage while safeing or flashing.

At least just for a Win PXE or PE SE, there is NO better and faster way as doing it with "Ventoy"..

OK - I guess, that "Ventoy" can't do anything - like installing windows from USB.

But, just for a life running windows ? just perfect :-)

Preparing an USB stick, is done in 1 Minute :-) - Drag and Drop the ISO's - a few minutes :-)

On DVD, i had no problems at all with both of my: Win PE SE and PXE
On USB, i had a problem with PE SE - don't know why - could not expand files without installing extra software.

Therefore, i gave him only the links to the PXE version. Both working perfect on USB and DVD.

Regards

@Ftmmsch
Copy link

Ftmmsch commented Jul 9, 2020

About: "LogiCube" Hardware Copier: "Forensic Falcon"
Now, i have it - would like to copy all my drives in a very short time.....

But, now, turn the Americans on the wheel!
USPS DHL Frankfurt and consorts!
So far no delivery has arrived here!
Everything from different sellers!
The last information, i got: send back to sender!
Informations for the receiver?
Nothing!
Let stupid die!

@Ftmmsch
Copy link

Ftmmsch commented Jul 9, 2020

@OmegaSetinell:

If you did not right now:
Please load the BIOS to Defaults - so, that the BIOS is locked again.

Do - if you like to - what i wrote in my previous post and send me the BIOS file from your locked BIOS.

If you do that - using my Life PXE ISO, it will be no problem at all.
It's safer, to take out the caddy and do like i described.
Doing it from a running (online) windows (from your hdd), is allways risky - at least NO risk using life USB or life DVD.

I would be happy if I got an answer.
You can see my email address when you go to my profile.

thank you

@Ftmmsch
Copy link

Ftmmsch commented Jul 10, 2020

@OmegaSetinell:

IF you look for my e-mail adress: It is XXX 2 dot! 01 ! NOT 201 !

@userx14
Copy link

userx14 commented Jul 10, 2020

Found why got a problem with this bios - its branded to a company (secret name) with a custom bios and motherboard revision.
Can somebody provide working dump ot CF-53(M)***** mk2 to try with it ?

@OmegaSetinell
Do you have a plan b if flashing such a bios bricks your device?
Panasonic has so many different moddels, I would be really carefull.
Have you searched for your password string with hxd yet? And if so have you seen two occurences?

Im flashing a lot fo machines ~200 pc. (just panasonics) with RT809F programer and HxD + WinHex editors. Not use software for flashing. >So i`ve got a lot of backup dumps of those machines (2 backups for each) and if i make mistake , reflashing with backup .bin of the mashine.

Ok, I didn't knew that you are in the possesion of a hardware flasher, then it's nearly impossible to fullbrick a machine.
Have you seen the question with the two occurences?

@Ftmmsch
Copy link

Ftmmsch commented Jul 10, 2020

Please send the ROM file as an email attachment.

I don't understand the deeper meaning of uploading it as a ZIP to DropBox .......

Also: if DropBox, then you should also give access.

Please as normal as "xxxx.rom" in the email attachment - or we leave it.

@Ftmmsch
Copy link

Ftmmsch commented Jul 10, 2020

Since you are obviously online and probably reads here in the thread:

Please send me the ROM file in the email attachment NOW - NOT as a ZIP

OK?

@Ftmmsch
Copy link

Ftmmsch commented Jul 10, 2020

? I have N O access to the file!

DropBox requires me to register!

Can't you do the file like Send Drive Google? with release?

@Ftmmsch
Copy link

Ftmmsch commented Jul 10, 2020

@OmegaSetinell:

Do it once :-)

I want to get this over with :-)

Btw: "ALL E-mail servers are blocked here and ports too" - WHERE are you? KGB ? LoL

@Ftmmsch
Copy link

Ftmmsch commented Jul 10, 2020

@ ALL, who is interested:

I have to "correct" my security notice that you should neither save nor flash with a running Windows.

Magic word: "EasyBCD"

In order to save and flash a BIOS file, you do not necessarily have to do without the internal HDD!
You do NOT have to explicitly prevent the internal HDD from starting, e.g. by removed the caddy from the Toughbook to start from Life ISO.

I started Windows (C) and with "EasyBCD" my ISO (Win 10 PXE 1809 Enterprise) added.
Afterwards the ISO is available for selection in the start menu.
So the regular Windows can NOT start / run and therefore cause NO problems.

This prevents Windows from running processes in the background.

So I don't need a DVD or USB stick to start from the Win 10 XPE ISO.

But beware! EasyBCD should be used carefully!

Here again the links to my Win 10 XPE 1809 Enterprise ISO's and the Youtube link (EasyBCD -> ISO)

Windows 10 PXE 1809 Enterprise ISO - x64 + x86
x64
https://drive.google.com/file/d/1JFvlA6MxcwWBk9fIniWjB93Kznl8QOCj/view?usp=sharing

x86
https://drive.google.com/file/d/1r6IVgcLUoDWe-P12VfrcgPjcVR_uolWW/view?usp=sharing

Youtube Link about running from ISO, using EasyBCD
https://www.youtube.com/watch?v=PvvseIdRuJY

Your'e welcome

@Ftmmsch
Copy link

Ftmmsch commented Jul 10, 2020

@OmegaSetinell

Here you are:
https://drive.google.com/file/d/1cJAPZFQ-yZKRwajdknbODnUNW-L8K2VU/view?usp=sharing

Send it allso to your e-mail adress.

@Kaluluka
Copy link

Kaluluka commented Jul 10, 2020

Hi!
Have chalenge: CF-53MK2 with custom firmware from German Telekom. It won't let me boot at all, directly asking for password after switch on (I put HDD from MK4 with Windows 10, but no change. Also not with USB or DVD-ROM).
So, I desoldered BIOS chip and read it with programmer, all 16Mb's of it.
But, UEFI TOOL not give me anything usable and AMI_BCP 4.53 did recognise it and shows all kind of stuff (I'm not familiar with it yet).
So, where is password and how to disable it?
Regards,
PW Candidate

@Ftmmsch
Copy link

Ftmmsch commented Jul 10, 2020

@Kaluluka:

Hi,
So, you could not boot even without caddy and life DVD or USB ? BIOS password on boot? (That is bitter....)

Did you allready try to change something in the file?

Go to my profile. There, you see my e-mail adress. Watch about the dot in my e-mail adress! It's 2 dot 01 ! NOT 201!

Send me the file - the best way is: RIGHT NOW ! :-) Just get out of my bed again :-)

If you send it to me NOW, you'll get it back as soon as possible :-)

P.S.
Motto -> One good deed every day -> Midnight is over -> the last good deed was yesterday -> send me the file :-)

@userx14
Copy link

userx14 commented Jul 10, 2020

@Kaluluka
Hi, had the same problem with a cf53-mk3, no boot from anything, just a password entry screen.

But, UEFI TOOL not give me anything usable

Please clarify a bit, have you used Uefi Tool a57 (which did not work for me) or a51?
Do you see the key "C811FA38-42C8-4579-A9BB-60E94EDDFB34"? You can search for it...

If you can't get UEFI-Tool to work you can search for "99 8A F4 1D 4F B1 AA 44 05 D8 60 6B" which are the last hex numbers of the encryption key. If I'm right your password will also be hashed, so the last bytes should not be affected and stay the same. You should find two occurences.

Or send the file to @Ftmmsch.

Greetings,
Benjamin

@Kaluluka
Copy link

THANKS for REPLIES!
I did manage again to zero-it out and did just short test (to late , past midnight) and it did boot now to BIOS.
More info tomorrow.
Regards and THANKS to all for REPLIES again.

@Ftmmsch
Copy link

Ftmmsch commented Jul 10, 2020

@Kaluluka:

I hope, that you stored at least ONE previous file! BEFORE you tried something!
If possible: send me ALL files you have! Even, the latest!

Please name the files chronologically and according to their condition.

So: the oldest with 1 etc. and edited and / or not edited.
So that I know whether you have already edited the file or not!

@Ftmmsch
Copy link

Ftmmsch commented Jul 11, 2020

@OmegaSetinell
"In my research i was found the password string is contained into PE32 image section"

Are you shure, that you did not mixed up with one of your safed files?
The one, i send you - i renamed it to:

"2-CF-53-MK2-N25Q128AX3B-SET-DEFAULT-VALUES-UNLOCKED.BIN"

Don't know, but in the fille you send me - the one you made after set to defaults,
i found two password sections - which i zeroed....

Tested that on my own Toughbook. After set to defaults = BIOS locked.
As in your file, i found two sections, which i zeroed = BIOS unlocked.

About the file, you send me:
Are you sure? that you backed up the ROM file AFTER you set the BIOS to defaults ????

P.S. instead of making a video - which wil take time:
Could you please just tell in short about facts?

@Kaluluka
Copy link

@Kaluluka
Hi, had the same problem with a cf53-mk3, no boot from anything, just a password entry screen.

But, UEFI TOOL not give me anything usable

Please clarify a bit, have you used Uefi Tool a57 (which did not work for me) or a51?
Do you see the key "C811FA38-42C8-4579-A9BB-60E94EDDFB34"? You can search for it...

If you can't get UEFI-Tool to work you can search for "99 8A F4 1D 4F B1 AA 44 05 D8 60 6B" which are the last hex numbers of the encryption key. If I'm right your password will also be hashed, so the last bytes should not be affected and stay the same. You should find two occurences.

Or send the file to @Ftmmsch.

Greetings,
Benjamin

I did use a57 version, but it gave me CRC error (in the bottom) and on first try i forgot to open tray (undermenus) to see the values as usual.
Maybe I was liitle tired or so, but after while i did open that tray and saw all i needed to find where to zero-it out. Was only in two places.
I'm testing that MKII now with HDD of MKIV in it, funny thing is: this one has 3-th Gen. intel I5 in it, instead of 2-nd Gen. as usual......

@Ftmmsch
Copy link

Ftmmsch commented Jul 11, 2020

@paw2000:
if you come back here and maybe stil need your uploaded file unlocked:

There where two sections in the second NVAR, which had the same hex value.
If you need it - here you are.
https://drive.google.com/file/d/1DaeBS7AocYXx42eoVkh24aSNswoK8EqB/view?usp=sharing

@Ftmmsch
Copy link

Ftmmsch commented Jul 11, 2020

@Kaluluka

If the file you send me, WAS actually the file, you safed AFTER you set the BIOS to Defaults:

There where two sections, i found and zeroed - IF that was the file from Default - BIOS.

@Ftmmsch
Copy link

Ftmmsch commented Jul 11, 2020

By the way: Regarding "Ventoy" USB:
What I said above about "Ventoy":

Obviously "Ventoy" is the easiest and fastest way for most Life ISO applications!

Note! You MUST use an EMPTY ! USB stick! because EVERYTHING wil be deleted!
So! beware! When you run "Ventoy", that you DON'T chose the wrong drive !

Not only did I put my Win 10 PE SE and PXE on it, but now I also tried Clone Zilla.
Runs perfectly!

P.S. as i offered a download: (version 1.0.14) There is a newer version on Ventoy right now: 1.0.15

@Kaluluka
Copy link

Kaluluka commented Jul 12, 2020

After Reseting BIOS to DEFAULT values, Password is back and I'm locked out again :(
This was my mistake. Now I have to desolder BIOS chip again, it was such hassle first time, because of foil there and had to tape around chip to not damage components around it.
I checked readed BIOS again and there are two different password hashes in many places, which I oversaw in first time.

@Ftmmsch
Copy link

Ftmmsch commented Jul 12, 2020

@Kaluluka:

If you still need help, you could send me the actual ROM file.

@Ftmmsch
Copy link

Ftmmsch commented Jul 13, 2020

@OmegaSetinell:

Maybe, you could help "FoRcEdOnLiNe" ?
He didn't answer anymore.
His problem actually isn't the password. He can't flash. All, he tried, stopped and ended with an error.

I guess, that his BIOS is write protected.

WHAT exactly, happen, when you try to write to a write protected BIOS?
Wil it STOP directly? - or, is it normal, that it stop's somewhere "in the middel" ?

Copy link

ghost commented Jul 13, 2020

I don’t know if the last entry was for me but, if it was I can’t tell what’s happening it doesn’t abruptly stop everything seems ok until I get the message. I won’t accept the rom flash using afuwin or afudos but it did take the manufacturer bios update. I haven’t tried anything since the last time I posted an entry here

@Chriszzler
Copy link

Chriszzler commented Jul 13, 2020

Hi evryone here is the password hex from the AMITSetup 0040-0080 , Could someone please solve the password for me ?

Panasonic CF-54D3961T2

5B 86 B6 FF 11 89 6C B0 C7 2B 22 81 7D A4 D8 70
33 AE 8E 4E E9 F7 44 74 9F DE FA 5C 55 D3 B0 71
0B 29 66 02 C1 B9 1C B6 77 16 D2 A9 2D 3D 88 D0
E3 63 3E F7 99 8A F4 1D 4F B1 AA 44 05 D8 60 6B
01

WhatsApp Image 2020-07-12 at 19 12 00

Just to add , i had exactly the same error as @FoRcEdOnLiNe , stopped in the middle . Luckily it still works. would love to just try and figure out the password.

Let me know if i can add any more info.

@userx14
Copy link

userx14 commented Jul 13, 2020

Hi evryone here is the password hex from the AMITSetup 0040-0080 , Could someone please solve the password for me ?

Hi @Chriszzler

Sorry for the short answer, but I'm on the go at the moment.
It's hashed, you won't get it back, check https://gist.github.com/en4rab/550880c099b5194fbbf3039e3c8ab6fd#gistcomment-3342591 or the other posts to find out why.

Greetings,
Benjamin

@Ftmmsch
Copy link

Ftmmsch commented Jul 13, 2020

@Chiriszzler:

Hi,
if you can do without the KNOWLEDGE of the password and possibly want to avoid further troubles and mistakes,
you can send me the ROM file - if you want. Go to my profile -> there is my email address.

@Ftmmsch
Copy link

Ftmmsch commented Jul 14, 2020

@FoRcEdOnLiNe:
This could be interesting for you:
All of this, because of a very interesting thread about BIOS unlocking:
http://forum.notebookreview.com/threads/msi-gt73vr-bios-unlock-mod-factory-restore-clear-cmos-and-prevent-common-issues.812372/

I just add two more Win 10 Builds to my drive. Both are x86 and have 16bit support (NTVDM is activated) - not possible in x64.

                              (Win 10 x86 can handle legacy and UEFI BIOS on x86.     On x64 only legacy BIOS)
              If you take a look on my earlier threads:  there are links to x64 versions        -      x64 = without 16bit suport 

1Win10PESE1809EnterpriseX86+16bit ISO 604 MB
https://drive.google.com/file/d/1KAYazWRVS4lYkJDVcGb7csBZ6PnhrtP-/view?usp=sharing

2Win10PESE1809EnterpriseX86+16bit ISO 915 MB - some more features
https://drive.google.com/file/d/1hoW_TjzM7H68M32IXktcKru-3MswuyU-/view?usp=sharing

All of this, because of a very interesting thread about BIOS unlocking:
http://forum.notebookreview.com/threads/msi-gt73vr-bios-unlock-mod-factory-restore-clear-cmos-and-prevent-common-issues.812372/

As i told before: all of my ISO's are also running well on a "Ventoy" prepared USB stick.

Regards

@Ftmmsch
Copy link

Ftmmsch commented Jul 14, 2020

@en4rab:

on my Toughbook CF-19 mk3, i tested various passwords - resp. safed a ROM file, each time, i changed the password.

1.) 0123456789
2.) 9876543210
3.) abcdefghijklmnopqrstuvwxyz
4.) zyxwvutsrqponmlkjihgfedcba
5.) + 6.) = the same in Capital letters

After, i looked into all of the ROM files, inoticed, that there was absolut NO difference.

All sectors were absolutely identical.
All characters were absolutely identical.

After that I stopped looking for passwords :-)

@AzraelArchitect
Copy link

AzraelArchitect commented Jul 16, 2020

I have a Panasonic CF-54 that I was tasked with upgrading to Windows 10. I've read this post and many others in my attempt to find out what I can. I know for sure that:

  • SecureBoot is on
  • Drive Lock is on
  • There is both an Administrative password and a User password

I pulled a ROM image using the AMI V BIOS Utility and got the AMITSESetup data using the UEFI Tool version a57. XORing the body data with the key in this post gave me what looks like SHA-1 hashes. I checked the hashes on a few rainbow tables but got no hits. Does anyone here know if the hashes are actually SHA-1. If they are, is there any salting? I thought I would ask around to see if anyone knew specifics before I started tearing into the ROM file to try and find some details.

Unfortunately flashing a modified ROM doesn't clear the NVRAM. I read on the AMI V documentation that to flash NVRAM with AMI V you have to have the BIOS Admin password.

@userx14
Copy link

userx14 commented Jul 16, 2020

Hi @ AzraelArchitect,

check the threads above, it's probably sha-1.
First of all I would recommand that you use a51 of UEFI Tool, it seems to work better for the sections. If your decoded password looks something like this "xx00xx00xx00..." and 20 bytes long with one zero byte in between each byte than you have found the correct section.

before I started tearing into the ROM file to try and find some details

It's not that hard. You can just zero out this admin/user password hash with HxD.exe at the offset indicated by uefi Tool and flash back the bios and the password will be gone.

Greetings,
Benjamin

@Ftmmsch
Copy link

Ftmmsch commented Jul 16, 2020

@AzraelArchitect:

Hi,
if you like - i could do that for you - sometimes, it's not easy, to find all sections.

Click on my symbol --> go to my account --> there, you find my e-mail adress --> send me your file

@AzraelArchitect
Copy link

@Benjaminrenz the tool doesn't let me check NVRAM so it doesn't get flashed, and leaves the passwords, I've already tried to flash the system

@userx14
Copy link

userx14 commented Jul 16, 2020

@Benjaminrenz the tool doesn't let me check NVRAM so it doesn't get flashed, and leaves the passwords, I've already tried to flash the system

The tool you are using for flashing or uefi tool?

@AzraelArchitect
Copy link

@Ftmmsch are you requesting the rom file? I've already pulled out the password hashes, I was just curious if anyone knew if Panasonic was using their own hashing algorithm. I wouldn't put it past Panasonic to do that. I was also curious if anyone knew if salt was used because I was just going to try and brute force the hash, and salt is pretty important to that.

@AzraelArchitect
Copy link

@Benjaminrenz the AMI V BIOS utility has the NVRAM option greyed out. I've inspected the .rom file with the UEFI tool on both versions a57 and a51. They both gave me very similar results, identical results as far as the AMITSESetup body

@userx14
Copy link

userx14 commented Jul 16, 2020

@Benjaminrenz the AMI V BIOS utility has the NVRAM option greyed out. I've inspected the .rom file with the UEFI tool on both versions a57 and a51. They both gave me very similar results, identical results as far as the AMITSESetup body

Well that's strange, it allows you to flash all other sections but nvram?
Can you boot freedos from usb and try afudos or alike?

just going to try and brute force the hash

sha-1 is quiet difficult to brute force:
https://crypto.stackexchange.com/questions/47177/would-sha1-be-broken-by-sheer-brute-force-even-if-it-had-no-weaknesses-of-its-o

Greetings,
Benjamin

@Ftmmsch
Copy link

Ftmmsch commented Jul 17, 2020

@AzraelArchitect:

Yes - i was asking for the file.

Maybe, you did not find every entry.

Weeks ago, i made some experiments on my own Toughbook.
After that, i had problems to find everything.

Therefore - if you like - you can send me the file

@AzraelArchitect
Copy link

AzraelArchitect commented Jul 18, 2020

@Benjaminrenz unfortunately freedos isn't an option. I can't boot any USB off the machine, and any hard drive I put into the machine also gets hosed because of Panasonics lovely drive lock.

And the sha-1 brute force was more of hoping they used a weak password and forgot it. The fact that I got no hits on a rainbow table makes me think they either used a good password for once, or it's salted.

@userx14
Copy link

userx14 commented Jul 18, 2020

@Benjaminrenz unfortunately freedos isn't an option. I can't boot any USB off the machine, and any hard drive I put into the machine also gets hosed because of Panasonics lovely drive lock.

And the sha-1 brute force was more of hoping they used a weak password and forgot it. The fact that I got no hits on a rainbow table makes me think they either used a good password for once, or it's salted.

And if you flash the bios chip with a programmer?
The ch341a programmers can be purchased from China for about 10$., the only problem would be the shipping time.
They just need a little hardware modification to work with 3.3V in a form of one jumper wire.
You could first try to see if the bios chip is accessible from underneath a service hatch (https://gist.github.com/en4rab/550880c099b5194fbbf3039e3c8ab6fd#gistcomment-3210765)

Greetings,
Benjamin

@Kaluluka
Copy link

Hi again!
I have question about CF-53MKIV BIOS:
In the BIOS SETUP, if I try to enter "Optional Kit Configuration", Under "Main" section, it ask for password: how and where I can remove this?
Regards,

@userx14
Copy link

userx14 commented Jul 21, 2020

@Kaluluka
search for optional kit on this site:
https://wiki.installgentoo.com/wiki/Toughbooks

@TheSickGuy
Copy link

Hey im New,
Can someone help me with my Password

5BD7B62A11E86C73C7AD22F27D42D837
33368ECEE9F744149F55FA6C55C8B0F7
0B936637C1C21CC87716D2A92D3D88D0
E3633EF7998AF41D4FB1AA4405D8606B
01

@AzraelArchitect
Copy link

@TheSickGuy Unfortunately that password is hashed, if you'd like the hash just give me a way to get it to you, but unfortunately that's a pretty significant wall.

@TheSickGuy
Copy link

Model is FZ-G1 MK2

@Ftmmsch
Copy link

Ftmmsch commented Aug 2, 2020

@TheSickGuy

If i could help you: send me your rom file. You can see my e-mail adress on my profile.
Please let me see in your mail, that it is from you: TheSickGuy

@warst
Copy link

warst commented Aug 4, 2020

I just wanted to say a huge THANK YOU to @en4rab for posting this information. I had a number of CF-MX4 and one FZ-Y1 set aside for over a year and I finally have decided to give this a go. I didn't get to find out the original password but zero'ing out both the sections (it was in the dump twice) did the trick and allowed me to boot from USB/network.

I started out by removing the bios chip from the board and reading it with great success, 10 remove/replace exercises in total (have done some Lenovo's and iMac's too). I've now figured out the ICSP function on my programmer using a SOP8 test clip and connecting the pins up correctly, I can now read & write directly on the motherboard without the need to touch a heat station or soldering iron. Amazing stuff.

I'm happy to help where I can so if you have any questions, please ask away as it's all quite fresh in my mind!

@Daddy1976
Copy link

Daddy1976 commented Aug 10, 2020

Hi, im New,
Can someone help me with my Password

CF-52 MK3

5B F4 B6 D2 11 47 6C 04 C7 0A 22 D9 7D 16 D8 7B 33 C9 8E E4 E9 60 44 E5 9F 67 FA EC 55 A1 B0 D2
0B 91 66 FF C1 11 1C F8 77 16 D2 A9 2D 3D 88 D0 E3 63 3E F7 99 8A F4 1D 4F B1 AA 44 05 D8 60 6B

I don't want to delete the bios password. It is written in 5 different places.

thx.

@Daddy1976
Copy link

Now I am reading the posts in advance, so even in my case it is only possible to delete the password to the bios and re-burn. But which to erase? There are 5 of them.
On offsets 0x240, 0x10732, 0x11207,0x20732,0x21207.

If I edit the bios and burn back, will it also deactivate the administrator password from the disk?
Whether I have to replace it ?

@userx14
Copy link

userx14 commented Aug 10, 2020

Hi, im New,
Can someone help me with my Password

CF-52 MK3

5B F4 B6 D2 11 47 6C 04 C7 0A 22 D9 7D 16 D8 7B 33 C9 8E E4 E9 60 44 E5 9F 67 FA EC 55 A1 B0 D2
0B 91 66 FF C1 11 1C F8 77 16 D2 A9 2D 3D 88 D0 E3 63 3E F7 99 8A F4 1D 4F B1 AA 44 05 D8 60 6B

I don't want to delete the bios password. It is written in 5 different places.

thx.

Hi @Daddy1976,
EDIT 14.08.2020 removed - FAIL: see https://gist.github.com/en4rab/550880c099b5194fbbf3039e3c8ab6fd#gistcomment-3417735
Best
Benjamin

@gxlcsgithub
Copy link

Hi @Benjaminrenz

I got this in my bios.

5B 11 B6 DB 11 28 6C 75 C7 A6 22 0E 7D 32 D8 0D 33 34 8E E2 E9 45 44 70 9F 51 FA 64 55 8D B0 07
0B EB 66 42 C1 96 1C DA 77 16 D2 A9 2D 3D 88 D0 E3 63 3E F7 99 8A F4 1D 4F B1 AA 44 05 D8 60 6B

Can you help to see what it is.
I tried XOR site, but can not understand what the input II is.

Also, I confirmed that there are 2 Hex strings as same at all as above, do you have any idea about that?
Thank you.

Regards,
Guan

@userx14
Copy link

userx14 commented Aug 11, 2020

Hi @gxlcsgithub,

I tried XOR site, but can not understand what the input II is.

Just enter the key from en4rab's first post as input 2:

5B 93 B6 26 11 BA 6C 4D C7 E0 22 74 7D 07 D8 9A 33 2E 8E C1 E9 54 44 E8 9F 7B FA 0E 55 A2 B0 35 0B C9 66 5C C1 EF 1C 83 77 16 D2 A9 2D 3D 88 D0 E3 63 3E F7 99 8A F4 1D 4F B1 AA 44 05 D8 60 6B

Your password xored is:
8200fd009200380046007a00350097001a002300110098002a006a002f00320022001e00790059...
and it looks like the other hashed passwords. 20 bytes so probably hashed with sha1. Since this is, in comparison to a simple xor, not reversible your best be is to zero out the entries in the biosfile and flashing the modified file back.

Greetings,
Benjamin

@Daddy1976
Copy link

Hi Benjamin . Decoded by xor.pw is 006700f400fd004900ea00ad001100e100e700250034000d001c00e2000300e7005800a300fe007b000000000000000000000000000000000000000000000000.
If I decode it by decoded with enr4b post then this is it but it doesn't make sense.

67 F4 FD 49 40 AD 11 E1 E7 25 34 0D 1C E2 03 E7 58 A3 FE 7B

67
F4
FD
49 EfiKeyIns
40 SCAN_F7
AD
11 EfiKeyB6 n N
E1 EfiKeyLShift
E7 EfiKeyA3 EFI_RIGHT_LOGO_MODIFIER
25 EfiKeyE8 8 *
34 EfiKeyC11 \ "
0D EfiKeyC7 j J
1C EfiKeyD6 y Y
E2 EfiKeyLAlt
03
E7 EfiKeyA3 EFI_RIGHT_LOGO_MODIFIER
58
A3
FE
7B

will you help me with that please ?

@Daddy1976
Copy link

btw where can i find the whole efikey table ? uncle google is useless.

@userx14
Copy link

userx14 commented Aug 14, 2020

btw where can i find the whole efikey table ? uncle google is useless.

Sorry Daddy1976,
I failed hard while copy pasting 🤦 . your output is of course correct, I tested en4rab's password instead xD.
So like in many other cases your password is hashed, and there is no way to get it back.
Your results contains 20 blocks with one byte hashvalue and one zerobyte spacer inbetween.
Use UEFI tool a51 (IMPORTANT not any newer version) to find the place where you need to overwrite your bios file with zeros, if you need help just reply.

Greetings,
Benjamin

@Daddy1976
Copy link

Daddy1976 commented Aug 14, 2020

Untitled

I don't get it a little. Here he writes offset 111B0h.

Untitled1

And here is 0x240h, 0x10732h, 0x11207h, 0x20732h, 0x21207h.
Should I rewrite all of them?

I do not understand that. One writes offset 111B0h and when i editing bios image it is in 5 places. What should I follow?

But only 11207h and 21207h have 0x80 - 01h at the end of 01h as in the first picture.
the others have 20h at the end.
Untitled2

@gamerpaddy
Copy link

thanks guys i just opened up a cf52, i tried the main method. didnt work, different key.
i tried Mark678's method, which wasnt 100% correct, i had to tick all boxes to flash not just nvram, since the part didnt flash with just nvram checked.
but then it worked flawlessly. (zeroed out all 64 bytes that were in the AMITSESetup section and before the last 0x01.)

@userx14
Copy link

userx14 commented Aug 16, 2020

I do not understand that. One writes offset 111B0h and when i editing bios image it is in 5 places. What should I follow?

But only 11207h and 21207h have 0x80 - 01h at the end of 01h as in the first picture.
the others have 20h at the end.
Untitled2

For a first attempt I would try to only zero the entry at 0x11207 simmilar to what you marked in the picture, as this is the position where the efi variable is stored. The other entries could be something like the default values the bios tries to load when you reset to defaults or something else.
So if I were you I would first attempt zeroing out the entry at 0x11207 and test if the password is gone and if this does not help then zeroing out all the other locations.

Greetings
Benjamin

@OmegaSentinell
Copy link

OmegaSentinell commented Aug 17, 2020

Find this HEX string in every position of DUMP and replaced with zeroes... this will remove BIOS login password , if you ve got BIOS default setted password pls send me dump and i`ll remove it. In some models i was found password string at more then 30 positions. Sould replace all and password should gone.

@OmegaSentinell
Copy link

Can anybody share a CF-19 mk3 dump ? even with password ?

@Ftmmsch
Copy link

Ftmmsch commented Aug 22, 2020

Send me an e-mail and i send you the ROM file of my CF-19 mk3.

You find my e-mail adress, when you go to my Profile.

@Ftmmsch
Copy link

Ftmmsch commented Aug 22, 2020

Send me an e-mail and i send you the ROM file of my CF-19 mk3.

You find my e-mail adress, when you go to my Profile.

@OmegaSentinell
Copy link

ready

@dieselmech-pt
Copy link

Hi all, newbie here, being following this thread for a while. Recently purchased a Panasonic CF-53 with a locked bios for spares really, bit lower spec one than what i am using, found this thread and thought why not try to unlock it ? Long story short it has Admin & user password installed, I've read the Bios chip and edited the relevant sections with an hex editor to all 0's, tried to flash back, but had error code 43, even with original Bios, still same fault. Ok so maybe try it in DOS mode, laptop won't boot to USB, so I installed PLOP to the mbr because when I installed it to the boot menu windows would delete the driver ! So managed to boot to DOS but still have the same error code 43 I tried finding the password as per the OP's post but had no luck there either, if any one has any more suggestions I could try I would be great full,
failing that when I get my soldering station back from repair I will remove the chip and program it that way, if possible. Thank you in advance

@userx14
Copy link

userx14 commented Aug 29, 2020

Hi all, newbie here, being following this thread for a while. Recently purchased a Panasonic CF-53 with a locked bios for spares really, bit lower spec one than what i am using, found this thread and thought why not try to unlock it ? Long story short it has Admin & user password installed, I've read the Bios chip and edited the relevant sections with an hex editor to all 0's, tried to flash back, but had error code 43, even with original Bios, still same fault. Ok so maybe try it in DOS mode, laptop won't boot to USB, so I installed PLOP to the mbr because when I installed it to the boot menu windows would delete the driver ! So managed to boot to DOS but still have the same error code 43 I tried finding the password as per the OP's post but had no luck there either, if any one has any more suggestions Thank you in advance

Hi @dieselmech-pt
Well you probably encounter the same problem as @FoRcEdOnLiNe , something on your device blocks the bios erasure.

finding the password as per the OP's post but had no luck there either,

if your password is hashed (zeros between bytes and 20bytes with data) you will not be able to find what the original password was.

...failing that when I get my soldering station back from repair I will remove the chip and program it that way, if possible...

I directly used a hardware programmer see the post https://gist.github.com/en4rab/550880c099b5194fbbf3039e3c8ab6fd#gistcomment-3210765, and my model was a cf-53 mk3. For me it worked with the included programming clip if one cuts away the +3.3v trace and reconnect it after the flashing process, this way one can avoid desoldering the bios chip.

Have you searched on the backside of the mainboard if the write protection trace of the bios chips is connected to anything?

Greetings,
Benjamin

@dieselmech-pt
Copy link

Hi @benjamin.

Thanks for the reply, I took the inspection cover off the bottom of the laptop to inspect the chip, pin 3 is the write protect and is the same as my CF-53 mk3, I checked to see if the pin went to earth on both laptops, but it doesn't, Looking at the chip data sheet didn't help me
either as the pin is not pulled high or low to enable/disable WP, So I will have to buy the programmer in the link you provided as mine doesn't cover that particular chip. I'm not keen on cutting the trace to the chip so I will de-solder to program it because it is also difficult to place a SOIC clip onto the chip, and even the 3M ones I bought a while ago are also next to useless at gripping SOIC chips.

Regards,

dieselmech-pt

@Daddy1976
Copy link

Hi guys. So, i share my knowledge. Unlocked :-) (Tested on two CF-52s)

It was not enough to rewrite in the image only those that ended in 0x01. I had to rewrite everything I found, because after rewriting only some of the passwords, the password kept coming back to me from some backup. So 5 positions are deleted at once. And bios is unlocked.

The only problem is that the HDD remains permanently locked and needs to be replaced. This can be solved by a disk cloning program before editing the bios and keeping the OS and settings.

I read and flash all with AfuWinGui. My Settings is here

Untitled

@ChainsawGarden
Copy link

Hello toughbook users! I am in the possession of a CF-31 mk6 (?). I have used AFUWINGUIx64.exe, made my BIOS backups, ran UEFI tool and looked for a "C811FA38-42C8-4579-A9BB-60E94EDDFB34" GUID. So far, I've found 2, but their subtypes were "Full". I wonder where I go from here if I can't find that same GUID with the same subtype.

@userx14
Copy link

userx14 commented Sep 15, 2020

Hi @ChainsawGarden
do you get the option "goto Data" in the right click menu? Which version of UEFI tool are you using? If it is the current version please give the a51 version a shot.
Does this "Full" GUID contain any data which looks like the potential hex string?
Greeting,
Benjamin

@ChainsawGarden
Copy link

Hi @ChainsawGarden
do you get the option "goto Data" in the right click menu? Which version of UEFI tool are you using? If it is the current version please give the a51 version a shot.
Does this "Full" GUID contain any data which looks like the potential hex string?
Greeting,
Benjamin

Hello Mr. Renz. My "Go To Data" option is greyed out, I am using UEFITool version Alpha 57, and the full Hex string that "Full" gives is "NVAR..yyy .AMITSESetup".

I will be trying out UEFITool version a51 as this is posting

@adolf022
Copy link

HI all, I am trying to get the ROM from a CF-20 core i5 7th gen, which has a UEFI mode enabled in BIOS (bios locked btw), I tried different AFUWIN versions, and a universal bios software but no luck so far, does anybody has an idea how to manage this. Thank you

@userx14
Copy link

userx14 commented Sep 15, 2020

Hi @ChainsawGarden
do you get the option "goto Data" in the right click menu? Which version of UEFI tool are you using? If it is the current version please give the a51 version a shot.
Does this "Full" GUID contain any data which looks like the potential hex string?
Greeting,
Benjamin

Hello Mr. Renz. My "Go To Data" option is greyed out, I am using UEFITool version Alpha 57, and the full Hex string that "Full" gives is "NVAR..yyy .AMITSESetup".

I will be trying out UEFITool version a51 as this is posting

If I remember correctely I had the same issue with a57. Be aware that the structure of the entrys is different on a51, so use the search for guid function.

@userx14
Copy link

userx14 commented Sep 15, 2020

HI all, I am trying to get the ROM from a CF-20 core i5 7th gen, which has a UEFI mode enabled in BIOS (bios locked btw), I tried different AFUWIN versions, and a universal bios software but no luck so far, does anybody has an idea how to manage this. Thank you

Have you figured out which version of AMI's bios the cf20 uses (Aptio V, Aptio 4, Amibios8...)? You say it's a 7th gen i5, so it could be that your AMIWIN version is incompatible with this version. What is the exact issue? Can't you get a dump or is the modification / writeback of the image the problem?

@adolf022
Copy link

BenjaminRenz, it is amibios, yes I can't get the dump, I found some afuwin versions on the website but none run as other times, I am wonder if there is an specific version for UEFI or if there a different way to get it?

@userx14
Copy link

userx14 commented Sep 15, 2020

BenjaminRenz, it is amibios, yes I can't get the dump, I found some afuwin versions on the website but none run as other times, I am wonder if there is an specific version for UEFI or if there a different way to get it?

I don't really get what you mean by "none run as other times, ..."?
Does it crash instantly?
Do you get an error while trying to launch the app, or what is the error message you get?
Did you start the utility as administrator?

Based on some youtube videos of the bios I would guess that it is an aptio 4, so amitool-version in the link in en4rab's post should work.

If you can't get the software way to work (after you have tried maybe afudos or other versions of the amitools and really tried everything possible in software) you could also consider flashing the bios chip with an hardware progammer. Unfortunatelly there is not much information available on the mainboard of the cf-20, but there is a near complete teardown:
https://www.youtube.com/watch?v=PJ2ngqDP5Ug
and some low resolution board shots available. It's hard to tell but I would guess that the Bios chip coule be the one underneath the metal shield (in the board shot they are removed, and only the side of the compartments are visible), in the center part of the image:
Download
But it could also be on the other side of the board, as some power management chips share the same package.
Of course this requieres that you feel comfortable performing such an teardown and that you've got an hardware bios programmer like an ch341a.

@ChainsawGarden
Copy link

@Benjaminrenz Here's what I got after using a51, going to the GUID & hitting "Body Hex View"
CF31a51snip

@userx14
Copy link

userx14 commented Sep 15, 2020

For the hex you provided : 5b89b61811826cdbc75d22327d79d89333f68e0ee9f544fa9fedfac855bab0c70b33665ec1891c8b7740d2ca2d9f88cde3043efc99bdf4724fe1aa1105d26077
I get the following when xor'ing:
001a003e0038009600bd0046007e000900d800cf00a10012009600c6001800f200fa0002006600080056006300a2001d0067000b0037006f00500055000a001c
which is rather strange, usually the passwords are either clear text (as in en4rab's example) and the spaces between bytes are filled with 0x08 or the password is hashed and the hash is stored, but then the valid bytes of the hash are only 20bytes long.
Your password on the other hand seems to contain 32 valid bytes, so I'm not sure if we are looking on a novel encryption scheme here or just another hash algorithm, possibly SHA256. I would try to overwrite it with zeros and flash the image back and see if the password is gone.
Since your model already features 7th-gen processors I would guess it's quiet new, so possibly this is their new encryption scheme 😃 . Let's hope that your bios is not write protected...

@ChainsawGarden
Copy link

@Benjaminrenz Unfortunately, I think my BIOS might just be write protected. Tried to flash using AFUWINGUIx64.exe and it said that the Stage failed. Wonder what I'm doing wrong (especially if its my settings that is the issue). Will send screenshots if needed.

@userx14
Copy link

userx14 commented Sep 16, 2020

@Benjaminrenz Unfortunately, I think my BIOS might just be write protected. Tried to flash using AFUWINGUIx64.exe and it said that the Stage failed. Wonder what I'm doing wrong (especially if its my settings that is the issue). Will send screenshots if needed.

Is "Stage failed" the only error message?
Have you tried simmilar settings to those:
https://gist.github.com/en4rab/550880c099b5194fbbf3039e3c8ab6fd#gistcomment-3446348

If I remember correctly the only person in the forum with a write protected bios got an "43 - error erasing flash", but that probably was on an older version.

I would guess that your suspicion is right and they have some write protection in place.
Could be physical or could be some software, as far as I know no one has found out yet.

Things you could try:

  • AFUDOS, might be worth a try because msdos can address the bios directly https://wiki.osdev.org/Memory_Map_(x86)#Real_mode_address_space_.28.3C_1_MiB.29 because of it's real mode address space

  • Searching for an hardware cause of an write protect (following the write protect trace of the bios flash chip on the mainboard)

  • Maybe the BIOS has a checksum, so you could try if flashing the original one back results in the same error.

@ChainsawGarden
Copy link

Actually, my NVRAM block option is greyed out, and I am not able to select a second non-critical block. Here's a screenshot:
secondsnip
Here's hoping I've got some luck left!

@ChainsawGarden
Copy link

@Benjaminrenz I've decided to take another go at this, and I noticed that you've edited your comment. As stated in my previous comment, NVRAM is greyed out. I didn't give you my "Progress" image so here ya go:


nomiracles_third

Concerning AFUDOS, I don't think I can boot into DOS solely because I can't boot anything from my USB (specifically FreeDOS as mentioned in https://gist.github.com/en4rab/550880c099b5194fbbf3039e3c8ab6fd#gistcomment-3446348.) because my BIOS is locked. No option to boot live disks.

Thanks for the help so far, Mr. Renz!

@dieselmech-pt
Copy link

Good Afternoon, so i finally got my CH314A to re-write the Bios chip, modified it to supply 3.3v to the chip, that's all good, the problem I'm having is trying to actually remove the Bios chip itself. I have a hot air solder station, so the question is how hot do i need to go to get the chip to lift off, because so far i'm at 285deg and it's not moving, yet the legs of the chip have discoloured with the heat. Am i doing something wrong ?

@userx14
Copy link

userx14 commented Sep 25, 2020

@dieselmech-pt

Good Afternoon, so i finally got my CH314A to re-write the Bios chip, modified it to supply 3.3v to the chip, that's all good, the problem I'm having is trying to actually remove the Bios chip itself. I have a hot air solder station, so the question is how hot do i need to go to get the chip to lift off, because so far i'm at 285deg and it's not moving, yet the legs of the chip have discoloured with the heat. Am i doing something wrong ?

Ok first some general questions:

From my reworking experience I have these tips for general removal of IC's:

  • test your temperature settings on a sacrificial board
  • preheat the board area around the chip you plan to remove, this takes some time especially on multilayer boards with a lot of thermal mass. To be on the save side you can use a large nozzle and a lower temperature for this step.
  • add some soldering flux, this really helps in situations where the chip does not want to come of.
  • for chips with accesible pins one can re-tin the pins with leaded soldering flux. The alloy that formes with leadfree flux has a lower melting point. Buy you will need to clean the pads and the chip afterwars with solder wick because this alloy is brittle.
  • the temperature that the desoldering station says it's at, is not really comparable between units. This is why some tests on sacrificial boards can help you get a feel for the temperature ranges of your particular station.
  • discoloring of the legs would not concern me that much, but discoloring of the pcb would 😏
  • for testing if the IC is loose tap it gentely from the side and see if it moves. Don't pull upwards right away or you will rip the pads of the board.

My goto reference for hot air rework is Louis Rossman, who professionally repairs macbook pcb's. He also has some videos about hot air stations on his channel which might be worth a look.
https://youtu.be/wYCmU6jMLo8?t=1649

@userx14
Copy link

userx14 commented Sep 28, 2020

@Benjaminrenz & @Ftmmsch
Hello my friends, please help me to remove the BIOS administrator password for panasonic cf-ax3 ( i have user password) ,i only know save the Rom and see nvram AMITSESetup, next step i'am very confused 😁 if u need my Rom i can send by email, sorry for my bad English, best regards 🙏🙏

Hi @bambang77,
your password is hashed probably with sha1 so it is impossible to get the password back. Your only chance is to zero out the password which is stored somewhere around the hexadecimal offset 3610c (at least that's what I can see in your screenshot in the offset field). Open the file with hxd.exe (hex editor with which you can use to edit the bios file), find the bytes that mach those highlighted on your screenshot and overwrite them with zeros. The last byte you have selected is not a part of the actual password, so leave that 01 as it is. The flash the bios back, and the password should be gone. This is the step where problems can occur, because the bios is write protected. Afuwingui will then fail with some error. If you encounter any problems or the instructions are unclear please let me know 😃
Greeting,
Benjamin

@userx14
Copy link

userx14 commented Sep 28, 2020

.just click ok or need to do nullbyte ,DOD sanitizing🤔 my friend

You need to fill with nullbyte. This will have the same effect as just manually overwriting each byte with zeros.
Just check the result of the operation 😄, if the bytes you have selected are zeros afterwards and the 01 is still at the same offset it worked fine.

Do not do DOD sanitizing as it would fill the bytes with random stuff, which is unwanted.

Just a note: It seems that your offset in HxD you have currently selected (left side of your screenshot) is different from what UEFI tool says.

If I see it correctely you have found multiple matches with HxD. The one you are looking for is only the one around offset 3610C which is probably the one which is called 36117. As far as I know it does not matter if you zero out the other occurences too, but you definitiveley have to zero out the one at 3610C.

Greetings,
Benjamin

@userx14
Copy link

userx14 commented Sep 30, 2020

@bambang77
The result of your screenshot looks fine to me.
You can flash the bios with the same tool you used for dumping the flash.
Take a look at this post for the settings that will probably work:
https://gist.github.com/en4rab/550880c099b5194fbbf3039e3c8ab6fd#gistcomment-3276663
Please note that flashing a modified bios has always some risk involved, so you better don't interrupt the flashing process by a power failure 😄 or something simmilar.
If you get any error during this procedure it could be that your flash is write protected.
Just reply if something is unclear.

@userx14
Copy link

userx14 commented Sep 30, 2020

@bambang77
Congratulations 🥳 ...

If you are interested in hardware hacking I bet you will find something you have already laying around to reverse engineer.
Or if you are more interested in actual computer programming I can recommend to tinker with an Arduino compatible microcontoller, they can be had for next to nothing. It's easy to get started and you can gradually explore the underlying layers with ever increasing complexity, and you will learn a lot about computer hardware along the way. That's also the way I got started 10 years ago, but I guess everyone learns differently, good luck on your way.

Greetings,
Benjamin

@n2xdd
Copy link

n2xdd commented Sep 30, 2020

can someone take a look at my bios for my toughbook cf-74? i cannot seem to find the DATA instance of C811FA38-42C8-4579-A9BB-60E94EDDFB34 . Im goin nuts and straining my eyes . is any one willing to take a look ?

@OmegaSentinell
Copy link

OmegaSentinell commented Oct 5, 2020

share dump , i can remove password freely
find me in skype with same name

@n2xdd
Copy link

n2xdd commented Oct 5, 2020 via email

@OmegaSentinell
Copy link

at skype or share via some cloud - googledrive , dropbox ....etc

@Fab03500
Copy link

Fab03500 commented Oct 8, 2020

.just click ok or need to do nullbyte ,DOD sanitizing🤔 my friend

You need to fill with nullbyte. This will have the same effect as just manually overwriting each byte with zeros.
Just check the result of the operation 😄, if the bytes you have selected are zeros afterwards and the 01 is still at the same offset it worked fine.

Do not do DOD sanitizing as it would fill the bytes with random stuff, which is unwanted.

Just a note: It seems that your offset in HxD you have currently selected (left side of your screenshot) is different from what UEFI tool says.

If I see it correctely you have found multiple matches with HxD. The one you are looking for is only the one around offset 3610C which is probably the one which is called 36117. As far as I know it does not matter if you zero out the other occurences too, but you definitiveley have to zero out the one at 3610C.

Greetings,
Benjamin

Hello all,

I read all the messages and with all this help I copied my bios with AFUWINGUI.EXE, found the password in hexadecimal, reset the password and save the new bios ...
But unfortunately impossible to reflash my cf52-Mk5 ...
AFUDOS cannot erase the bios .... (both on windows and on a bootable usb key)

Can you help me please ?

Thanks in advance

@userx14
Copy link

userx14 commented Oct 9, 2020

Hello all,

I read all the messages and with all this help I copied my bios with AFUWINGUI.EXE, found the password in hexadecimal, reset the password and save the new bios ...
But unfortunately impossible to reflash my cf52-Mk5 ...
AFUDOS cannot erase the bios .... (both on windows and on a bootable usb key)

Can you help me please ?

Thanks in advance

@Fab03500
Your Bios might be write protected, in this case a hardware flasher like a ch314a is probably the only option. Or you find a dip-switch on the writeprotect line of the flash ic, but I guess that's unprobable. Not sure how they have implemented their write protection, but attaching a hardware programmer did the job for me back then (search at the beginning of this thread, there is picture of this, bios chip with jumper cable). I had to cut the 3.3v line with a knive, so that the programmer does not power the board. One better should not slip with that, or the board might be badly damaged...

The ch314a probably has to be modified for 3.3v bios chips, because it defaults to 5v pullup (which is not that healty for 3.3v chips). I think I have posted the link to the relevant sites alreads, just crtl+f for ch341a in this thread...

So if you want to go the hardware flasher "route" i would recomment that you first try find out which bios chip is user on your mainboard (to find out which voltage it needs), and if it is easily reachable.

If you have further questions, feel free to ask...
And If you find an alternative way to bypass the write protection please let everyone know. I have read somewhere that dos can access the bios storage area direclty by memory mapping, but this does not neccesarily mean this bypasses the wp.

@dieselmech-pt
Copy link

Good Evening one and all !

So to cut a long story short I had a problem with the CF-53 laptop I bought with a password protected Bios.
I ended up buying a second hand motherboard with a Bios password also, its a 3340i as opposed to the 3320i
The issue I have is when I read the Bios and loaded it into the UEFI tool (ver51) I had a lot of lines in the parser
tab at the bottom of the tool that I never had with the other Bios chip. If I resolder the chip back to the motherboard
and install the board into the laptop am I going to have issues with it not booting ? I still have the original bios
from the CF-53 I bought with the password locked. Any thoughts and comments on this appreciated.

CF-53 BIOS

@OmegaSentinell
Copy link

Good Evening one and all !

So to cut a long story short I had a problem with the CF-53 laptop I bought with a password protected Bios.
I ended up buying a second hand motherboard with a Bios password also, its a 3340i as opposed to the 3320i
The issue I have is when I read the Bios and loaded it into the UEFI tool (ver51) I had a lot of lines in the parser
tab at the bottom of the tool that I never had with the other Bios chip. If I resolder the chip back to the motherboard
and install the board into the laptop am I going to have issues with it not booting ? I still have the original bios
from the CF-53 I bought with the password locked. Any thoughts and comments on this appreciated.

CF-53 BIOS

I think its because of diferent microcodes of processors. I can remove bios password freely if you send me a original dump of the chip.

@dieselmech-pt
Copy link

Thank you OmegaSentinell, I have the original dump, how can I send it to you ?

@OmegaSentinell
Copy link

Thank you OmegaSentinell, I have the original dump, how can I send it to you ?

In skype - OmegaSentinell or google drive or dropbox ...

@dieselmech-pt
Copy link

Ok, Just made a new Dropbox account, let me know if you can't download it.
Thanks
https://www.dropbox.com/s/tk2je925y2eu0ca/CF_53_New%20BIOS.bin?dl=0

@OmegaSentinell
Copy link

OmegaSentinell commented Oct 18, 2020

OK Try this one. PATCHED

@dieselmech-pt
Copy link

Downloaded file, will be a few days before I can test it, Thank you for patching the file OmegaSentinell

@OmegaSentinell
Copy link

No problem , just tell me if working or not pls.

Copy link

ghost commented Nov 6, 2020

rom

I can't understand the decording process.
Please help. What can i do for my password?

@userx14
Copy link

userx14 commented Nov 7, 2020

rom

I can't understand the decording process.
Please help. What can i do for my password?

@inpshjoy
Looks different from what I have seen before. Please first try uefi tool a51 instead of a57 and check if the entry is different.
Greetings,
Benjamin

Copy link

ghost commented Nov 7, 2020

@benjamin
rom
Thanks for your help. But i don't think this is defferent from first.

@userx14
Copy link

userx14 commented Nov 7, 2020

@inpshjoy
Just realized that the Subtype of your entry is "Full", it should be "Data" instead (see screenshots at the beginning of this gist). Please try A51 again and see if there is an option called "goto data" or simmilar when your rightclick the entry. Still it might be possible that newer bios versions work differently.
Best
Benjamin

Copy link

ghost commented Nov 7, 2020

http://naver.me/G19BLyxx
Ubove is my ROM file.
I tried to execute your instructions.
But there are no such data. All data which have Action "C811FA38-42C8-4579-A9BB-60E94EDDFB34" are Full type.

@userx14
Copy link

userx14 commented Nov 7, 2020

@inpshjoy
Ok sorry, you were right the first time: your hashed pw is input1:
6a938f265cba224d83e052741e07d89a332e8ec1e95444e89f7bfa0e55a2b0350bc9665cc1ef1c83

putting that into https://xor.pw with the key from en4rab while discarding the trailing bytes so input2:
5b93b62611ba6c4dc7e022747d07d89a332e8ec1e95444e89f7bfa0e55a2b0350bc9665cc1ef1c83

gives:
310039004d004e004400700063000000000000000000000000000000000000000000000000000000

cutting the zeros gives:
31394d4e447063

so your password is 7 characters long. If this enconding is ASCII it would be:

19MNDpc

but it could also be encoded as the keymap, so in case the above pw does not work please refer to en4rab's post "WTF scancodes how does this map to keys"

Copy link

ghost commented Nov 9, 2020

@benjamin

Wow! That's the right password! You saved my computer! Thanks

While, I don't know the method you find the key. But all the problem is done! Thank you.

@newgeminiman
Copy link

I'm trying to flash the CF-53 MK4 BIOS after replacing the password with zero, as @ChainsawGarden mentioned NVRAM block option is greyed out when clicking flash - stage: failed.
so I tried on DOS with option /P /B /N /C and get the error "43 - error erasing flash"

This is my password string pull from UEFITool

5B3DB62B11D46C7BC74622DC7D7BD8D933748E49E91A44709F00FAD4556BB02F0BED6666C12D1C8F7716D2A92D3D88D0E3633EF7998AF41D4FB1AA4405D8606B

after xor and got this
ae 0d 6e 36 a6 a8 7c 43 5a 88 4e 98 7b da c9 1a 24 3a c2 0c
J y 9 0 R g

not sure if I did right or this some hashed password. or any other solution?

@userx14
Copy link

userx14 commented Nov 15, 2020

@newgeminiman
20 bytes are witha very high likelyhood the sha1 hash of the password.
Zeroing out the data should work, but if you can't flash the bios via software this probably will not help you.
I think no one has figured out yet how and why the bios is write protected.

One solution would possibly be using an hardware bios programmer like a ch341a.

If you have any questions on hardware flashing please let me know.

Greetings,
Benjamin

@dieselmech-pt
Copy link

@OmegaSentinell

So I finally managed to swap the motherboard over in the laptop, but unfortunately the laptop does not go to post screen, as I bought the motherboard off ebay with password locked I never tried it first in the laptop I just removed the chip read it and upload the file you modified for me. It could just be that the ch341a programmer I bought did not program it correctly, so now I have to remove the board again and try to reflash the chip. Anyway that is where I am at the moment

@userx14
Copy link

userx14 commented Nov 20, 2020

@OmegaSentinell

So I finally managed to swap the motherboard over in the laptop, but unfortunately the laptop does not go to post screen, as I bought the motherboard off ebay with password locked I never tried it first in the laptop I just removed the chip read it and upload the file you modified for me. It could just be that the ch341a programmer I bought did not program it correctly, so now I have to remove the board again and try to reflash the chip. Anyway that is where I am at the moment

Have you read back the flash and compared the file you are flashing with the result with a diff tool of the build in verification tool?
Does the chip detection of the CH314a work and if not have you set the correct voltages for your bios chip and checked your wiring?
Greetings Benjamin

@OverlordShin
Copy link

Can someone please help me get the password from a CF-31? (CF-ALEPEMA8)

5B 89 B6 18 11 82 6C DB C7 5D 22 32 7D 79 D8 93 33 F6 8E 0E E9 F5 44 FA 9F ED FA C8 55 BA B0 C7
0B 33 66 5E C1 89 1C 8B 77 40 D2 CA 2D 9F 88 CD E3 04 3E FC 99 BD F4 72 4F E1 AA 11 05 D2 60 77

Tried xor'ing but it seemed to have zeroes in-between?

@userx14
Copy link

userx14 commented Nov 21, 2020

@OverlordShin
when every other byte is zero and you got 20 bytes with actual content your bios password is most likeley stored as a hash. You can't get it back, but you can zero out the bytes and flash back that bios to get rid of the password. Be warned that bios flashing is risky. See also the posts above for settings when writing back / tipps.
Greetings Benjamin

@ChainsawGarden
Copy link

I see that I have no other option but to flash using a hardware programmer. I've been looking around this thread and noticed that the ch341a that I was looking at would do no good; it's rated @ 5V whereas my bios chip can only take 3.3v.

Don't wanna fry my board!

Looked on Amazon for hours for a ch341a that did 3.3v, no dice. Heard everywhere that you could mod it to 3.3v but I would rather buy something already at that voltage.

Does anyone know of one that can do 3.3v?

@userx14
Copy link

userx14 commented Nov 24, 2020

@ChainsawGarden
The supply voltage that the progammer sends to the BIOS chip's VCC fine and 3.3V when using a ch341a, but the pullups for the logic signals are 5V.
Some versions of the Programmer are affected by this problem, so first test if the pullup for the logic signals is not already 3.3V.
The problem is that the logic high pullup level of the ch341a is bound to its supply voltage with if 5V on some units. There are different options on how you can modify the supply voltage. Essentialy you disconnect pin28 of the ch341a ic from the 5V line and reconnect it to the 3.3v onboard regulator.
Take a look on this schematic from eevblog:
https://www.eevblog.com/forum/repair/ch341a-serial-memory-programmer-power-supply-fix/?action=dlattach;attach=360624;image;PHPSESSID=ondvqcvpl7jjkjd9a8o57a3sm4

So you can either:

  • lift the pin28 and connect a jumper to the 3.3V regulator pin with a bodge wire. A tutorial for this can be found here: https://www.chucknemeth.com/usb-devices/ch341a/3v-ch341a-mod
  • or scratch the copper trace going to the chip in two places so that it is still connected to a pin on the pin row next to the socket. Then you can use a jumper wire to connect the pin with the 3.3V pin on the pin row on the other side of the socket. This way you can change the supply voltage on the fly, if you want to still be able use the ch341a as a serial interface with 5V levels.

@userx14
Copy link

userx14 commented Nov 25, 2020

I see that I have no other option but to flash using a hardware programmer. I've been looking around this thread and noticed that the ch341a that I was looking at would do no good; it's rated @ 5V whereas my bios chip can only take 3.3v.

Don't wanna fry my board!

Looked on Amazon for hours for a ch341a that did 3.3v, no dice. Heard everywhere that you could mod it to 3.3v but I would rather buy something already at that voltage.

Does anyone know of one that can do 3.3v?

A Raspberry Pi, can also be used as a BIOS Programmer with a tool called flashrom and would already be 3.3V. But you need to take extra precautions if the 3.3V BIOS chip supply is connected so some other components of the board which could pull to much current.

@shahabkhaan
Copy link

can someone help me to decode this

000000000000005B76B67B116E6CE6C7
BD22CD7DB1D89433078E05E90444E89F
CEFAE35599B03E0B7966D9C1361C0977
16D2A92D3D88D0E3633EF7998AF41D4F

5B76B67B116E6CE6C7BD22CD7DB1D894
33078E05E90444E89FCEFAE35599B03E
0B7966D9C1361C097716D2A92D3D88D0
E3633EF7998AF41D4FB1AA4405D8606B

@userx14
Copy link

userx14 commented Nov 26, 2020

@shahabkhaan
most likely sha1 of your password (because 20bytes), so only way is to overwrite it with zeros.
e5005d00d400ab005d00b900b6000e002900c40050000000b500ed003b000b00b0008500d9008a000000000000000000000000000000000000000000000000

@shahabkhaan
Copy link

but i cant over write bios that gives a message failed.

@shahabkhaan
Copy link

i have 10 password protected laptops and all have a sticker on back swick mining services ,some help will be much appreciated

@shahabkhaan
Copy link

shahabkhaan commented Nov 27, 2020

my bios file is attached plz someone help me to find the password
https://drive.google.com/file/d/18XLvz9AMIrvdrSwXq-iCgKbVaDgg9IG2

@userx14
Copy link

userx14 commented Nov 28, 2020

but i cant over write bios that gives a message failed.

Have you considered a hardware bios flasher?
From the sha1 key that is stored in your BIOS there is no simple way to derive the original password.

@shahabkhaan
Copy link

no i have not tried hardware bios flasher and i even dont know how to flash hardware

@OmegaSentinell
Copy link

VOID PasswordEncode( CHAR16 Password, UINTN MaxSize)
{
UINTN ii;
unsigned int key = 0x935b;
#if SETUP_PASSWORD_NON_CASE_SENSITIVE
for ( ii = 0; ii < MaxSize; ii++ )
Password[ii] = ((Password[ii]>=L'a')&&(Password[ii]<=L'z'))?(Password[ii]+L'A'-L'a'):Password[ii];
#endif
// Encode the password..
for ( ii = 1; ii <= MaxSize/2; ii++ )
Password[ii-1] = (CHAR16)(Password[ii-1] ^ (key
ii));
}

Where to find full code , not just a fragment ?

@userx14
Copy link

userx14 commented Dec 2, 2020

VOID PasswordEncode( CHAR16 _Password, UINTN MaxSize) { UINTN ii; unsigned int key = 0x935b; #if SETUP_PASSWORD_NON_CASE_SENSITIVE for ( ii = 0; ii < MaxSize; ii++ ) Password[ii] = ((Password[ii]>=L'a')&&(Password[ii]<=L'z'))?(Password[ii]+L'A'-L'a'):Password[ii]; #endif // Encode the password.. for ( ii = 1; ii <= MaxSize/2; ii++ ) Password[ii-1] = (CHAR16)(Password[ii-1] ^ (key_ii));
}

Where to find full code , not just a fragment ?

I'm not really sure how if this can help you, but in 2013 the source code for AMIBIOS was leaked, see this article from techpowerup:
https://www.techpowerup.com/182484/amibios-source-code-and-amis-uefi-signing-key-leaked

But I'm not sure what your goal is?
Greetings Benjamin

@Wasmachineman-NL
Copy link

If I had to guess, he wants to reverse engineer the password encryption so we can decrypt hashed passwords.

@userx14
Copy link

userx14 commented Dec 2, 2020

If I had to guess, he wants to reverse engineer the password encryption so we can decrypt hashed passwords.

Well it's most likeley sha1, the most used hashing function which produces 20bytes output, but even if he would have the source code and you would be able to find out if it is sha1 or if they included some salt you will be unable to reverse the sha1:
https://stackoverflow.com/questions/2235079/is-it-possible-to-reverse-a-sha1
He could try rainbow tables if the password happens to be short enough though.
But I would guess just finding someone to reflash the bios chip for you (or you if you can do it yourself even better) is an easyer endavor, and more cost/time effective.
Although I'll be happy to be proven wrong 😄

@OmegaSentinell
Copy link

OmegaSentinell commented Dec 2, 2020

If I had to guess, he wants to reverse engineer the password encryption so we can decrypt hashed passwords.

i want to reprogram in python , and to decrypt ami bios passwords for other brands too...

@tunconder
Copy link

Hi Everyone ,
I used minipro TL866CS to read my CF-53's bios chip which is Micron MX25L6406E , its size 8 MB (not all of CF-53's chips are 16 MB) , just found strings ending with 5D8606B in 2 different lines , erased 64x2 lines with zeros , because found hashes according to descriptions above , soldering chip back in its place , fingers crossed , thanks to everyone who contributes this thread ,

@SoftwareGuy
Copy link

SoftwareGuy commented Dec 13, 2020

Hi there,

I dumped the BIOS off a embedded board via AFUWINGUI, and followed the guide in the original post that showed what to look for using the tools to find the Setup routine data, etc. However, I want to know if this if this is a hash or can be decoded, because if I XOR it with the code in OP and try to decode it, the result contains characters that don't seem to be correct.

(image removed)

Do you think it's safe to blank it with just 00s? I do see some repetition here, but I'm not sure what that means.

The BIOS version says it's got a Core version of 4.06 and NVRAM size of 262144 bytes. The BIOS dump image does complain about somethings being misaligned, and it's 3MB in size.

If I'm going to flash back, do I just select the NVRAM programming option? Can I get a brick if I only flash the NVRAM? Or does the BIOS have methods to "reset" the NVRAM if it determines it's corrupted?

EDIT: I'm using the latest version of the UEFI Explorer Tool with the "New Engine". A58 iirc.

@en4rab
Copy link
Author

en4rab commented Dec 13, 2020

SoftwareGuy I just had a look and xor'd the data and as far as i can tell I think your bios is just storing the password as ascii characters.
The first password (which i think is the setup pass) seems to be:
1F 93 D7 26 72 BA 2E 4D AD E0 12 74 48 07 88 9A 40 2E EA C1 E9....... XOR'd with
5B 93 B6 26 11 BA 6C 4D C7 E0 22 74 7D 07 D8 9A 33 2E 8E C1 E9..... Gives
44 00 61 00 63 00 42 00 6a 00 30 00 35 00 50 00 73 00 64 00 00

Viewing this in a hex editor

Offset(h) 00 01 02 03 04 05 06 07 08 09 0A 0B 0C 0D 0E 0F
00000000  44 00 61 00 63 00 42 00 6A 00 30 00 35 00 50 00  D.a.c.B.j.0.5.P.
00000010  73 00 64 00 00 00 00 00 00 00 00 00 00 00 00 00  s.d.............

It looks like the password is ascii (or UTF16 as every other byte is 00) so i think the user password is
DacBj05Psd
and doing the same for the admin password gives
s2FtaN1v

Give those a try and see if it works.

@SoftwareGuy
Copy link

Thanks en4rab. Just tried both passwords and they let me in. Brilliant stuff! Thanks a bunch, much appreciated.

@miarcin
Copy link

miarcin commented Dec 17, 2020

Hi there,

Can someone help me if i can decode password for my Panasonic CF-D1 ??

cfd1

@en4rab
Copy link
Author

en4rab commented Dec 17, 2020

miarcin I had a quick look and xoring the admin pass gave
Offset(h) 00 01 02 03 04 05 06 07 08 09 0A 0B 0C 0D 0E 0F
00000000 EF 00 A1 00 EE 00 52 00 33 00 87 00 E8 00 CA 00 ï.¡.î.R.3.‡.è.Ê.
00000010 38 00 20 00 79 00 A9 00 62 00 0E 00 6A 00 4F 00 8. .y.©.b...j.O.
00000020 A9 00 1A 00 47 00 6B 00 00 00 00 00 00 00 00 00 ©...G.k.........
00000030 00 00 00 00 00 00 00 00 00 00 00 00 00 00 00 ...............

The 20 bytes that make up the password suggest that this is a SHA1 hash so cant be decoded.

@miarcin
Copy link

miarcin commented Dec 17, 2020 via email

@SoftwareGuy
Copy link

Hello, thanks, for that.  Can be reset somehow?

If your BIOS is not write-protected, then you could potentially zero-out the values and then flash back the modified firmware image to the target device. However, if your BIOS is write-protected, then you will be out of luck (unless a hardware flasher can work around the write-protection).

Ask for further instructions (or read the posts in this thread in full detail, DO NOT skim-read) on how to zero it out and flash it back. Remember, with software flashing, it's like playing a game with only one life and no continues. If you screw up the BIOS, your device is toast unless you can revive it with a HW Flasher.

@miarcin
Copy link

miarcin commented Dec 20, 2020

Thanks, i have reset password. Thanks for help.

I have PAY someone for that, he claims that he can do it, but after his solution panasonic stuck in bios loop and enter bios over and over, no way to save values, every time back to begining.
He make mistake and i have correct it.
Now its ok.
But i have to desolder bios and program it all over again.
Regards

@jnaman
Copy link

jnaman commented Dec 24, 2020

Can someone help me decode
My Hex:
6B93872623BA584DF1E01A744E07ED9A
332E8EC1E95444E89F7BFA0E55A2B035

Any help would be much appreciated
bios

@tunconder
Copy link

@jnaman try "tab ... qwryiet"

@tunconder
Copy link

I mean ... press "tab" key first .... then in order .... qwryiet

@userx14
Copy link

userx14 commented Dec 24, 2020

Hi @jnaman

when I enter your hex in xor.pw together with en4rab's key I get:
3000 3100 3200 3400 3600 3800 3300 3500
I see that @tuncoder has already decoded that with the help of the table from en4rab, but another possibility could still be that these are raw ASCII characters, in this case it would be 01246835, just try both and see if one of them works.
Please note that your keymap might be different depending on your keyboard language if you try the "tab"qwryiet from tuncoder.

Anyway this password is not hashed, so I guess that you can figure it out...

Thanks for providing the hex as copy pastable characters, this way I don't have to write down the characters from the image where there is always the possibility that I mess up 😃 .

Good luck,
Benjamin

@jnaman
Copy link

jnaman commented Dec 24, 2020

Thanks @tunconder for assistance and quick response but unfortunately the decode provided didn't work.
Thanks @Benjaminrenz and a huge shoutout to you , the decode worked and now I am in my BIOS.

@userx14
Copy link

userx14 commented Dec 24, 2020

It was pretty much a 50:50 chance of the direct ascii or keymap table decoding, glad you got it working 👍
Could you mention your rough model e.g. (cf 53-mk3) in case someone else stumbles across this thread with the same model?

@jnaman
Copy link

jnaman commented Dec 26, 2020

@Benjaminrenz My laptop is actually HP Spectre x360 (bl075nr)

@jocker010101
Copy link

Hi
I bought cf19 mk8 few years ago now, I knew that bios is pass locked. I tried different combinations with no luck. I don't really need to go there however it bothers me that bluetooth is disabled and I would like to turn it on. Is there any other way to turn it on, please?
I'm sorry for OT.

@SoftwareGuy
Copy link

SoftwareGuy commented Dec 27, 2020

Hi
I bought cf19 mk8 few years ago now, I knew that bios is pass locked. I tried different combinations with no luck. I don't really need to go there however it bothers me that bluetooth is disabled and I would like to turn it on. Is there any other way to turn it on, please?
I'm sorry for OT.

Give us a dump of the BIOS password area (follow the instructions in the first post), and then we'll give you access into the BIOS so you can turn all the features that might have been disabled back on. There's no other way apart from trying to guess which byte is the bluetooth enable/disable setting.

@jocker010101
Copy link

jocker010101 commented Dec 27, 2020

I tired to do it myself but looks like I'm too stupid for that :D
This is a dump:
5B86B6FF11896CB0C72B22817DA4D870
33AE8E4EE9F744749FDEFA5C55D3B071
0B296602C1B91CB67716D2A92D3D88D0
E3633EF7998AF41D4FB1AA4405D8606B

Thank you for your help
When I got my CF19 it came from a Cash-converter shop in London (a pawn shop) and it had the Volvo logo sticker on it, which meant that it came from a Volvo dealership at some point.

@userx14
Copy link

userx14 commented Dec 27, 2020

@jocker010101
Your Password is hashed,
15d933fdcbf5a3ea808fa39ca5527144e05e5635, so it impossible to know what the password was.
Only change to reset it by overwriting the location where it is stored with zeros. Please check out the other comment on how that works, and if you have any question please let me know. It is however possible that your bios is write protected, so that even if you alter the image you cannot flash it back via the sofware and the only option left would be using an hardware bios programmer.
If you are just after Bluetooth how about an inexpensive usb bluetooth stick?

@jocker010101
Copy link

Thank you BenjaminRenz... I was afraid that it was hashed :( I do not want to brick my laptop and will not attempt to flash bios :( I do have a BT stick but I was hoping to get access to Bios and get it on.

@jocker010101
Copy link

jocker010101 commented Dec 30, 2020

I decided to have a go and try to mend my flash image and see how it goes. I downloaded HxD and trying to find my password section however when I trying to search for password string nothing is being found, how can I find where my password is being stored so I can 00'd. please?

Best regards
Jocker010101

I founded, I was looking under the wrong section....I found two strings with my password and 00'd both... will try to flash it under windows and I will see

@jocker010101
Copy link

jocker010101 commented Dec 30, 2020

No luck...my bios is not write-protected, however result show that not a whole flash was over-written:
config
flash result

@userx14
Copy link

userx14 commented Dec 30, 2020

Have you tested yet if there was any effect even though that only parts of the flash have been written?
Or what happens if you dump the flash again? Is the hex for the passsord still there?

@jocker010101
Copy link

I decided to compare both dumps and they are slightly different: the original dump has a bigger password section and a new one is slightly smaller:
0B 29 66 02 C1 B9 1C B6 77 16 D2 A9 2D 3D 88 D0. The rest of the password section is 00'ed

@jocker010101
Copy link

Have you tested yet if there was any effect even though that only parts of the flash have been written?
Or what happens if you dump the flash again? Is the hex for the password still there?

Yes, I test it, the password is still there :(

I think we getting somewhere....slowly :d

@userx14
Copy link

userx14 commented Dec 30, 2020

Maybe the flash triggered some kind of factory reset...

@jocker010101
Copy link

Maybe the flash triggered some kind of factory reset...

No, I don't think so, these comparisons are from the created file.... I didn't read the new flash. Maybe this software which I'm using is not capable of 00 it properly :(

@jocker010101
Copy link

jocker010101 commented Dec 30, 2020

I'm in.... Thank you sooooooo much :D It took me a few over-writtes until all remainings of the password were gone!

@vkinnar
Copy link

vkinnar commented Jan 11, 2021

I am trying to recover my BIOS Password for Panasonic CF-53, I could get the codes form AMITESSetup and tried to exor with the string provided, and resulted the same @c0deh4xor, Following are the results, I think @c0deh4xor could solve the issue, but I am not being able to figure out how to extract the password out of it. Can you help me extracting password out of this?

AMITSESetup String
5B2FB62411166CBAC73B22CF7D5DD8B133838E62E9CA44D29F0CFAA95500B0890B51665AC1BE1C0F7716D2A92D3D88D0E3633EF7998AF41D4FB1AA4405D8606B

exor String
5B93B62611BA6C4DC7E022747D07D89A332E8EC1E95444E89F7BFA0E55A2B0350BC9665CC1EF1C837716D2A92D3D88D0E3633EF7998AF41D4FB1AA4405D8606B

Result of exor
bc 02 ac f7 db bb 5a 2b ad a3 9e 3a 77 a7 a2 bc 98 06 51 8c

This is again a 20 byte string.

@vkinnar
Copy link

vkinnar commented Jan 11, 2021

@c0deh4xor you have written
"Just blank it all out, that's what I did with mine and it boots fine or replace it with a known SHA-1 hash ;)"

Can you explain how can I do this? Please mention which tools to be used.

@userx14
Copy link

userx14 commented Jan 11, 2021

Short summary:
Note the offset that uefi tools displays when you have the uefi key "AMITSESetup String" selected (this will be in hexadecimal notation). Use a Hex-Editor of your choice (I use HxD.exe) to overwrite the bytes at this location with zeros. To be sure check that the bytes you are overwriting are the same that are displayed inside uefi tool as the original password bytes. Do not shorten the file, just replace them with zeros. Then flash the bios back to the device. On some devices the bios is write protected and this step will fail, then the only way so far was to use a hardware bios programmer.
Good luck, if you have any questions on the details just let me know 😄

@vkinnar
Copy link

vkinnar commented Jan 12, 2021

Thanks a lot @Benjaminrenz,

I found two instances of the supervisor password stored in bios, at both the places I replaced the content with 0's and it went find, my laptop bios in password free now. That too without opening the laptop. Great help.

@OmegaSentinell
Copy link

OmegaSentinell commented Jan 19, 2021

Hex Char EFIkey Hex Char EFIkey
10 z EfiKeyB1 30 Tab EfiKeyTab
11 x EfiKeyB2 31 q EfiKeyD1
12 c EfiKeyB3 32 w EfiKeyD2
13 v EfiKeyB4 33 e EfiKeyD3
14 b EfiKeyB5 34 r EfiKeyD4
15 n EfiKeyB6 35 t EfiKeyD5
16 m EfiKeyB7 36 y EfiKeyD6
17 , EfiKeyB8 37 u EfiKeyD7
18 . EfiKeyB9 38 i EfiKeyD8
19 / EfiKeyB10 39 o EfiKeyD9
1A   EfiKeyRShift 3A p EfiKeyD10
1B   EfiKeyUpArrow 3B [ EfiKeyD11
1C 1 EfiKeyOne 3C ] EfiKeyD12
1D 2 EfiKeyTwo 3D \ EfiKeyD13
1E 3 EfiKeyThree 3E   EfiKeyDel
1F   EfiKeyCapsLock 3F   EfiKeyEnd
20 a EfiKeyC1 40   EfiKeyPgDn
21 s EfiKeyC2 41 7 EfiKeySeven
22 d EfiKeyC3 42 8 EfiKeyEight
23 f EfiKeyC4 43 9 EfiKeyNine
24 g EfiKeyC5 44 ` EfiKeyE0
25 h EfiKeyC6 45 1 EfiKeyE1
26 j EfiKeyC7 46 2 EfiKeyE2
27 k EfiKeyC8 47 3 EfiKeyE3
28 l EfiKeyC9 48 4 EfiKeyE4
29 ; EfiKeyC10 49 5 EfiKeyE5
2A ' EfiKeyC11 4A 6 EfiKeyE6
2B | EfiKeyC12 4B 7 EfiKeyE7
2C 4 EfiKeyFour 4C 8 EfiKeyE8
2D 5 EfiKeyFive 4D 9 EfiKeyE9
2E 6 EfiKeySix 4E 0 EfiKeyE10
2F + EfiKeyPlus

have you got a full 256 symbols table ?

@OmegaSentinell
Copy link

forget it , i was made my generator already.

@Iulian1977
Copy link

This is mine.
4E5641529800FFFFFF830E414D495453
45536574757000000000000000000000
00000000000000000000000000000000
00000000000000000000000000000000
00000000000000000000000000000000
000000000000006E13A0A6033A7ECDFE
6016F45E87F81A23AEB941CAD47568BB
FBE98E7322B0350BC9665CC1EF1C8377
16D2A92D3D88D0E3633EF7998AF41D4F
B1AA4405D8606B01

Any solution? Thx in advance.

@userx14
Copy link

userx14 commented Jan 21, 2021

@Iulian1977
3580 1680 1280 1280 3980 3480 2380 2080 1080 3780 2380 3180 2480 1380 2680
It's not hashed, so you are lucky.
It should be decodable with the efi table from en4rab

@JDL-84
Copy link

JDL-84 commented Jan 27, 2021

I was wondering if someone could give me a steer.
I've a CF-19 MK3 with a BIOS password. The AMI BIOS is from 08/2009 which appears to be the only version.
This is the C811FA38-42C8-4579-A9BB-60E94EDDFB34 key. Which is listed as FULL opposed to DATA, but I can see others have posted with this and been successful.
CF-19 mk3 Original

I just wanted to blank the password out, seemed easier that the recovery. I've done this with HxD, replacing with 00 as instructed in the comments, leaving the 0x80 as '.'

CF-19 mk3 Blanked

I can flash this and will continue to boot back into Windows, but the password remains. The only thing I can spot is that when I flash with AFUWINGUI (v3.09.03.1462), I am not given the "Non Critical Block" options as others have used. They are greyed out.

Can anyone stop the error please? I've uploaded both the original and modified rROM's here.

@JDL-84
Copy link

JDL-84 commented Jan 27, 2021

In the minutes since posting, I've re-read and recovered the password! Must have had a brain fart.

Using this

4D13A4A6293A79CDF26014F44987EB1A332E8EC1E95444E89F7BFA0E55A2B035
0BC9665CC1EF1C837716D2A92D3D88D0E3633EF7998AF41D4FB1AA4405D8606B

XOR with

5B 93 B6 26 11 BA 6C 4D C7 E0 22 74 7D 07 D8 9A 33 2E 8E C1 E9 54 44 E8 9F 7B FA 0E 55 A2 B0 35 
0B C9 66 5C C1 EF 1C 83 77 16 D2 A9 2D 3D 88 D0 E3 63 3E F7 99 8A F4 1D 4F B1 AA 44 05 D8 60 6B

has provided me with

16(m) 80 12(c) 80 38(i) 80 15(n) 80 35(t) 80 36(y) 80 34(r) 80 33 (e) 80000000000000000000000000000000000000000000000000000000000000000000000000000000000000000000000000
mcintyre

This has been a really useful post. Thank everyone that has inputted into this.

@kev1984
Copy link

kev1984 commented Jan 28, 2021

Thanks a lot @Benjaminrenz,

I found two instances of the supervisor password stored in bios, at both the places I replaced the content with 0's and it went find, my laptop bios in password free now. That too without opening the laptop. Great help.

I made same steps as above but for CF-C2. Bios password clear now.

@otorra14
Copy link

Hi! I have this encoded password
5B 62 B6 77 11 10 6C E1 C7 AF 22 9B 7D F2 D8 53 33 BE
8E 26 E9 58 44 F6 9F 2A FA 0E 55 61 B0 B2 0B 00 66 AB C1
09 1C 79 77 16 D2 A9 2D 3D 88 D0 E3 63 3E F7 99 8A F4
1D 4F B1 AA 44 05 D8 60 6B.

Based on the previous posts i XOR it with
5B 93 B6 26 11 BA 6C 4D C7 E0 22 74 7D 07 D8 9A 33 2E 8E C1 E9 54 44 E8 9F 7B FA 0E 55 A2 B0 35
0B C9 66 5C C1 EF 1C 83 77 16 D2 A9 2D 3D 88 D0 E3 63 3E F7 99 8A F4 1D 4F B1 AA 44 05 D8 60 6B

And got this result f1005100aa00ac004f00ef00f500c9009000e7000c001e0051000000c3008700c900f700e600fa000000000000000000000000000000000000000000000000

After removing the 00 i got this result.

f1 51 aa ac 4f ef f5 c9 90 e7 0c 1e 51 c3 87 c9 f7 e6 fa.
Could any please let me know if this is right and how can i get the password. I manage to find only some of the numbers like => 51 that is 3
4f that is O then 90 that is Z and 87 that is W. Please let me know if this thing that i have done so far is right and show me the rest

@kev1984
Copy link

kev1984 commented Jan 30, 2021

Hi! I have this encoded password
5B 62 B6 77 11 10 6C E1 C7 AF 22 9B 7D F2 D8 53 33 BE
8E 26 E9 58 44 F6 9F 2A FA 0E 55 61 B0 B2 0B 00 66 AB C1
09 1C 79 77 16 D2 A9 2D 3D 88 D0 E3 63 3E F7 99 8A F4
1D 4F B1 AA 44 05 D8 60 6B.

Based on the previous posts i XOR it with
5B 93 B6 26 11 BA 6C 4D C7 E0 22 74 7D 07 D8 9A 33 2E 8E C1 E9 54 44 E8 9F 7B FA 0E 55 A2 B0 35
0B C9 66 5C C1 EF 1C 83 77 16 D2 A9 2D 3D 88 D0 E3 63 3E F7 99 8A F4 1D 4F B1 AA 44 05 D8 60 6B

And got this result f1005100aa00ac004f00ef00f500c9009000e7000c001e0051000000c3008700c900f700e600fa000000000000000000000000000000000000000000000000

After removing the 00 i got this result.

f1 51 aa ac 4f ef f5 c9 90 e7 0c 1e 51 c3 87 c9 f7 e6 fa.
Could any please let me know if this is right and how can i get the password. I manage to find only some of the numbers like => 51 that is 3
4f that is O then 90 that is Z and 87 that is W. Please let me know if this thing that i have done so far is right and show me the rest

Just wipe encoded password with zeros in dumped bios file and flash it back into bios.

@userx14
Copy link

userx14 commented Jan 31, 2021

Hi! I have this encoded password
5B 62 B6 77 11 10 6C E1 C7 AF 22 9B 7D F2 D8 53 33 BE
8E 26 E9 58 44 F6 9F 2A FA 0E 55 61 B0 B2 0B 00 66 AB C1
09 1C 79 77 16 D2 A9 2D 3D 88 D0 E3 63 3E F7 99 8A F4
1D 4F B1 AA 44 05 D8 60 6B.

Based on the previous posts i XOR it with
5B 93 B6 26 11 BA 6C 4D C7 E0 22 74 7D 07 D8 9A 33 2E 8E C1 E9 54 44 E8 9F 7B FA 0E 55 A2 B0 35
0B C9 66 5C C1 EF 1C 83 77 16 D2 A9 2D 3D 88 D0 E3 63 3E F7 99 8A F4 1D 4F B1 AA 44 05 D8 60 6B

And got this result f1005100aa00ac004f00ef00f500c9009000e7000c001e0051000000c3008700c900f700e600fa000000000000000000000000000000000000000000000000

After removing the 00 i got this result.

f1 51 aa ac 4f ef f5 c9 90 e7 0c 1e 51 c3 87 c9 f7 e6 fa.
Could any please let me know if this is right and how can i get the password. I manage to find only some of the numbers like => 51 that is 3
4f that is O then 90 that is Z and 87 that is W. Please let me know if this thing that i have done so far is right and show me the rest

@otorra14
It is only the hash of your password, you will be unable to decode it like that.
as kev1984 said overwriting it with zeros is currently the only possibility to remove it.

@otorra14
Copy link

otorra14 commented Feb 1, 2021

@kev1984 @Benjaminrenz i have try it with zeros but it is impossible to flash this model from windows

@OmegaSentinell
Copy link

This is mine.
4E5641529800FFFFFF830E414D495453
45536574757000000000000000000000
00000000000000000000000000000000
00000000000000000000000000000000
00000000000000000000000000000000
000000000000006E13A0A6033A7ECDFE
6016F45E87F81A23AEB941CAD47568BB
FBE98E7322B0350BC9665CC1EF1C8377
16D2A92D3D88D0E3633EF7998AF41D4F
B1AA4405D8606B01

Any solution? Thx in advance.

tmccorfazufqgv - this is your password

@userx14
Copy link

userx14 commented Feb 2, 2021

@kev1984 @Benjaminrenz i have try it with zeros but it is impossible to flash this model from windows

@ otorra14
Well, I would guess that a hardware bios flasher would be able to bypass this, but you need to consider how important the unlocked bios is to you.

@DavStriker
Copy link

Hi everyone,
Not simple for me with the Xor ...
I'm stuck at this :
Try

Computer is a CF-H2.

Thank you in advance for your help.

@userx14
Copy link

userx14 commented Feb 3, 2021

@DavStriker
it's hashed, your hash is:
52f49fb16f9944a27f9be4d2ff55cd8a305f584f
So your only chance for now is to overwrite these bytes with zeros and hope that you are able to flash back the modified bios.
Just for future reference, if someone else want's help on decoding their hex, please also copy the hex from uefiTool into your message as plaintext which can be copy pasted. Otherwise I have to retype all the characters without an error from you image which is quiet exhausting.

@DavStriker
Copy link

@Benjaminrenz 👍
Thank you for your research and answer.
Sorry for the retyping.

I will try ASAP.

@userx14
Copy link

userx14 commented Feb 3, 2021

@Benjaminrenz 👍
Thank you for your research and answer.
Sorry for the retyping.

I will try ASAP.

@DavStriker
No Problem 😄 , if you any questions on hardware flashing please let me know.

@WartexM
Copy link

WartexM commented Feb 9, 2021

@Benjaminrenz @en4rab

Guys could you please help me identify if this is XORed plaintext, SHA1 or some other stuff. This is from a BOSCH video recorder, tech support refuses to release the password. Board is supposedly made by SuperMicro. Thanks in advance!

biosstrings

@userx14
Copy link

userx14 commented Feb 9, 2021

@WartexM
hope I did not made a mistake while retyping the hex characters fron your image.
xored:
4b4337484552544a
seems like plaintext Ascii, and most likeley not hashed.
In this case:
KC7HERTJ
or some scancodes...
Greetings
Benjamin

@WartexM
Copy link

WartexM commented Feb 9, 2021

@Benjaminrenz

THANK you so much for figuring it out. This is a user password and it does work, but most of the settings are hidden, is there more to that string?

what bytes did you retype and what string did u xor it with? Thanks again!

@userx14
Copy link

userx14 commented Feb 9, 2021

@WartexM
The Hex you have posted only containes the xored result I just posted, nothing more. I would have expected that the bunch of zero bytes in the front mean that either the user or admin password is not set. The other bytes expect the very last one are from the xor encrypted user/admin password which is set.
Do you have a reference of which bios options are typically available on this machine?
I guess the manufacturer will customize and disable some advanced settings to reduce RMA rates. I'm not an expert on reenabeling those, but you will most likeley find help on various bios modding forums.
Good luck
Benjamin

@WartexM
Copy link

WartexM commented Feb 9, 2021

@Benjaminrenz
the bios is very restricted and only has boot order, LAN boot rom etc, does not even allow password change. I dug around in UEFI editor and it has hundreds of hiddent settings such as max CPU TDP, clock multipliers etc etc. I have to dive deeper lol. Thank you for your help!

@skawalker2011
Copy link

skawalker2011 commented Feb 9, 2021

Hello everyone.

I need know my CF-19 BIOS password. I did first step and I have that code from UEFITool
5B EA B6 D9 11 28 6C 51 C7 F0 22 F1 7D DD D8 4A 33 EE 8E DB E9 51 44 CF 9F 7F FA B2 55 27 B0 3B
0B DF 66 9C C1 04 1C 8A 77 16 D2 A9 2D 3D 88 D0 E3 63 3E F7 99 8A F4 1D 4F B1 AA 44 05 D8 60 6B

4E5641529800FFFFFF8308414D495453
45536574757000000000000000000000
00000000000000000000000000000000
00000000000000000000000000000000
00000000000000000000000000000000
000000000000005BEAB6D911286C51C7
F022F17DDDD84A33EE8EDBE95144CF9F
7FFAB25527B03B0BDF669CC1041C8A77
16D2A92D3D88D0E3633EF7998AF41D4F
B1AA4405D8606B01

Unfortunatelly, I don't know what next. Could you help me, please? I don't know from where I should take code "with" (in article this is 5B 93 B6 26 11 BA 6C 4D C7 E0 22 74 7D 07 D8 9A 33 2E 8E C1 E9 54 44 E8 9F 7B FA 0E 55 A2 B0 35
0B C9 66 5C C1 EF 1C 83 77 16 D2 A9 2D 3D 88 D0 E3 63 3E F7 99 8A F4 1D 4F B1 AA 44 05 D8 60 6B)

image

@userx14
Copy link

userx14 commented Feb 10, 2021

@skawalker2011
So far everything seems right, the problem is that your Bios does only store the hash of your password 79ff...eb09 (20 bytes) and reversing such an hash to the original password is practically impossible.
You could just overwrite this section with zeros and flash the modified bios, but some laptops seem to be write protected.
Greeting
Benjamin

@OutOfIdeas-png
Copy link

This is fantastic. I have a CF-20 with computrace enabled, does anyone know the address to toggle off computrace? I bought this thing off of eBay and it has sat in a box for a year because of a bios password and computrace spyware.

@userx14
Copy link

userx14 commented Feb 11, 2021

@OutOfIdeas-png
I guess someone in the win-raid forum figured out how remove the computrace module from the bios from a dell laptop:
https://www.win-raid.com/t2688f39-Dell-Precision-M-bios-modding-Bios-mod-AMT-and-Computrace-1.html

Or maybe you have access to a setting to disable it when you don't have a bios password set.
Greetings
Benjamin

@userx14
Copy link

userx14 commented Feb 11, 2021

I have found an interesting article on the write protection bios in intel platforms:
https://www.win-raid.com/t3553f39-Guide-Unlock-Intel-Flash-Descriptor-Read-Write-Access-Permissions-for-SPI-Servicing.html

@OutOfIdeas-png
Copy link

@OutOfIdeas-png
I guess someone in the win-raid forum figured out how remove the computrace module from the bios from a dell laptop:
https://www.win-raid.com/t2688f39-Dell-Precision-M-bios-modding-Bios-mod-AMT-and-Computrace-1.html

Or maybe you have access to a setting to disable it when you don't have a bios password set.
Greetings
Benjamin

Once it’s “activated” in the BIOS, it can’t be disabled, regardless of the password.

At best, absolute software said they could remove their tracking from the laptop, but they say it was deactivated 5 months before I got it, yet it still loads all their persistent software on first boot. I haven’t messed with it much because of the glaring security flaws inherent with it being present.

If I can’t find a way to disable it and dump it back to the bios I may have to just replace the bios chip.

@userx14
Copy link

userx14 commented Feb 11, 2021

Once it’s “activated” in the BIOS, it can’t be disabled, regardless of the password.

At best, absolute software said they could remove their tracking from the laptop, but they say it was deactivated 5 months before I got it, yet it still loads all their persistent software on first boot. I haven’t messed with it much because of the glaring security flaws inherent with it being present.

If I can’t find a way to disable it and dump it back to the bios I may have to just replace the bios chip.

If I remember correctely there was also a way to force a bios nvram reset with garbadge data, but this might be machine dependent:
www.blackhat.com/presentations/bh-usa-09/ORTEGA/BHUSA09-Ortega-DeactivateRootkit-PAPER.pdf

Maybe overwriting the section from where computrace injects its code into the os might work, but if it doesn't you probably need a hardware bios flasher to get it back to life.

@Iulian1977
Copy link

@Iulian1977
3580 1680 1280 1280 3980 3480 2380 2080 1080 3780 2380 3180 2480 1380 2680
It's not hashed, so you are lucky.
It should be decodable with the efi table from en4rab

Hi,
I sincerely I don't know how to do that... If you can help I'll thank you a lot.

@JDL-84
Copy link

JDL-84 commented Feb 11, 2021

@Iulian1977
3580 1680 1280 1280 3980 3480 2380 2080 1080 3780 2380 3180 2480 1380 2680
It's not hashed, so you are lucky.
It should be decodable with the efi table from en4rab

Hi,
I sincerely I don't know how to do that... If you can help I'll thank you a lot.

35(t) 80 16(m) 80 12(c) 80 12(c) 80 39(o) 80 34(r) 80 23(f) 80 20(a) 80 10(z) 80 37(u) 80 23(f) 80 31(q) 80 24(g) 80 13(v) 80 26(j) 80
tmccorfazufqgvj

@tunconder
Copy link

tunconder commented Feb 11, 2021 via email

@Iulian1977
Copy link

@Iulian1977
3580 1680 1280 1280 3980 3480 2380 2080 1080 3780 2380 3180 2480 1380 2680
It's not hashed, so you are lucky.
It should be decodable with the efi table from en4rab

Thank you very much guys. It worked. I have now a Thoughbook with my own Bios password.
All best!

@silviu85franta
Copy link

It's possible that bios's for models other than the CF-U1 may encrypt the password in some way, the AMI source has a function intended to be customised by the OEM to provide a more secure method of password storage:

VOID HiiGetEfiKey(CHAR16 *PwKey);
//<AMI_PHDR_START>
//----------------------------------------------------------------------------
// Procedure:	PasswordEncode
//
// Description:	This function is a hook called when user entered
//              password has to be encoded. This function is
//              available as ELINK. OEMs may choose to use different
//              encryption logic here.
//
// Input:		Password : Password array to be encrypted. Encryped
//              password is returned in the same array.
//              MaxSize : Max size of Password
//
// Output:		VOID
//
//----------------------------------------------------------------------------
//<AMI_PHDR_END>

In both the above cases it looks like the stored password is 20 bytes in size (ignoring the 00 bytes) but this doesnt look like it is any sort of keyboard scancodes or ascii.
This is a wild guess but the fact the password seems to be 20 bytes or 160 bits makes me think that possibly its a SHA1 hash of the password being stored, I did try googleing 5573de0647627740098ec78c5eb7f3f422ccf3ad but got no hits, and if it was a SHA1 hash im not sure if it would be a hash of the ascii or keyboard scan codes so im afraid im out of ideas.

It could be that it is a SHA1 hash. Were did you found the source code for the AMI BIOS ? Was it leaked somewhere ?

Hello,
I want to know if you can find your BIOS Password for your Panasonic CF-53 MK1.
I have the same password but i'm stuck.
Can you help me please?
Thanks

@silviu85franta
Copy link

My password is :
5B C6 B6 55 11 64 6C 4B C7 A7 22 16 7D 70 D8 DA
33 27 8E 4F E9 93 44 64 9F 25 FA B9 55 51 B0 C1
0B EB 66 90 C1 1C 1C 2E 77 16 D2 A9 2D 3D 88 D0
E3 63 3E F7 99 8A F4 1D 4F B1 AA 44 05 D8 60 6B

Can you help me please ? Thank you so much

@userx14
Copy link

userx14 commented Feb 14, 2021

@silviu85franta

Hello,
I want to know if you can find your BIOS Password for your Panasonic CF-53 MK1.
I have the same password but i'm stuck.
Can you help me please?
Thanks

Edit:
The hex you provided is most likeley created by hashing the password as it is 20bytes long.

Most likeley the bios is "encrypting" the entered password by storing only the hash.
You cannot easily reverse the operation of a hashing function. The simplest way to reset the password is to overwrite the section in the bios image with zeros (which is the same state as no password set) and flash back the modified image.
Greetings
Benjamin

@silviu85franta
Copy link

Thank you Benjamin for you help.
I'm novice in rewrite password. Can you explain me please how I must to do to overwrite the section in the bios image withe the zeros, please?
Thank you
Greetings
Silviu

@userx14
Copy link

userx14 commented Feb 14, 2021

@silviu85franta

Thank you Benjamin for you help.
I'm novice in rewrite password. Can you explain me please how I must to do to overwrite the section in the bios image withe the zeros, please?
Thank you
Greetings
Silviu

Please check out:
https://gist.github.com/en4rab/550880c099b5194fbbf3039e3c8ab6fd#gistcomment-3469377

If you have further questions please let me know.

@silviu85franta
Copy link

Thank you Benjamin,
I will check your link and I hope to find my solution of my problem.
Thanks again.

@silviu85franta
Copy link

Hello Benjamin,
With your good explication I can enter in the Bios.
You are THE BEST.
THANK YOU SO MUCH !!!
But now I have a problem with HDD.
Before to cancel Bios password I use normally the PC. But now, after cancel Bios password, my Hdd is recognized but I can't enter.
When I start the PC mark: "no bootable device -- insert boot disk and press any key"
I think is locked.
Do you have a method to unlocked the HDD

Thanks you again for your help.
Greetings,
Silviu

@SoftwareGuy
Copy link

SoftwareGuy commented Feb 16, 2021

@silviu85franta HDD Passwords are different beast all together. What probably happened is that the HDD password was tied to your master BIOS password (or something of the two were linked together), and now since you've cleared it, you're stuffed.

You should (and I hope everyone reading this thread does too) keep a backup of your data before you go playing around with BIOS password clearing/resetting, sometimes master passwords also play a role with other subsystems.

Unfortunately... recovery isn't likely possible from this one, unless you have a backup.

EDIT: Maybe try booting a Linux Live Distro and see if the hard disk actually has partitions, maybe something in the GPT/MBR got hosed. If fdisk can't detect any partitions, or they come up as garbage, then you're outta luck.

@silviu85franta
Copy link

Ok.
Thank you very much for this valuable information.
For me it's not too bad to lose the information that was on the hard drive.

What I would like is to format the hard drive and reinstall Windows on it. But the problem is that no software allows me to actually format the hard drive so that I can then put a bootable file on it to install Windows.

Hope I explained well with my poor English.
Do you have any solution for this problem please?

Many thanks in advance for your help.
Best regards.
Silviu

@vkinnar
Copy link

vkinnar commented Feb 16, 2021 via email

@ChainsawGarden
Copy link

@Benjaminrenz Got my programmer, wired it all up correctly and I read my chip. Noticed a size difference between the two files; the BIOS i read using the AFU tools is about half the size of the BIOS i read with the ch341a.

I made sure to make backups and backups of those backups so I have a clean AFU tools obtained bios & a clean ch341a programmer obtained bios.

Before I put everything back together, I want to know if it's alright that there's a size difference.

@SoftwareGuy
Copy link

@ChainsawGarden My two cents would be to check the offsets for the data. Sometimes there's a lot of empty 00 space after the end of the BIOS ROM image. AFU Tools may only dump the actual used portion of the chip giving you a "only-used" dump. I remember when I dumped a board that AFU showed like two thirds of the chip actually used, while rest was "ignored".

Please exhibit extreme caution though when experimenting - you've got a safety net with the hardware flasher though. 😅

@OutOfIdeas-png
Copy link

OutOfIdeas-png commented Feb 17, 2021 via email

@userx14
Copy link

userx14 commented Feb 17, 2021

@Benjaminrenz Got my programmer, wired it all up correctly and I read my chip. Noticed a size difference between the two files; the BIOS i read using the AFU tools is about half the size of the BIOS i read with the ch341a.

I made sure to make backups and backups of those backups so I have a clean AFU tools obtained bios & a clean ch341a programmer obtained bios.

Before I put everything back together, I want to know if it's alright that there's a size difference.

Have you checked what the size of that chip is based on it's ic marking?
I sometimes have encountered the problem that the programmer would read garbage data and incorrect flash sizes when there is stuff on the 3.3V power line which pulls to much current. If the chip always reports as the same model when reading it's id like 3 times you are probably good to go.

Also @SoftwareGuy is likeley to be right with that AFU tool is only reading parts of the flash chip. If you have a backup of the original flash content it is probably save to just try it out, but a better approach would be to check the ch341a dump and see on which offset it contatins the password bytestring and if this matches the offset from the afu dump.

You could also just alter the image from the ch341 on a second pc. Because I only did it that way I cannot realy tell you if this size missmatch is to be expected. As long as you don't mess up while connecting the programmer you should have as many attempts as this flash chip has write cycle endurance 😄
Good luck
Benjamin

@ChainsawGarden
Copy link

@Benjaminrenz I decided to perform the steps to clearing the password again on a copy of the programmer-dumped BIOS.

I'll try re-flashing in a couple of hours.

@ChainsawGarden
Copy link

ChainsawGarden commented Feb 18, 2021

@Benjaminrenz HOLY CRAP, IT WORKS!

Did a flash, thought I did it wrong or fried my board. Realized I didn't erase the chip first. Plugged in my ch341a and erased the bios (located near the CMOS battery plug, for those who are curious!) and wrote my modified, passwordless bios in.

AND THE PASSWORD IS GONE! G-O-N-E!

https://www.youtube.com/watch?v=Jmd4OLzhQw0

I can't be happier & I wish everyone else with a CF-31 luck. I might even help others if I can find some folks that need the password off.

@ChainsawGarden
Copy link

We've got another problem: seems like I can't boot into my hard drive; it's not shown in the UEFI priorities list either.

Hard drive did have windows 10 but I wiped that to put a Linux distro on it.

Did a diagnostics test and it shows that the drive is functional.

There must be some system blocking me from using this drive (with a different OS than the stock SWin10) and/or USBs.

@userx14
Copy link

userx14 commented Feb 19, 2021

Secureboot maybe?
Edit:
Did it work before the Bios flash?

@ChainsawGarden
Copy link

Secureboot maybe?

Secure Boot's disabled in the BIOS. It says that I can clear the secure boot keys, however...

@ChainsawGarden
Copy link

ChainsawGarden commented Feb 20, 2021

Update: Clearing the Secure Boot keys didn't do anything that I could see.
Caddy's still in; went into the UEFI Priority tab and nothing shows up.
However, when I enable Boot on LAN, IP4/IP6 ethernet boot options show up.

@ChainsawGarden
Copy link

@Benjaminrenz To answer your edit, nope, didn't work pre-flash either.

I took the hard drive, wiped the OS & put a linux distro on there before I tried to flash; that's when the whole machine then became bios-locked.

Previous OS was Windows 10 (idk what build)

@SoftwareGuy
Copy link

Can you try a different disk?

@ChainsawGarden
Copy link

Can you try a different disk?

I've got a spare windows 7 disk that i'll try.

@ChainsawGarden
Copy link

@SoftwareGuy No dice; the BIOS showed that the drive exists but it has no boot options for it.

@SoftwareGuy
Copy link

Is there any disk master passwords or user passwords set? Maybe that's causing it not to detect anything?
Alternatively, the only other option I can think of is to get a full BIOS update from the manufacturer, wipe the BIOS chip fully after resetting NVRAM and then flash the updated BIOS image.

That would cause a full factory reset. If you have a hardware flasher, you should be brick-proof.

@ChainsawGarden
Copy link

Is there any disk master passwords or user passwords set? Maybe that's causing it not to detect anything?
Alternatively, the only other option I can think of is to get a full BIOS update from the manufacturer, wipe the BIOS chip fully after resetting NVRAM and then flash the updated BIOS image.

That would cause a full factory reset. If you have a hardware flasher, you should be brick-proof.

I have a hardware flasher, great.

I've got passwords for the BIOS that I set myself, I don't think it's that though.

Whatever it is, I triggered it when I wiped Windows 10 off of the SSD or hard drive. Don't know what it's called, guess its some sort of utility that checks for a specific operating system.

Hopefully I can find a compatible BIOS on Panasonic's main site. I've got backups of the old BIOS, so I'm safe.

As I'm looking for the BIOS image on Panasonic's main site, I am starting to doubt that they have it on there. I'm mostly finding binaries probably meant to go on toughbooks with windows already installed on there.

Probably a bunch of things I can do, but regardless, I appreciate the help.

@userx14
Copy link

userx14 commented Feb 21, 2021

Do you have uefi shell as a boot option?

@ChainsawGarden
Copy link

Do you have uefi shell as a boot option?

Nope, doesn't appear in the UEFI "Priorities".

@ChainsawGarden
Copy link

I fixed the issue.

https://www.rodsbooks.com/linux-uefi/

Properly prepare your boot medium—Third-party tools for moving .iso images onto USB flash drives, such as unetbootin, often fail to create the proper EFI-mode boot entries. I recommend you follow whatever procedure your distribution maintainer suggests for creating USB flash drives. If no such recommendation is made, use the Linux dd utility, as in dd if=image.iso of=/dev/sdc to create an image on the USB flash drive on /dev/sdc. Ports of dd to Windows, such as WinDD and dd for Windows, exist, but I've never tested them. Note that using tools that don't understand EFI to create your installation medium is one of the mistakes that leads people into the bigger mistake of installing in BIOS mode and then having to correct the ensuing problems, so don't ignore this point!

I usually use tools like Rufus to create my drives; so that was the problem. I used dd on the SSD and the Linux image is on there now.

..But I think I screwed up somewhere because I can't remove the image now. I can boot it, but for whatever reason I can't wipe it, gives me IO errors. Should've used the offline iso..

@ChainsawGarden
Copy link

ChainsawGarden commented Feb 22, 2021

Even though I have all the USB options enabled, my Toughbook will not boot from a USB.

@Benjaminrenz Any ideas why this is happening?

@SoftwareGuy
Copy link

SoftwareGuy commented Mar 11, 2021

Greetings, got another board here that needs unlocking. I am not sure about this one though, I tried to have a crack at it but I got a bad result. I couldn't find the a link to the NVRAM Data entry in the ROM, so I had one that had the category as "Full". Could someone give me a hand?

(image removed)

It doesn't look like a hash in size.

@altisco
Copy link

altisco commented Mar 11, 2021

@silviu85franta hello, i managed to unlock an HDD from a CF-53 using guide posted here: http://www.hddoracle.com/viewtopic.php?f=3&t=1541#p8356.
It's seems that panasonic used the same master password on all CF-53 (and probably CF-54) drives, so i used master password and Victoria for windows 7 32bit and my hdd becomed unlocked, you can give it a try, but you'll need a desktop PC with 32bit win 7 and at least 2 sata ports that will let you boot win 7 (on an unlocked drive) while a the locked HDD is connected; i used an old IBM ThinkCentre A51p.
Now, what i'm trying to do is to unlock an SSD from a CF-19 burned out by thunder lightning, but i need someone with a working CF-19 and a WesternDigital HDD.

@en4rab
Copy link
Author

en4rab commented Mar 11, 2021

I just had a look and it seems like this bios is storing a smaller amount of data for the password but in the same way:
xoring
32 93 f1 26 25 BA 07 4D FF E0 5B 74 39 07 B9 9A 33 2E 8E C1 E9 54 44 E8 9F 7B FA 0E 55 A2 B0 35 0B C9 66 5C C1 EF 1C 83
with
5B 93 B6 26 11 BA 6C 4D C7 E0 22 74 7D 07 D8 9A 33 2E 8E C1 E9 54 44 E8 9F 7B FA 0E 55 A2 B0 35 0B C9 66 5C C1 EF 1C 83
Gave:

Offset(h) 00 01 02 03 04 05 06 07 08 09 0A 0B 0C 0D 0E 0F

00000000  69 00 47 00 34 00 6B 00 38 00 79 00 44 00 61 00  i.G.4.k.8.y.D.a.
00000010  00 00 00 00 00 00 00 00 00 00 00 00 00 00 00 00  ................
00000020  00 00 00 00 00 00 00 00                          ........

So it looks like its a password stored as ascii so give iG4k8yDa a try and see if that works.

@SoftwareGuy
Copy link

Great, that was the ticket! Got into the BIOS. Just so I know next time, do I just trim the XOR key down to fit the input data? When I put the input into xor.pw and the key in the second input, it said that it wasn't valid hexadecimal and the result could be wrong.

@en4rab
Copy link
Author

en4rab commented Mar 12, 2021

Yes just use the first X bytes of the xor key, the xor.pw site isnt the most robust it was just the first site a google search turned up.
It seems to be a bit fussy about hex values with spaces inbetween it strips out the spaces and prints that error but should be fine.
Im sure there are other sites that would do just as well like as another example cyberchef would do it but is possibly a bit overkill for xoring two strings: Cyberchef XOR recipe

@mikrovr
Copy link

mikrovr commented Mar 22, 2021

@en4rab
Hi Robin,
I made this little script in a few hours, maybe this useful to help people, if you are interested let me

pwgen-amibios

Mikrovr

@SoftwareGuy
Copy link

@mikrovr I actually was going to make a similar application but if you want to put yours up in a git repo that would be swell. Having an automated process makes things easier, although if stuck then people can just go back to manual methods.

@mikrovr
Copy link

mikrovr commented Mar 23, 2021

@SoftwareGuy
I will do it... There is no chance that it won't work, the script is very simple, it doesn't depend on any debugging.

@silviu85franta
Copy link

@en4rab
Hi Robin,
I made this little script in a few hours, maybe this useful to help people, if you are interested let me

pwgen-amibios

Mikrovr

Hello,

I want to know if with your application can you help me to find the Bios password for a Panasonic CF-53 MK1?

The password is :
5B C6 B6 55 11 64 6C 4B C7 A7 22 16 7D 70 D8 DA
33 27 8E 4F E9 93 44 64 9F 25 FA B9 55 51 B0 C1
0B EB 66 90 C1 1C 1C 2E 77 16 D2 A9 2D 3D 88 D0
E3 63 3E F7 99 8A F4 1D 4F B1 AA 44 05 D8 60 6B

Thank you for your help
Greetings,
Silviu

@userx14
Copy link

userx14 commented Mar 28, 2021

5B C6 B6 55 11 64 6C 4B C7 A7 22 16 7D 70 D8 DA
33 27 8E 4F E9 93 44 64 9F 25 FA B9 55 51 B0 C1
0B EB 66 90 C1 1C 1C 2E 77 16 D2 A9 2D 3D 88 D0
E3 63 3E F7 99 8A F4 1D 4F B1 AA 44 05 D8 60 6B

Seems hashed:
5573de0647627740098ec78c5eb7f3f422ccf3ad
Sorry, but I do not have much time at the moment.
Please search the thread for instructions on how to overwrite it with zeros.
Greetings,
Benjamin

@silviu85franta
Copy link

Thank you very much Benjamin for your answer. Regarding the removal of the Bios password by replacing it with zeros, I know how to do this but as the hard drive is locked by the bios password, I am afraid I will no longer be able to use it after deleting the bios password.
Do you have any method to initialize hard drive locked with bios password?
Thank you very much.
Greetings, Silviu

@silviu85franta
Copy link

I want to clarify that by using this method I have already lost the use of an SSD.

@ChainsawGarden
Copy link

I want to clarify that by using this method I have already lost the use of an SSD.

Are you sure? I had the same problem, but fixed it. All the BIOS password does is prevent you from using that drive on this specific computer, you could connect your solid state drive to an adapter and use it in a different computer and it will work.

Also, everyone, I fixed the USB issue! Ribbon cables weren't fully in I guess.

@silviu85franta
Copy link

I tried to do as you said, plug it into an adapter and use it as an external ssd, but the system won't let me initialize it.
He marks me "Access denied".
I even tried to format it the slow way but didn't give anything.
When I plug the SSD back into the PC with the unknown BIOS password, the SSD works fine but on a PC that does not have a BIOS password any action is impossible to perform.
I have tried with several software such as AOMEI or others but could not progress.
If someone can help me it will be very nice.
Thank you in advance

@altisco
Copy link

altisco commented Mar 31, 2021

I tried to do as you said, plug it into an adapter and use it as an external ssd, but the system won't let me initialize it.
He marks me "Access denied".
I even tried to format it the slow way but didn't give anything.
When I plug the SSD back into the PC with the unknown BIOS password, the SSD works fine but on a PC that does not have a BIOS password any action is impossible to perform.
I have tried with several software such as AOMEI or others but could not progress.
If someone can help me it will be very nice.
Thank you in advance

@silviu85franta
I wrote you some days ago but github flagged my account and only today i'm able to reply, have you seen my previous reply? i think i can help you.

@userx14
Copy link

userx14 commented Mar 31, 2021

@silviu85franta
from what I've heard it might be possible with linux and hdparm.
I've found these two threads so far:
https://serverfault.com/questions/712849/how-to-unlock-an-ssd-disk-with-hdparm
https://forum.hddguru.com/viewtopic.php?f=1&t=32046
Greetings
Benjamin

@altisco
Copy link

altisco commented Mar 31, 2021

my CF-53 also has password hashed, as seen in other post, and even if i know the supervisor password originally set, there seems to be no way of decrypting from the hex.

hex from bios dump:
5B C1 B6 F4 11 AC 6C DC C7 5A 22 5C 7D 31 D8 C2 33 E1 8E ED E9 F5 44 0E 9F 18 FA 04 55 D9 B0 2E 0B B7 66 D6 C1 5C 1C 01 77 16 D2 A9 2D 3D 88 D0 E3 63 3E F7 99 8A F4 1D 4F B1 AA 44 05 D8 60 6B
ascii known password:
2wsxdr5tgbhu8

@altisco
Copy link

altisco commented Mar 31, 2021

@Ftmmsch
do you still have CF-19?
i'm trying to unlock an SSD from a CF-19 burned out by thunder lightning, but i need someone with a working CF-19 and a WesternDigital HDD, can you help me?

@OmegaSentinell
Copy link

OmegaSentinell commented Apr 5, 2021

@en4rab
Hi Robin,
I made this little script in a few hours, maybe this useful to help people, if you are interested let me

pwgen-amibios

Mikrovr

Can i access to source , ive got something simillar via python 2.7 ,..
panasonic_decryptor

@OmegaSentinell
Copy link

5B C6 B6 55 11 64 6C 4B C7 A7 22 16 7D 70 D8 DA
33 27 8E 4F E9 93 44 64 9F 25 FA B9 55 51 B0 C1
0B EB 66 90 C1 1C 1C 2E 77 16 D2 A9 2D 3D 88 D0
E3 63 3E F7 99 8A F4 1D 4F B1 AA 44 05 D8 60 6B

Seems hashed:
5573de0647627740098ec78c5eb7f3f422ccf3ad
Sorry, but I do not have much time at the moment.
Please search the thread for instructions on how to overwrite it with zeros.
Greetings,
Benjamin

try with
35p69y6

@DavStriker
Copy link

Hi everyone,
For my CF-H2, bios password was : DrfJik .
Had also another witch didn't worked on mine : otpYDrf .
Greeting, David.

@sh0fet
Copy link

sh0fet commented Apr 7, 2021

@OmegaSentinell, @en4rab, @mikrovr, @Benjaminrenz
CF-53sawzym2, someone will help me?

5B86B6FF11896CB0C72B22817DA4D870
33AE8E4EE9F744749FDEFA5C55D3B071
0B296602C1B91CB67716D2A92D3D88D0
E3633EF7998AF41D4FB1AA4405D8606B

i think result:
15d933fdcbf5a3ea808fa39ca5527144e05e5635

What is code?

@altisco
Copy link

altisco commented Apr 8, 2021

@silviu85franta
did you succeed in unlocking the HDD?

@silviu85franta
Copy link

Hello, I failed to unlock my ssd.
I tried with hdparm in Linux but since the ssd is blocked directly by the bios password, I cannot unblock the ssd.
If I chose to write the bios file with zeros, I could enter the bios but I could no longer use my ssd. So for now I'm looking for a way to decrypt the bios password and then remove the protection from the ssd directly into the bios.
I have been looking for about 1 year but without success. I even contacted the Panasonic after-sales service, but they did not give me any solution.
So if a charitable soul wants to help me solve my problem I will be very grateful to them.
Thanks

@altisco
Copy link

altisco commented Apr 8, 2021

Hello, I failed to unlock my ssd.
I tried with hdparm in Linux but since the ssd is blocked directly by the bios password, I cannot unblock the ssd.
If I chose to write the bios file with zeros, I could enter the bios but I could no longer use my ssd. So for now I'm looking for a way to decrypt the bios password and then remove the protection from the ssd directly into the bios.
I have been looking for about 1 year but without success. I even contacted the Panasonic after-sales service, but they did not give me any solution.
So if a charitable soul wants to help me solve my problem I will be very grateful to them.
Thanks

@silviu85franta
As i wrote here https://gist.github.com/en4rab/550880c099b5194fbbf3039e3c8ab6fd#gistcomment-3661784
i think i can help you.

you'll need a Desktop PC with AT LEAST 2 SATA ports and that will let you boot win 7 32bit (on an unlocked drive) with a Locked HDD connected (i used an IBM ThinkCentre A51p)

  1. connect win7 32 HDD to primary sata port and boot win7 letting boot process run with HDD Locked (in my case, at HDD password prompt, i pressed ESC).
  2. download VICTORIA http://hdd.by/Victoria/Victoria473b.zip
  3. run VICTORIA and follow guide at http://www.hddoracle.com/viewtopic.php?f=117&t=1072 using MASTER PASSWORD (make sure that you are working on PIO mode in VICTORIA)
  4. if everything runs fine, victoria will output PWD removing complete and, after reboot, your HDD will be unlocked and usable

if you give me your email i'll send you HEX Master Password

@silviu85franta
Copy link

Thank you very much for your kindness to give me this advice.
I will apply them this weekend.
Here is my email: silviu85franta@yahoo.com for Hex MASTER PASSWORD.
Thank you so much.

@Kissel-B
Copy link

Can someone help me with the Xoring I am completely confused on that trying to unlock bios of toughbook CF-20 can nay one shed some light my output is below. Thanks
5B56B6FD11ED6CBAC73E227C7DE4D88B
33608EBFE9C844C09FABFA725528B08E
0B0B6632C1931C7077A2D29D2D478823
E3483E7299C7F4E34F88AA780577607E

@userx14
Copy link

userx14 commented Apr 16, 2021

Can someone help me with the Xoring I am completely confused on that trying to unlock bios of toughbook CF-20 can nay one shed some light my output is below. Thanks
5B56B6FD11ED6CBAC73E227C7DE4D88B
33608EBFE9C844C09FABFA725528B08E
0B0B6632C1931C7077A2D29D2D478823
E3483E7299C7F4E34F88AA780577607E

@Kissel-B Hi,
Can't make head or tail of it either. When xor'ed you probably also got 32 bytes padded with zeros. Most likeley this password is in some way further processed by the bios, since the codes are not in the Ascii range and I would guess that it is unlikeley that these are efi-keycodes, because who would use 32 character long passwords 😃 . But it does not seem to be the typical 20 bytes for a sha1 hashed passwords either.
Overwriting with zeros will probably unset the password, but the bios needs not to be software write protected to flash the modified image, or you need to use a hardware flasher.
Greetings,
Benjamin

@Kissel-B
Copy link

Can someone help me with the Xoring I am completely confused on that trying to unlock bios of toughbook CF-20 can nay one shed some light my output is below. Thanks
5B56B6FD11ED6CBAC73E227C7DE4D88B
33608EBFE9C844C09FABFA725528B08E
0B0B6632C1931C7077A2D29D2D478823
E3483E7299C7F4E34F88AA780577607E

@Kissel-B Hi,
Can't make heads or tails of this either. When xor'ed you probably also got 32 bytes padded with zeros. Most likeley this password is in some way further processed by the bios, since the codes are not in the Ascii range and I would guess that it is unlikeley that these are efi-keycodes, because who would use 32 character long passwords 😃 . But it does not seem to be the typical 20 bytes for a sha1 hashed passwords either.
Overwriting with zeros will probably unset the password, but the bios needs not to be software write protected to flash the modified image, or you need to use a hardware flasher.
Greetings,
Benjamin

Yea the BIOS is in UEFI mode. The version of windows 10 was in UEFI. I was able to upgrade the bios to the latest rev through the OS which it let me do so hopefully it will let me. I was looking at Zeroing it out but the hash wasn’t lining up between The UEFI tool and the HxD editor. I put it away for the night I am going to pick it up in the morning didn’t want to brick it. Thanks for looking at it.

@userx14
Copy link

userx14 commented Apr 16, 2021

Yea the BIOS is in UEFI mode. The version of windows 10 was in UEFI. I was able to upgrade the bios to the latest rev through the OS which it let me do so hopefully it will let me. I was looking at Zeroing it out but the hash wasn’t lining up between The UEFI tool and the HxD editor. I put it away for the night I am going to pick it up in the morning didn’t want to brick it. Thanks for looking at it.

You could also just search for the string of bytes in HxD and see if some offset is close to the one displayed by UEFI tool. I have seen that sometime UEFI tool does not display the offset from the beginning of the file but rather the offset from the start of the section.

@Kissel-B
Copy link

Yea the BIOS is in UEFI mode. The version of windows 10 was in UEFI. I was able to upgrade the bios to the latest rev through the OS which it let me do so hopefully it will let me. I was looking at Zeroing it out but the hash wasn’t lining up between The UEFI tool and the HxD editor. I put it away for the night I am going to pick it up in the morning didn’t want to brick it. Thanks for looking at it.

You could also just search for the string of bytes in HxD and see if some offset is close to the one displayed by UEFI tool. I have seen that sometime UEFI tool does not display the offset from the beginning of the file but rather the offset from the start of the section.

I think I screwed up I got the error 43 when flashing the the bios and the error not to restart until I reflash it Below are the settings I used I then unckecked everything except main BIOS image and tried again it looked the process completed but when I read the bios and looked at it again the password was not zeroed out in the file. I am scared to reboot. Any suggestions?
image

@userx14
Copy link

userx14 commented Apr 16, 2021

Error 43 normaly stands for "unable to erase flash". So the bios chips is write protected. Most likeley nothing was changed on the chip. If you want to be sure just diff the your original read file with the a current backup and check for differences, but I would guess you will not find any difference.

I would guess the main problem will be that you will be unable to change the flash content with any software method and only a hardware flasher like a ch341a will be able to write the chip.

@Kissel-B
Copy link

Kissel-B commented Apr 16, 2021 via email

@userx14
Copy link

userx14 commented Apr 16, 2021

Yea I bricked it. I just happen to have a 341A coming from Amazon tomorrow can you point me to some directions to flash this puppy.

So first some of the ch314a have a design flaw, that the pullup voltage is 5V instead of 3.3V, which might be unhealthy for the flash chips. By lifting the supply pin of the ch341a ic and connecting with the output of the 3.3V regulator this can be fixed.
Just check the pullup voltage on the pins in the dip sockets with a multimeter.
https://www.chucknemeth.com/usb-devices/ch341a/3v-ch341a-mod

Then find the flash chip on the mainboard (8pin, ic-marking will likeley start with "25") and make sure it's voltage is 3.3V by searching for the datasheet or any information online or carefully measuring it's VCC pin voltage while the laptop is running.

Use the smd-clip to attach the programmer to the flasher's dip socket. Make sure the orientation of the clip on the ic and in the dip socked is correct, and as an additional check by measuring continuity of gnd when the clip is attached, it's quite easy to get this wrong since you can mess up on both sides of the cable 😃 . Make absolutely sure you got this right.

There are two drivers for the chip, one for the serial interface mode and one for the bios programmer functionaliy. So you need to install the right one.

When you use the chinese software that looks like this
https://i.imgur.com/TarZn3y.png
there is a button to detect the chip capacity / type. This function should be working and give the same chip id when repeated. You can also try to read out the flash content. If this changes from read to read, then you connection is not good / wrong, or there are some devices which are powered when the ch341a supplies powers the 3,3V VCC rail of the mainboard which power some devices on the board which interfere with the data pins of the flash chip. I had this issue and needed to cut the 3,3V pin of the flash chip with a cutter and reconnect it after flashing.
I also used the ch431a for other BIOS flashes and the connection with the smd clip almost never works on the first try.

Then you need to erase the chip, flash the prepared image and optionally verify the chip's content.

I'm not sure what your knowledge / equipment regarding this toppic is, so you have any additional questions, just let me know.

@Kissel-B
Copy link

Kissel-B commented Apr 16, 2021 via email

@userx14
Copy link

userx14 commented Apr 17, 2021

I would recommend to use the free, open source AsProgrammer for Windows:
https://www.onetransistor.eu/2018/11/use-ch341a-with-asprogrammer-on-windows.html
https://github.com/nofeletru/UsbAsp-flash/releases/

I always though there would be an official software, but as it turns out the software that is available online from some sketchy sites is probably a crack. The original software seems to be created by the taobao shop SkyGz and is payware. The versions available online under the name "CH341A version 1.37" seem to be cracks of older versions without copy protection.

If you are on linux you can use flashrom:
https://www.win-raid.com/t4287f16-GUIDE-The-Beginners-Guide-to-Using-a-CH-A-SPI-Programmer-Flasher-With-Pictures.html

@Kissel-B
Copy link

Kissel-B commented Apr 17, 2021 via email

@Kissel-B
Copy link

Kissel-B commented Apr 18, 2021 via email

@userx14
Copy link

userx14 commented Apr 18, 2021

Not having much luck tonight. Adjusted the programmer to 3.3V. used ASprogrammer but doesn’t seems to be working when I read the chip everything is just FFFFFF. Erase And program seems to just sit there. Not sure if the chip is been destroyed I am at a loss.

This is most likeley a bad connection or devices on the line. If you can't read the ID/the flash content there is no point in trying to write to the chip. With these beasts either everything works or nothing at all.
I've seen two "failure modes", if it reads random bytes, the connection is instable. If you always get FFFFFF it can be multiple things unfortunatelly. If your MISO line is not properly connected you will see the pullup of the ch341a in effect. Another possibility is that the chip is not responding because it does not get any power, or another pin used for communication with the chip like SCLK or MOSI line or RESET is missing. Or other devices which get powered on the bus might drive these controll lines and your programmer might have to weak output stages trying to overpower them.

If you happen to have an oscilloscope on hand it is quiet usefull to test if the controll signals are reaching the IC or what comes back from it.
I would also recommend checking the levels of HOLD and WriteProtect with a multimeter, note that these are sometimes inverted logic, so check the datasheet.

Are you using the smd-clip? If yes, I would recommend using magnet wires or normal wires and attach the debugger pins directely to the legs of the bios chip, and check the connection / pinout again. My ch341a came with a pcb that plugs into the dip socket and has solder pads for bios chips. I just attached the wires there. This also serves as convenient probing points.

Does the ch341a blink when you try to read the flash? One of the red LED's is connected to CS and should blink when you try to read something from the chip.

The bios chips are at least in my experience not that easy to kill. I've accidentally rotated the smd-clip on two bios chips already and both survived. That of course doesn't mean I would reccommend beeing sloppy when checking the pinout 😄, because the moment you realize that you messed it up isn't that nice.

Keep trying, I rareley got it working on the first attempt either.
Good luck,
Benjamin

@Kissel-B
Copy link

Kissel-B commented Apr 18, 2021 via email

@userx14
Copy link

userx14 commented Apr 18, 2021

Well I have made some progress it seems there is a aluminum shield around part of the motherboard I guess to keep out interference the one side of the bios chip is right next to the wall of this shield. After shaving down some of the plastic on the programming clip it seems that I am making a connection now. But it appears that the chip is write protected. It’s a winbond 25Q128FVSQ 1734. When I try to erase it the process takes about 1 second fails the blank check and says the chip is protected selecting unprotect doesn’t seem to work and anytime I try to write I get Null message that the data does not match.

Ok, so reading the flash content works reproducabily?
Have you checked the logic level of the WriteProtect pin? According to the data sheet it needs to be 3.3V so that the flash content can by modified...
Is there a trace leading somewhere from the WP pin on your mainboard?
Also according to the datasheet the Chip supports software write protect features by setting internal registers.
What does happen when you try to read these registers?
https://amireslampanah.com/wp-content/uploads/2020/10/image-7.png

@Kissel-B
Copy link

Kissel-B commented Apr 19, 2021 via email

@userx14
Copy link

userx14 commented Apr 19, 2021

Is your first backup as big as the bios chip's total storage?

The only thing I could find was this website:
http://supportishere.com/installing-panasonic-toughbook-bios-updates-in-a-task-sequence/
which seems to have the official bios update executables. It might be possible to open the update application as a zip and extract the bios files, but I'm not sure if this is the right model.

@altisco
Copy link

altisco commented Apr 20, 2021

Hello, I failed to unlock my ssd.
I tried with hdparm in Linux but since the ssd is blocked directly by the bios password, I cannot unblock the ssd.
If I chose to write the bios file with zeros, I could enter the bios but I could no longer use my ssd. So for now I'm looking for a way to decrypt the bios password and then remove the protection from the ssd directly into the bios.
I have been looking for about 1 year but without success. I even contacted the Panasonic after-sales service, but they did not give me any solution.
So if a charitable soul wants to help me solve my problem I will be very grateful to them.
Thanks

@silviu85franta
As i wrote here https://gist.github.com/en4rab/550880c099b5194fbbf3039e3c8ab6fd#gistcomment-3661784
i think i can help you.

you'll need a Desktop PC with AT LEAST 2 SATA ports and that will let you boot win 7 32bit (on an unlocked drive) with a Locked HDD connected (i used an IBM ThinkCentre A51p)

  1. connect win7 32 HDD to primary sata port and boot win7 letting boot process run with HDD Locked (in my case, at HDD password prompt, i pressed ESC).
  2. download VICTORIA http://hdd.by/Victoria/Victoria473b.zip
  3. run VICTORIA and follow guide at http://www.hddoracle.com/viewtopic.php?f=117&t=1072 using MASTER PASSWORD (make sure that you are working on PIO mode in VICTORIA)
  4. if everything runs fine, victoria will output PWD removing complete and, after reboot, your HDD will be unlocked and usable

if you give me your email i'll send you HEX Master Password

Today @silviu85franta confirmed me he successfully unlock HDD that had been locked after zeroing bios pwd. So if anyone is in the same situation, method provided can safely remove HDD password on CF-53.
I think other toughbook series share HDD Master password, and i'm looking for someone with a working CF-19 and a WesternDigital HDD in order to extract password and unlock a CF-19 SDD. If confirmed in other series, it will be definitely mean that HDD Master Password is hardcoded in mainboard, maybe in bios.
Is there anyone with CF-19 who can help me?

@Kissel-B
Copy link

Is your first backup as big as the bios chip's total storage?

The only thing I could find was this website:
http://supportishere.com/installing-panasonic-toughbook-bios-updates-in-a-task-sequence/
which seems to have the official bios update executables. It might be possible to open the update application as a zip and extract the bios files, but I'm not sure if this is the right model.

Ben,
I think it’s hopeless. I think what I did was flash the entire bios originally and not just the navram. I have been looking high and low everything I tried just doesn’t work. I bought a new bios copy from Taiwan but that will take a month to get here. The guy was nice enough to send me the image he put on the chip. I used flashrom to install it with the CH341A. It took and verified but it still doesn’t work all you get is a quick flash of the indicator lights. If I try and flash my 8MB rom I took originally the unit still will not boot but the power lights say on constant. I am going to just have to wait until the chip arrives but I am not that hopeful since I have that rom already and it doesn’t work.

@userx14
Copy link

userx14 commented Apr 24, 2021

Ben,
I think it’s hopeless. I think what I did was flash the entire bios originally and not just the navram. I have been looking high and low everything I tried just doesn’t work. I bought a new bios copy from Taiwan but that will take a month to get here. The guy was nice enough to send me the image he put on the chip. I used flashrom to install it with the CH341A. It took and verified but it still doesn’t work all you get is a quick flash of the indicator lights. If I try and flash my 8MB rom I took originally the unit still will not boot but the power lights say on constant. I am going to just have to wait until the chip arrives but I am not that hopeful since I have that rom already and it doesn’t work.

Have you checked for differences between the images?
Have you removed the bios battery between the flashes?
Which version of the cf20 do you have? There seems to be a mk1 with 6th gen intel processors and a mk2 with 7th gen intel processors.
I have an UEFI image for the mk2 version from the Panasonic website.

@r-plabs
Copy link

r-plabs commented Apr 25, 2021

Which version of the cf20 do you have? There seems to be a mk1 with 6th gen intel processors and a mk2 with 7th gen intel processors.
I have an UEFI image for the mk2 version.

Hi Benjamin,

I made some mistake when I modified my BIOS for the CF-20 mk2 with CPU i5-7Y57 and I don't have the original backup file.
Can you share your backup if possible so I can recover mine? I modified different parts of NVRAM and also I wanted to disable the ME. Something went wrong I guess...

@userx14
Copy link

userx14 commented Apr 25, 2021

Just found out you can get the bios files directely from panasonic
head to https://pc-dl.panasonic.co.jp/itn/index.html
Select Category BIOS, EC, Firmware, then select your model. Download the BIOS updater (it is warpped inside an unpacker utility).

Get 7zip: https://sourceforge.net/projects/sevenzip/files/7-Zip/
Open the unpacker utility with 7zip, navigate to the folder called _ and extract the File called BiosUpdate_[Version].exe. Or run the unpacker directely if you want to accept the license.

Then open this file (BiosUpdate_[Version].exe) with 7zip and search for the largest file in the archive, for example this could be: .rsrc/1033/RCDATA/3003 and extract it.

Get unpack_lznt1.exe from https://github.com/rustyx/unpack_lznt1/releases .
Put the exe inside one folder with the 3003 file you just extracted. In windows explorer press Shift+Rightclick inside empty space inside the folder and select Open Powershell here or open powershell directely and navigate to the folder with cd.

In powershell run: .\unpack_lznt1.exe .\3003 out.rom 8 which will try to extract the bios file from the file 3003 starting from an offset of eight bytes into the output file out.rom. It should say: Done: unpacket xxxxxxx -> xxxxxxx bytes.

(Edit: only update information not complete image)

@Kissel-B
Copy link

Kissel-B commented Apr 25, 2021 via email

@r-plabs
Copy link

r-plabs commented Apr 25, 2021

@Benjaminrenz

I already tried that but it's not like you say it. The file from Panasonic site is pretty much useless in my case. Look at the file after you unpack it and you will see that it is just an update file packed in a AMI Aptio Capsule. I used the UEFITool for that. The NVRAM structure is light and looks different and it is missing even some DXE modules and of course the ME part and some padding.

The Aptio Capsule is not flashable with a programmer and it normally contains updates. At least for Panasonic. I saw other vendors like Asus which you can extract the BIOS part from the caspule and you can flash it with small modifications but not in the Panasonic case.

@Kissel-B
Copy link

@Benjaminrenz

I already tried that but it's not like you say it. The file from Panasonic site is pretty much useless in my case. Look at the file after you unpack it and you will see that it is just an update file packed in a AMI Aptio Capsule. I used the UEFITool for that. The NVRAM structure is light and looks different and it is missing even some DXE modules and of course the ME part and some padding.

The Aptio Capsule is not flashable with a programmer and it normally contains updates. At least for Panasonic. I saw other vendors like Asus which you can extract the BIOS part from the caspule and you can flash it with small modifications but not in the Panasonic case.

@r-plabs Here is the image file I got from Taiwan I ordered a new bios chip this is the image that is supposed to be on it I have Zero luck if it works for you I'd appreciate you telling me what you did The link will expire in 24 hours link and password is below https://1drv.ms/u/s!AiKMSCeUMB7k3gXbLdnP8uyb53k9?e=yLQRzA

j48GuW9utt61zEA

@userx14
Copy link

userx14 commented Apr 25, 2021

@Benjaminrenz

I already tried that but it's not like you say it. The file from Panasonic site is pretty much useless in my case. Look at the file after you unpack it and you will see that it is just an update file packed in a AMI Aptio Capsule. I used the UEFITool for that. The NVRAM structure is light and looks different and it is missing even some DXE modules and of course the ME part and some padding.

The Aptio Capsule is not flashable with a programmer and it normally contains updates. At least for Panasonic. I saw other vendors like Asus which you can extract the BIOS part from the caspule and you can flash it with small modifications but not in the Panasonic case.

Well sorry then, I was used to that the capsule contains the complete bios. But there are also ME updates available from the same site, so maybe these can be combined?

@r-plabs
Copy link

r-plabs commented Apr 26, 2021

@Kissel-B
I get this message when I try to download the file "This item might not exist or is no longer available"
Can you re-upload?
Thanks!

@Kissel-B
Copy link

Kissel-B commented Apr 26, 2021

@r-plabs
Here you go

@Kissel-B
I get this message when I try to download the file "This item might not exist or is no longer available"
Can you re-upload?
Thanks!

https://1drv.ms/u/s!AiKMSCeUMB7k3gYMQYzhpM5CbZBS?e=GWAcT6 Will expire in 24 hours

j48GuW9utt61zEA

@r-plabs
Copy link

r-plabs commented Apr 26, 2021

Thanks, I got it. I will start working to fix my image. BTW: If you attempt to flash another image which was not from your laptop you need to "clean ME" otherwise you can have strange behavior. There are many guides on the net how do a "clean ME". My recommendation is to use your original image and copy missing bits from this working image.

Best regards!

@Kissel-B
Copy link

Kissel-B commented Apr 26, 2021 via email

@r-plabs
Copy link

r-plabs commented Apr 27, 2021

@Kissel-B

I managed to fix my ME doing a cleaning again and now I am in the process to fix the NVRAM part. You can try to replace the UEFI BIOS section from your 16MB file with the one from your 8MB file. Check also the Padding file if size is matching. I saw that the dump with some Windows backup tools adds a lot of FFs in the beginning of that padding. Just use a Hex editor and remove that and always use option "replace as is" with UEFI Tool.

I also read again your messages and I can say that I had big issues with the CH341A programmer. First, my model came set to 5V and I had to solder a wire to make it 3.3V. Second issue is that you need more power to flash it "in-circuit" and CH341A and also other cheap programmers will not do the job. You need to get a more advanced programmer which has the "ICSP" port and use that one to read/write in-circuit. The BIOS chip is connected to the CPU and memory from what I saw and when you power on the BIOS chip to read/write the programmer also needs to supply enough voltage to power the other components on that rail. In the tablet cases like CF-20/CF-33/FZ-G1/FZ-M1 where memory is soldered and CPU is soldered and you cannot remove them so they don't get power from programmer the only way is to use ICSP port or desolder the chip. You can remove the motherboard wrap it in aluminium foil and leave only the BIOS chip visible and use hot air to desolder it. For soldering back use a flat fine tip soldering iron which is temperature controlled.

@Kissel-B
Copy link

Kissel-B commented Apr 27, 2021 via email

@r-plabs
Copy link

r-plabs commented Apr 27, 2021

@Kissel-B
I used both Revelprog and also TL866II Plus. The TL866II Plus is a little bit strange since their docs on how to use the ICSP port is not very clear. At least not to me. I found the pinout for the ICSP port to match to the BIOS chip of a CF-19 but I removed the wires and I cannot find my notes. For CF-20 and FZ-G1 I used the Revelprog and it worked without issues.

I checked the XGecu site now and it seems they released a new programmer called T56 which looks quite good but I cannot say if it works with in-circuit programming. If I will have time I will look again at the pinout for TL866 Plus and the ICSP port.

@Kissel-B
Copy link

@Kissel-B

I managed to fix my ME doing a cleaning again and now I am in the process to fix the NVRAM part. You can try to replace the UEFI BIOS section from your 16MB file with the one from your 8MB file. Check also the Padding file if size is matching. I saw that the dump with some Windows backup tools adds a lot of FFs in the beginning of that padding. Just use a Hex editor and remove that and always use option "replace as is" with UEFI Tool.

I also read again your messages and I can say that I had big issues with the CH341A programmer. First, my model came set to 5V and I had to solder a wire to make it 3.3V. Second issue is that you need more power to flash it "in-circuit" and CH341A and also other cheap programmers will not do the job. You need to get a more advanced programmer which has the "ICSP" port and use that one to read/write in-circuit. The BIOS chip is connected to the CPU and memory from what I saw and when you power on the BIOS chip to read/write the programmer also needs to supply enough voltage to power the other components on that rail. In the tablet cases like CF-20/CF-33/FZ-G1/FZ-M1 where memory is soldered and CPU is soldered and you cannot remove them so they don't get power from programmer the only way is to use ICSP port or desolder the chip. You can remove the motherboard wrap it in aluminium foil and leave only the BIOS chip visible and use hot air to desolder it. For soldering back use a flat fine tip soldering iron which is temperature controlled.

How did it turn out have any luck?

@Kissel-B
Copy link

Kissel-B commented May 6, 2021

@Benjaminrenz

Hey Ben need your insight here. The bios chip finally arrived yesterday I had an assembler from my work install it. The units power and wireless leds come on for 2 seconds and turn off if I plug the charger in the charging circuit seems to be functioning but nothing else just 2 seconds of leds and a black screen. I know that chip was installed correctly what am I missing?
16E47F5A-E78B-443D-94C3-0A2F1891A9DC

@userx14
Copy link

userx14 commented May 7, 2021

@Kissel-B
the soldering seems perfect, I would guess that this has still to do with the content of the flash chip.

Regarding the LED blinking, is this some new behavior or already was the case with the same firmware on the other chip?
Is the fan (if there is any) spinning up?

Could still be the case that there are some differences between the models that panasonic makes, they could have some hardware revisions which require different bioses. Have you already tried the proposal of r-plabs of placing your bios dump from the windows ami tool inside the 16MB file that you got?

I would proceed and experiment with flashing such a modified bios file.

I would also guess that the problem is neither the ch341 programmer nor the flash chip. If you can write and read the chip with the ch341 then there IMHO no real reason to change the programmer.

Greetings
Benjamin

@Kissel-B
Copy link

Kissel-B commented May 7, 2021 via email

@userx14
Copy link

userx14 commented May 7, 2021

@Kissel-B
Nice you got it working.
It's always a hassle if the OEM does not release bios images for their boards.

@corty8
Copy link

corty8 commented May 16, 2021

Hello everyone

I have an fz-g1 mk4 toughpad With a bios password, I can boot to windows but can't get into the UEFI

Is it possible to clear the password via windows or is the only way to pull the chip and clear it that way?

@userx14
Copy link

userx14 commented May 18, 2021

Hi @corty8

I have an fz-g1 mk4 toughpad With a bios password, I can boot to windows but can't get into the UEFI

With "can't get into UEFI" you mean it is password locked? Or that it 'fastboots' past the bios?

Is it possible to clear the password via windows or is the only way to pull the chip and clear it that way?

This depends on if the toughpad has bios write protection in place. Also depends on how risky you want the operation to be, if the software backup is incomplete you will be in trouble when the write operation fails.

If you want to be relativeley safe then I would recommend you try the following.

  • attempt backing up the bios with the afu utility on windows

  • check that the backup is a complete backup incuding intel me by either analyzing it with uefi tool or just searching the bios ic on the mainboard and check it's ic marking and determine the size with the manufacturer's datasheet and compare this with your backup

  • if the size should missmatch I would strongly recommend that you backup your original bios with a bios programmer like a ch341a before proceeding since original bios images of toughbooks are extremeley hard to come by.

  • when you are absoluteley certain you have a backup you can try to flash a modified bios with the afu windows utility, this can fail and might lead to a soft brick (see last 20 posts), it can work sucessfully or it can just be unable to erase anything on the flash chip. I would only do this step if you are not dependent on this laptop for the time it takes to ship a programmer.

  • if it doesn't work or you have a soft brick you can use the ch341a to flash the modified bios directely to the bios chip. The advantage is here, that there is no software write protection which could stop you. The disadvantage is that you need to take extra care not to mess something up electrically (rotated programmer clip, 3.3V modification of the ch341a and devices on the 3.3V line overloading the ch341a can be a problem)

For how "recent" this laptop is, I would guess that there is some software write protection in place, but that's just a guess.

Greetings
Benjamin

@Kissel-B
Copy link

Kissel-B commented May 18, 2021 via email

@userx14
Copy link

userx14 commented May 18, 2021

@Benjaminrenz Have you ever seen a laptop that has battery drain while is powered down caused by a bios flash? My CF-20 that I have been working on works great everything functions fine in the OS but after I shut it down it burns through the batter at about 1/2 per night. I have reinstalled windows a couple of times both with my image and Panasonic’s I have disabled fastboot, hibernation, USB always on charge updated to the latest drivers and firmware to no avail. I am kind of leaning towards to bios flash. Have you ever seen this ? I must have 20 different laptops with windows 10 and I have never seen it before.

@Kissel-B
Woha, that's really strange, I haven't seen something like this.
If the laptop is in the powered down state, the only things powered should be the standby power rails. The Embedded Controller etc. will hang on this rail lurking for a power button press. The other rails should not be powered because their power management ic is disabled, if I remember correctely it was the job of the embedded controller to do this.
Well I guess there are essentially two options: either the battery does not hold it's charge, I had this with dying lithium phone batteries where they self discharge over night. You could test this by removing the battery for the night and reconnecting it the next day and compare with the drain with the battery connected.

Another possibility is that something is not powered down as it should be, maybe some devices like the wifi/cellular card or some power regulators. You probably could measure the power draw of a battery with a multimeter. You could check if the voltage rails for the processor appart from the standby rails are powered when the machine is supposed to be powered off or maybe if you have thermal imaging / ir thermometer see if some parts of the board have elevated temperatures.
Half the battery in 12h should be something like 2-3W power draw. Might be sufficient to detect which part is getting warm.

Greetings
Benjamin

@Kissel-B
Copy link

Kissel-B commented May 18, 2021 via email

@r-plabs
Copy link

r-plabs commented May 19, 2021

@corty8

You can make a backup with AFUWIN and I will try to fix it for you and you can flash it back also with AFUWIN.
I also did modifications on a FZ-G1 and used only AFUWIN and UEFI Tool.

Problem with FZ-G1 is that you cannot read the chip without desoldering it since it has the voltage lines to CPU/memory/BIOS chip combined and your programmer needs to power them with enough mili-amps so you can read the chip without errors.

@r-plabs
Copy link

r-plabs commented May 19, 2021

@Benjaminrenz

I also some Dell Latitude doing the same. I don't know what is the reason and I couldn't identify it. I can say that from Friday evening to Monday morning the battery is flat 0%. I am talking about a 65W battery.

Also, did you upgrade the BIOS and EC of the CF-20 to the latest ones? There are updates for CF-20 MK1 and Mk2 for both BIOS and EC.

@Kissel-B
Copy link

Kissel-B commented May 19, 2021 via email

@corty8
Copy link

corty8 commented May 20, 2021

@r-plabs
Thanks for your reply
I have a backup using AFUWIN, how can I send it to you?

@Kissel-B
Copy link

Kissel-B commented May 28, 2021 via email

@userx14
Copy link

userx14 commented May 28, 2021

@Benjaminrenz Ben quick question I got my hands on another CF-20 which doesn’t seem to have the battery draining issues. I want to try and copy the bios off of it and put it on the old one to see if there is any effect. Do you know a way to backup the bios in windows. I don’t want to rip the shield up on the new unit to physically read the bios chip. Is there a software that can make a full rom of try bios chip?

If the windows utility from ami does not create a full backup you could try Linux and flashrom, https://flashrom.org/Flashrom . But I don't know if it is compatible.

Lost_N_Bios also has an interesting method for windows to back up intel me: https://www.win-raid.com/t5165f16-How-do-you-exactly-Dump-Unlock-and-Flash-an-Asus-AMI-Aptio-IV-BIOS.html#msg86490

Greetings
Benjamin

@r-plabs
Copy link

r-plabs commented May 29, 2021

@corty8
Upload it to any file transfer site and paste here the link.

@OmegaSentinell
Copy link

@Benjaminrenz Ben quick question I got my hands on another CF-20 which doesn’t seem to have the battery draining issues. I want to try and copy the bios off of it and put it on the old one to see if there is any effect. Do you know a way to backup the bios in windows. I don’t want to rip the shield up on the new unit to physically read the bios chip. Is there a software that can make a full rom of try bios chip?

If the windows utility from ami does not create a full backup you could try Linux and flashrom, https://flashrom.org/Flashrom . But I don't know if it is compatible.

Lost_N_Bios also has an interesting method for windows to back up intel me: https://www.win-raid.com/t5165f16-How-do-you-exactly-Dump-Unlock-and-Flash-an-Asus-AMI-Aptio-IV-BIOS.html#msg86490

Greetings
Benjamin

not need all this things , asus can be unlocked via bios backdoor , just generate code from bios date...
Or dump via afuwin and send here for decrypt...

@TBone32
Copy link

TBone32 commented Jun 14, 2021

Hi, New to the BIOS game and 1st time post. I have a CF-31, BIOS password locked. Will only boot to HDD. Running Win 10/64 bit.
Can someone double check my XOR? I believe it is a SHA1 hash.
UFIF tool produced:

5B 90 B6 EB 11 EC 6C 29 C7 0F 22 8D 7D 8B D8 BE 33 03 8E 67 E9 59 44 22 9F BB FA E5 55 C1 B0 9F
0B 96 66 5D C1 B5 1C 92 77 16 D2 A9 2D 3D 88 D0 E3 63 3E F7 99 8A F4 1D 4F B1 AA 44 05 D8 60 6B

image

Attempted a prnt scrn paste above..... Let me know if it didn't work.

Thanks!

@userx14
Copy link

userx14 commented Jun 15, 2021

Hi, New to the BIOS game and 1st time post. I have a CF-31, BIOS password locked. Will only boot to HDD. Running Win 10/64 bit.
Can someone double check my XOR? I believe it is a SHA1 hash.
UFIF tool produced:

5B 90 B6 EB 11 EC 6C 29 C7 0F 22 8D 7D 8B D8 BE 33 03 8E 67 E9 59 44 22 9F BB FA E5 55 C1 B0 9F
0B 96 66 5D C1 B5 1C 92 77 16 D2 A9 2D 3D 88 D0 E3 63 3E F7 99 8A F4 1D 4F B1 AA 44 05 D8 60 6B

image

Attempted a prnt scrn paste above..... Let me know if it didn't work.

Thanks!

Can confirm, I also get an 20byte hash.

Greetings,
Benjamin

@OmegaSentinell
Copy link

OmegaSentinell commented Jun 16, 2021

g5xp69y6 - try this password

@TBone32
Copy link

TBone32 commented Jun 16, 2021

g5xp69y6 - try this password

No luck..... thanks for looking at it for me!

@PebisMan
Copy link

Just wanted to say thanks for this thread! I have a CF-19 Mk5 that I was luckily able to boot to DOS on a USB drive. Using the @en4rab method I was able to decrypt the password and found it was an SHA-1 hash. Replaced with all 00s and using AFUDOS, flashed NVRAM only. Password is now gone.

@OmegaSentinell
Copy link

Just wanted to say thanks for this thread! I have a CF-19 Mk5 that I was luckily able to boot to DOS on a USB drive. Using the @en4rab method I was able to decrypt the password and found it was an SHA-1 hash. Replaced with all 00s and using AFUDOS, flashed NVRAM only. Password is now gone.

set defaults in bios and save+restrat ...

@homura-akemi-f02-22
Copy link

How do I change the password encryption logic on my cf20 from sha1 to sha256 or something stronger? Isn't sha1 already out of date?

@SoftwareGuy
Copy link

SoftwareGuy commented Jul 7, 2021

How do I change the password encryption logic on my cf20 from sha1 to sha256 or something stronger? Isn't sha1 already out of date?

You cannot, because the hashing methods are baked inside the BIOS firmware. You'd need access to the manufacturer's internal development equipment and source codes to be able to bake your own BIOS version.

Besides, the average person will not being going to the lengths we do to be able to remove/reset the password. This recovery technique is more for system administrators or repairers that have legitimate reasons to unlock a locked BIOS, ie. disposal, refurbishment or unlocking a device that belongs to themselves but was locked by the manufacturer or previous owner.

EDIT: Even if you did, you would have to modify the storage area where the password is kept as a SHA1 hash is smaller than a SHA256 hash byte-wise. You should not be relying on BIOS passwords as a super high security solution; if you are looking for a better security method, use a PM-backed security thing.

Copy link

ghost commented Jul 21, 2021

@Benjaminrenz

Can someone please help me with figuring out the pw for this? It subtype shows full no matter what version of EUFITool I use.... Please help. Attached screenshot... Thank you in advance. Any help would be greatly appreciated.

screenshot

@userx14
Copy link

userx14 commented Jul 21, 2021

Hi @deuceduzit
Have you tried just the ascii characters which are written inside this key (2PAK5bnD4M>G) ? After all it doen't have to be xored. Kind of suspicious that all the bytes fall directely inside the ascii range.

Copy link

ghost commented Jul 21, 2021

Hi @deuceduzit
Have you tried just the ascii characters which are written inside this key (2PAK5bnD4M>G) ? After all it doen't have to be xored. Kind of suspicious that all the bytes fall directely inside the ascii range.

Yea, I just tried it and unfortunately it didn't work. I also tried zeroing it out and reflashing it. Didn't do anything and password is still there.

@userx14
Copy link

userx14 commented Jul 21, 2021

Have you tried other special characters inplace of ">"? maybe this could be keyboard layout specific.

Does the key remain the same even when you read the bios back after flashing and what do use to flash the bios?

Copy link

ghost commented Jul 21, 2021

Have you tried other special characters inplace of ">"? maybe this could be keyboard layout specific.

Does the key remain the same even when you read the bios back after flashing and what do use to flash the bios?

The keys changed to blanks when I read the bios back confirming the write worked. I used a ch341a usb programmer. Weird that the password is still there.

@OmegaSentinell
Copy link

Share dump pls , i can help.

@JulMiDa
Copy link

JulMiDa commented Jul 28, 2021

Could someone please help me ?
I get folloring vom the BIOS dump file(0x40 to 0x7F):

5B 00 B6 4D 11 76 6C 38 C7 43 22 AE 7D 9D D8 C7 33 C1 8E 98 E9 B9 44 3B 9F 75 FA 78 55 26 B0 F4
0B A9 66 EE C1 EF 1C 4F 77 16 D2 A9 2D 3D 88 D0 E3 63 3E F7 99 8A F4 1D 4F B1 AA 44 05 D8 60 6B

@userx14
Copy link

userx14 commented Jul 28, 2021

The keys changed to blanks when I read the bios back confirming the write worked. I used a ch341a usb programmer. Weird that the password is still there.

You could also check if you find any more occurences of this exact byte string in other locations in this file and zero all of them.

@userx14
Copy link

userx14 commented Jul 28, 2021

Could someone please help me ?
I get folloring vom the BIOS dump file(0x40 to 0x7F):

5B 00 B6 4D 11 76 6C 38 C7 43 22 AE 7D 9D D8 C7 33 C1 8E 98 E9 B9 44 3B 9F 75 FA 78 55 26 B0 F4
0B A9 66 EE C1 EF 1C 4F 77 16 D2 A9 2D 3D 88 D0 E3 63 3E F7 99 8A F4 1D 4F B1 AA 44 05 D8 60 6B

Seems hashed to me, if one passes this through xor.pw one gets 20 bytes:
936bcc75a3da9a5def59edd30e7684c160b200cc

@JulMiDa
Copy link

JulMiDa commented Jul 28, 2021

Could someone please help me ?
I get folloring vom the BIOS dump file(0x40 to 0x7F):
5B 00 B6 4D 11 76 6C 38 C7 43 22 AE 7D 9D D8 C7 33 C1 8E 98 E9 B9 44 3B 9F 75 FA 78 55 26 B0 F4
0B A9 66 EE C1 EF 1C 4F 77 16 D2 A9 2D 3D 88 D0 E3 63 3E F7 99 8A F4 1D 4F B1 AA 44 05 D8 60 6B

Seems hashed to me, if one passes this through xor.pw one gets 20 bytes:
936bcc75a3da9a5def59edd30e7684c160b200cc

Thanks to Velen for the answer, how can I read the password now?

@Ftmmsch
Copy link

Ftmmsch commented Jul 28, 2021 via email

@JulMiDa
Copy link

JulMiDa commented Jul 28, 2021

Hi.   If you like to send me the saved file, i could take a look at it. In the weekend. GreetingsLothar Peters Gesendet von meinem BlackBerry 10-Smartphone. Von: JulMiDaGesendet: Mittwoch, 28. Juli 2021 09:50An: en4rabAntwort an: en4rabCc: Lothar Peters; MentionBetreff: Re: @.*** commented on this gist. Could someone please help me ? I get folloring vom the BIOS dump file(0x40 to 0x7F): 5B 00 B6 4D 11 76 6C 38 C7 43 22 AE 7D 9D D8 C7 33 C1 8E 98 E9 B9 44 3B 9F 75 FA 78 55 26 B0 F4 0B A9 66 EE C1 EF 1C 4F 77 16 D2 A9 2D 3D 88 D0 E3 63 3E F7 99 8A F4 1D 4F B1 AA 44 05 D8 60 6B Seems hashed to me, if one passes this through xor.pw one gets 20 bytes: 936bcc75a3da9a5def59edd30e7684c160b200cc Thanks to Velen for the answer, how can I read the password now? —You are receiving this because you were mentioned.Reply to this email directly, view it on GitHub, or unsubscribe. [ { @.": "http://schema.org", @.": "EmailMessage", "potentialAction": { @.": "ViewAction", "target": "https://gist.github.com/550880c099b5194fbbf3039e3c8ab6fd#gistcomment-3832208", "url": "https://gist.github.com/550880c099b5194fbbf3039e3c8ab6fd#gistcomment-3832208", "name": "View Gist" }, "description": "View this Gist on GitHub", "publisher": { @.": "Organization", "name": "GitHub", "url": "https://github.com" } } ]

Thank you very much, I just sent you the file by e-mail to udf *** @ gmail ***

@Ftmmsch
Copy link

Ftmmsch commented Jul 28, 2021 via email

@Ftmmsch
Copy link

Ftmmsch commented Jul 28, 2021 via email

@JulMiDa
Copy link

JulMiDa commented Jul 28, 2021

I sent you a onedrive link to the email, maybe it will do better. Many Thanks

@Ftmmsch
Copy link

Ftmmsch commented Jul 28, 2021 via email

@JulMiDa
Copy link

JulMiDa commented Jul 28, 2021

Hallo. Ich wieder. Ich habe gerade in @.*** geschaut. Da ist nichts. Bitte nochmal an: @.*** Gesendet von meinem BlackBerry 10-Smartphone. Von: JulMiDaGesendet: Mittwoch, 28. Juli 2021 12:49An: en4rabAntwort an: en4rabCc: Lothar Peters; ErwähnungBetreff: Re: @.*** hat diesen Kern kommentiert. Hallo. Wenn du mir die gespeicherte Datei schicken möchtest, könnte ich sie mir anschauen. Am Wochenende. GrüßeLothar Peters Gesendet von meinem BlackBerry 10-Smartphone. Von: JulMiDaGesendet: Mittwoch, 28. Juli 2021 09:50An: en4rabAntwort an: en4rabCc: Lothar Peters; ErwähnungBetreff: Re: @.*** hat diesen Kern kommentiert. Könnte mir bitte jemand helfen? Ich erhalte folgendes aus der BIOS-Dump-Datei (0x40 bis 0x7F): 5B 00 B6 4D 11 76 6C 38 C7 43 22 AE 7D 9D D8 C7 33 C1 8E 98 E9 B9 44 3B 9F 75 FA 78 55 26 B0 F4 0B A9 66 EE C1 EF 1C 4F 77 16 D2 A9 2D 3D 88 D0 E3 63 3E F7 99 8A F4 1D 4F B1 AA 44 05 D8 60 6B Kommt mir gehasht vor, wenn man das über xor.pw weitergibt bekommt man 20 Bytes: 936bcc75a3da9a5def59edd30e7684c160 .200cc Danke an Velenb .200cc für die antwort, wie kann ich jetzt das passwort lesen? – Sie erhalten dies, weil Sie erwähnt wurden. Antworten Sie direkt auf diese E-Mail, zeigen Sie sie auf GitHub an. oder abmelden. [ { @.": "Zeigen Sie es auf GitHub an oder melden Sie sich ab. [ { @.***": " http://schema.org", @.": "EmailMessage", "potentialAction": { @.": "ViewAction", "target": " https:// gist.github.com/550880c099b5194fbbf3039e3c8ab6fd#gistcomment-3832633 ", "url": " https://gist.github.com/550880c099b5194fbbf3039e3c8ab6fd#gistcomment-3832633 ", "name": "Gist anzeigen " : "} View this Gist on GitHub", "publisher": { @.***": "Organization", "name": "GitHub", "url": " https://github.com " } } ]

strange, then I'll send you the link here directly. I am sorry for the circumstances

https://1drv.ms/u/s!ApzCPlF0Hn90gf5I-JeY9htV2i-R7w

@Ftmmsch
Copy link

Ftmmsch commented Jul 31, 2021

@JulMiDa

Here you are:
https://drive.google.com/file/d/1PRuXEI9KK9btn3AZi2IPPrLNKxRL8dt2/view?usp=sharing

I think, you about the settings you need for flashing the rom file?

Regards

Lothar

@JulMiDa
Copy link

JulMiDa commented Jul 31, 2021 via email

@Ftmmsch
Copy link

Ftmmsch commented Jul 31, 2021

:-) so, i zeroed out today for nothing - resp. to late :-)

I found very much to zero out...

So, you didn't try to flash - before you reflashed the chip?

@JulMiDa
Copy link

JulMiDa commented Jul 31, 2021 via email

@panapc
Copy link

panapc commented Sep 5, 2021

Hello.

Do you know how to unlock this bios file? I know that all zeros can be dewritten on other models.
I don't know how to do it with this model.

Below is the file link.
https://

thank you.

@userx14
Copy link

userx14 commented Sep 7, 2021

Hi @panapc
in your BIOS file I could find the key AMITSESetup at 88A40Ah, but it looks a bit different from the ones from the Panasonic models I have seen (more padding in front):
**EDIT removed**
xoring gives:
**EDIT removed**

So there is probably some additional encryption going on.
I'm not sure but zeroing this might reset the password.

@Ftmmsch
Copy link

Ftmmsch commented Sep 7, 2021

@Ftmmsch
Copy link

Ftmmsch commented Sep 7, 2021

@panapc
Copy link

panapc commented Sep 7, 2021

Hi @userx14

It's a new model, so I found it difficult to analyze passwords.
But your solution gave me a chance.

I am very grateful.

@panapc
Copy link

panapc commented Sep 7, 2021

@Ftmmsch

thank you very much.
There may be other parts as well.

You can delete the link.

@Liakou
Copy link

Liakou commented Sep 17, 2021

Hello

I have a problem to decode my BIOS password and i can´t work with xor.

Can you send me the Password from my bios.

I send you the output from HEX View 👍
00000000000000000000000000000000
00000000000000000000000000000000
00000000000000000000000000000000
00000000000000000000000000000000
5B11B669112A6C8DC7F822697DB9D813
33168E8DE96F44EF9F1BFA1C5515B081
0B5C6623C11B1CF37716D2A92D3D88D0
E3633EF7998AF41D4FB1AA4405D8606B
01000000000000000000000000000000
00000000000000000000000000000000
00000000000000000000000000000000
00000000000000000000000000000000
00000000000000000000000000000000
00000000000000000000000000000000
00000000000000000000000000000000
00000000000000000000000000000000
0000

Thanks a lot for your assist.

Regards

Michael

@userx14
Copy link

userx14 commented Sep 17, 2021

Hi Michael / @Liakounis ,

it's probably hashed:

when applying xor I get:
824f90c0181dbe89384c3b076012b7b4957ff470

you could overwrite it with zeros and write it back.
But you should do a full bios backup with me or check if there is one online available for your specific model before proceeding.

Greetings,
userx14

@esters
Copy link

esters commented Sep 22, 2021

Good day,

Currently I am tinkering with the Panasonic CF-53 MK1 which had a SHA1 hashed password which has been successfully removed. As a test I set up two master passwords in the bios - "test" and "password" both of them have completely different hashes than those who are known for the specified hash type:

Password - test

14de57dcb76658666368b482008eb39849f9d062 - BIOS Dump
a94a8fe5ccb19ba61c4c0873d391e987982fbbd3 - SHA1 Hash

Password - password

7bdfc5f77170d6707e86c06616f5c5cf04c3b4f0 - BIOS
5baa61e4c9b93f3f0682250b6cf8331b7ee68fd8 - SHA1 Hash

My goal is to determine what probably is the additional salt of the input bios password. Any ideas/clues?

@adolf022
Copy link

adolf022 commented Nov 5, 2021

Hi, i've been trying to get the password on a Panasonic machine, I followed some of the steps, but the XOR step is not my thing yet. I am just wondering if I can get some help, I tried reading some other post. can I do something with this?

5B46B6A911846C0CC73022E97DB4D855
335F8EE5E98144889FE5FAEE5516B0A8
0B8A66B5C1B61C797716D2A92D3D88D0
E3633EF7998AF41D4FB1AA4405D8606B

46a9840c30e9b4555fe58188e5ee16a88ab5b679 is is hashed?

@userx14
Copy link

userx14 commented Nov 5, 2021

Hi, i've been trying to get the password on a Panasonic machine, I followed some of the steps, but the XOR step is not my thing yet. I am just wondering if I can get some help, I tried reading some other post. can I do something with this?

5B46B6A911846C0CC73022E97DB4D855 335F8EE5E98144889FE5FAEE5516B0A8 0B8A66B5C1B61C797716D2A92D3D88D0 E3633EF7998AF41D4FB1AA4405D8606B

46a9840c30e9b4555fe58188e5ee16a88ab5b679 is is hashed?

Hi @adolf022 ,

you should get something that starts with 5b, otherwise you are doing something wrong when applying the xor.
If I paste the hex bytes you provided, and the key 5B 93 B6 26 11 BA 6C ... (see first post by en4rab) in xor.pw, I get something that looks like a hash:
d58f3e41d09db3cf7124d5609ee0b49d43e959fa (i've already removed the two zeros between each pair of hex chars)

Greetings,
Benjamin

@userx14
Copy link

userx14 commented Nov 5, 2021

Good day,

Currently I am tinkering with the Panasonic CF-53 MK1 which had a SHA1 hashed password which has been successfully removed. As a test I set up two master passwords in the bios - "test" and "password" both of them have completely different hashes than those who are known for the specified hash type:

Password - test

14de57dcb76658666368b482008eb39849f9d062 - BIOS Dump a94a8fe5ccb19ba61c4c0873d391e987982fbbd3 - SHA1 Hash

Password - password

7bdfc5f77170d6707e86c06616f5c5cf04c3b4f0 - BIOS 5baa61e4c9b93f3f0682250b6cf8331b7ee68fd8 - SHA1 Hash

My goal is to determine what probably is the additional salt of the input bios password. Any ideas/clues?

Sorry for the very late reply,

but unfortunatelly if the hashing and salting is done properly you will not be able to determine the salt from the "password -> hash" tests you have done (here is why). The only possibility I see is to analyze the bios firmware code and try to find the salt that way, but I'm relativeley clueless on how this works.
If you find out how the password is salted, you could still only try to brute force and attempt to check if you get a match by trying every possible combination or common words.

Best,
Benjamin

@esters
Copy link

esters commented Nov 13, 2021

@userx14 - Thanks! I will try to take a look if I can somehow analyze the BIOS image. I have created a repo with my findings. If anyone needs I found out how to unlock the hard drive after the patched BIOS has been flashed on the Toughbook.

https://github.com/esters/Toughbook-CF53-MK1

@userx14
Copy link

userx14 commented Nov 13, 2021

@userx14 - Thanks! I will try to take a look if I can somehow analyze the BIOS image. I have created a repo with my findings. If anyone needs I found out how to unlock the hard drive after the patched BIOS has been flashed on the Toughbook.

https://github.com/esters/Toughbook-CF53-MK1

Very interesting, thanks for the investigations.

@OutOfIdeas-png
Copy link

OutOfIdeas-png commented Nov 13, 2021 via email

@userx14
Copy link

userx14 commented Nov 13, 2021

In my attempts at this, I encountered an error and the machine shut down… naturally it was in the write phase and it was about 3% completed. I’m thinking about trying a bios programming dongle. I’m not well versed in ROM chip design and architecture. Any recommendations for a solution? CF-20 Mk2 BTW.

I would recommend and had sucess using the following steps:

  • find the complete rom image including the intel me secion as a bin file for your specific model online (typically this is the hardest part imho).
  • aquire a ch341a with a sot8 clamp (used to be available for about 10€ from china)
  • do the 3.3V fix
  • download AsProgrammer
  • connect the sot8 clamp, and ensure correct polarity by measuring continuity to GND of the laptop's mainboard and the usb plug of the ch341a
  • install the included parallel ch341a driver from the AsProg zip archive
  • set up AsProgrammer to use ch341a (Hardware Tab)
  • check if the chip is detected by using read id function in AsProg, if you get changing values with every read or 0xff or 0x00 for all, then either the connection is not good, or something on the mainboard of the laptop is to power hungry for the ch341a's 3.3V regulator. In this case you need to desolder the chip from the board.
  • select the right chip part number from the list returned by read id or a simmilar one
  • (optional) try to backup the broken image which might be still on the flash chip
  • unlock write protection, erase, program and verify the chip with the bin file from step 1

@OutOfIdeas-png
Copy link

OutOfIdeas-png commented Nov 13, 2021 via email

@OmegaSentinell
Copy link

Better to use NeoProgrammer software for CH341A board ...

@fz-g1
Copy link

fz-g1 commented Nov 26, 2021

Dear all, I tried to delete my password (on a Panasonic FZ-G1 mk4) but during the write session I also got error 34. And when I now compare the old original Rom with the new one I get from AFuWINgui I see that certain sections are deleted in the current one. Would it be wise/possible to restart the tablet

@fz-g1
Copy link

fz-g1 commented Nov 26, 2021

Sorry it was error 43 problems erasing FLASH

@userx14
Copy link

userx14 commented Nov 26, 2021

Error 43 is not good news, see here: https://gist.github.com/en4rab/550880c099b5194fbbf3039e3c8ab6fd#gistcomment-3708976
There is a change that the bios is bricked and you will not be able to boot anymore.

If you do not have any means of hardware flashing the bios chip then I would not reboot just now, but instead try other tool to backup or flash the bios.

@userx14
Copy link

userx14 commented Nov 26, 2021

Definitiveley backup the bios from the tablet's hdd to an usb drive,
maybe try flashrom https://flashrom.org/Flashrom, but I'm not sure is this board is supported.

EDIT:

  • check that you've got a full backup including the intel me section. I'm not sure how big the chip is in MB, maybe @Kissel-B knows?
    (might also depend on your specific revision of the device)
  • if there is some write protection in place it might not be possible to write these sections from a running windows, which might be bad news if you do not have a hardware flasher
  • does the image at https://www.badcaps.net/forum/showthread.php?t=79316 match your model?
  • if you have exhausted all options you can try from windows and it dows not reboot you probably need a hardware programmer, just ask if you need help

@Kissel-B
Copy link

Kissel-B commented Nov 26, 2021 via email

@fz-g1
Copy link

fz-g1 commented Nov 26, 2021

Thanks for the support, it seems that I'll be needing it. I'm really stressed out... Well the file I saved using AfuWin64Gui is a rom file of 8.192 KB. The ones I find on the Badcaps site are BIN files and twice the size... Inside they look different, as mine starts with MEI_FZG1-4 and probably some other caracters identifying my Toughpad... I find this kind of string in their file on location 00A80000: MEI_FZG1-2 (So a Mk2 version).. It seems I'm missing out on the first part of the file...

@fz-g1
Copy link

fz-g1 commented Nov 26, 2021

I found a similar thing in a cf54cu bin file starting at 00A00000

@fz-g1
Copy link

fz-g1 commented Nov 26, 2021

@userx14
Copy link

userx14 commented Nov 26, 2021

I found some bios update programs from panasonic themselves, would that be an option? https://na.panasonic.com/us/support/toughbook-support-center#/tablets;id=126/toughpad-fz-g1;id=61356;sid=NaN/bios-ec-and-firmware;id=002003

Probably it will not hurt to try it and check if it filled the missing sections with another backup.

@fz-g1
Copy link

fz-g1 commented Nov 26, 2021

I read the manual and it states: Automatically, Windows will shut down and the BIOS update program will run. Wait
until Windows startup again....

@userx14
Copy link

userx14 commented Nov 26, 2021

I read the manual and it states: Automatically, Windows will shut down and the BIOS update program will run. Wait until Windows startup again....

Hm, then maybe try if you are able to backup the full 16mb with some other tool first.

@fz-g1
Copy link

fz-g1 commented Nov 26, 2021

@fz-g1
Copy link

fz-g1 commented Nov 26, 2021

I saw in the remarks on the badcaps forum, that the latest file did't have any serial numbers it it, so I decided to use HxD to pick the first part of their file (FZ-G1r mk4 UNLOCKED.bin) and merge that into my own rom file. Now they are exactly the same size 16.384 KB. But if I would be using AfuWin64Gui would I need the .rom or a .bin extension? By the way I used a Aptio V version... Or should I use another tool...

@fz-g1
Copy link

fz-g1 commented Nov 26, 2021

In both cases when opening either the .rom or .bin file the nvram is grayed out...

@fz-g1
Copy link

fz-g1 commented Nov 26, 2021

Well I tried them out both and AfuWin64Gui reports that 3- error: ROM file size does not match existing Bios size...

@userx14
Copy link

userx14 commented Nov 26, 2021

Well I tried them out both and AfuWin64Gui reports that 3- error: ROM file size does not match existing Bios size...

It could be possible that aptio 5 is only able to access the part from 0x0a000000 onwards.
Maybe try a different tool, but I guess that the other sections are not accesible from a running windows.
I'm not that into sofware flashing tools so I can't really give you recommendations.
If everything else fails you will need to flash your merged bin file with a hardware programmer.

@fz-g1
Copy link

fz-g1 commented Nov 26, 2021

What kind of tool do you recommend? I can't figure out Flashrom.. is there a windows executable available?

@userx14
Copy link

userx14 commented Nov 26, 2021

What kind of tool do you recommend? I can't figure out Flashrom.. is there a windows executable available?

Yes, but I'm not to sure about the supported hardware:
https://www.win-raid.com/t7547f41-Tool-Flashrom-v-Win.html

@fz-g1
Copy link

fz-g1 commented Nov 26, 2021

By the way, I tried the Panasonic Bios update tool, but it said it has already been updated....

@fz-g1
Copy link

fz-g1 commented Nov 27, 2021

Would Intel FIT (Flash Image Tool) be an option probably v11 in my case...

@userx14
Copy link

userx14 commented Nov 27, 2021

Would Intel FIT (Flash Image Tool) be an option probably v11 in my case...

Maybe check out these intel me tools: https://github.com/zearp/OptiHack/blob/master/text/BIOS_STUFF.md#extracting
The page is for Dell optiplex machines, so do not read to much in the details, just hope that the intel me backup stuff works on the toughbooks too.

@fz-g1
Copy link

fz-g1 commented Nov 27, 2021

I used fptw64.exe to back-up and later-on flash the bios back, but it gives: Error 368 failed to disable write protection for the bios space..

@fz-g1
Copy link

fz-g1 commented Nov 27, 2021

Well, it seems I will need a bios programmer and flash it back (without password ;-) What would be the best hardware tool and software to use in my case?

@userx14
Copy link

userx14 commented Nov 27, 2021

Well, it seems I will need a bios programmer and flash it back (without password ;-) What would be the best hardware tool and software to use in my case?

My favorite one is the ch341a, but first check what flash chip model is, that you want to program (logic voltage level 5v, 3.3v, 1.8v). For 3.3V it's recommeded to modify the programmer and for 1.8V you need an adapter. See here for a short description: https://gist.github.com/en4rab/550880c099b5194fbbf3039e3c8ab6fd#gistcomment-3961486

@fz-g1
Copy link

fz-g1 commented Nov 28, 2021

Thanks, I'll open her up... Would it be a recommendation for the newer boards, to before starting, to extract the bios with fptw64.exe and flash it back with it, to find out if it is write protected. With AfuWINGui64.exe, during flashing the BIOS, it already erased part of the Bios before finding out it was write protected.... causing the problems I'm in right now...

@fz-g1
Copy link

fz-g1 commented Dec 3, 2021

Well I have some spare time and I would like to take a look at the BIOS chip, is there somebody who can point me in the direction where I can locate it? It's laying in front of me but I want to disconnect the least possible ;-)

@fz-g1
Copy link

fz-g1 commented Dec 3, 2021

Just to be clear, it's for a FZ-G1 (the mk4, if there are any differences between them)..

@userx14
Copy link

userx14 commented Dec 3, 2021

I'm not sure which revision that is or if they changed something, but I found images from a replacement board:
https://ixustrade.nl/panasonic-fz-g1-intel-i5-3437u-at-1-90ghz-4gb-motherboard-su6e-10w16au-01x.html
on the second image I would guess that the bios chip is the one on the left with the red dot.
So probably it is underneath the cooler, see the images in this thread:
http://forum.notebookreview.com/threads/fz-g1-tips-tricks-mods.809551/page-5

@fz-g1
Copy link

fz-g1 commented Dec 3, 2021

Thanks I lot, I'll have a look there!

@corty8
Copy link

corty8 commented Dec 6, 2021

Hi All

I have a toughbook CF-54 mk3 that I am trying to do and when I open up the bin file in UEFItool I get yellow and red highlighted sections and for the life of me I can't find the GUID that I need to find the password

I have done a number of G1 Tablets and CF-31 units now and all were fine but this is the first time I a have seen the highlighted sections

Any pointers would be appreciated

Cheers

@userx14
Copy link

userx14 commented Dec 6, 2021

@corty8
Which version of UEFItool are you using? For me only alpha 51 worked, and I could search for the guid using the menu.
If everything fails you could search the raw hex dump for the end of the xor encoding string:
3E F7 99 8A F4 1D 4F B1 AA 44 05 D8 60 6B

@corty8
Copy link

corty8 commented Dec 6, 2021

Thanks for your reply

I have been using alpha 51 and have done quite a few FZ-G1 and CF-31 and all have been fine but with this machine it seems to be an issue
I have also tried 57 & 58 with the same result

this is a current model machine so I am wondering if something has changed

@corty8
Copy link

corty8 commented Dec 6, 2021

is the XOR Encoding string just 60 6B, I get over 150 entries when I search for that and searching for the complete string you have posted above produces no results at all

@userx14
Copy link

userx14 commented Dec 6, 2021

@corty8
maybe try other parts of the encryption key then, they could have changed the length. The theory behind it is that if the thing that is xored contains 0x00 as padding on the end you would expect to get the encryption key when xoring. The longer the matching section the larger is the probability that it is not just a random coincidence, as most likeley happened with 60 6B.
Have your tried using a normal hex editor instead of UEFI-tool to search for the bytes?

this is a current model machine so I am wondering if something has changed

yeah, that can also be a possibility

Can the string "AMITSESetup" be found by searching with UEFI-tool?

@corty8
Copy link

corty8 commented Dec 6, 2021

Yeah I have tried a couple of different hex editors still cant find

the only part I can find together is 44 05 D8 from that I get 10 entries but they look totally different, than previous versions as with the older ones there was plenty of empty space around it and easy to spot

If you are up for a challenge I would be happy to put a link up to the bin file :)

@userx14
Copy link

userx14 commented Dec 6, 2021

the only part I can find together is 44 05 D8 from that I get 10 entries but they look totally different, than previous versions as with the older ones there was plenty of empty space around it and easy to spot

They probably have changed their password protection mechanism then...

If you are up for a challenge I would be happy to put a link up to the bin file :)

Yeah, I can take a look, but if they changed the way the password is stored there is not much we can do 😒 ...

@Ftmmsch
Copy link

Ftmmsch commented Dec 6, 2021

@corty8

If you like: you could send me your BIOS file to: ftmmsch@gmail.com

@corty8
Copy link

corty8 commented Dec 6, 2021

@corty8
Copy link

corty8 commented Dec 6, 2021

@Ftmmsch
Thanks for looking, I have just posted a link above

@userx14
Copy link

userx14 commented Dec 6, 2021

-- EDIT: Now right bios file --

Capture

I think the yellow and red markings indicate that the bios is protected by an RSA Key.

Capture2

When I search for AMITSEsetup I can find three matches, two of them are empty, but one of them (the one in the second screenshot) seems to have some data attached.

@corty8
Copy link

corty8 commented Dec 6, 2021

@userx14
Copy link

userx14 commented Dec 6, 2021

@corty8 Please check edited answer...

Every second byte seems to be identical with the original xor key...
5b XX b6 XX ... 05 XX 60 XX (xx are the bytes that are different)so that's probably the location where it is stored...

@corty8
Copy link

corty8 commented Dec 6, 2021

interesting, I didnt notice that.. I will do some checking

@r-plabs
Copy link

r-plabs commented Dec 6, 2021

@userx14
Your BIOS has Bootguard enabled which is bad. I think all Panasonic with 6th gen Intel CPUs and after have it enabled.
If you modify wrong sections you will brick your tablet/laptop. I didn't read much about it so I don't know if this can be unbricked or not.
Just be careful and in the future don't buy any laptop/tablet with 6th gen Intel CPU or higher that has password or custom BIOS (Mxx after version number) unless price is very low. When I say low it means under 100 USD/EUR.

@corty8
Copy link

corty8 commented Dec 6, 2021

I have done 6th gen before without any issues, this is a 7th gen machine
If I make changes to the bin file and it is bricks it I can still copy back the original bin file can't I?

@r-plabs
Copy link

r-plabs commented Dec 6, 2021

@corty8
Bootguard is not mandatory, depends if the vendor will activate it or not. I saw some Dell laptops that had it in 5th gen already but on Panasonic I saw it on some 7th gen but in general after 6th gen you can expect to have it enabled from factory.

As for flashing back the original BIOS to unbrick it I didn't try it. I bought a 7th gen without password since I was expecting to have the Bootguard issue and I didn't want to experiment on some expensive laptop.

Another point for all FZ-G1 is that you cannot read the chip correctly without de-soldering it. At least it was not working on Mk1-2-3. I noticed that CPU and RAM was also powered when BIOS chip was connected to the programmer via clip and it produced a lot of errors. Maybe it works with some programmer that can do ICSP and has enough current to sustain the other components also during reading and writing. In the end I de-soldered the chip and read/write it on programmer and soldered it back when finished. For testing I soldered short wires to the pads that went to a socket so I can remove the chip easily and reflash it. Do not use too long wires since it will create issues maybe because of voltage drop?!

@userx14
Copy link

userx14 commented Dec 6, 2021

I'm not sure, but isn't the purpose of the RSA key/bootguard to protect the actual bios and it's modules, while the nvram variables are still editable?
Otherwise the bios itself would need the key to encrypt the nvram variables when changing any setting.

@corty8
Yes, you should be able to flash back the original image without the modification in case the modified version does not work.

@r-plabs
I'm a bit confused because you are talking about an "fz-gz", while corty8 tinkers with a "cf-54 mk3".
Are refering to @fz-g1, who has the FZ-G1 tablet?

Another point for all FZ-G1 is that you cannot read the chip correctly without de-soldering it

Have you tried cutting the bios chips 3.3v rail and connecting a switch to it, this way you don't have to extend the signal lines? But I think it is not a problem, since the communication on spi isn't that high speed.

@fz-g1
So the plan with just "Copying" parts of the original bios together with the me section is expected to fail, if bootguard is enabled. But if you are able to find a full dump of a fz-g1 mk4 that should work.
Maybe try the images from here:
https://www.badcaps.net/forum/showthread.php?t=80985

@fz-g1
Copy link

fz-g1 commented Dec 6, 2021

Thanks userx14, I downloaded that bin-file.. so splitting this file 8MB in two and paste part one with my 4MB file wouldn't work? You can clearly find the location where the second part of the 8MB resembles mine.. and the size is correct as well...

@fz-g1
Copy link

fz-g1 commented Dec 6, 2021

I saw some remarks of people clearing just one instance of the password and after resetting the bios, they got the password back (as they didn't take out the other one in the bin-file). Would it be an option to use a reset to switch back to a working unbricked part of the bios.... Do they have something like dual-bios?

@userx14
Copy link

userx14 commented Dec 6, 2021

so splitting this file 8MB in two and paste part one with my 4MB file wouldn't work?

Sorry, my knowledge is limited when it comes to bootguard, that was just a guess. Just something to keep in mind when the tablet does not boot with the modified bios image, that it could be caused by bootguard. Just try and see if it works I guess 😏 .

I saw some remarks of people clearing just one instance of the password and after resetting the bios, they got the password back

I think they talk about the option "restore default" in bios which initializes the NVRAM variables with some default values, which probably includes the manufacturer set bios password.
I don't think they have dual bios support, normally for dual bios you will have two identical flash chips.

@corty8
Copy link

corty8 commented Dec 6, 2021

Well got to admit this one got the better of me, I couldn't work out a way to strip the password out on this CF-54 mk3, in the end I sent the bin file to someone that I have used before and they stripped it out for me.
Reprogramed the chip and soldered it back on the board just now, machine is back up and running again and all the original machine serial/model number and hours are retained

@userx14
Copy link

userx14 commented Dec 7, 2021

@corty8
Can you check if the data at 0x89c710 has been altered in this new file, would be interesting to see what needs to be modified.
Would have guessed that the bytes around there just need to be overwritten with zeros.
Maybe you could run a diff on the two files.

@corty8
Copy link

corty8 commented Dec 7, 2021

@userx14
Yes there is a definite charge there, I have done a hex compare and there are quite a few differences in the file
I can upload the new bin file if you like you can compare it with the one I posted above

@Ftmmsch
Copy link

Ftmmsch commented Dec 7, 2021

Don't know why - ut my previous post is gone - deleted!
Maybe, because of the e-mail adress!

You could send my your file to the e-mail adress in my account - but, that one, i usually don't use constant.

Better you send me your file to:

my user name at g mail dot com.

@userx14
Copy link

userx14 commented Dec 7, 2021

I can upload the new bin file if you like you can compare it with the one I posted above

Would be interesting indeed.

@userx14
Copy link

userx14 commented Dec 8, 2021

@corty8 thanks,

Ok short summary for the changes for the panasonic CF-54 mk3, if anyone else is interested:

0x00003010 - 0x00003da0 (me region flash partition table)             probably caused by different/modified ME-version
0x00133000 - 0x00603cff (intel me region)                             maybe a different ME-version or effect of using ME disable/cleaner, unsure, large regions replaced with 0xff
0x0089c710 - 0x0089c74F (location for the AMITSESetup NVRAM variable) was overwritten with zeros

Well the change at 0x0089c710 is exactely what one would expect to remove the password.
I'm unsure if the ME modification was neccesary, I would guess that this could be the action of me_cleaner which disables intel me by overwriting selected pages with 0xff.

@fz-g1
Copy link

fz-g1 commented Dec 9, 2021

Mission accomplished! FZ-G1R mk4 BIOS: MX25L12873F Motherboard DHLB1030ZD/X1
Thanks a lot everyone especially you userx14 ;-) As without information you cannot grow in knowledge, here my findings:

I used a CH341 Black (with the V3.3 adjustment proposed by userx14) with NeoProgrammer 2.2.0.10 (I read that AsProgrammer might give some problems) and the Clamp and I was able to read and write the bios!
After first successfully downloading and saving 3 identical images, I checked the files and found out that the second part of the BIOS file (00800000 - 00FFFFFF) which I got with the NeoProgrammer was partially erased by AfuWin64Gui during an unsuccessful write effort (in which it already wiped part of the BIOS before finding out that it was write-protected).
So as final bios file I used the first part of the BIOS-file I downloaded from the BIOS with NeoProgrammer (so 0 - 007FFFFF) and as second part (00800000 - 00FFFFFF) I took the file which I got with Afuwin.exe, from which I deleted the password. Of course if you haven't screwed up your BIOS with Afuwin then you could use the full file from NeoProgrammer after taking out the password with HxD.

In NeoProgrammer I selected all the options in Write IC (Off-Protect, Erase, Blank Check, Write and Verify) to write this file to the BIOS.
(There will still be a part in the BIOS in which "toughkit" is a useful word ;-) )

Thanks again everybody!!!

@userx14
Copy link

userx14 commented Dec 9, 2021

@fz-g1
Glad it worked out 👍 , interesting that the failed flash erased only some parts of the bios and aborts afterwards.
That should mean that it is easyer to find and use an incomplete bios image to revocer from this, as only the upper section is needed.

I think one has to assume that with the newer versions / revisions of the panasonic lineup one will most likeley encounter this error with afuwin,
and that one should do a full dump with a hardware flasher to avoid any unpleasant surprises.

Models known from this thread to encounter errors with software flashing (definitiveley do a backup with a hardware programmer beforehand):

  • CF-20 Mk2
  • CF-31 MK3
  • CF-53 mk3
  • CF-53 mk4
  • FZ-G1 mk4

@drshock
Copy link

drshock commented Dec 18, 2021

This XOR technique does not work on the ToughPad FZ-G1 series of tablets. The ToughPad passwords are in the same BIOS NVRAM area, but as others have mentioned about newer ToughBooks, this BIOS area is encrypted in the ToughPads too, even with the oldest MK1 series. However, you can still clear the password by zeroing out both the user and supervisor data values in the BIOS flash chip.

I did a video on how I applied this technique to clear the BIOS password on my ToughPad FZ-G1A MK1, as well as the ToughPad tablet disassembly required to access, desolder, reprogram, and reinstall the BIOS flash chip. I thought I'd share it here too as this might apply to later ToughBooks that encrypt this NVRAM area as well and help someone else out - ToughPad FZ-G1 Clear BIOS Password

I've given a shout out to this gist in my video, and included a link to this gist in the videos description. Thanks for sharing the ToughBook approach here, as that inspired me to dig into how to clear the lost BIOS password on my ToughPad FZ-G1 that I use for automotive diagnostics work.

@Biozax
Copy link

Biozax commented Dec 29, 2021

Hello, Everyone.
Glad I Have Found This Thread, Because I Have Try To Find Out My Bios Password For Panasonic Toughbook CF-31 For A Long Time.
Can Anyone Tell Me: Is It Posible To Remove It With userx14 Method, or It Should Be Only Flashed?
I Have Made ROM Bios File, But I Cant Handle With The Rest. I Have Open File In UEFITool_NE_A59_win32, but Dont Understand, How To Find Need Line In Code.
Can Anyone Help Me: https://drive.google.com/file/d/1ADYcAcvcbLBODWNHtjKWgKira9R_6kej/view?usp=sharing
Thanks For The Answer And Help To Anyone!
Happy New Year Everyone!

@Biozax
Copy link

Biozax commented Dec 30, 2021

Forgot To Say: Model: Panasonic Toughbook CF-31 MK4 (Intel Core I5-3340M)

@Ftmmsch
Copy link

Ftmmsch commented Dec 30, 2021

@Biozax:

Drive Google ? - Access denied !

@Biozax
Copy link

Biozax commented Dec 30, 2021

Sorry, Looks Like I Didnt Open It For Everyone
Here It Is:
https://drive.google.com/file/d/1ADYcAcvcbLBODWNHtjKWgKira9R_6kej/view?usp=sharing

Thank You!

@userx14
Copy link

userx14 commented Dec 30, 2021

@Biozax

With a hex editor one can find two occurrences:

I would guess that one is the current value and the other one could be loaded when one uses "reset to default".

Or Uefi Tool Alpha 51 seems to work as well (corresponds to second screenshot from hex editor):

The password is hashed (20bytes) so you probably have to overwrite both occurences with zeros.

The dangerous part is flashing the modified image back to the bios chip, and there is a known problem for the CF-31 MK3 resulting in a brick.
I would guess that it will very likely occur with a MK4, so please check the previous posts.
Since the flashing procedure could abort with an error I would advise against trying a flash with afuwin on windows without having a full backup, and your file seems to only be a partial backup.
A hardware flasher like a CH341a should be able to create a full backup.

Best,
Benjamin

@Biozax
Copy link

Biozax commented Dec 30, 2021

Thanks For Your Attention and Help.
Understand.

@passssha
Copy link

passssha commented Feb 1, 2022

Good afternoon. Can you please tell me, is it possible to restore the password?
5BC1B65211E76C83C7
B5225A7D8FD8FF339C8E66E9DA44659F
25FA89555BB0EE0B9D6669C1A81C2B77
16D2A92D3D88D0E3633EF7998AF41D4F
B1AA4405D8606B01

@userx14
Copy link

userx14 commented Feb 1, 2022

@passssha
Your password is hashed (20 bytes with zeros as padding in between). The only option known to reset it is to overwrite the sections in the bios with zeros and flash the resulting image back to the device. Mind the risks involved and that flashing back the bios using the software afuwin tool on some panasonic models will lead to a bricked device (see this list, which is probably incomplete).
Best Benjamin

@passssha
Copy link

passssha commented Feb 1, 2022

@en4rab
It worked (: I did the reset on Windows 10. I ran all programs as Administrator. Dump was edited in Hex Editor Neo (14-day trial). I found 2 occurrences on the mask "D8606B01" and wiped them all with zeros. After the reboot I was able to enter the BIOS. Thank you very much for your help. (Laptop Panasonic CF-53MK4)

@fastar1981
Copy link

Hi all
Anyone could help me to get the bios pass
https://drive.google.com/file/d/14XVmrpRfDzr0uGdngT_cAbrlAQAQ73Qr/view?usp=sharing
Thanks

@userx14
Copy link

userx14 commented Mar 10, 2022

Hi all Anyone could help me to get the bios pass https://drive.google.com/file/d/14XVmrpRfDzr0uGdngT_cAbrlAQAQ73Qr/view?usp=sharing Thanks

Hi @fastar1981,
unfortunatelly the password does not seem to be stored the same way as in the BIOS images I've already looked at.
I mean I can find the AMITSESetup in one compressed section, but can't find the associated data.
Maybe someone else has an idea?
Is this a new panasonic model?
Best,
Benjamin

@r-plabs
Copy link

r-plabs commented Mar 11, 2022

@fastar1981
This doesn't look like a Panasonic BIOS image. what laptop it is?

@fastar1981
Copy link

fastar1981 commented Mar 12, 2022

@userx14 @r-plabs
Thanks
I bought a computer with this motherboard but I don't know the model because it doesn't put it on the motherboard
Is a aptio V but I can't find where the sha256 is
I cant calculate the sha and I cant remove the pass becase I can not find where is loated the second sha
i think its a weird motherboard

@t4thfavor
Copy link

t4thfavor commented Mar 17, 2022

I need help with the XoR part. It's been a minute since I've been in c++, does anyone have a link or example project I can use to decrypt my hash? I have an MK1 CF-31 that I've been trying to extract the password from for 2 years.

using this https://xor.pw/# I'm able to recreate the OP's password (with their hashes), but mine just generated gibberish. Any ideas?

@userx14
Copy link

userx14 commented Mar 17, 2022

I need help with the XoR part. It's been a minute since I've been in c++, does anyone have a link or example project I can use to decrypt my hash? I have an MK1 CF-31 that I've been trying to extract the password from for 2 years.

@t4thfavor
Just use the website xor.pw,
one field is your hashed password, the other the xor sequence from the first post, which one you put in which field (1/2) doesn't matter.
Make sure to cut the xor sequence from the first post on the end, such that it matches the length of your hashed password.
It is likeley that the length matches already.

Best,
Benjamin

@t4thfavor
Copy link

t4thfavor commented Mar 17, 2022

I need help with the XoR part. It's been a minute since I've been in c++, does anyone have a link or example project I can use to decrypt my hash? I have an MK1 CF-31 that I've been trying to extract the password from for 2 years.

@t4thfavor Just use the website xor.pw, one field is your hashed password, the other the xor sequence from the first post, which one you put in which field (1/2) doesn't matter. Make sure to cut the xor sequence from the first post on the end, such that it matches the length of your hashed password. It is likeley that the length matches already.

Best, Benjamin

I did that, I get 0xcc as my first bit which maps to some nonsense character. What are the odds that my bios is encrypted somehow? Everything else matches and I can reproduce your results with the hashes you posted. Mine are just stupid.

This is what I get, and it maps to something like "Ì^M5‰œž¸0^H" where "^H" is one character and :^M is one character, etc.
cc000d00350089009c009e00b80030000800eb0073002800d600c900cc001600c100fc00a300aa000000000000000000000000000000000000000000000000

EDIT: I have two identical machines, both produce the same hashes exactly. Is that good or bad?

@userx14
Copy link

userx14 commented Mar 18, 2022

This is what I get, and it maps to something like "Ì^M5‰œž¸0^H" where "^H" is one character and :^M is one character, etc. cc000d00350089009c009e00b80030000800eb0073002800d600c900cc001600c100fc00a300aa000000000000000000000000000000000000000000000000

These 20 bytes (with zeros as padding in between) are most likeley a sha1 hash of the password or input keys.
Since hashing is a one way function there is no feasable way to find the password.

But overwriting the hash with all zeros disables the password. Some models have write protection for software flashing the bios in place, which can result in a brick, see the posts above.

@t4thfavor
Copy link

@userx14 I overwrote the passwords last night and just overwrote the whole bios image, at first it didn’t work, but then I realized I left a single character in one of the bios blocks. I removed both password blocks and wrote them back from inside windows. Seems to be a serious flaw in their bios security, but whatever, it benefits me this time :)

Thanks for your help!

@dragonlost
Copy link

Hello.
I have a Panasonic CF-AX2 laptop. Unfortunately I only have the user Bios password so I can't boot from USB.
I dumped my BIOS. I found the 2 areas concerned, however I don't see what I can do afterwards to get the supervisor password or delete it.

Thanks for your help

dump link : https://drive.google.com/file/d/1YQbb03qpKXiYYhF8bX1yV_i5Tg36xLAs/view?usp=sharing

@t4thfavor
Copy link

t4thfavor commented Mar 31, 2022 via email

@dragonlost
Copy link

ok it's done I replaced the 2 passwords with 0 to 2 places. What tool do I need to flash the bios with?

@userx14
Copy link

userx14 commented Apr 1, 2022

ok it's done I replaced the 2 passwords with 0 to 2 places. What tool do I need to flash the bios with?

Well, that's the tricky part.
The issue is that the software flasher AFUWIN bricks some laptops, likeley because of write protection of the flash chip.
In this case the only possible way to recover the bios is using a hardware bios programmer like the ch341a,
which can be had for around 10 bucks. The previous posts contain details on this procedure.
Unfortunatelly when backing up the bios with AFUWIN it sometimes only generates a partial backup of half the size, where some parts like the ME-region are missing.
So the first thing you should do, when you consider the software flashing, is to check the size of the flash chip based on the markings on the physical chip and compare with the size of your backup.

@dragonlost
Copy link

Ok i see. my bios chip is N25Q128A. do you know what size the file should be?

@userx14
Copy link

userx14 commented Apr 1, 2022

Ok i see. my bios chip is N25Q128A. do you know what size the file should be?

That chip is 128Mb / (8 bits per byte) = 16MBytes,
So 16MB is the filesize for a complete dump.

The risk is, that flashing the modified image could not work and "restoring" the chip with a hardware flasher afterwards might get difficult,
as full image dumps are not that easy to find on the web (either paywall or just not available). Also you might loose some model specific things like the mac address of the network card when you flash dumps from someone else.

@dragonlost
Copy link

ok I have all the equipment at home to desolder this component. I will order a programmer to extract and then completely reinject the bios.

@warst
Copy link

warst commented Apr 1, 2022

ok I have all the equipment at home to desolder this component. I will order a programmer to extract and then completely reinject the bios.

Don't de-solder it, just order one of these clips and some jumper wire - https://uk.farnell.com/pomona/5250/test-clip-8-pos-1-27mm-soj-soic/dp/2406243

@userx14
Copy link

userx14 commented Apr 1, 2022

Trying the sop8 clip first seems resonable, if it does not work you can always fall back to desoldering.
Sometimes there are additional devices on the 3.3v rail which overwhelm the bios programmer's power output capability,
in which case you have no choise but to desolder or temporarely cut the 3.3V power trace.

@warst
Copy link

warst commented Apr 1, 2022

Trying the sop8 clip first seems resonable, if it does not work you can always fall back to desoldering. Sometimes there are additional devices on the 3.3v rail which overwhelm the bios programmer's power output capability, in which case you have no choise but to desolder or temporarely cut the 3.3V power trace.

Different devices do certainly behave differently. I have processed hundreds of different bios chips from most vendors (including Apple which has it's own quirks!), there's always a way to make them read. A combination of applying power supply, removing battery, turning the device on (with no battery attached) and then off, without removing power supply can work. Or no battery/no power supply. Sometimes even holding down the power button whilst reading will work. Panasonic is very straightforward and should read just fine with a clip. WSON8 works just the same but using probes.

@userx14
Copy link

userx14 commented Apr 1, 2022

@warst
Very interesting, indeed.
Which programmer are you using?
I was always afraid of powering the mainboard, since then I feared that there are potentially devices communicating with the bios chip and the output transistors of the programmer would work against the devices on the mainboard (especially the clock line).
Since as far as I know the cheap ones have no additional current limiting resistors for their data lines.

@warst
Copy link

warst commented Apr 1, 2022

@warst Very interesting, indeed. Which programmer are you using? I was always afraid of powering the mainboard, since then I feared that there are potentially devices communicating with the bios chip and the output transistors of the programmer would work against the devices on the mainboard (especially the clock line). Since as far as I know the cheap ones have no additional current limiting resistors for their data lines.

I use a TL866ii Plus with ICSP adapter, its brilliant and not expensive either. http://www.autoelectric.cn/en/tl866_main.html The board is used to having this low voltage during normal operation so the worst you will get is a bad dump, follow the rule of dump twice and compare for differences (which I'm sure you do) and if the dumps are the same, you are good to proceed. I don't disconnect the connection to the chip until I have flashed back as the chances are, if it read OK, it'll write back OK too. So long as the laptop is in an OFF state, having power applied hasn't ever caused me any issues. The worst I have ever had is a bad dump so then I try a different variation of power/battery combination. I prefer to test with everything removed first and then work my way up to power adapter with no battery and on from there.

@userx14
Copy link

userx14 commented Apr 1, 2022

I use a TL866ii Plus with ICSP adapter, its brilliant and not expensive either. http://www.autoelectric.cn/en/tl866_main.html The board is used to having this low voltage during normal operation so the worst you will get is a bad dump, follow the rule of dump twice and compare for differences (which I'm sure you do) and if the dumps are the same, you are good to proceed. I don't disconnect the connection to the chip until I have flashed back as the chances are, if it read OK, it'll write back OK too. So long as the laptop is in an OFF state, having power applied hasn't ever caused me any issues. The worst I have ever had is a bad dump so then I try a different variation of power/battery combination. I prefer to test with everything removed first and then work my way up to power adapter with no battery and on from there.

Yeah, that one seems to have way better output protection.
Next time I will come across a board that needs additional power I'm going to try the your method with the off state and connected ac adapter. That probably only powers the 3.3V line and leaves the data pins unpowered, Thanks for the info.

@warst
Copy link

warst commented Apr 1, 2022

Yeah, that one seems to have way better output protection. Next time I will come across a board that needs additional power I'm going to try the your method with the off state and connected ac adapter. That probably only powers the 3.3V line and leaves the data pins unpowered, Thanks for the info.

No problem at all, let me know how you get on, I have subscribed to this since it started, felt I should at least start commenting to help people out! Oh, also, you do know that some of the chips are 1.8v? I have a little step down in-line module to handle that too, so the clips still just work the same. I also have some tips for WSON8 should you ever want to read those without desoldering/attaching jumper wires to the pads.

@dragonlost
Copy link

Ok that's good I have a clamp for SOP-8 and I bought a TL866II Plus programmer too!
I will keep you posted on my progress as soon as I receive it.

@warst
Copy link

warst commented Apr 1, 2022

Ok that's good I have a clamp for SOP-8 and I bought a TL866II Plus programmer too!
I will keep you posted on my progress as soon as I receive it.

Make sure you get yourself one of these too - [SPI Driver](£6.37 | SPI DRIVER, SPI flash in Circuit Programming adapter for TL866II PLUS programmer https://a.aliexpress.com/_v1V1wU)

@9Kid
Copy link

9Kid commented Apr 4, 2022

Hello, I apologize for the question , could the operating hours of a device be modified by this method? is there a tutorial somewhere? thx.

@t4thfavor
Copy link

Hello, I apologize for the question , could the operating hours of a device be modified by this method? is there a tutorial somewhere? thx.

Two ways to find out.

  1. Take a dump of the bios chip, run PC for several hours, take second dump and then compare them in a hex editor.
  2. Take a dump in bios, run PC for several hours, flash it back to PC and see if the hours reset to what they were in the original flash. (This one could cause issues with write protected laptios)

Both methods should give you some reasonable idea on whether or not that info is stored in the bios at all.

@dragonlost
Copy link

That's all worked! I followed this video but without unsoldering the component : https://www.youtube.com/watch?v=YG01jdeMVmk

In link the complete bios of my CF-AX2. This might be useful for someone : https://drive.google.com/drive/folders/1OBuW-YCeXo6noc3bsXV3EaS4PXw6Ia7d?usp=sharing

@dragonlost
Copy link

Only problem I have left. The hard drive is locked and cannot be unlocked ! I will take it out to reformat it on another PC. I do not want to recover the give nor windows 7.

@9Kid
Copy link

9Kid commented Apr 5, 2022

  1. hex editor.

Thx I will try. all the best.

@avilon-reg
Copy link

Hi! Tell me how to get this string for my CF-53?
5B 93 B6 26 11 BA 6C 4D C7 E0 22 74 7D 07 D8 9A 33 2E 8E C1 E9 54 44 E8 9F 7B FA 0E 55 A2 B0 35
It is my dump:
0000: 4E5641529800FFFFFF830D414D495453
0010: 455365747570005BE2B69C11CC6C0AC7
0020: AD229C7DD1D8E033748E7DE96D44E89F
0030: BFFA885595B0660B0F66BCC1E51CC677
0040: 16D2A92D3D88D0E3633EF7998AF41D4F
0050: B1AA4405D8606B5BD0B67E113D6C59C7
0060: 6322347DF1D85E33718E0AE966442F9F
0070: 50FAF155F2B0BB0BE1662EC19E1C6A77
0080: 16D2A92D3D88D0E3633EF7998AF41D4F
0090: B1AA4405D8606B01

@userx14
Copy link

userx14 commented Apr 15, 2022

Hi @avilon-reg

Both passwords are hashed,
the first one corresponds to these bytes in your dump:
5be2b69c11cc6c0ac7ad229c7dd1d8e033748e7de96d44e89fbffa885595b0660b0f66bcc1e51cc67716d2a92d3d88d0e3633ef7998af41d4fb1aa4405d8606b
-> (xored and removed padding in between bytes) ->
71ba76474de8d67a5abc3900c4863753c6e00a45

the second one is here:
5bd0b67e113d6c59c76322347df1d85e33718e0ae966442f9f50faf155f2b0bb0be1662ec19e1c6a7716d2a92d3d88d0e3633ef7998af41d4fb1aa4405d8606b
-> (xored and removed padding in between bytes) ->
435887148340f6c45fcb32c72bff508e287271e9

Both are only the sha1 hash of the respective passwords which one cannot reverse. But you can overwrite the passwords raw bytes in the bios dump with zeros and flash the modified image back to your bios flash. But read some of the previos comments, because some laptops have write protection which bricks the device if you attempt to flash it with afuwin.

Best,
Benjamin

@OAKTREELIMB
Copy link

Hi,
I extracted following strings from my Panasonic CF-53 mk1 laptop BIOS.
Would you please help me to find the passwords. The only thing I know so far is my Panasonic has both Power On Password and Administrator Password.
Best Regards

0000 5B 03 B6 49 11 B3 6C 48 C7 3A 22 23 7D F1 D8 E0
0010 33 E7 8E 4E E9 B1 44 08 9F 5E FA F0 55 D8 B0 6C
0020 0B 65 66 F3 C1 34 1C 83 77 16 D2 A9 2D 3D 88 D0
0030 E3 63 3E F7 99 8A F4 1D 4F B1 AA 44 05 D8 60 68
0040 5B BB B6 5B 11 A7 6C FA C7 46 22 CD 7D 5A D8 32
0050 33 CB 8E 17 E9 D9 44 C6 9F 9C FA 4B 55 9A B0 F4
0060 0B 89 66 41 C1 7F 1C FA 77 16 D2 A9 2D 3D 88 D0
0070 E3 63 3E F7 99 8A F4 1D 4F B1 AA 44 05 D8 60 6B
0080 01

@OAKTREELIMB
Copy link

@userx14
Copy link

userx14 commented Jun 14, 2022

Hi @OAKTREELIMB,

Both of your passwords seem to be hashed, when xored they return a 20byte long sequence (probably sha hash) with zero bytes as padding in between. This hashing means that it's likeley impossible to determine the original password.

You could overwrite the bytes with zeros and flash the bios back onto the machine which removes the passwords, but please read some of the previous comments regarding problems on flashing the bios with afuwin because of hardware write protection and resulting bricks.

Best, Benjamin

@OAKTREELIMB
Copy link

@userx14
Thank you for your help.
I think I'm not going to clear the Password. I had removed the hard drive from the laptop and put it on other computer as either a boot drive or a secondary drive. On the other working computer, it asks for hard drive password immediately after power on. Entering wrong password 3 times it will shut down the computer. I then remove the locked drive, boot my computer up then put the locked hard drive in a connected SATA docking station. My computer can see the physical drive but there is no partition. I can't do anything with it. When I try to partition it, I get error message "I/O error" "too many bad sectors".
I can put the locked drive back to original Panasonic Laptop. It can boot up fine without the need of entering any password and run windows normally. I'm affraid that the Panasonic with the locked hard drive will ask for password at power up if I flash the BIOS with password removed.

@userx14
Copy link

userx14 commented Jun 14, 2022

@OAKTREELIMB,
Sorry but I haven't experimented with locked hdd's yet. What you encounter sounds like the password protection feature of hdd's called "ata password". Depending on the manufacturer of the drive there seem to be some master passwords floating around to remove the password protection.

I'm affraid that the Panasonic with the locked hard drive will ask for password at power up if I flash the BIOS with password removed.

If you create a dump with a hardware flasher before writing your modified bios back,
you should be able to restore the original image with the password still in place.

@esters
Copy link

esters commented Jun 16, 2022

@OAKTREELIMB

I had the same issue with CF-53 MK 1. Turns out the hdd was locked with the first 64 bits of bios password. More here - https://github.com/esters/Toughbook-CF53-MK1#hard-disk-password-removal

@altisco
Copy link

altisco commented Jun 18, 2022

@OAKTREELIMB

same issue for me, solved by using HDD Master password (seems all CF-53 share the same).
if you are still in trouble you can give me your email and i'll send you HEX Master Password.
https://gist.github.com/en4rab/550880c099b5194fbbf3039e3c8ab6fd?permalink_comment_id=3698449#gistcomment-3698449

@OAKTREELIMB
Copy link

@altisco '
Yes, please send me the Master Password and instruction how to use it.
Thank you so much.
Please send to treelimb@gmail.com

@zCruuz
Copy link

zCruuz commented Jul 12, 2022

Hi, i got my dump but don't understand how i can determine if the Toughbook CF-53 password is unencrypted. Can someone tell me how this "xoring" works?
my dump looks like this:
4E 56 41 52 8B 00 FF FF FF 88 5B E2 B6 9C 11 CC 6C 0A C7 AD 22 9C 7D D1 D8 E0 33 74 8E 7D E9 6D 44 E8 9F BF FA 88 55 95 B0 66 0B 0F 66 BC C1 E5 1C C6 77 16 D2 A9 2D 3D 88 D0 E3 63 3E F7 99 8A F4 1D 4F B1 AA 44 05 D8 60 6B 5B D0 B6 7E 11 3D 6C 59 C7 63 22 34 7D F1 D8 5E 33 71 8E 0A E9 66 44 2F 9F 50 FA F1 55 F2 B0 BB 0B E1 66 2E C1 9E 1C 6A 77 16 D2 A9 2D 3D 88 D0 E3 63 3E F7 99 8A F4 1D 4F B1 AA 44 05 D8 60 6B 01

@userx14
Copy link

userx14 commented Jul 12, 2022

Hi @zCruuz

The first sequence in your dump is:
5be2b69c11cc6c0ac7ad229c7dd1d8e033748e7de96d44e89fbffa885595b0660b0f66bcc1e51cc67716d2a92d3d88d0e3633ef7998af41d4fb1aa4405d8606b
->xored 71ba76474de8d67a5abc3900c4863753c6e00a45

The second sequence is:
5bd0b67e113d6c59c76322347df1d85e33718e0ae966442f9f50faf155f2b0bb0be1662ec19e1c6a7716d2a92d3d88d0e3633ef7998af41d4fb1aa4405d8606b
->xored 435887148340f6c45fcb32c72bff508e287271e9

Both seem to be hashes.

Best,
Benjamin

@kevingrout
Copy link

Hi trying to recover password on a Stone laptop, Aptio4 told me i needed Aptio5 which successfully extracted rom file.
Found a few C811FA38-42C8-4579-A9BB-60E94EDDFB34 on sub on NVRAM but after that things dont look right, any pointers would be good.
Many thanks
Kevin

@userx14
Copy link

userx14 commented Jul 13, 2022

Hi trying to recover password on a Stone laptop, Aptio4 told me i needed Aptio5 which successfully extracted rom file. Found a few C811FA38-42C8-4579-A9BB-60E94EDDFB34 on sub on NVRAM but after that things dont look right, any pointers would be good. Many thanks Kevin

So from what I get, you dumped your rom file and are unable to find the storage location of the xores / (possibly hashed) password with uefi tool?

  • make sure you using uefi tool version a51
  • if uefi tool does not work you could try a hex editor and search for 4f b1 aa 44 05 d8 60 6b which is the last part of the sequence if the password is hashed. To check if you really found the location, copy some bytes before that and compare with the xor key in the first post. Every second byte should look the same.

@kevingrout
Copy link

bios
Hi
Cant find 4f b1 aa using hexedit, attached is a picture, less bytes than the shown ones but data at 40 , the user password is set to 1111

@userx14
Copy link

userx14 commented Jul 13, 2022

bios Hi Cant find 4f b1 aa using hexedit, attached is a picture, less bytes than the shown ones but data at 40 , the user password is set to 1111

Could be hashes of the passwords directely and not xored?
Both seem to be 20 bytes long and seemingly random, so they could be sha1.

@kevingrout
Copy link

Yes noticed that so im presuming the user password '1111' is 20 bytes 26F7EF0F129A96B45A2BC3921B60A5F371C7B9B7

@userx14
Copy link

userx14 commented Jul 13, 2022

Yes noticed that so im presuming the user password '1111' is 20 bytes 26F7EF0F129A96B45A2BC3921B60A5F371C7B9B7

Yeah, but if they have done their job well it is salted with something before putting it into the hash function.

You cound check if one of them changes if you are able to alter the user password.

@kevingrout
Copy link

kevingrout commented Jul 13, 2022

Brain now hurts :) more dump info
Note 4 x 1 different from before as was looking at wrong C811FA38-42C8-4579-A9BB-60E94EDDFB34
user =20 x 0's

8B36AB9EB46EE70ADF40E18A9E037E46
6FE4C665000000000000000000000000
000000000000000080691481CCAD07F6
89E882E202FD951DC2576E5200000000
00000000000000000000000000000000
00

user =4 x 1's
8B84FE6B155A7C2CEA39C6E9A02539BC
1A9F30DE000000000000000000000000
000000000000000080691481CCAD07F6
89E882E202FD951DC2576E5200000000
00000000000000000000000000000000
00

@kevingrout
Copy link

Update, cleared user password and first 20 bytes changed to 00 so read/edited and reflashed now have admin access and no passwords set. would have been nice to work out what password was.
Many thanks for your help userx14

@cbbeerman
Copy link

I'm working on a Toughbook CF-31 and was able to find the password in the .rom as described.
From the file it appears to only have a supervisor password
I also don't understand where XOR value comes from
I'd appreciate any help
Thank you

0000 00000000000000000000000000000000
0010 00000000000000000000000000000000
0020 00000000000000000000000000000000
0030 00000000000000000000000000000000
0040 5B42B64D110C6CF3C782227A7D66D89A
0050 33DB8E92E9E844B19F18FA45552AB0E1
0060 0B626693C1F81C3B7736D2742D1A8887
0070 E3F73EF99901F4C34FF7AA1605A46028
0080 01

5B42B64D110C6CF3C782227A7D66D89A33DB8E92E9E844B19F18FA45552AB0E10B626693C1F81C3B7736D2742D1A8887E3F73EF99901F4C34FF7AA1605A46028

@userx14
Copy link

userx14 commented Jul 14, 2022

When calculating the xor of the bytes of your dump with the key from en4rab I get:
d1006b00b600be0062000e0061000000f5005300bc00590063004b008800d400ab00cf001700b8002000dd002700570094000e008b00de00460052007c0043
padding removed:
d16bb6be620e6100f553bc59634b88d4abcf17b820dd2757940e8bde46527c43
First time I've seen a hashed result that is 32bytes long, if you ignore the zero padding. Maybe hashed with sha256?
Best
Benjamin

@cbbeerman
Copy link

Maybe or could it be that the unsigned int key = 0x935b is wrong for this Toughbook model. Guess I'll have to figure out how the key changes the XOR value

@userx14
Copy link

userx14 commented Jul 14, 2022

Well I think you found the right sequence.
At least the sequence was definitifeley xored with the en4rab key, since otherwise you would not get those 0x00 as padding.

@cbbeerman
Copy link

Very good point. Maybe it has something to do with possible uppercase characters in the password.
I'll play with some of my ideas and will post the results if I discover anything.
Thank you userx14 for all of your help and thank you en4rab for posting this.

@corty8
Copy link

corty8 commented Jul 26, 2022

Hi All
I was just wondering if anyone has looked into the location where the Accumulative Hours are stored on the Toughbooks?
I can find references to it but not much than that
Cheers

@Wasmachineman-NL
Copy link

Hi All I was just wondering if anyone has looked into the location where the Accumulative Hours are stored on the Toughbooks? I can find references to it but not much than that Cheers

why, so you can fuck over the used market by selling CF-19's with 15k+ hours as 500h? No thanks.

@maxtheobald
Copy link

Hello,
I have a FZ-G1 MK4 in front of me which has a bios password. I followed the instructions and the video on Youtube, but made a dump via CH341a and neoprogrammer. However, I can't find a password in AMITSESetup.

HEX:
0000 4E5641521901FFFFFF8327414D495453
0010 455365747570000000000000000000000
0020 00000000000000000000000000000000
0030 00000000000000000000000000000000
0040 00000000000000000000000000000000
0050 00000000000000000000000000000000
0060 00000000000000000000000000000000
0070 00000000000000000000000000000000
0080 00000000000000000000000000000000
0090 00000000000000010000000000000000
00A0 00000000000000000000000000000000
00B0 00000000000000000000000000000000
00C0 00000000000000000000000000000000
00D0 00000000000000000000000000000000
00E0 00000000000000000000000000000000
00F0 00000000000000000000000000000000
0100 00000000000000000000000000000000
0110 000000000000000000

HEX Body:
0010 00000000000000000000000000000000
0020 00000000000000000000000000000000
0030 00000000000000000000000000000000
0040 00000000000000000000000000000000
0050 00000000000000000000000000000000
0060 00000000000000000000000000000000
0070 00000000000000000000000000000000
0080 01000000000000000000000000000000
0090 00000000000000000000000000000000
00A0 00000000000000000000000000000000
00B0 00000000000000000000000000000000
00C0 00000000000000000000000000000000
00D0 00000000000000000000000000000000
00E0 00000000000000000000000000000000
00F0 00000000000000000000000000000000
0100 0000

I hope for a bad or wrong dump and next time I will unsolder the IC and re-read it.

@userx14
Copy link

userx14 commented Sep 6, 2022

I hope for a bad or wrong dump and next time I will unsolder the IC and re-read it.

Hi max,

i would guess that a bad dump is unlikely, since you were able to find AMITSESetup.

Maybe the following issues apply:

  • UEFI tool sometimes does not show the content of the variables, if you are using the current version. Use the older "a51" release and see if the content changes.
  • If this does not help you can try search for the last few hex characters of the key "B1 AA 44 05 D8 60 6B" by opening the bios with a raw hex editor. For short passwords or the 20 bytes hash these should stay the same. But there are potentially multiple matches.
  • Panasonic might have changed the way that the password is stored.

Best,
Benjamin

@corty8
Copy link

corty8 commented Sep 7, 2022

Hello, I have a FZ-G1 MK4 in front of me which has a bios password. I followed the instructions and the video on Youtube, but made a dump via CH341a and neoprogrammer. However, I can't find a password in AMITSESetup.

HEX: 0000 4E5641521901FFFFFF8327414D495453 0010 455365747570000000000000000000000 0020 00000000000000000000000000000000 0030 00000000000000000000000000000000 0040 00000000000000000000000000000000 0050 00000000000000000000000000000000 0060 00000000000000000000000000000000 0070 00000000000000000000000000000000 0080 00000000000000000000000000000000 0090 00000000000000010000000000000000 00A0 00000000000000000000000000000000 00B0 00000000000000000000000000000000 00C0 00000000000000000000000000000000 00D0 00000000000000000000000000000000 00E0 00000000000000000000000000000000 00F0 00000000000000000000000000000000 0100 00000000000000000000000000000000 0110 000000000000000000

HEX Body: 0010 00000000000000000000000000000000 0020 00000000000000000000000000000000 0030 00000000000000000000000000000000 0040 00000000000000000000000000000000 0050 00000000000000000000000000000000 0060 00000000000000000000000000000000 0070 00000000000000000000000000000000 0080 01000000000000000000000000000000 0090 00000000000000000000000000000000 00A0 00000000000000000000000000000000 00B0 00000000000000000000000000000000 00C0 00000000000000000000000000000000 00D0 00000000000000000000000000000000 00E0 00000000000000000000000000000000 00F0 00000000000000000000000000000000 0100 0000

I hope for a bad or wrong dump and next time I will unsolder the IC and re-read it.

I have never had any success trying to do these on the board and for what it is worth they are by far one of the easiest chips to remove and re-install once you have reprogrammed them

@mikrovr
Copy link

mikrovr commented Sep 7, 2022

@corty8
It will not be possible to find the corresponding password for your model. Just clear the NVRAM.

@corty8
Copy link

corty8 commented Sep 7, 2022

@corty8 It will not be possible to find the corresponding password for your model. Just clear the NVRAM.

oh yes that is what I have do, I have done dozens of the FZ-G1 units, but someone above mentions that they have tried to do it while the BIOS chips is still soldered to the board and said I have not had any success in trying to do it that way, I always remove the chip to clear it

@maxtheobald
Copy link

Hello, I have a FZ-G1 MK4 in front of me which has a bios password. I followed the instructions and the video on Youtube, but made a dump via CH341a and neoprogrammer. However, I can't find a password in AMITSESetup.
HEX: 0000 4E5641521901FFFFFF8327414D495453 0010 455365747570000000000000000000000 0020 00000000000000000000000000000000 0030 00000000000000000000000000000000 0040 00000000000000000000000000000000 0050 00000000000000000000000000000000 0060 00000000000000000000000000000000 0070 00000000000000000000000000000000 0080 00000000000000000000000000000000 0090 00000000000000010000000000000000 00A0 00000000000000000000000000000000 00B0 00000000000000000000000000000000 00C0 00000000000000000000000000000000 00D0 00000000000000000000000000000000 00E0 00000000000000000000000000000000 00F0 00000000000000000000000000000000 0100 00000000000000000000000000000000 0110 000000000000000000
HEX Body: 0010 00000000000000000000000000000000 0020 00000000000000000000000000000000 0030 00000000000000000000000000000000 0040 00000000000000000000000000000000 0050 00000000000000000000000000000000 0060 00000000000000000000000000000000 0070 00000000000000000000000000000000 0080 01000000000000000000000000000000 0090 00000000000000000000000000000000 00A0 00000000000000000000000000000000 00B0 00000000000000000000000000000000 00C0 00000000000000000000000000000000 00D0 00000000000000000000000000000000 00E0 00000000000000000000000000000000 00F0 00000000000000000000000000000000 0100 0000
I hope for a bad or wrong dump and next time I will unsolder the IC and re-read it.

I have never had any success trying to do these on the board and for what it is worth they are by far one of the easiest chips to remove and re-install once you have reprogrammed them

Okay, no problem, I'll desolder the chip and read it in again.

@corty8 It will not be possible to find the corresponding password for your model. Just clear the NVRAM.

Okay and now clearing the NVRAM means what exactly? What do I have to watch out for?

I hope for a bad or wrong dump and next time I will unsolder the IC and re-read it.

Hi max,

i would guess that a bad dump is unlikely, since you were able to find AMITSESetup.

Maybe the following issues apply:

  • UEFI tool sometimes does not show the content of the variables, if you are using the current version. Use the older "a51" release and see if the content changes.
  • If this does not help you can try search for the last few hex characters of the key "B1 AA 44 05 D8 60 6B" by opening the bios with a raw hex editor. For short passwords or the 20 bytes hash these should stay the same. But there are potentially multiple matches.
  • Panasonic might have changed the way that the password is stored.

Best, Benjamin

I will search in Hex Editor for these Hex characters, maybe i will have success.

Thank you guys for your help.

best wishes

@corty8
Copy link

corty8 commented Sep 7, 2022

maxtheobald are you doing a search for the GUID or are you actually scrolling through and trying to find it?

@warst
Copy link

warst commented Sep 7, 2022

Hello, I have a FZ-G1 MK4 in front of me which has a bios password. I followed the instructions and the video on Youtube, but made a dump via CH341a and neoprogrammer. However, I can't find a password in AMITSESetup.
HEX: 0000 4E5641521901FFFFFF8327414D495453 0010 455365747570000000000000000000000 0020 00000000000000000000000000000000 0030 00000000000000000000000000000000 0040 00000000000000000000000000000000 0050 00000000000000000000000000000000 0060 00000000000000000000000000000000 0070 00000000000000000000000000000000 0080 00000000000000000000000000000000 0090 00000000000000010000000000000000 00A0 00000000000000000000000000000000 00B0 00000000000000000000000000000000 00C0 00000000000000000000000000000000 00D0 00000000000000000000000000000000 00E0 00000000000000000000000000000000 00F0 00000000000000000000000000000000 0100 00000000000000000000000000000000 0110 000000000000000000
HEX Body: 0010 00000000000000000000000000000000 0020 00000000000000000000000000000000 0030 00000000000000000000000000000000 0040 00000000000000000000000000000000 0050 00000000000000000000000000000000 0060 00000000000000000000000000000000 0070 00000000000000000000000000000000 0080 01000000000000000000000000000000 0090 00000000000000000000000000000000 00A0 00000000000000000000000000000000 00B0 00000000000000000000000000000000 00C0 00000000000000000000000000000000 00D0 00000000000000000000000000000000 00E0 00000000000000000000000000000000 00F0 00000000000000000000000000000000 0100 0000
I hope for a bad or wrong dump and next time I will unsolder the IC and re-read it.

I have never had any success trying to do these on the board and for what it is worth they are by far one of the easiest chips to remove and re-install once you have reprogrammed them

Okay, no problem, I'll desolder the chip and read it in again.

@corty8 It will not be possible to find the corresponding password for your model. Just clear the NVRAM.

Okay and now clearing the NVRAM means what exactly? What do I have to watch out for?

I hope for a bad or wrong dump and next time I will unsolder the IC and re-read it.

Hi max,
i would guess that a bad dump is unlikely, since you were able to find AMITSESetup.
Maybe the following issues apply:

  • UEFI tool sometimes does not show the content of the variables, if you are using the current version. Use the older "a51" release and see if the content changes.
  • If this does not help you can try search for the last few hex characters of the key "B1 AA 44 05 D8 60 6B" by opening the bios with a raw hex editor. For short passwords or the 20 bytes hash these should stay the same. But there are potentially multiple matches.
  • Panasonic might have changed the way that the password is stored.

Best, Benjamin

I will search in Hex Editor for these Hex characters, maybe i will have success.

Thank you guys for your help.

best wishes

For what it's worth, I've done at least 50 FZ-G1's of various generations (amongst many other Panasonic models) and have read the chip on the board every time. It's a game of trial and error. Remove the battery, attach the charger - try to read. If that fails, leave the battery connected, with the charger connected. Or try turning the device on, with battery and charger connected and then switch off, leave all connected and then try to read. Sometimes you have to enter the bios and then power off. It's usually a combination of these things AND, sometimes the same device will perform differently to another of the same model. I also have a fair amount of luck using a bench power supply for powering the eeprom, this way I'm not relying on the fluctuating power supply of a cheap programmer. TL866ii is also a good programmer, but I have a CH341a which I modified to not supply 5v to the chip (as these have a design flaw - google CH341a 3.3v mod).

If you get one successful dump, dump again and then compare the two files with HxD for any differences. If they are identical, you are good to go.

Good luck!

@satorisage
Copy link

Hi - Trying to understand fully what you've shared here.

The HEX I retrieve from the rom is:
5B 46 B6 48 11 E2 6C 70 C7 9D 22 B1 7D 43 D8 2E 33 B8 8E D7 E9 5C 44 DA 9F 8A FA FE 55 D8 B0 7F 0B E0 66 C8 C1 FF 1C A6 77 16 D2 A9 2D 3D 88 D0 E3 63 3E F7 99 8A F4 1D 4F B1 AA 44 05 D8 60 6B

In your example you said you "xor" that with the other 64 bytes (the second 32 being the same as the first set) - but where did that part come from? Is that applied across all cf-53 models or did you need to retrieve that out of the rom?

Also how can I "xor" the HEX values? Is is an operation I can write in Python?

Thanks in advance for your time and assistance - I love reverse engineering and learning

@userx14
Copy link

userx14 commented Sep 9, 2022

Hi satorisage,

but where did that part come from?

See the secton "1337 encryption" of en4rab's original post. The key can generated in 16 bytes increments because it is
0x935b * (currentIteration + 1),
when you only use the lower 16 bytes of the result. This seems to be the same across many different toughbook models.

Is is an operation I can write in Python?

Yes, see following code using your rom data.

show code for panasoHardcoded.py python3
import binascii

def hexPrettyPrint(bytesStr):
    print(binascii.hexlify(bytesStr, sep=" "))

def generatePanaXorSequence(numOfBytes):
    if(numOfBytes%2):
        raise ValueError("Only even number of bytes supported")
    key = int("0x935b", 16)
    numOfInt16 = numOfBytes//2
    generatedKey = bytes()
    for i in range(numOfInt16):
        keyForThisInt16 = key*(i+1) 
        keyForThisInt16 = keyForThisInt16 & int("0xffff", 16)   #only keep the lower 2 bytes
        keyForThisInt16 = keyForThisInt16.to_bytes(2, 'little') 
        generatedKey = generatedKey + keyForThisInt16
    return generatedKey
    
def xorByteStrings(bytesStr1, bytesStr2):
    if(len(bytesStr1) != len(bytesStr2)):
        raise ValueError("Xor needs same length of byteStrings")
    byteStringResult = bytes()
    for i in range(len(bytesStr1)):
        byteStringResult += bytes([bytesStr1[i] ^ bytesStr2[i]])
    return byteStringResult
    
def getSHA1ifExist(bytesStr):
    sha1 = bytes()
    for i in range(20):                 #sha1 is 20 bytes
        if(bytesStr[2*i] != 0):         #check if the upper bytes is always zero of each int16
            return None
        sha1 += bytes([bytesStr[2*i + 1]])
    for i in range(40, len(bytesStr)):
        if(bytesStr[i] != 0):           #all bytes after the first 40 bytes should be zero
            return None
    return sha1

def getASCIIifExist(bytesStr):
    asciiBytes = bytes()
    for i in range(len(bytesStr)//2):
        if(bytesStr[2*i+1] != 0):        #check if the lower bytes is always zero of each int16
            return None
        if(bytesStr[2*i]):
            asciiBytes += bytes([bytesStr[2*i]])
    return asciiBytes.decode("ascii")

#calculation
yourValueFromNvRam = "5B 46 B6 48 11 E2 6C 70 C7 9D 22 B1 7D 43 D8 2E 33 B8 8E D7 E9 5C 44 DA 9F 8A FA FE 55 D8 B0 7F 0B E0 66 C8 C1 FF 1C A6 77 16 D2 A9 2D 3D 88 D0 E3 63 3E F7 99 8A F4 1D 4F B1 AA 44 05 D8 60 6B"
yourValueFromNvRam = yourValueFromNvRam.replace(" ", "")                        #remove whitespaces
yourValueFromNvRam = binascii.unhexlify(yourValueFromNvRam)                     #to bytes
generatedKeyWithSameLength = generatePanaXorSequence(len(yourValueFromNvRam))
resultOfXor = xorByteStrings(yourValueFromNvRam, generatedKeyWithSameLength)

#analysis
sha1 = getSHA1ifExist(resultOfXor)
if(sha1 == None):
    asciiString = getASCIIifExist(resultOfXor)
    if(asciiString):
        print(f"here is you password:\n{asciiString}")
    print("here is you xored sequence:")
    hexPrettyPrint(resultOfXor)
else:
    print("the xored sequence is likeley the following sha1 hash:")
    hexPrettyPrint(sha1)

(edit 04.01.23: add ascii conversion)

Please let me known if you have any additional questions.

One interesting thing I hadn't had time to implement yet is to open the dumped hex file, and search for occurences fo the last few bytes of the xor sequence for the length 64 bytes.
Since the password or hash is likely to be relatively short <40 bytes the last few bytes are most likely equal to the xor sequence.
Then derive the start of the sequence an overwrite all 64 bytes with zeros to generate a flashable image without password protection.

Maybe a check if the bios dump is complete (includes the intel me section, ...) would be important, because flashing back a partial modified dump will result in a "dead" device. Finding a complete dump online to recover from this state might be difficult.

Best,
Benjamin

@satorisage
Copy link

Hi satorisage,

but where did that part come from?

See the secton "1337 encryption" of en4rab's original post. The key can generated in 16 bytes increments because it is 0x935b * (currentIteration + 1), when you only use the lower 16 bytes of the result. This seems to be the same across many different toughbook models.

Is is an operation I can write in Python?

Yes, see following code using your rom data.

show code for panasoHardcoded.py python3
Please let me known if you have any additional questions.

One interesting thing I hadn't had time to implement yet is to open the dumped hex file, and search for occurences fo the last few bytes of the xor sequence for the length 64 bytes. Since the password or hash is likely to be relatively short <40 bytes the last few bytes are most likely equal to the xor sequence. Then derive the start of the sequence an overwrite all 64 bytes with zeros to generate a flashable image without password protection.

Maybe a check if the bios dump is complete (includes the intel me section, ...) would be important, because flashing back a partial modified dump will result in a "dead" device. Finding a complete dump online to recover from this state might be difficult.

Best, Benjamin

Thanks for the reply! Seems like for the CF54's I have this key could be incorrect - or maybe there is something else going on. When I extracted and calculated the result I got d56e583d7dc544b496160832f1f07a4a29941025 as the sha1. But the password is "tsipub" and as a sha1 hash it calculates to 48d87741220aa2a705005a01bbbcdb1c858eae41. Any thoughts on what could be going on there?

@userx14
Copy link

userx14 commented Sep 9, 2022

Seems like for the CF54's I have this key could be incorrect

If the code says that the xored result is likeley a sha1 hash then the xor-key part is working / the generated key from panaXorSequence is correct. It is basically impossible to get the these zero valued bytes every second character for a non matching key (just add hexPrettyPrint(resultOfXor) in the else case and you will see these zeros). If you look closely at your valueFromNvram you can see that many bytes (those that are zero after performing the xor) are equal to the output of the generatePanaXorSequence function.

But the password is "tsipub" and as a sha1 hash it calculates to 48d87741220aa2a705005a01bbbcdb1c858eae41. Any thoughts on what could be going on there?

I would have two possible explanations for this behavior:

  • instead of the password in ascii they could have hashed the scancodes. I suspect this because they also stored the scancodes for the non hashed password see first post of en4rab.
  • they could have added some constant extra bytes at the end of the password like a constant salt

I have to admit that I didn't really looked into this, and just replaced the section with zeros and called it a day.

I guess that trying one letter passwords, reading the hash, and then trying to brute force the hash could lead to some insight.

Best,
Benjamin

@maxtheobald
Copy link

Hello folks,
what can I say? The tip from @userx14 to simply overwrite the affected bit combination with 0 worked! Apparently the supervisor password is only stored once in the chip of the FZ-G1 MK4. Interestingly, the operating hours counter was also set to 0.
By the way, flashing also worked when installed.
Thanks again for your help.

@Randname666
Copy link

Hello. So I tried this on a Panasonic FZ-G1 MK2 and seems went further than the guy with a FZ-G1 MK4. It doesn't contain an item with guid "C811FA38-42C8-4579-A9BB-60E94EDDFB34" but the one with name "AmiTseSetupGuid" and also text "AMITSESetup".
The content read as :
5b7db609112d6c18c7bc22b37d2fd8b0334e8e26e9a244339fb9fafd55eeb0520b286641c1251c427716d2a92d3d88d0e3633ef7998af41d4fb1aa4405d8606b and after Xoring, it comes with such a result:
ee002f00970055005c00c70028002a006000e700f600db00c200f3004c006700e1001d00ca00c1000000000000000000000000000000000000000000000000
Which the 80s that should be showing up are instead coming up with 00s and other bytes doesn't seems to be either valid EFI scancodes or ASCII codes. I wonder if some kind of masking or other procedure has been applied to them ?

@userx14
Copy link

userx14 commented Sep 17, 2022

Hi @Randname666, your result is most likely the sha1 of the password / keyboard scancodes and maybe some additional constant. (20 bytes = "sha1 length" and every second byte is zero padding).

@Randname666
Copy link

Hi @Randname666, your result is most likely the sha1 of the password / keyboard scancodes and maybe some additional constant. (20 bytes = "sha1 length" and every second byte is zero padding).

Well, tried hashcating that sha1 and it exhausted 8 bytes of a-z, A-Z, 0~9 combinations. Either that's not the right direction, or just unfortunate enough to come into a guy who's really serious about device security.

@userx14
Copy link

userx14 commented Sep 18, 2022

Well, tried hashcating that sha1 and it exhausted 8 bytes of a-z, A-Z, 0~9 combinations. Either that's not the right direction, or just unfortunate enough to come into a guy who's really serious about device security.

Most likeley they are not ascii characters but key scancodes and there could be some additional constant added to the end.

It is possible to just overwrite the xored hash with zeros and flash the modified image back. But there is the risk that if you only have a partial bios backup / the bios chip is write protected, that you can brick the device when using a software flash tool. (See some of the earlier posts)

@Randname666
Copy link

Randname666 commented Sep 19, 2022

But there is the risk that if you only have a partial bios backup / the bios chip is write protected, that you can brick the device when using a software flash tool.

So, things like AFUWINGUI won't generate a full BIOS backup sometimes? Also, I am not sure if I got the idea of "write protected" here but I attempted a BIOS upgrade with the program provided by Panasonic, as on some "consumer level" laptops upgrading, downgrading, or "upgrading" to the same version of the current BIOS could get the password wiped, but not the case here: The FZ-G1 MK2 accepted and successfully finished the BIOS update, but the password is still kept. Luckily that the schema of the password storage is not changed.

I'm in lack of the tool and the skills to do it the hardware way if something goes wrong so I'd rather let the password stay there at least at the moment.

@satorisage
Copy link

satorisage commented Sep 19, 2022 via email

@hueyvle
Copy link

hueyvle commented Oct 17, 2022

hi Experts,
I bought a Renew CF-53 from Amazon and it appears to have bios password locked. Contacted the seller, and so far, no answer.
Here is the link to the bios dump: https://drive.google.com/file/d/1vZ1mwTIIfs1fcMAmoxbcp3ntUjrT1zuC/view?usp=sharing
What I tried so far:

  1. Tried to zero out the password and then flash it. The problem is that bios flash is locked
    Error 280: Failed to disable write protection for the BIOS space!

  2. Tried the UEFI tool to get and got the hash pw.
    5B-8F-B6-EE-11-9A-6C-3A-C7-77-22-6D-7D-02-D8-74-33-59-8E-E2-E9-0F-44-C7-9F-59-FA-0C-55-71-B0-6D 0B-81-66-EB-C1-27-1C-C2-77-16-D2-A9-2D-3D-88-D0-E3-63-3E-F7-99-8A-F4-1D-4F-B1-AA-44-05-D8-60-6B
    The problem is when I Xor with the static Hex string from this post
    5B 93 B6 26 11 BA 6C 4D C7 E0 22 74 7D 07 D8 9A 33 2E 8E C1 E9 54 44 E8 9F 7B FA 0E 55 A2 B0 35 0B C9 66 5C C1 EF 1C 83 77 16 D2 A9 2D 3D 88 D0 E3 63 3E F7 99 8A F4 1D 4F B1 AA 44 05 D8 60 6B
    I got these
    0x00, 0x1C, 0x00, 0xC8, 0x00, 0x20, 0x00, 0x77, 0x00, 0x97, 0x00, 0x19, 0x00, 0x05, 0x00, 0xEE, 0x00, 0x77, 0x00, 0x23, 0x00, 0x5B, 0x00, 0x2F, 0x00, 0x22, 0x00, 0x02, 0x00, 0xD3, 0x00, 0x58, 0x00, 0x48, 0x00, 0xB7, 0x00, 0xC8, 0x00, 0x41, 0x00, 0x00, 0x00, 0x00, 0x00, 0x00, 0x00, 0x00, 0x00, 0x00, 0x00, 0x00, 0x00, 0x00, 0x00, 0x00, 0x00, 0x00, 0x00, 0x00, 0x00, 0x00, 0x00, 0x00,
    Fitlered out the 0x00, I got
    0x1C, 0xC8, 0x20, 0x77, 0x97, 0x19, 0x05, 0xEE, 0x77, 0x23, 0x5B, 0x2F, 0x22, 0x02, 0xD3, 0x58, 0x48, 0xB7, 0xC8, 0x41
    Now I have no idea what to do next.
    Some help would be greatly appreciated.

@userx14
Copy link

userx14 commented Oct 17, 2022

Hi @hueyvle,

to 1). I guess your best bet is to use a hardware flasher like the ch341a which can be had for around 5$-15$. If you scan through some of the previous posts you might find additional tips (e.g. how to bypass feeding 3.3V to the other ic's on the board) or simply ask if you need assistance.

to 2). Your filtered result is 20bytes long, so most likeley that's a sha1 hash.
If you paste your hex bytes into the python code in this post it would also reports this.
Unfortunatelly I do not know if there is additional salt involved in hashing or what is hashed there (keyscancodes or direct ascii characters), so brute forcing is not an option.

Best,
Benjamin

@hueyvle
Copy link

hueyvle commented Oct 17, 2022

Thank you @userx14 for your inputs.

I would gladly pay $15 to have this fixed. I'm just not a hardware guy and would be very nervous to use the hw flasher.
So, my plan is

  1. disable BIOS write protection (this guide https://winraid.level1techs.com/t/guide-grub-fix-intel-fpt-error-280-or-368-bios-lock-asus-other-mod-bios-flash/32725).
  2. blank out the password on the bios dump
  3. flash the bios with the dump.

I know it is too much to ask, but what are your thoughts on this plan. Is it doable?

Thanks!

@userx14
Copy link

userx14 commented Oct 17, 2022

I know it is too much to ask, but what are your thoughts on this plan. Is it doable?

Well, I would first make sure that you have a full backup of this flash chip.
This is important because there have been cases where attempting to flash the modified dump erased the hole flash chip, which meant that parts not backed up were lost (and free downloads of full dumps of these panasonic machines are hard to find online).
I'm suspicious, because your file is 0x580000 bytes long which could mean that this is not a full backup of the whole flash, but only the bios/uefi secion, but I'm not sure.
Can you try to find out if the file size matches to the flash chip size built into you machine by checking the IC marking?

I did the hardware flashing with a ch341a on a cf53 mk2 (just as a reference picture), not sure if it is the same on newer models, but the flash chip was accessible under the service hatch.

Greetings,
Benjamin

@hueyvle
Copy link

hueyvle commented Oct 17, 2022

my laptop is CF53 MK4

Can you try to find out if the file size matches to the flash chip size built into you machine by checking the IC marking?

Well, I don't know how to check IC marking, but it does sound like I need pop the hatch open. I used "flash programming tool" fptw from Intel ME system tools v9.5.
fptw.exe -BIOS -D <binname>
Please let me know if you have different tool.

I disconnected the backup Battery (two pin connector opposite to the bios chip in the wifi/4G hatch) and in order to detect the chip I had to disconnect the 3.3v supply of the bios ic (pin 8) by scratching the trace coming out from underneath the chip, possibly because the programmer powered other stuff on the 3.3V line (IC is Micron 25Q128AB, see picture). After dumping the 16MB bios file with programmer software 1.30, getting the correct offset with UEFI-Tool-A51, zeroing out the 64bytes with HxD.exe and flashing back to the chip, I reconnected 3.3V with a jumper wire. All of this can be done without dissasembling the laptop through the wifi and 4g module access hatch, although it's quiet tight and I had do saw of a chunk of my bios test clip because it collided with the magnesium housing.

I really prefer not messing with wire and soldering.

@MichelBaie
Copy link

Hi, could someone please help me to get my BIOS password please ?
I've found this using HxD :
image
26 A5 D2 82 6C 1F DB F2 F9 3B 13 80 D3 56 C3 83 F8 5B 08 6A AA 5C 48 98 38 F8 AC 5F F2 2E 1F E9

Here's the bios dump : https://transfert.free.fr/IZwnsI

Thanks !!

@userx14
Copy link

userx14 commented Nov 26, 2022

Hi, could someone please help me to get my BIOS password please ? I've found this using HxD : image 26 A5 D2 82 6C 1F DB F2 F9 3B 13 80 D3 56 C3 83 F8 5B 08 6A AA 5C 48 98 38 F8 AC 5F F2 2E 1F E9

Here's the bios dump : https://transfert.free.fr/IZwnsI

Thanks !!

Hi @MichelBaie ,

this seems to be the correct section in the bios, but getting back the original password is probably difficult. Likely there is no xor done and these 32 bytes are directely obtained from something like a SHA-256 hash.
Overwriting with zeros should still work though, but be careful when attempting this, since there have been some problems with sections of the bios getting lost when flashing with software flashers.
This is difficult to recover from, when you do not have a full backup of bios flash chip.

Best
Benjamin

@OmegaSentinell
Copy link

Password is hashed , i can remove it from dump , file link not valid.

@Ftmmsch
Copy link

Ftmmsch commented Jan 4, 2023 via email

@cbbeerman
Copy link

I don't know why the post in this mornings notification email isn't here
But it looks like KJTR's PW is

C e l l T e c h

@OmegaSentinell
Copy link

I don't know why the post in this mornings notification email isn't here But it looks like KJTR's PW is

C e l l T e c h

how did you find it ?

@cbbeerman
Copy link

cbbeerman commented Jan 4, 2023

I XOR'd the string with the key and the response wasn't long enough. So not knowing the particulars of their model and since some of the eariler ones aren't hashed I looked up the response in ascii
for example
$18 XOR $5B is $43 which is "C" in ascii

@OmegaSentinell
Copy link

I XOR'd the string with the key and the response wasn't long enough. So not knowing the particulars of their model and since some of the eariler ones aren't hashed I looked up the response in ascii for example $18 XOR $5B is $43 which is "C" in ascii

Witch string ?

@userx14
Copy link

userx14 commented Jan 4, 2023

I XOR'd the string with the key and the response wasn't long enough. So not knowing the particulars of their model and since some of the eariler ones aren't hashed I looked up the response in ascii for example $18 XOR $5B is $43 which is "C" in ascii

Witch string ?

@OmegaSentinell
I think he is refering to the byte sequence from the bios in the now deleted post from @KJTR.
The python code in my previous post now has this case built in (getASCIIifExist):
After xoring the result is directly the ascii characters of the password with some zero padding.

https://gist.github.com/en4rab/550880c099b5194fbbf3039e3c8ab6fd?permalink_comment_id=4294901#gistcomment-4294901

This does not change anything in the case where the output of the xor is a sha1 or different hash.

Best,
Benjamin

@cbbeerman
Copy link

Yes from the deleted post

unnamed

@OmegaSentinell
Copy link

OmegaSentinell commented Jan 4, 2023

Here is my version using python2

#!/usr/bin/python2
import sys
import os
import binascii

magic_ami_key = 0x935B

#INFO
info = "========================INFO======================== \n         PANASONIC PASSWORD DECRYPTOR \n           Created by OmegaSentinell \n              All Rights reserved"
print(info)

#Usage
usage = "=======================USAGE======================== \n   Open DUMP file (<filename>.BIN) in HEX EDITOR\n   Copy HEX password string from AMITSE section\n   Paste into program below \n===================================================="
print(usage)

#Version
version = "V_0.4"

##user input
password_hash = raw_input("[ Paste HEX Data ] : ").strip().replace(' ', '')
#for test - password_hash = "13138ea6243a5fcdd56018f47d07d89a332e8ec1e95444e89f7bfa0e55a2b0350bc9665cc1ef1c837716d2a92d3d88d0e3633ef7998af41d4fb1aa4405d8606b"
max_pwsd_length = len(password_hash)/4

##Get XOR Key
def make_xor_key():
	magic_ami_xor_key = ""
	for j in xrange(0,max_pwsd_length,1):
		xor_key = (hex(magic_ami_key * (j + 1)))
		xor_key = xor_key[-4:]
		for i in xrange(4,0,-2):
			magic_ami_xor_key += str(xor_key[i-2:(i-2)+2].upper())
	return magic_ami_xor_key

##Convert to integers
a = password_hash
b = make_xor_key()

##translate integers to HEX
binary_a = a.decode("hex")
binary_b = b.decode("hex")

##XORing strings
def xor_strings(xs, ys):
    return "".join(chr(ord(x) ^ ord(y)) for x, y in zip(xs, ys))
xored = xor_strings(binary_a, binary_b).encode("hex")

##Cleanup string
xored_clean = xored.strip().replace('80', '').replace('00', '')

#Panasonic Dictionary
ascii_chars  =  {
          "10"  :  "z",
          "11"  :  "x",
          "12"  :  "c",
          "13"  :  "v",
          "14"  :  "b",
          "15"  :  "n",
          "16"  :  "m",
          "17"  :  ",",
          "18"  :  ".",
          "19"  :  "/",
          "1A"  :  "[RShift]",
          "1B"  :  "[UpArrow]",
          "1C"  :  "1",
          "1D"  :  "2",
          "1E"  :  "3",
          "1F"  :  "[CapsLock]",
          "20"  :  "a",
          "21"  :  "s",
          "22"  :  "d",
          "23"  :  "f",
          "24"  :  "g",
          "25"  :  "h",
          "27"  :  "k",
          "28"  :  "l",
          "29"  :  ";",
          "2A"  :  "'",
          "2B"  :  "|",
          "2C"  :  "4",
          "2D"  :  "5",
          "2E"  :  "6",
          "2F"  :  "+",
          "30"  :  "[TAB]",
          "31"  :  "q",
          "32"  :  "w",
          "33"  :  "e",
          "34"  :  "r",
          "35"  :  "t",
          "36"  :  "y",
          "37"  :  "u",
          "38"  :  "i",
          "39"  :  "o",
          "3A"  :  "p",
          "3B"  :  "[",
          "3C"  :  "]",
          "3D"  :  "\\",
          "3E"  :  "[DEL]",
          "3F"  :  "[END]",
          "40"  :  "[PgDn]",
          "41"  :  "7",
          "42"  :  "8",
          "43"  :  "9",
          "44"  :  "`",
          "45"  :  "1",
          "46"  :  "2",
          "47"  :  "3",
          "48"  :  "4",
          "49"  :  "5",
          "4A"  :  "6",
          "4B"  :  "7",
          "4C"  :  "8",
          "4D"  :  "9",
          "4E"  :  "0",
        }

##Translate output test
def panasonic_scancode_to_password(xored_clean):
	decoded_password_panasonic=""
	for i in xrange(0,len(xored_clean),2):
		try:
			decoded_password_panasonic +=str(ascii_chars[xored_clean[i:i+2].upper()])
		except:
			pass
	return str(decoded_password_panasonic)

print("\n[ HASH DATA ]\n" +password_hash +"\n")     ##show input HEX string
print("[ XOR KEY ]\n" +make_xor_key() +"\n")        ##show XOR Key
print("[ RESULT ]\n" +xored_clean.upper() +"\n")    ##show result from XORed (HEX string and XOR Key)
print("[ SCANCODE ]\n" +xored_clean.decode("hex") +"\n") ##show decrypted hex in ascii
print("[ PASSWORD ]\n" +panasonic_scancode_to_password(xored_clean)); ##show decrypted password .translate(ascii_chars)

raw_input("\n\nPress Enter to continue...")
os.system('cls')
execfile("PANASONIC_PASSWORD_DECRYPT.py")
if (raw_input() == 0) : os.system('exit')

@corty8
Copy link

corty8 commented Jan 9, 2023

Hi All,

I have an odd one today, clearing a password on a machine and normally the password appears twice in the BIOS, on this machine I could only find one occurrence of the password string so I set that to all zeros like I normally do reprogrammed the chip and installed it but the machine still has a password

Has anyone seen this before?

There must be another occurrence in there somewhere

Cheers

@mikrovr
Copy link

mikrovr commented Jan 9, 2023

@corty8
Post the BIOS file

@Ftmmsch
Copy link

Ftmmsch commented Jan 9, 2023 via email

@corty8
Copy link

corty8 commented Jan 9, 2023

@mikrovr
Copy link

mikrovr commented Jan 9, 2023

@corty8
Yes, it's very simple... Wait a few minutes...

@mikrovr
Copy link

mikrovr commented Jan 9, 2023

@corty8
Copy link

corty8 commented Jan 9, 2023

@mikrovr
So that file is clear of all passwords now?

@mikrovr
Copy link

mikrovr commented Jan 9, 2023

@corty8
It sure is! :)

@corty8
Copy link

corty8 commented Jan 9, 2023

That's great, thanks for that I will try it tomorrow

What is that utility that you used there?

@corty8
Copy link

corty8 commented Jan 11, 2023

@mikrovr
That file worked fine, Thanks for that
Unfortunately I have since discovered the machine has fault on the battery circuit, will not recognise a battery at all so not sure what to do with it yet
they are not always easy :)

@NevoidHyp
Copy link

@corty8 https://we.tl/t-mpzuKOP0WN

2023-01-09_06-27-43

sorry all, i'm a bit less savvy than i'd like, but is this possible with an ASUS ROG Zephyrus G14 on version GA401IU.219?
it's either that, DavidZou's EEPROM method, Kiosk, or small claims court... xD

@mikrovr
Copy link

mikrovr commented Jan 13, 2023

@ NevoidHyp
Post the BIOS file (eeprom), we can check it for you.

@warst
Copy link

warst commented Jan 13, 2023

@corty8 https://we.tl/t-mpzuKOP0WN

2023-01-09_06-27-43

Hey Mikrovr, would you be able to post this app please?

@passssha
Copy link

Does anyone have any experience with removing the BIOS password from a Panasonic CF-54?

@satorisage
Copy link

satorisage commented Feb 22, 2023 via email

@warst
Copy link

warst commented Apr 11, 2023

any chance i could get someone to check this bin. it's for a asus GL731GT-RB73 https://drive.google.com/file/d/1Kd1euEJsgnRqcNWBNp01tKhU3GOOEsf4/view?usp=sharing

What is it you are hoping to check? This is a post for Panasonic devices - you'd be better off looking in the badcaps forum or something similar. The bios dump looks good - I can see the ME region and your Windows product key.... KRCBM-NX9Y9-29BW8-4CJ4M-.....

@SergeySolovyenko
Copy link

HI guys! I have passworded Panasonic CF-C1. Please help. I trying use your programms to get password, but nothing work. I have a full dump of my bios in .rom format. I realy need help. Also i try to use ChatGPT but he dont work correctly. - https://drive.google.com/file/d/1JwfQ7EdWbaKVny8QSkwv1Gb4DkCEp3mV/view?usp=sharing

@userx14
Copy link

userx14 commented Jun 25, 2023

key AMITSESetup from uefitool a51:
5B44B6C511656CD0C7A0222D7DC9D82033B58E1EE9CD440F9F08FAD45516B0C20BCB6679C1A71C3D7716D2A92D3D88D0E3633EF7998AF41D4FB1AA4405D8606B

from python tool:

the xored sequence is likely the following sha1 hash:
b'd7 e3 df 9d 40 59 ce ba 9b df 99 e7 73 da b4 f7 02 25 48 be'

This means as far as I know that it is impossible to find out your password, but you can overwrite the hash with zeros and it should be gone.
But be cautious when flashing bios images from within windows, I've seen multiple cases of bricked machined because some part of the bios could not be written from within the os and the bios backups were incomplete. More information in the previous posts.

@Ftmmsch
Copy link

Ftmmsch commented Jun 25, 2023

@userx14

That it allways is risky, to flash within windows, i knew.

But: what about doing this from a live DVD ? - I did it once from a WIN 10 PSE DVD.
Under this conditions, the OS isn't running, because it's not loaded.

But: could it be risky allso?

@SergeySolovyenko
Copy link

Hi to ALL! I Fix problem with BIOS Password on the my Panasonic CF-C1
How to :

  1. I make a dump with APTIO 4
  2. In the UEFITool i fund password section on the AMITSESetup in first tree. BUT! This information same writed in 2 tree. I Erase this information with writing zeros and save this modificated ROM.
  3. Im flash BIOS With this custom ROM from windows with APTIO 4 - Need to put checkbox - Write All bloks, and Do not check ID. Optionaly - restart after flashing.
  4. Congrats! We are removed password from the BIOS!!!!
    Thanks for all people who help to me here! I think this instruction will help for some people!

@SergeySolovyenko
Copy link

@userx14

That it allways is risky, to flash within windows, i knew.

But: what about doing this from a live DVD ? - I did it once from a WIN 10 PSE DVD. Under this conditions, the OS isn't running, because it's not loaded.

But: could it be risky allso?

СF-C1 dont have a DVD or CD. Only USB and in my case, he is not see any external DVD. Also, nevermind. I can't load DVD from BIOS trow f12 because in this case he load LAN system boot in default mode.

@warst
Copy link

warst commented Jun 30, 2023

@userx14
That it allways is risky, to flash within windows, i knew.
But: what about doing this from a live DVD ? - I did it once from a WIN 10 PSE DVD. Under this conditions, the OS isn't running, because it's not loaded.
But: could it be risky allso?

СF-C1 dont have a DVD or CD. Only USB and in my case, he is not see any external DVD. Also, nevermind. I can't load DVD from BIOS trow f12 because in this case he load LAN system boot in default mode.

Get yourself a CH134a with a test eeprom clip and flash it the correct way, it's very cheap, straightforward and you can easily experiment more in the future. Make sure it has the 5v-3.3v mod applied though as the vcc line is tied directly to the 5v usb port power which is bad news for a bios chip!

@Ftmmsch
Copy link

Ftmmsch commented Jul 3, 2023 via email

@juhisByte
Copy link

juhisByte commented Jul 9, 2023

Hi all,
i have Panasonic fz-g1 mk4 pad, where is bios password. I have bios dump file, but not sure how to get cracked that password from it.

Is here anybody who can help me
Regards

@SergeySolovyenko
Copy link

Привет всем, у меня есть панель Panasonic fz-g1 mk4, где находится пароль биоса. У меня есть файл дампа биоса, но я не знаю, как взломать этот пароль.

Здесь есть кто-нибудь, кто может мне помочь С уважением

Hi!. I think i can help. Share your dump here.

@juhisByte
Copy link

i cannot add rar, or file here :(
Can u give ur email, or something where i can send it

Regards

@SergeySolovyenko
Copy link

SergeySolovyenko commented Jul 10, 2023

i cannot add rar, or file here :( Can u give ur email, or something where i can send it

Regards

Just write to me in the Telegram

@Jeeg1975
Copy link

Jeeg1975 commented Aug 8, 2023

Hallo,
PW

my Englisch is Bad, but i try it.
I have one CF-52 with Password, i understand i can delete it, but i want know what word is was.
Can you say my PW? ( i understand that the PW from Toughbook works,... WTF scancodes how does this map to keys)
Thank you

@bsistuk
Copy link

bsistuk commented Aug 9, 2023

image

0F 93 FE 26 45 BA 2A 4D 97 E0 61 74 7D 07 D8 9A 33 2E 8E C1 E9 54 44 E8 9F 7B FA 0E 55 A2 B0 35 0B C9 66 5C C1 EF 1C 83 01

@userx14
Copy link

userx14 commented Aug 9, 2023

@Jeeg1975
You can try the python code in this comment and paste your code (leave out the last 01 in your highlighted selection, it is not part of the password) from your screenshots into the variable
yourValueFromNvRam. If it is hashed, you will not be able to find out the original password.

@Jeeg1975
Copy link

Jeeg1975 commented Aug 9, 2023

ok thank you,

@cbbeerman
Copy link

cbbeerman commented Aug 9, 2023

Looks like the PW for
0F 93 FE 26 45 BA 2A 4D 97 E0 61 74 7D 07 D8 9A 33 2E 8E C1 E9 54 44 E8 9F 7B FA 0E 55 A2 B0 35 0B C9 66 5C C1 EF 1C 83 01
is
THTFPC

@essquireo0o
Copy link

You are doing it wrong - I found the actual hash and can crack it using brute force - let me know if anyone needs help. I spent an entire year digging into Toughbook BIOS Rom's using UEFIEdit NE and this may sound arrogant, but I am the only one that can get the actual password for the machine. You can see my eBay feedback here https://www.ebay.com/fdbk/feedback_profile/ingbtc and my site here https://www.toughbookbios.com/

I have worked with every major toughbook vendor.

@AutonomousCat
Copy link

For mine the super user password comes first and then the 00s. Is this hashed? The python tool isn't providing the right password.

5B 20 B6 29 11 52 6C 0B C7 56 22 76 7D 24 D8 EC 33 EA 8E BD E9 00 44 33 9F 41 FA C9 55 6C B0 74 0B B4 66 CD C1 FD 1C A1 77 1E D2 3D 2D 6E 88 E7 E3 C3 3E 26 99 40 F4 7E 4F FA AA DA 05 D0 60 05 5B 20 B6 29 11 52 6C 0B C7 56 22 76 7D 24 D8 EC 33 EA 8E BD E9 00 44 33 9F 41 FA C9 55 6C B0 74 0B B4 66 CD C1 FD 1C A1 77 1E D2 3D 2D 6E 88 E7 E3 C3 3E 26 99 40 F4 7E 4F FA AA DA 05 D0 60 05 01 00 00 00 00 00 00 00 00 00 00 00 00 00 00 00 00 00 00 00 00 00 00 00 00 00 00 00 00 00 00 00 00 00 00 00 00 00 00 00 00 00 00 00 00 00 00 00 00 00 00 00 00 00 00 00 00 00 00 00 00 00 00 00 00 00 00 00 00 00 00 00 00 00 00 00 00 00 00 00 00 00 00 00 00 00 00 00 00 00 00 00 00 00 00 00 00 00 00 00 00 00 00 00 00 00 00 00 00 00 00 00 00 00 00 00 00 00 00 00 00 00 00 00 00 00 00 00 00 00

@userx14
Copy link

userx14 commented Oct 11, 2023

@AutonomousCat
did you use yourValueFromNvRam = "5B 20 B6 29 11 52 6C 0B C7 56 22 76 7D 24 D8 EC 33 EA 8E BD E9 00 44 33 9F 41 FA C9 55 6C B0 74 0B B4 66 CD C1 FD 1C A1 77 1E D2 3D 2D 6E 88 E7 E3 C3 3E 26 99 40 F4 7E 4F FA AA DA 05 D0 60 05" ?
Strangely it repeats twice, this could mean that both bios passwords are the same.
I'm not sure about the result though, it is 32 bytes long with zero bytes padding in between. Maybe SHA256?

@AutonomousCat
Copy link

@userx14 I'm using this. https://gist.github.com/en4rab/550880c099b5194fbbf3039e3c8ab6fd?permalink_comment_id=4423922#gistcomment-4423922

It's probably hashed. Anything I can do with the public keys listed on the Security tab in UEFITool NE alpha 67?

@cbbeerman
Copy link

Try
sempra123

:)

@AutonomousCat
Copy link

AutonomousCat commented Oct 12, 2023

Try sempra123

Is this a joke? @cbbeerman

@cbbeerman
Copy link

Im sorry it was not a joke I didn't clear out old data

@cbbeerman
Copy link

Here is the hash sorry again

B30FE846B6022376C47C54DB3AC7CE417D91122208945337A0D1CA634B9E086E

@Fasihi-Rad
Copy link

Hello everyone
I have a CF-D1N
first I can't find C811FA38-42C8-4579-A9BB-60E94EDDFB34 (AMITSESetup)

but I found this when search for C811FA38-42C8-4579-A9BB-60E94EDDFB34

image_2023-11-07_183400088
(There is 2 of them (header-offset 50h))

The XOR process it's not look very promising, it's seems to be hashed !

The question is
Am I get the right address, could I zeros those section ?

here is the rom : https://drive.google.com/file/d/1p0fY14pDjYojEwhp4RMKXiDYh15-0B1P/view?usp=sharing

@en4rab
Copy link
Author

en4rab commented Nov 7, 2023

Screenshot 2023-11-07 153908 The AMITSESetup entry is about 13 lines up from the one you highlighted and by the looks of it its a sha1 hash, it also looks like there are 2 copies of the NVRAM data so you might have to null out both entrys

@aosaginohi
Copy link

aosaginohi commented Nov 10, 2023

I tried to follow the guide but I am a little stuck, is someone able to tell me my password for my bios I have a Panasonic CF-SZ6.
I could dump it fine with the afu tool, but after that I am a little stuck on how to continue.

From what I can figure out this is what I can find:
5B 63 B6 A9 11 AB 6C 05 C7 F1 22 28 7D F5 D8 31 33 5B 8E A6 E9 21 44 80 9F BA FA 2F 55 9A B0 46 0B 55 66 0F C1 63 1C 6A 77 16 D2 A9 2D 3D 88 D0 E3 63 3E F7 99 8A F4 1D 4F B1 AA 44 05 D8 60 6B

This is the rom file i got from saving it with the afu tool:
https://drive.google.com/file/d/1err9pzUP7TDOGerwaWIYuhO-c6VSY4WE/view?usp=sharing

Thank you so much in advanced for anyone who can help me!

@userx14
Copy link

userx14 commented Nov 14, 2023

The code you found looks like the correct sequence, 606B on the end is typical for the xored result. Pasting this into my python script returns that this is likely an sha1 hash. So the only publicly known method is to overwrite it with zeros (check out some of the previous comments and make sure to have a full backup of all bios regions).

@aosaginohi
Copy link

The code you found looks like the correct sequence, 606B on the end is typical for the xored result. Pasting this into my python script returns that this is likely an sha1 hash. So the only publicly known method is to overwrite it with zeros (check out some of the previous comments and make sure to have a full backup of all bios regions).

Thank you for the answer! :)

@essquireo0o
Copy link

This method works on DUO cores, but anything i3 and above it is encoded. I spent a year trying to find the hash and then finding the algo associated with the hash. I can break any password (80-90% of the time, depending on how long the password is). Here is the full process to find the password for any duo core machine.

Open ROM dump in UEFITool_NE

Press Ctrl-F and select Text tab. Uncheck Unicode and type AMITSESetup.

Press OK.
Look at strings with ending: at header-offset 0Bh
Double-click on first one

.

Please note that the found entry inside StdDefaults node. So it’s useless. Double-click on next one

Note that it’s only Link to NVAR entry. Right-click on AMITSESetup and choose Go to data

Right-click on AMITSESetup and choose Body hex view

It’s empty again. So go to third one.

It’s inside StdDefaults node again. So go to 4 th .

Again - Go to data

Again Body hex view

Select data for admin hash

Copy by Ctrl+C and past into text editor
5B9FB60411F46C1AC78422857D14D816
33208E50E9E344D69F8CFA1A557AB0BB
0B44661DC1C21CB57716D2A92D3D88D0
E3633EF7998AF41D4FB1AA4405D8606B

Select twenty even bytes (in hex)
5B9FB60411F46C1AC78422857D14D816
33208E50E9E344D69F8CFA1A557AB0BB
0B44661DC1C21CB57716D2A92D3D88D0
E3633EF7998AF41D4FB1AA4405D8606B

Write down in line
9F04F41A848514162050E3D68C1A7ABB441DC2B5

It’s SHA1 hash from the password in Unicode format.

The password for this hash – abc
abc in Unicode format (in hex) - 61 00 62 00 63 00

Use https://www.fileformat.info/tool/hash.htm to calculate hash (Binary hash).

SHA-1 9f04f41a848514162050e3d68c1a7abb441dc2b5

Done.

https://toughbookbios.com/ (i3 processor or higher contact me to get the password, CF-31, CF-53, CF-54 - any model I can crack the password)

@corty8
Copy link

corty8 commented Nov 18, 2023

This method works on DUO cores, but anything i3 and above it is encoded. I spent a year trying to find the hash and then finding the algo associated with the hash. I can break any password (80-90% of the time, depending on how long the password is). Here is the full process to find the password for any duo core machine.

Open ROM dump in UEFITool_NE

Press Ctrl-F and select Text tab. Uncheck Unicode and type AMITSESetup.

Press OK. Look at strings with ending: at header-offset 0Bh Double-click on first one

.

Please note that the found entry inside StdDefaults node. So it’s useless. Double-click on next one

Note that it’s only Link to NVAR entry. Right-click on AMITSESetup and choose Go to data

Right-click on AMITSESetup and choose Body hex view

It’s empty again. So go to third one.

It’s inside StdDefaults node again. So go to 4 th .

Again - Go to data

Again Body hex view

Select data for admin hash

Copy by Ctrl+C and past into text editor 5B9FB60411F46C1AC78422857D14D816 33208E50E9E344D69F8CFA1A557AB0BB 0B44661DC1C21CB57716D2A92D3D88D0 E3633EF7998AF41D4FB1AA4405D8606B

Select twenty even bytes (in hex) 5B9FB60411F46C1AC78422857D14D816 33208E50E9E344D69F8CFA1A557AB0BB 0B44661DC1C21CB57716D2A92D3D88D0 E3633EF7998AF41D4FB1AA4405D8606B

Write down in line 9F04F41A848514162050E3D68C1A7ABB441DC2B5

It’s SHA1 hash from the password in Unicode format.

The password for this hash – abc abc in Unicode format (in hex) - 61 00 62 00 63 00

Use https://www.fileformat.info/tool/hash.htm to calculate hash (Binary hash).

SHA-1 9f04f41a848514162050e3d68c1a7abb441dc2b5

Done.

https://toughbookbios.com/ (i3 processor or higher contact me to get the password, CF-31, CF-53, CF-54 - any model I can crack the password)

I have messaged you twice now via your website, no reply on either occasion

@essquireo0o
Copy link

This method works on DUO cores, but anything i3 and above it is encoded. I spent a year trying to find the hash and then finding the algo associated with the hash. I can break any password (80-90% of the time, depending on how long the password is). Here is the full process to find the password for any duo core machine.
Open ROM dump in UEFITool_NE
Press Ctrl-F and select Text tab. Uncheck Unicode and type AMITSESetup.
Press OK. Look at strings with ending: at header-offset 0Bh Double-click on first one
.
Please note that the found entry inside StdDefaults node. So it’s useless. Double-click on next one
Note that it’s only Link to NVAR entry. Right-click on AMITSESetup and choose Go to data
Right-click on AMITSESetup and choose Body hex view
It’s empty again. So go to third one.
It’s inside StdDefaults node again. So go to 4 th .
Again - Go to data
Again Body hex view
Select data for admin hash
Copy by Ctrl+C and past into text editor 5B9FB60411F46C1AC78422857D14D816 33208E50E9E344D69F8CFA1A557AB0BB 0B44661DC1C21CB57716D2A92D3D88D0 E3633EF7998AF41D4FB1AA4405D8606B
Select twenty even bytes (in hex) 5B9FB60411F46C1AC78422857D14D816 33208E50E9E344D69F8CFA1A557AB0BB 0B44661DC1C21CB57716D2A92D3D88D0 E3633EF7998AF41D4FB1AA4405D8606B
Write down in line 9F04F41A848514162050E3D68C1A7ABB441DC2B5
It’s SHA1 hash from the password in Unicode format.
The password for this hash – abc abc in Unicode format (in hex) - 61 00 62 00 63 00
Use https://www.fileformat.info/tool/hash.htm to calculate hash (Binary hash).
SHA-1 9f04f41a848514162050e3d68c1a7abb441dc2b5
Done.
https://toughbookbios.com/ (i3 processor or higher contact me to get the password, CF-31, CF-53, CF-54 - any model I can crack the password)

I have messaged you twice now via your website, no reply on either occasion

I tested every form and email on the website, and everything came through. Contact me directly ns@ingbtc.com - Also please send me the link of where you are contacting me from so I can fix it ASAP

@zhou-xuelin
Copy link

zhou-xuelin commented Dec 23, 2023

HI, gentlemen.
I have a FW-7551W(v2.0) uCPE motherboard which is a computer motherboard, manufactured by Lanner.
微信图片_20231224000625
This bios has a hardware watchdog. if not cancel it in bios, it will reset after several minutes. That is the reason why I want to modify bios settings.
(It just ask for password when press F2/ESC/DEL into setup utility and it doesn't ask for boot and successfully boot in WinPE via Ventory. )

I encounter the same problem with recover(or rest) the AMI bios password of the administrator. However, I am not lucky enough when searching plain or hashed text within each "AMITSESetup" entry. In this entry, its data are ALL zero. And it also doesn't contain any entry named as a GUID serial number with "AMITSESetup".
微信图片_20231224001249

The headshots of FW-7551W:
微信图片_20231224000631
微信图片_20231224001013
The screenshot of GPU-Z about bios:
微信图片_20231224000703

In addition, @SoftwareGuy said:
I see something that's slightly interesting but I can't confirm what it is. Might be a password hash or something... I'd probably see if you could drop a message on that Gist if you have a GitHub account (if not, I could probably do it for you) with a link to the BIOS. I'm sure someone would have a clue.
微信图片_20231224002719

unfortunately, I change the highlight bytes to zero bytes and reflash it into SPI-RROM by progammer. It still need a password for setup utility.
微信图片_20231224003632

So I just want to know there is any pattern with an entry stored password? How can I search the sector which stores password of admin in UEFITools.

P.S. I have uploaded a SPI-ROM dump file.
github.com/zhou-xuelin/FW-7551/blob/main/FW-7551W_v2.0.bin

@kevinhulster
Copy link

kevinhulster commented Jan 11, 2024

Hello all,

Sadly, as @fastar1981 and @maxtheobald I have a motherboard where the password is neither an XOR with the multiples of 5B93 nor a SHA1 value that I could erase.

It's an Advantech motherboard of some networking device.

All AMITSESetup that are not in "AmiStandardDefaultsVariable" have the subtype "Full" and are only filled with zeroes:

image

Also, There is an occurrence of AMITSESetup in a "compressed section" but without any interesting data:

image

This is the device in question: https://forum.openwrt.org/t/nuage-networks-7850-nsg-e200-hardware-discovery/144525/5

Does anyone has any success recovering such password or erasing it? (I don't care of the password if I can erase it).

Many thanks to the community for all the work already shared!

Regards,
Kevin.

@mikrovr
Copy link

mikrovr commented Jan 11, 2024

@kevinhulster
Post original BIOS file.

@kevinhulster
Copy link

Here it is:

NSG-E202.rom

@fastar1981
Copy link

@kevinhulster I still haven't gotten it. I hope someone can help us
Thanks to all

@r-plabs
Copy link

r-plabs commented Jan 12, 2024 via email

@kevinhulster
Copy link

@r-plabs I dump it through AMI afulnx tool.

@mayk469
Copy link

mayk469 commented Feb 14, 2024

Hello all,

Can anyone help me to erase the bios password ? I have attached the extracted file .

Thanks!

@en4rab
Copy link
Author

en4rab commented Feb 15, 2024

Try thua5P or thua5P|

@HackerajOfficial
Copy link

Hello all,

Can anyone help me to erase the bios password ? I have attached the extracted file .

Thanks!

try now https://alien.raaz.info.np/server/unlock/AMITSESetup/

@mayk469
Copy link

mayk469 commented Feb 15, 2024

Hello all,
Can anyone help me to erase the bios password ? I have attached the extracted file .
Thanks!

try now https://alien.raaz.info.np/server/unlock/AMITSESetup/

I tried, it doesn't work.

@mikrovr
Copy link

mikrovr commented Feb 15, 2024

@mayk469
Copy link

mayk469 commented Feb 15, 2024

mikrovr

Thanks @mikrovr ! I've tried all the variations with and without the uppercase, but it doesn't work.

@mikrovr
Copy link

mikrovr commented Feb 15, 2024

@mayk469
What is your country of origin, what is the standard keyboard you are using to enter the password?

@mayk469
Copy link

mayk469 commented Feb 15, 2024

I used two different US keyboard layout (ANSI and ISO).

@en4rab
Copy link
Author

en4rab commented Feb 15, 2024

did thua5P or thua5P| not work?

@HackerajOfficial
Copy link

Hello all,
Can anyone help me to erase the bios password ? I have attached the extracted file .
Thanks!

try now https://alien.raaz.info.np/server/unlock/AMITSESetup/

I tried, it doesn't work.

Your file can not decrypt so, use unlock option and simply flash the bios

@mayk469
Copy link

mayk469 commented Feb 15, 2024

did thua5P or thua5P| not work?

Thank you very much! It worked with thua5P. I didn't understand the first time that this is the password .

You guys are the best!

@mikrovr
Copy link

mikrovr commented Feb 15, 2024

@en4rab
Your answer was right!

AMI BIOS Password Recovery Tool v1.2 (Reset or/and recover lost passwords)
Copyright (C) 2016-2018 Paulo Coelho aka Mikrovr mikrovr@gmail.com

Password Recovery

Admin: thua5P

Note: Passwords are case-sensitive, upper and lower case.
Done!
Press any key to exit

// I had to make a small adjustment to the body of the hash.
max( 0, ( ( x - 1 ) | ( m - 1 ) ) + 1 - m )

@warst
Copy link

warst commented Feb 16, 2024

@en4rab Your answer was right!

AMI BIOS Password Recovery Tool v1.2 (Reset or/and recover lost passwords) Copyright (C) 2016-2018 Paulo Coelho aka Mikrovr mikrovr@gmail.com

Password Recovery

Admin: thua5P

Note: Passwords are case-sensitive, upper and lower case. Done! Press any key to exit

// I had to make a small adjustment to the body of the hash. max( 0, ( ( x - 1 ) | ( m - 1 ) ) + 1 - m )

Hey @mikrovr, is AMI BIOS Password Recovery Tool v1.2 available to use somewhere? I have some Panasonic bios dumps that are locked (I have unlocked them but kept the locked copy too) and I would like to know if I am able to recover the password from them.

@9Kid
Copy link

9Kid commented Mar 19, 2024

Anyone had luck unlocking a [Panasonic Let''s note RZ6? AMITSESetup is only of 0 , not a single character, but the password still is required.

@Castdeath97
Copy link

Trying to get the .bin dump via AFUWINGUI, but I get "32 - error: problem opening file to write". Any ideas?

@cesar030693
Copy link

cesar030693 commented Apr 16, 2024

Hello, can someone help me decipher the password? I am unable to flash the BIOS and am receiving the error message "43 - error: problem erasing flash". I've successfully unlocked the BIOS by flashing it on a few other CF-53 devices, but this particular one is giving me the error. Can anyone assist me with this issue?

its a panasonic cf-53J

I have included the link to the ROM file.

https://mega.nz/file/MCcV2CLb#_5Dl0p41pw2--RwTDNiMzgWGkL_NDncVbMZAmJtjUsE

83717453-c0053900-a600-11ea-98dd-09f5bb569b01

Sign up for free to join this conversation on GitHub. Already have an account? Sign in to comment