This post tells how to reinstall USB fax modem capabilities on macOS Sierra, after Apple dropped support.
If dropping support for fax modems affects you negatively, please take the time to issue feedback at Apple's website.
To restore USB Fax Modem capability to Sierra, simply copy the files listed below from your old El Capitan install.
Here is this list of files you need:
/Library/Preferences/com.apple.print.FaxPrefs.plist
/System/Library/Frameworks/ApplicationServices.framework/Versions/A/Frameworks/PrintCore.framework/Versions/A/Resources/Fax.ppd
/Library/Printers/Fax.ppd # copy /System/Library/Frameworks/.../Fax.ppd file to /Library/Printers
/usr/bin/fax
/usr/bin/efax
/usr/bin/efix
/usr/share/man/man1/fax.1
/usr/share/man/man1/efax.1
/usr/share/man/man1/efix.1
/etc/efax.rc
/usr/libexec/fax/coverpage.py
/usr/libexec/fax/faxnotify
/usr/libexec/fax/imagestopdf
/System/Library/CoreServices/Menu extras/Fax.menu
/usr/libexec/cups/backend/fax
Here are the basic steps. I confirm that this works for me:
- This requires a Time Machine, Disk Utility, Carbon Copy Cloner, or other backup of your pre-Sierra image.
- Reboot your Mac with the Command-R recovery partition, and, if necessary (it should be if it's not), use Disk Utility to unlock and mount your encrypted boot drive.
- Open the Terminal, and disable SIP using the command
csrutil disable. - Reboot the Mac normally.
- Use
cp -Rorrsyncto copy over all the files to your Sierra boot drive. Ensure that the files have no ACL's or extended attributes if necessary withchmod -Nandxargs -c. Test withls -eandxargs. - Reboot your Mac with the Command-R recovery partition, and, if necessary (it should be if it's not), use Disk Utility to unlock and mount your encrypted boot drive.
- Open the Terminal, and enable SIP using the command
csrutil enable. Do not ignore this step. - Reboot the Mac normally.
- Open the Directory Utility app from the Spotlight search tool, unlock with admin credentials, and enable the root account.
- In Safari, browse to your Mac's CUPS server at http://localhost:631, Administration>Add Printer, authenticate as root and follow the steps to add the printer with a URI that looks like fax://dev/cu.usbmodem9804243. This will be the same printer in the previous plist prefs file, /Library/Preferences/com.apple.print.FaxPrefs.plist. Specify the PPD file /Library/Printers/Fax.ppd.
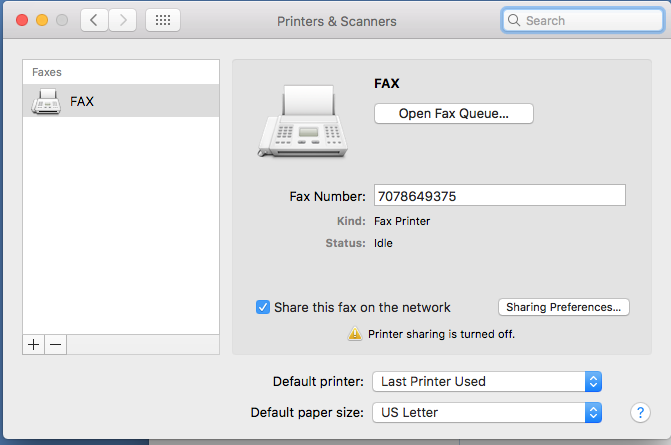
- You should now see a working USB Fax Modem in System Preferences>Printers & Scanners.
- Open the Directory Utility app from the Spotlight search tool, unlock with admin credentials, and disable the root account.
Fresh installation of Mac OS Sierra 10.12.5
Reboot in recovery mode and Disable SIP
Reboot in normal mode and manually copied listed files (from working El Capitan installation)
Reboot in recovery mode and Enable SIP
Reboot in normal mode and Enable root
Open Safari and open http://localhost:631 but web interface was disabled
Used terminal command cupsctl WebInterface=yes to enable web interface
Re-open Safari and open http://localhost:631 and authenticated as root
Click into Administration and add printer but there is no usb fax
It is listed in the /Library/Preferences/com.apple.print.FaxPrefs.plist file
along the lines of fax://dev/cu.usbmodem9804243
Any help appriciated as to why it is not showing up.