- Applicability
- Introduction
- Procedure
- 1. Obtain permission to edit Boot Camp Assistant's Property List file.
- 2. Obtain your Mac's "Model Identifier" and "Boot ROM Version".
- 3. Edit Boot Camp Assistant's Property List file.
- Enable earlier macOS versions
- Enable USB option
- Enable WIM support
- Enable 32-bit support
- Enable 32-bit Windows 10, and Windows versions prior to Windows 10
- Enable Windows versions after Windows 7
- Enable 64-bit Windows 10
- Enable BIOS/UEFI firmware modes
- Enable internal installation
- Enable boot ROM support
- 4. OPTIONAL: Restore original permissions (recommended).
- 5. Code-sign the edited application package (if necessary).
- 6. OPTIONAL: Re-enable System Integrity Protection (recommended).
- Conclusion
This information applies specifically to the following system, but may also apply to other hardware/software versions:
- Hardware: MacBook Pro (17-inch, Mid 2010)
- Operating System: macOS High Sierra 10.13.6
- Application: Boot Camp Assistant, version 6.1.0 (6067.60.1)
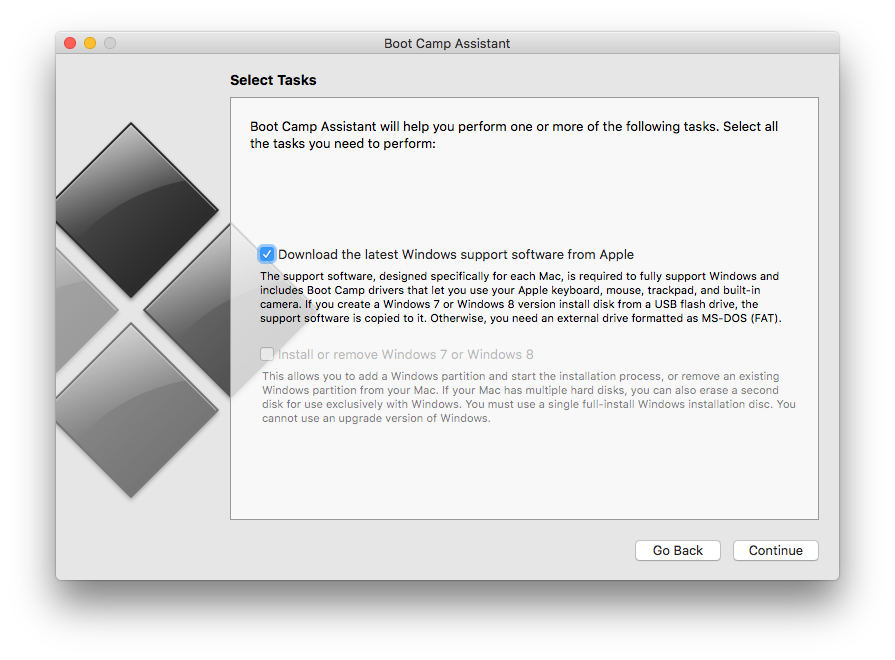
In macOS, Boot Camp Assistant (Finder → Applications → Utilities → Boot Camp Assistant) has the ability to create bootable USB disks for installing Windows in Boot Camp on a Mac computer. However, some Mac computers don't support booting from external USB devices, or don't support certain versions of Windows in Boot Camp, etc.; in these cases, the option to create bootable USB disks for installing Windows has been suppressed within Boot Camp Assistant.
But you should still be able to use Boot Camp Assistant to create bootable USB disks for installing Windows on other computers, right?
To do so, you need to tell Boot Camp Assistant that your Mac supports the necessary options and Windows versions, by editing the Info.plist property list file within its application package.
1. Obtain permission to edit Boot Camp Assistant's Property List file.
First, make sure it's OK with your mom.
Then, because Boot Camp Assistant is part of the operating system, in newer versions of macOS it is protected from editing, so you need to work around this limitation.
Copy the /Applications/Utilities/Boot Camp Assistant.app application package to another location, such as your ~/Desktop/. You will then be free to edit the Info.plist file within the copied application package.
Option B: Disable System Integrity Protection (SIP).
Boot into "Recovery Mode" by restarting your Mac, then while it's rebooting, before the "gong" startup sound, press and hold ⌘ Command + R until after the Apple logo and progress bar appear.
In Recovery Mode, open the Terminal application (Utilities menu → Terminal), then disable SIP by entering the following command:
csrutil disableThen restart for the change to take effect.
Finally, if necessary, modify the permissions so that you can edit the Info.plist file. In Finder → Applications → Utilities → Terminal, enter the following commands as necessary to add "write" permissions for "group" and "other" users:
sudo chmod go+w /path/to/your/Boot\ Camp\ Assistant.app/Contents
sudo chmod go+w /path/to/your/Boot\ Camp\ Assistant.app/Contents/Info.plist
Note: Replace
/path/to/your/with the actual path to yourBoot Camp Assistant.appapplication package. For example:
- If you copied Boot Camp Assistant to your Desktop:
sudo chmod go+w ~/Desktop/Boot\ Camp\ Assistant.app/Contents
sudo chmod go+w ~/Desktop/Boot\ Camp\ Assistant.app/Contents/Info.plist
- If you are modifying the original Boot Camp Assistant application package:
sudo chmod go+w /Applications/Utilities/Boot\ Camp\ Assistant.app/Contents
sudo chmod go+w /Applications/Utilities/Boot\ Camp\ Assistant.app/Contents/Info.plist
Or, right-click on the Boot Camp Assistant.app file → Show Package Contents, then right-click on the Contents folder → Get Info.
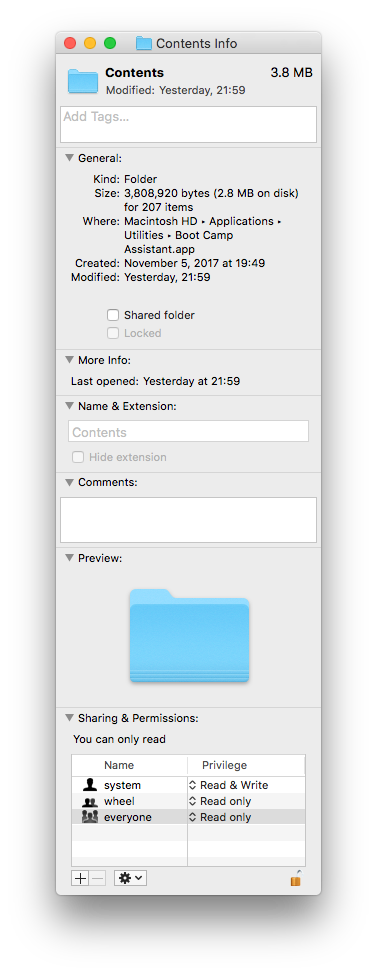
Click to unlock the icon in the bottom right corner (and enter your password if prompted), then set all privileges to "Read & Write".
Open the Contents folder, then repeat for the Info.plist file within.
2. Obtain your Mac's "Model Identifier" and "Boot ROM Version".
Apple menu → About This Mac → Overview tab → System Report... button → Hardware:
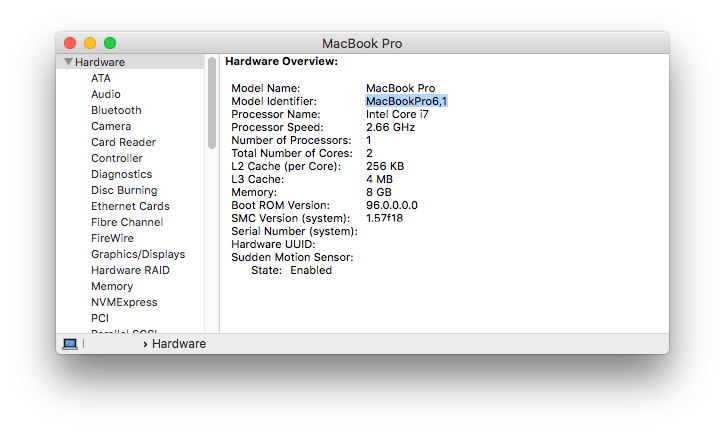
Make a note of your "Model Identifier" and "Boot ROM Version".
Use a suitable code editor to open the /path/to/your/Boot Camp Assistant.app/Contents/Info.plist file, and add/remove/change the Model Identifier or Boot ROM Version within the various dictionary keys as follows. You might need to experiment with different combinations to find a configuration that works for you. (Explanations are just guesses, as I wasn't able to find any documentation online. Also refer to the included Info.plist file for examples.)
This option enables this version of Boot Camp Assistant to run in earlier versions of macOS.
- CHANGE the version number to be less than or equal to your operating system version.
	<key>LSMinimumSystemVersion</key>
<string>10.0.0</string>This enables the option to "Create a Windows 7 (or Windows 8) version install disk" onto a USB drive.
- REMOVE the value for your Model Identifier.
	<key>PreUSBBootSupportedModels</key>
<array/>This should enable support for Windows installation package formats prior to ESD (Electronic Software Distribution), such as WIM (Windows Imaging Format).
-
Note: This option is unconfirmed - for me, the WIM format appeared to be supported regardless of the settings here.
-
Note: This also seems to enable the option to "Download the latest Windows support software from Apple".
- CHANGE the value for your respective model to any valid Intel-based Model Identifier (omitting the comma and subsequent digits) that is greater than or equal to your respective model's identifier.
	<key>PreESDRequiredModels</key>
	<array>
		<string>MacBook10</string>
		<string>MacBookAir8</string>
		<string>MacBookPro15</string>
		<string>MacPro6</string>
		<string>Macmini8</string>
		<string>iMac18</string>
		<string>iMacPro1</string>
		<string>Xserve3</string>
		<string>Parallels14</string>
</array>This enables installation of 32-bit versions of Windows.
- Note: This option is unconfirmed - for me, the resulting installers appeared to support 32-bit Windows regardless of the settings here (notwithstanding the specific Windows versions enabled/disabled by the options below).
- CHANGE the value for your respective model to any valid Intel-based Model Identifier that is greater than your respective model's identifier.
	<key>32BitSupportedModels</key>
	<array>
		<string>MacBook10,1</string>
		<string>MacBookAir8,1</string>
		<string>MacBookPro15,2</string>
		<string>MacPro6,1</string>
		<string>Macmini8,1</string>
		<string>iMac18,3</string>
		<string>iMacPro1,1</string>
		<string>Xserve3,1</string>
		<string>Parallels14,1</string>
</array>This enables installation of 32-bit Windows 10, and other Windows versions prior to Windows 10.
- Related error message:
Need 64-bit Windows 10 or later ISO file.
Boot Camp only supports 64-bit Windows 10 or later installation on this platform. Please use an ISO file for 64-bit Windows 10 or later installation.
- CHANGE the value for your respective model to any valid Intel-based Model Identifier that is greater than or equal to your respective model's identifier.
	<key>PreWindows10OnlyModels</key>
	<array>
		<string>MacBook10,1</string>
		<string>MacBookAir8,1</string>
		<string>MacBookPro15,2</string>
		<string>MacPro6,1</string>
		<string>Macmini8,1</string>
		<string>iMac18,3</string>
		<string>iMacPro1,1</string>
		<string>Xserve3,1</string>
		<string>Parallels14,1</string>
</array>This enables installation of Windows versions after Windows 7.
- Related error message:
Windows 8 is not supported on this Mac
Boot Camp only supports installing Windows 7 on this Mac. Please insert a USB drive or DVD which contains a full version of Windows 7.
- REMOVE the value for your Model Identifier.
	<key>Win7OnlyModels</key>
<array/>This enables installation of 64-bit Windows 10.
- Related error message:
Windows 10 is not supported on this Mac.
Boot Camp only supports 64-bit Windows 8 or Windows 7 installation on this platform. Please use an ISO file for 64-bit Windows 8 or Windows 7 installation.
- REMOVE the value for your Model Identifier. (Notice that the word "Suppored" is missing the letter "t".)
	<key>SupporedNonWin10Models</key>
<array/>This option enables booting to BIOS (Basic Input/Output System) and/or UEFI (Unified Extensible Firmware Interface) firmware modes.
- Note: This option is unconfirmed - for me, the resulting installers appeared to support both BIOS and UEFI regardless of the settings here.
- CHANGE the value for your respective model to any valid Intel-based Model Identifier (omitting the comma and subsequent digits) that is greater than or equal to your respective model's identifier.
	<key>PreUEFIModels</key>
	<array>
		<string>MacBook10</string>
		<string>MacBookAir8</string>
		<string>MacBookPro15</string>
		<string>MacPro6</string>
		<string>Macmini8</string>
		<string>iMac18</string>
		<string>iMacPro1</string>
		<string>Xserve3</string>
		<string>Parallels14</string>
</array>- REMOVE the value for your Model Identifier.
	<key>UEFIOnlyModels</key>
<array/>This option enables installation to internal hard drives. Probably irrelevant if you are trying to create an external USB installation disk.
- Note: This option is unconfirmed - I have never attempted to install Windows onto an internal drive in a Mac.
- REMOVE the value for your Model Identifier
	<key>ExternalInstallOnlyModels</key>
<array/>This option enables support for your boot ROM.
- Note: This option is unconfirmed - it had no effect for me, but others have suggested that it is required.
- ADD this key if it is missing, and ADD your Boot ROM Version as a new
<string>value within the key's<array>value.
  <key>DARequiredROMVersions</key>
  <array>
    <string>96.0.0.0.0</string>
</array>For security reasons, it is recommended to restore the original permissions within the Boot Camp Assistant application package. In Finder → Applications → Utilities → Terminal, enter the following commands as necessary to remove "write" permissions for "group" and "other" users:
sudo chmod go-w /path/to/your/Boot\ Camp\ Assistant.app/Contents/Info.plist
sudo chmod go-w /path/to/your/Boot\ Camp\ Assistant.app/Contents
Or, right-click on the Boot Camp Assistant.app file → Show Package Contents, then within the Contents folder, right-click on the Info.plist file → Get Info. Then click to unlock the icon in the bottom right corner (and enter your password if prompted), then set the privileges for everything other than "system" to "Read only". Repeat for the Contents folder itself.
Some versions of macOS will require the Boot Camp Assistant application package to be code-signed in order to run it. In Finder → Applications → Utilities → Terminal, enter one of the following commands to sign it ad-hoc (without an identity):
sudo codesign --force --sign - /path/to/your/Boot\ Camp\ Assistant.app- If that doesn't work, then for later versions of macOS, nested content must be signed as well, by specifying the
--deepoption:
sudo codesign --force --sign - /path/to/your/Boot\ Camp\ Assistant.app --deepNOTE: If Xcode Command Line Tools are not already installed, the above commands may prompt to do so; afterward, the above commands may need to be run again.
For security reasons, it is recommended to re-enable System Integrity Protection (SIP). Boot into "Recovery Mode" by restarting your Mac, then while it's rebooting, before the "gong" startup sound, press and hold ⌘ Command + R until after the Apple logo and progress bar appear. In Recovery Mode, open the Terminal application (Utilities menu → Terminal), then enable SIP by entering the following command:
csrutil enableThen restart for the change to take effect.
If everything worked, in Boot Camp Assistant you should now have the option to "Create a Windows 7 or Windows 8 version install disk" (which should also work for Windows 10 and later versions, depending on the chosen configuration for your Info.plist file).
