Let's start with the basics: the official guide by Ubuntu (https://ubuntu.com/server/docs/install/storage) is outdated/wrong. And as of March 2021 it's possible that there's a bug as well with how the bios_grub partitions are created when using multiple disks.
Now on to the solution:
- Select "Custom storage layout" when you reach the storage configuration step of the installer.
- If the disks have existing partitions, click on each disk under AVAILABLE DEVICES and then select REFORMAT. This will (temporarily) wipe out the partitions.
- Now select the 1st disk to add as "boot" disk (same menu that had REFORMAT in).
- Do the same with the 2nd disk. [Note on March 2021: If this does not work for you in the newest installer of 20.04.2, just skip that part. In the end the 1st disk will have 4 partitions (bios, /boot, swap and /) and the 2nd just 3 (/boot, swap and /), which doesn't really matter. If you want to have the same number of partitions on each disk, go ahead and create a 1 MB partition on the 2nd disk, before doing the 3 others. This way, blocks will be sync'ed between the 2 disks. It's possible that there's a bug in how the bios_grub partitions are created in the installer when using multiple disks as this behaviour is not consistent with version 20.04.1 or the current Ubuntu Server docs as referenced here.]
- You should now see two 1.000M bios_grub partitions created under USED DEVICES. These small partitions will be used by GRUB for booting the server. [Note on March 2021: the setup works with one bios_grub partition as well].
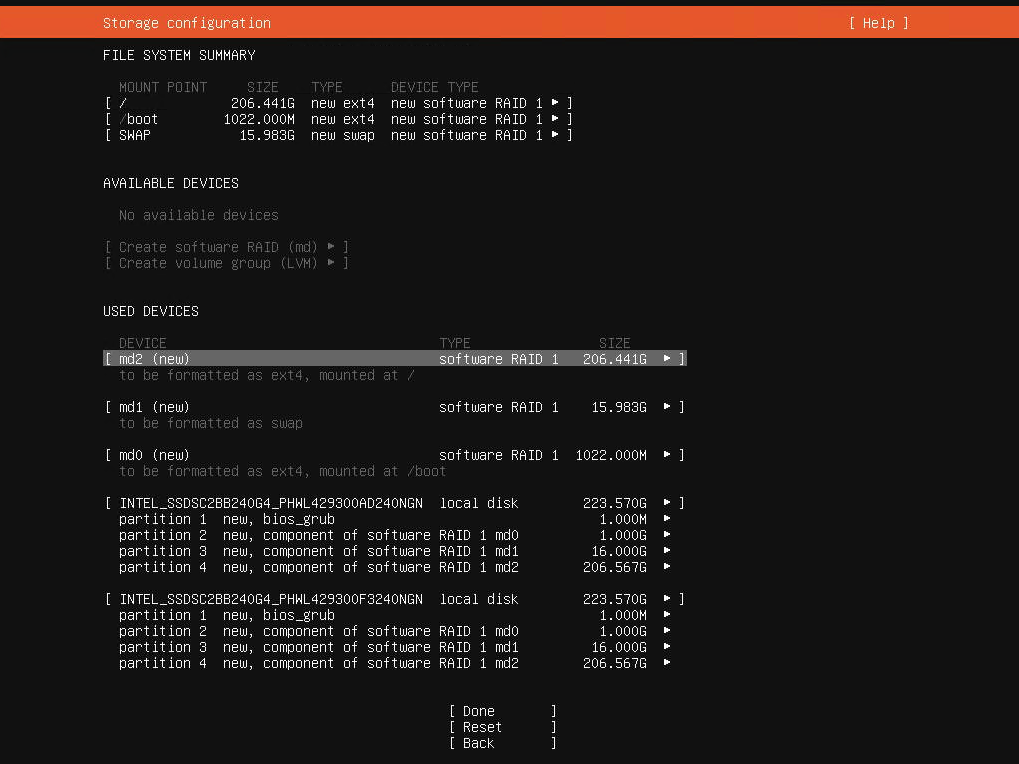
- The trick to setup a softRAID array is to create partitions for /boot, swap and / on each disk, but WITHOUT formatting them (and as such, there won't be a mount point for now).
- So go ahead and "Add GPT Partition" on the 1st disk, give it a 1G size and choose to leave it unformatted. Do the same for the 2nd disk. These will be the /boot partitions for the softRAID array. Under each disk on AVAILABLE DEVICES you will now see "partition 2".
- Now we'll prepare the swap partitions. "Add GPT Partition" on the 1st disk, give it the same or half the size of your RAM (e.g. let's say 16G cause we have 16G of actual RAM - but it's really up to you to decide that) and choose to leave it unformatted. Do the same for the 2nd disk. Under each disk on AVAILABLE DEVICES you will now see "partition 3".
- Now we'll prepare the / partitions. "Add GPT Partition" on the 1st disk, do not set a size (so it uses all available) and choose to leave it unformatted as with all the other partitions you created so far. Do the same for the 2nd disk. Under each disk on AVAILABLE DEVICES you will now see "partition 4".
- Now click on "Create software RAID (md)" under AVAILABLE DEVICES. We'll create the first softRAID partition (md0) by selecting the two "partition 2" entries (one from each disk). Click "Save".
- Repeat the process for md1 and select the two "partition 3" entries. Hit "Save".
- Repeat the process for md2 and select the two "partition 4" entries. Hit "Save".
- We now have 3 pairs of AVAILABLE DEVICES which will now format as the actual softRAID partitions. So select md0 and then "Add GPT Partition", format as EXT4 and mount on /boot.
- Select md1 and then "Add GPT Partition", format as SWAP.
- Select md2 and then "Add GPT Partition", format as EXT4 and mount on /.
- All these mdX softRAID partitions will now appear under USED DEVICES and you are ready to proceed with Ubuntu's installation.
- At the very bottom, you should now see "Done" enabled so hit it and proceed.
Enjoy :)
Discuss here: https://gist.github.com/fevangelou/2f7aa0d9b5cb42d783302727665bf80a
USB sticks are notorious for failing, don't do that. The TrueNAS crowd learned that the hard way.