Walkthrough for installation and trial use of Pylustrator in your browser in temporary remote sessions served via MyBinder
Benefits:
- Runs remotely so nothing modified on your machine yet you can test Pylustrator use hands-on.
- Everything is already prepared, except for installation of the one package to be demonstrated.
- No login required.
Options:
- Use Pylustrator in a full graphical user interface
- Terminal command line & code interpreter/ console use
Two ways to use Pylustrator on a machine are demonstrated. The first is a full typical graphical user interface like you are probably used to running most of your computer applications.
For those prefering a more command line or console experience, I added a demonstration of a second way to run Pylustrator on the remote machine.
I imagine most people will just be interested in the first option of a typical graphical user interface.
The demonstration documentation is broken into a third section to accomodate explaining how to get the demonstration code. This is because this process will be the same no matter what interface is being used to run the plotting code.
To better resemble a naive machine, installing Pylustrator for both routes is covered. It is only necessary to do this one way, per session. If the session is restarted, one of the ways of installing Pylustrator will need to be done again.
Specifically, this will use Spyder code editor as the interactive development environment on a Linux-based desktop in your browser.
This demonstration will open an example of code that activates Pylustrator and generates plots in a figure, sending the plot figure to the Pylustrator interactive interface. Then the user can adjust the plot figure in the Pylustrator interative interface/ GUI and see the code change upon exiting the interface by closing it or saving. The produced code can be used to generate the modified version of the figure later without the pylustrator-specific code stripped out of it.
-
Go to the Spyder GitHub repository site and click the
launch binderbadge, or click here, to initiate launching a session. -
After the session spins up and shows a Linux desktop in your browser window, double-click the 'Spyder 4.x' icon on the left side.
-
A window will come up and you select
Launch Anywayto start Spyder. -
Dismiss welcome screen by pressing 'Dismiss'
-
To install Pylustrator, next to the '
In [1]:' prompt in the bottom, right console , enter the text%pip install pylustratorand hit return. (Because it is a console on a remote computer, you cannot easily copy and paste text from your local browser into the machine, and so you'll need to type.) -
Pylustrator will be installed.
-
Currently, it seems you need the package
icecreamto run the demo code, and so install that by running%pip install icecreamas you did to install Pylustrator. -
Now to prepare to run some code, go to the section 'How to get the demonstration code into a clipbaord on the remote system' and step through that to get the plotting demonstration code into the clipboard of the remote machine.
-
Click back in to the Spyder interface, and highlight all the code in the main pane on the left under the
temp.pytab. With that selected, right-click and select 'Paste' from the large menu that comes up. That should place the plotting code as the content in thetemp.pypane now. -
Highlight all the code in the
temp.pypane and then hit the green 'play' button on the toolbar above the pane. An alternative to using the 'play' button, select 'Run' from the main menu along the top of the Spyder-IDE window, and choose the top entry > 'Run' from the list of possible selections. -
You'll see panel that says at the top 'Run settings for temp.py' and click on '
Run' in the bottom right corner to run the code. Clicking that 'Run' will also set it to use the default settings subsequently in the same session. -
Two windows will open. The Pylustrator one will be in the bottom right corner with the Pylustrator icon in the upper left and the three plots in the main portion to the right side of window. For those preferring a video version, you can now follow along with the video demonstration provided on the main documentation page by clicking here. (Tiktok-style demonstration can be seen here & without the audio here.)
-
The idea is to next make some changes to the subplots and then trigger closing the Pylustrator window and see the code to make those changes get added to the code you initially ran. So go ahead and make a few changes. You can click on any of the subplots in the window and click-and-drag them around to arrange them as you want.
-
When you have made a few changes, click the '
X' in the upper right corner of the Pylustrator window to begin to close the Pylustrator interface. It will ask if you want to save your changes. Select 'Yes'. The Pylustrator interface window will close. Now click click the 'X' in the upper right corner of the window labeled 'Figure 1' that opened when you ran the code block and after a few seconds you should see the bottom of the code you ran get appended with code that will produce the changes you introduced. (Note that if you click back over to the code editor after just closing the first, Pylustrator interface window, the code will update with your changes; however, if you try to run the code again nothing will happen. And so it is always best to also close the 'Figure 1' window, too.) -
So now you have the code to produce the changes you made graphically and you can run the code again to see the plot made with those modified specifications and further modify.
-
When you are done, you can just remove the two lines from the code about Pylustrator, specifically remove
import pylustratorandpylustrator.start(). Now you have normal code that works without Pylustrator and produces the plots stylized as you wished. Hopefully this step-by-step guide to a hands-on use of Pylustrator helped you see how easy it could be to plug Pylustrator in to your process of making plots. There are certain arranging that are much faster by direct adjustment. For people who prefer less interaction with code, a lot of making a figure ready for sharing or publication can be done with the assistance of Pylustrator's interface to help you modify your plot using a graphical user interface (GUI) to quickly make it match your vision and yet you still get the benefit of having reproducible code at the end.
Active sessions of a desktop environment in your browser can be used to demonstate Pylustrator use for users prefering to work directly in a terminal.
Specifically, this will use the IPython interpreter run in a Linux terminal in your browser.
The same steps can be done with the Python interpreter by leaving off the i when the interpreter console is started later in the steps.
Feel free to skip the pip install- step if you are already in a running session and have installed Pylustrator. Running the installation step again won't cause any issue.
-
Go to the Spyder GitHub repository site and click the
launch binderbadge, or click here, to initiate launching a session. For this section of the demo, Spyder will only be used be used as a text editor, however, this demo environment provides a full-featured linux desktop in the browser where the text editor 'nano' can be used directly in the terminal if you prefer. -
After the session spins up and shows a Linux desktop in your browser window, click on the '
Applications' tab in the upper left of the session desktop. Then choose 'Terminal Emulator' (second entry) from the drop-down menu. -
A terminal window will come up. And now you want to install Pylustrator on the machine by running at the '
$' promptpip install pylustratorand hitting return. (Because it is a console on a remote computer, you cannot easily copy and paste text from your local browser into the machine, and so you'll need to type.) -
Pylustrator will be installed.
-
Now you want to start the IPython console in this terminal window, and so next to the the '
$' prompt, type 'ipython'. Note this is the point at which the next few steps can be done with the Python interpreter by leaving off theito instead start the Python interpreter console in the terminal. -
Now IPython (or Python) will start in the terminal and you next want to prepare to run some code. To do that go to the section 'How to get the demonstration code into a clipbaord on the remote system' and step through that to get the plotting demonstration code into the clipboard of the remote machine.
-
Click back in to the terminal from earlier and then type '
paste' and your see the code get pasted into the window. Hit the 'Return' key to run the code. Alternatively, to paste the code in the terminal, right-click and select 'Paste' from the large menu that comes up. That should place the plotting code as the content in the console, and then next you hit the 'Return' key to run the code. -
A new windows will open in the bottom right corner. This is the Pylustrator interface. You should see Pylustrator icon in the upper left and the three plots in the main portion to the right side of window.
-
The idea is to next make some changes to the subplots and then trigger closing the Pylustrator window and see the code to make those changes get added to the code you initially ran. So go ahead and make a few changes. You can click on any of the subplots in the window and click-and-drag them around to arrnange them as you want.
-
When you have made a few changes, click the '
X' in the upper right corner of the Pylustrator window to begin to close the Pylustrator interface. It will ask if you want to save your changes. Select 'Yes'. The Pylustrator window will close and after a few seconds you should see in the bottom of the terminal window a code block of aoutmatic generated code from Pylustrator. In fact, it will be prefaced by the text `#% start: automatic generated code form pylustrator. Below that will be the lines of code that you can append to the code you pasted to produce the last version of the plot when you saved it, in other words it is the code that corresponds to everything you did since started changing the plots. Copy the code and append it to the code copied from the documentation. -
So now you have the code to produce the changes you made graphically and you can run the longer version of the code to see the plot made with those modified specifications and further modify.
-
When you are done, you can just remove the two lines from the code about Pylustrator, specifically remove
import pylustratorandpylustrator.start(). Now you have normal code that works without Pylustrator and produces the plots stylized as you wished. Hopefully this step-by-step guide to a hands-on use of Pylustrator helped you see how easy it could be to plug Pylustrator in to your process of making plots. There are certain arranging that are much faster by direct adjustment. For people who prefer less interaction with code, a lot of making a figure ready for sharing or publication can be done with the assistance of Pylustrator's interface to help you modify your plot using a graphical user interface (GUI) to quickly make it match your vision and yet you still get the benefit of having reproducible code at the end.
Both methods will use this section to cover how to get code for this demonstration into the remote machine's clipboard so that the code can be copied to the interface being used.
You want to follow the steps closely and make sure you are working on the remote machine so that you are doing the steps of getting the code into the clipboard on the remote machine and not your local system.
-
On the remote machine, click on the '
Applications' tab in the upper left of the session desktop. Then choose 'Web Browser' (5th entry) from the drop-down menu. If that gives an error, go to the desktop and look for 'Web Browser' icon or an icon that says 'Workshop' and click that and translate the instructions in the next few steps to be run in that browser. -
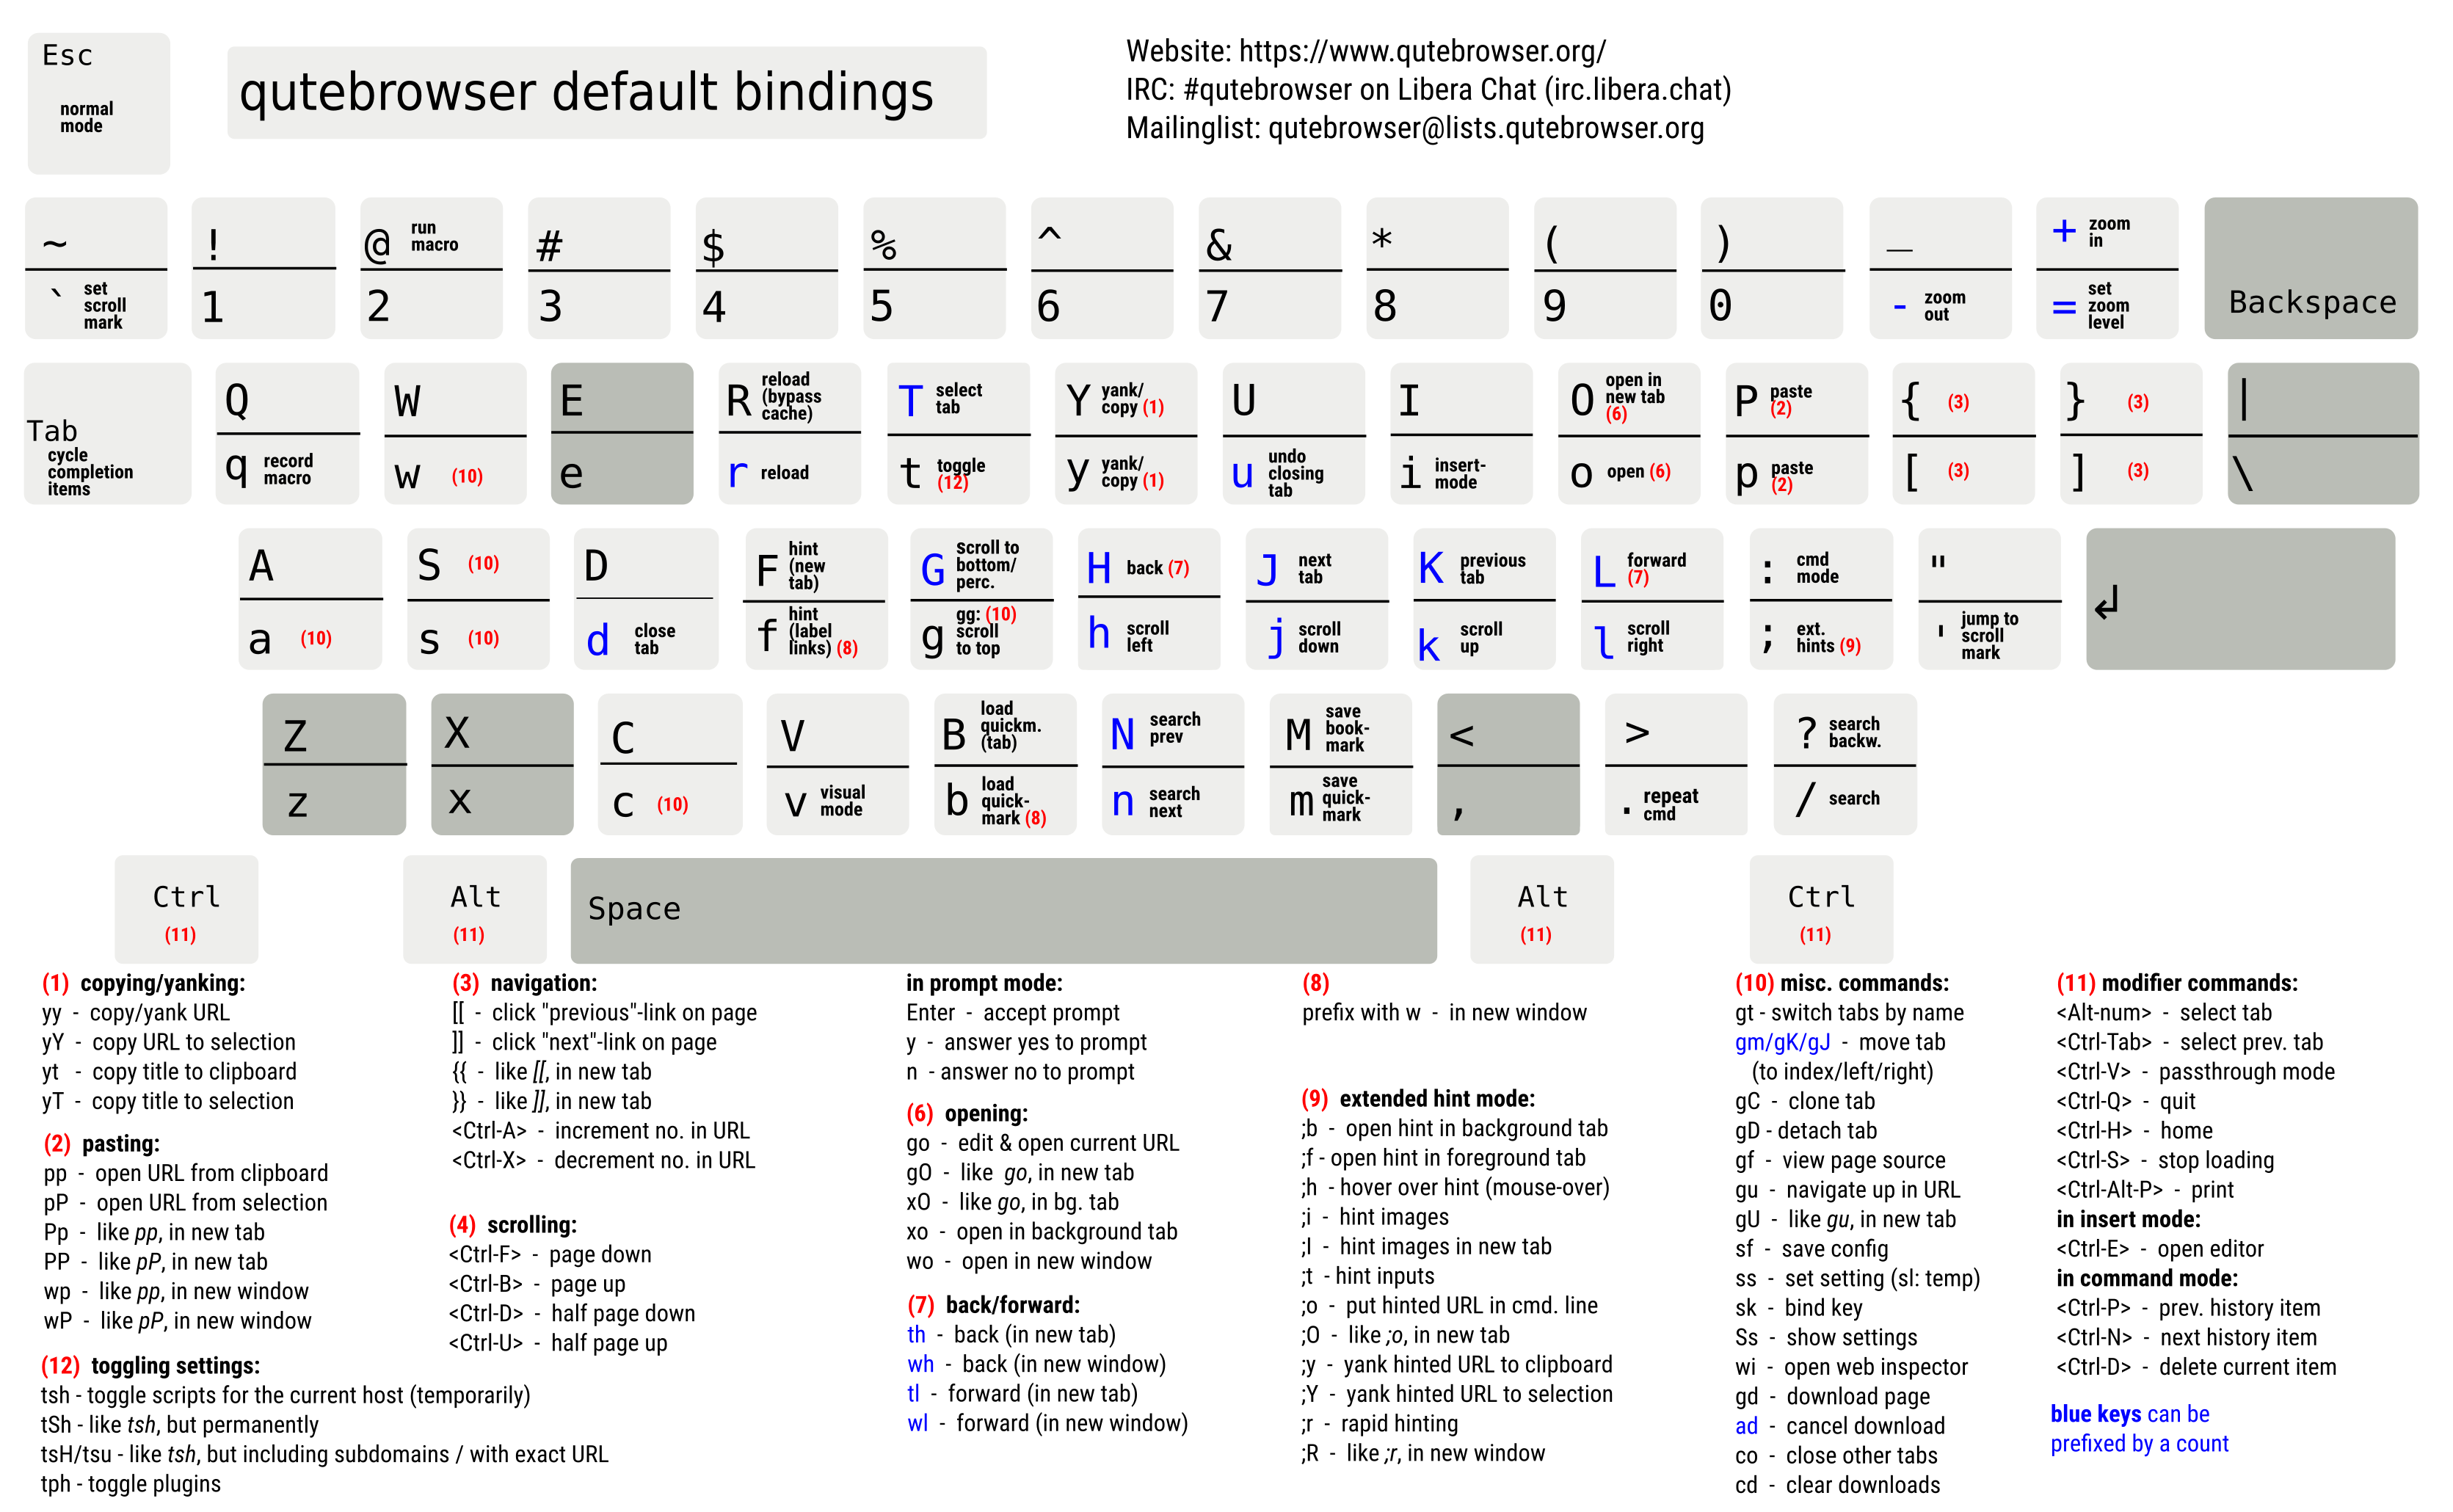
A browser window will open and then you want to cLick the DuckDuckGo tab in the upper left of this new window. (The browser currently is qutebrowser and I found a guide to the commands, such as navigating 'back' here. Interestingly, when you press
:to get to the comamnd interface and start typing a command, often on the right side, it will show a keyboard shortcut that are the keybindings discussed on the 'quickstart' and shown on the key binding cheatsheet. For example, from the Quickstart, for navigation "Use H and L to go back and forth in the history." Alternatively, uou can right-click in Qutebrowser window and select 'Back' as well.) -
In the DuckDuckGO search bar type '
pylustrator documentation' and enter hit return. (As stated above, because it is remote computer, you cannot easily copy and paste text from your local browser into the machine, and so you'll need to type.) -
Near the top, you should see listed a link 'Welcome to the Pylustrator Documentation'. Click on that link to open the documentation.
-
In the window that comes up, scroll down until you see a good-sized, green-colored code block just below the text that says, "You can test pylustrator with the following code
example_pylustratory.py". Click on the textexample_pylustratory.pyat the end of that sentence because that is a hyperlink that will open the raw code. -
Highlight the raw code when it opens in the browser, and then right-click on the highlighted text to bring up a menu.
-
In that menu that comes up, click on '`Copy'. Return to whichever section sent you here to continue now that you have the code copied into your clipboard.