What is this?
Raspberry Pi 4 OS (Raspbian) install apcupsd Installation guide
What is apcupsd?
apcupsd is a open source UPS mangement and controlling software, it allows the computer to interact with APC UPSes.
Boot and establish ssh access.
First, install apcupsd utility, and the dynamic web page monitor.
sudo apt-get -y update
sudo apt-get -y install apcupsd apcupsd-cgi
Then backup the configuration file.
cd /etc/apcupsd/
sudo cp apcupsd.conf apcupsd.orig
Using vim editor to editing the configuration file.
sudo vi apcupsd.confIf you are using APC BN650M1 series, and connect to raspberry by USB cable, the configuration file will be like this:
## apcupsd.conf v1.1 ##
UPSNAME BN650M1-TW

# UPSCABLE <cable>
UPSCABLE usb

# UPSTYPE
UPSTYPE usb
DEVICE

# POLLTIME <int>
#POLLTIME 60

# LOCKFILE <path to lockfile>
LOCKFILE /var/lock

# SCRIPTDIR <path to script directory>
SCRIPTDIR /etc/apcupsd

# PWRFAILDIR <path to powerfail directory>
PWRFAILDIR /etc/apcupsd

# NOLOGINDIR <path to nologin directory>
NOLOGINDIR /etc

# During power failures
ONBATTERYDELAY 6
BATTERYLEVEL 15

MINUTES 10
TIMEOUT 0

ANNOY 60
ANNOYDELAY 60

# NOLOGON <string> [ disable | timeout | percent | minutes | always ]
NOLOGON disable
# KILLDELAY <seconds>  0 disables
KILLDELAY 0

# Network Information Server
# NETSERVER [ on | off ] on enables, off disables the network
NETSERVER on

# NISIP <dotted notation ip address>
NISIP 0.0.0.0

# NISPORT <port> IANA
NISPORT 3551

EVENTSFILE /var/log/apcupsd.events
EVENTSFILEMAX 10

# Configuration statements used if sharing
# UPSCLASS
UPSCLASS standalone

# UPSMODE
UPSMODE disable
After saving the configuration file, start (or restart) apcupsd service.
sudo service apcupsd startIf, after 10 minutes, you see "Communications with UPS lost." in /var/log/apcupsd.events, check the DEVICE line above is blank. When installing apcupsd, it defaults to /dev/ttyS0. After fixing the line, try restarting apcupsd.
Running commond, if everything goes right, you will saw the UPS status.
apcaccessIf you want to monitoring your UPS online (via LAN network), please follow the instructions below.
Install Apache 2.4.
sudo apt-get -y install apache2
Then backup the configuration file.
sudo cp /etc/apache2/apache2.conf /etc/apache2/apache2.orig
sudo cp /etc/apache2/sites-available/000-default.conf /etc/apache2/sites-available/000-default.orig
Using vim editor to editing the apache configuration file.
cd /etc/apache2/
sudo vi apache2.conf
The configuration file section at Directory will be like this:
<Directory /var/www/>
	Options Indexes FollowSymLinks
	AllowOverride None
	Require all granted
</Directory>

#	apcupsd
ScriptAlias /apcupsd/ /usr/lib/cgi-bin/apcupsd/
<Directory "/usr/lib/cgi-bin/apcupsd">
	DirectoryIndex upsstats.cgi
	Options +FollowSymLinks +ExecCGI
	AddHandler cgi-script .cgi
	DirectoryIndex upsstats.cgi
	Require all granted
</Directory>
Using vim editor to editing the website configuration file.
cd /etc/apache2/sites-available/
sudo vi 000-default.conf
The configuration file section at serve-cgi-bin.conf will be like this:
Include conf-available/serve-cgi-bin.conf

	# apcupsd-cgi
	ScriptAlias /apcupsd/ /usr/lib/cgi-bin/apcupsd/
	<Directory "/usr/lib/cgi-bin/apcupsd">
		DirectoryIndex multimon.cgi
		Options +FollowSymLinks +ExecCGI
		AddHandler cgi-script .cgi
		DirectoryIndex upsstats.cgi
		Require all granted
	</Directory>
Enable the CGI module
sudo a2enmod cgiAfter saving the configuration file, running configtest to check syntax errors, if everything goes right, you will saw Syntax OK
pi@raspberry:/etc/apache2 $ sudo apache2ctl configtest
Syntax OK
If you saw this error, please follow the instructions below.
pi@raspberry:/etc/apache2 $ sudo apache2ctl configtest
apache2: Could not reliably determine the server's fully qualified domain name, using 127.0.1.1 for ServerName
Syntax OK
Go back to apache configuration file.
cd /etc/apache2/
sudo vi apache2.conf
Add this section
ServerName localhostAfter saving the configuration file, start (or restart) Apache service.
sudo systemctl restart apache2sudo service apache2 reloadNow you can check the CGI monitor
http://your.server.address/apcupsd/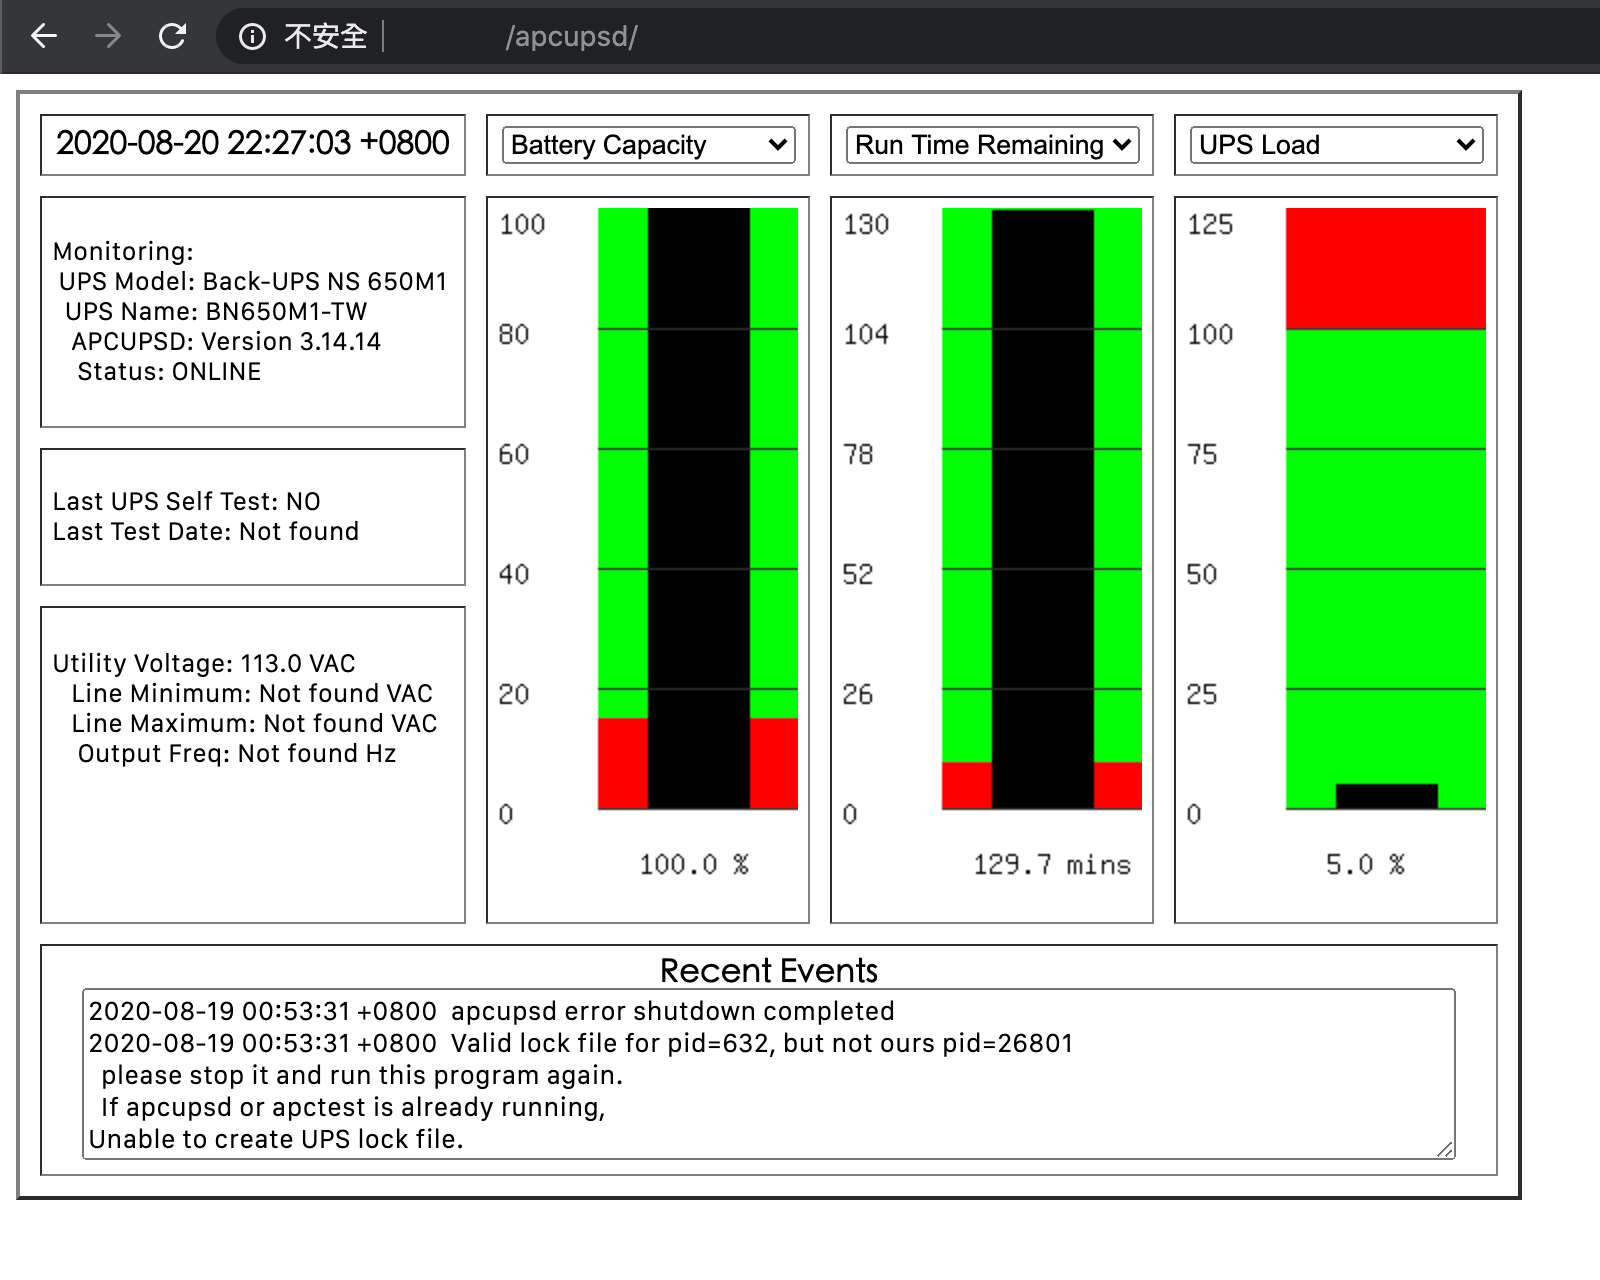
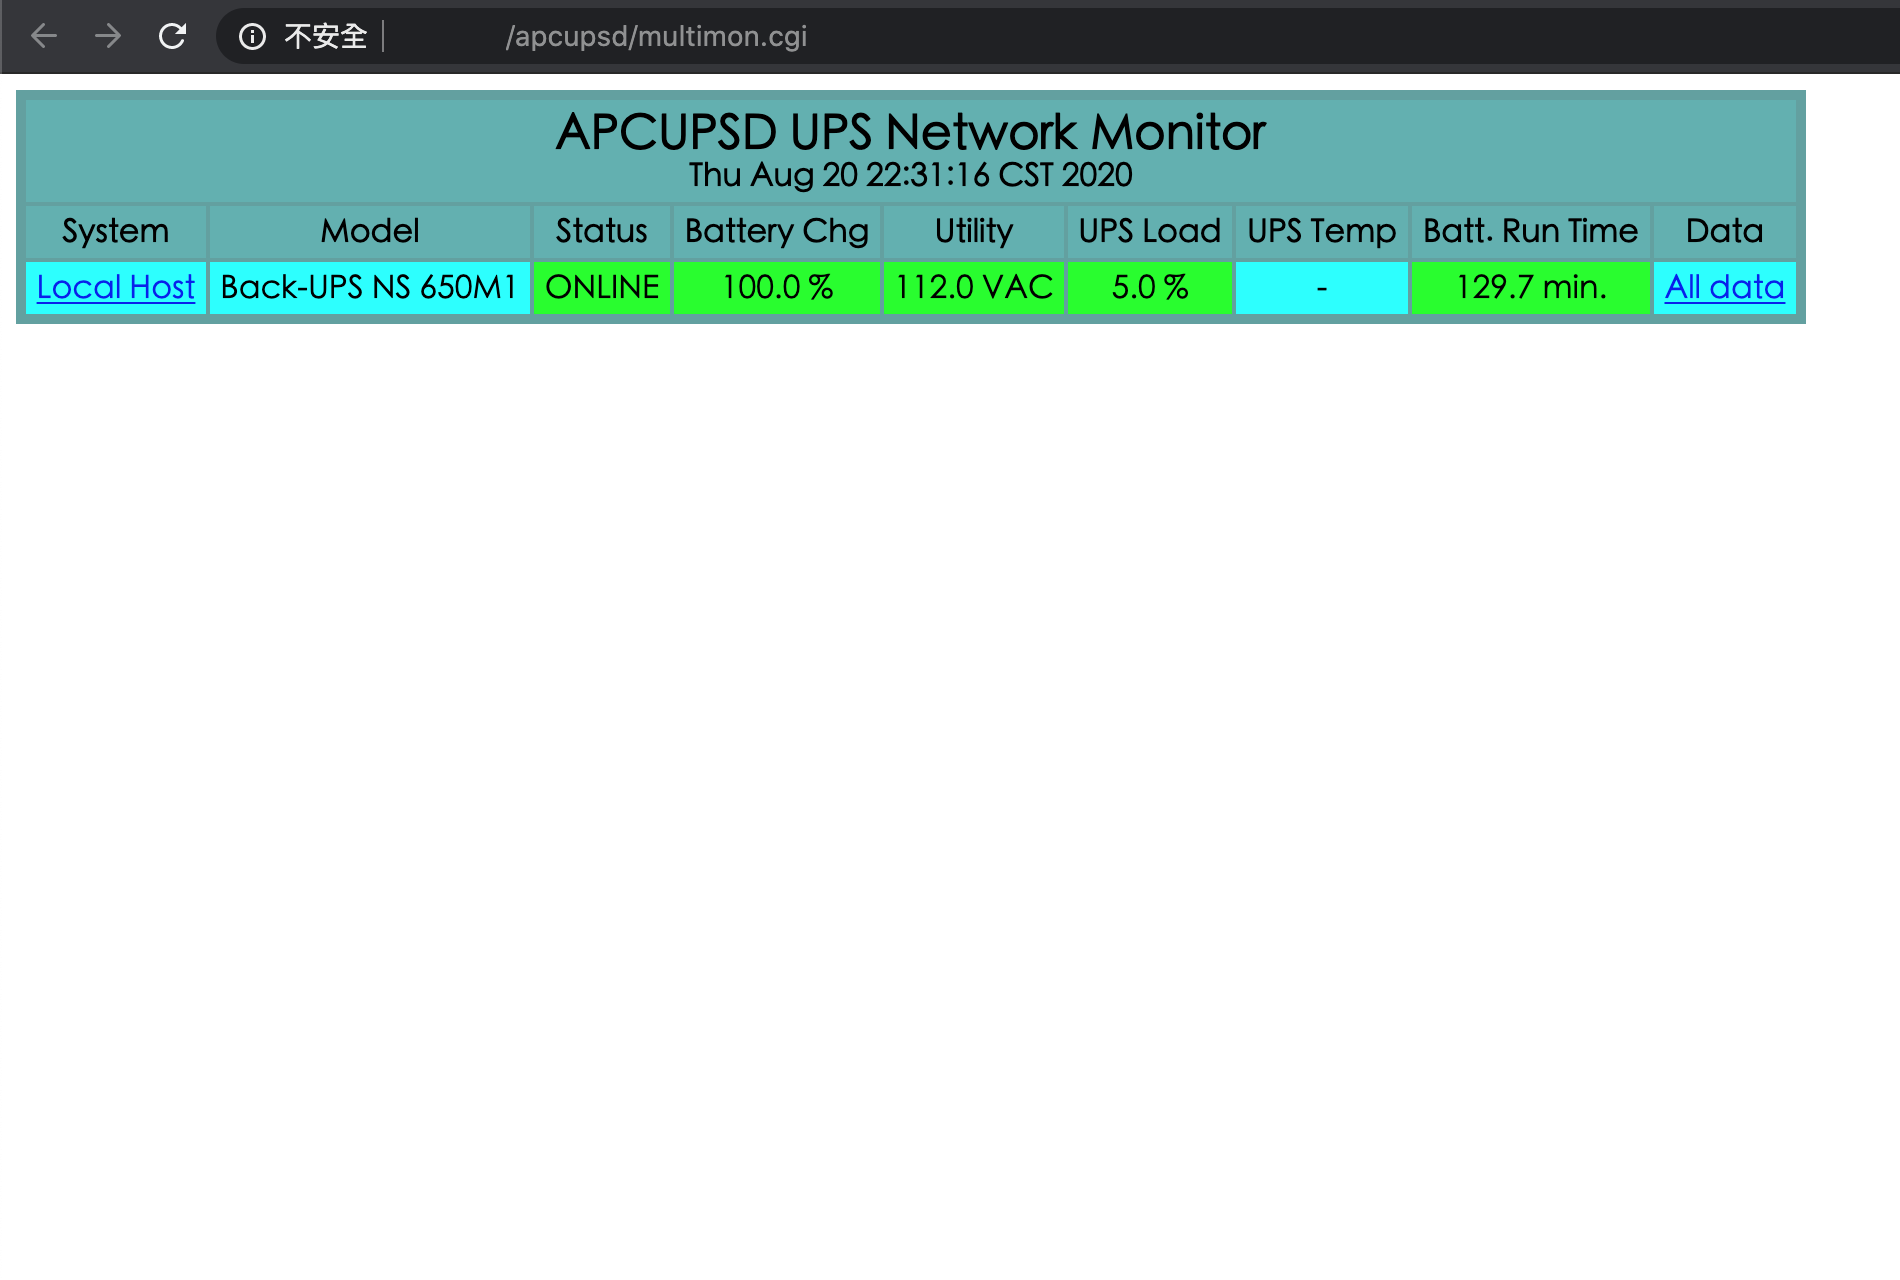
If you have multi-APC UPSes which can broadcasting data, then you can choice multimon function into index as default.
Please modify the section below
DirectoryIndex upsstats.cgiinto
DirectoryIndex multimon.cgiThe multimon.cgi will be like this
You can also modify the apache default index page, let you easier to access different function.

If apache server default folder (/var/www/html) show Permission denied alert, using the command below
sudo chown -R $USER:$USER /var/wwwIf your Raspberry PI is doing nothing more than monitoring the UPS state to shut other devices down, you can reduce the power consumption of the PI by disabling Wifi, Bluetooth, and HDMI.
Per https://sleeplessbeastie.eu/2022/06/01/how-to-disable-onboard-wifi-and-bluetooth-on-raspberry-pi-4/, to disable Wifi and Bluetooth:
List Bluetooth devices
$ hcitool devDevices:
hci0 E4:5F:01:42:3A:4B
List wireless devices
$ iw devphy#0
Unnamed/non-netdev interface
wdev 0x2
addr e6:5f:01:42:3a:4a
type P2P-device
Interface wlan0
ifindex 3
wdev 0x1
addr e4:5f:01:42:3a:4a
type managed
channel 34 (5170 MHz), width: 20 MHz, center1: 5170 MHz
Inspect options
$ less /boot/overlays/README[...]
Name: disable-bt
Info: Disable onboard Bluetooth on Pi 3B, 3B+, 3A+, 4B and Zero W, restoring
UART0/ttyAMA0 over GPIOs 14 & 15.
N.B. To disable the systemd service that initialises the modem so it
doesn't use the UART, use 'sudo systemctl disable hciuart'.
Load: dtoverlay=disable-bt
Params: <None>
[...]
Name: disable-wifi
Info: Disable onboard WLAN on Pi 3B, 3B+, 3A+, 4B and Zero W.
Load: dtoverlay=disable-wifi
Params: <None>
[...]
Disable Bluetooth and WLAN devices
# Disable Bluetooth devices
$ echo "dtoverlay=disable-bt" | sudo tee -a /boot/config.txt
# Disable WLAN devices
$ echo "dtoverlay=disable-wifi" | sudo tee -a /boot/config.txt
# Disable systemd service that initializes Bluetooth Modems connected by UART.
$ sudo systemctl disable hciuart
# Reboot PI
$ sudo reboot
Ensure Bluetooth are not available
$ hcitool devDevices:
Ensure wireless devices are not available.
$ iw devInspect network devices
$ ip -br alo UNKNOWN 127.0.0.1/8 ::1/128
eth0 UP 192.168.1.29/24 fe80::a713:d226:4129:bd3e/64