Skip to content

Instantly share code, notes, and snippets.

@hungneox
Last active May 4, 2024 10:41
Show Gist options
  • Star 70 You must be signed in to star a gist
  • Fork 10 You must be signed in to fork a gist
  • Save hungneox/1831e86982f7d8ee430f4b594fa4f223 to your computer and use it in GitHub Desktop.
Save hungneox/1831e86982f7d8ee430f4b594fa4f223 to your computer and use it in GitHub Desktop.
How Make a Windows 10 USB Using Your Mac - Build a Bootable ISO From Your Mac's Terminal

Most new PCs don't come with DVD drives anymore. So it can be a pain to install Windows on a new computer.

Luckily, Microsoft makes a tool that you can use to install Windows from a USB storage drive (or "thumbdrive" as they are often called).

But what if you don't have a second PC for setting up that USB storage drive in the first place?

In this tutorial we'll show you how you can set this up from a Mac.

Step 1: Download the Windows 10 ISO file

You can download the ISO file straight from Windows. That's right - everything we're going to do here is 100% legal and sanctioned by Microsoft.

If you want an English-language version of the latest update of Windows 10, you can download the ISO here.

If you have a relatively new computer, you probably want the 64-bit version. If you're not sure, go with the 32-bit version to be safe.

If you want a non-English-language version of Windows, or want to get an older update version, download the ISO here instead.

Step 2: Insert your USB storage drive into your Mac

The ISO file is only about 5 gigabytes, but I recommend you use a USB drive with at least 16 gigabytes of space just in case Windows needs more space during the installation process.

I bought a 32 gigabyte USB drive at Walmart for only $3, so this shouldn't be very expensive.

Stick your USB drive into your Mac. Then open your terminal. You can do this using MacOS Spotlight by pressing both the โŒ˜ and Space bar at the same time, then typing "terminal" and hitting enter.

Don't be intimidated by the command line interface. I'm going to tell you exactly which commands to enter.

Step 3: Use the diskutil command to identify which drive your USB is mounted on

Open Mac Spotlight using the โŒ˜ + space keyboard shortcut. Then type the word "terminal" and select Terminal from the dropdown list.

Paste the following command into your terminal and hit enter:

diskutil list

You will see output like this (note - your Mac's terminal may be black text on a white background if you haven't customized it).

diskutil list

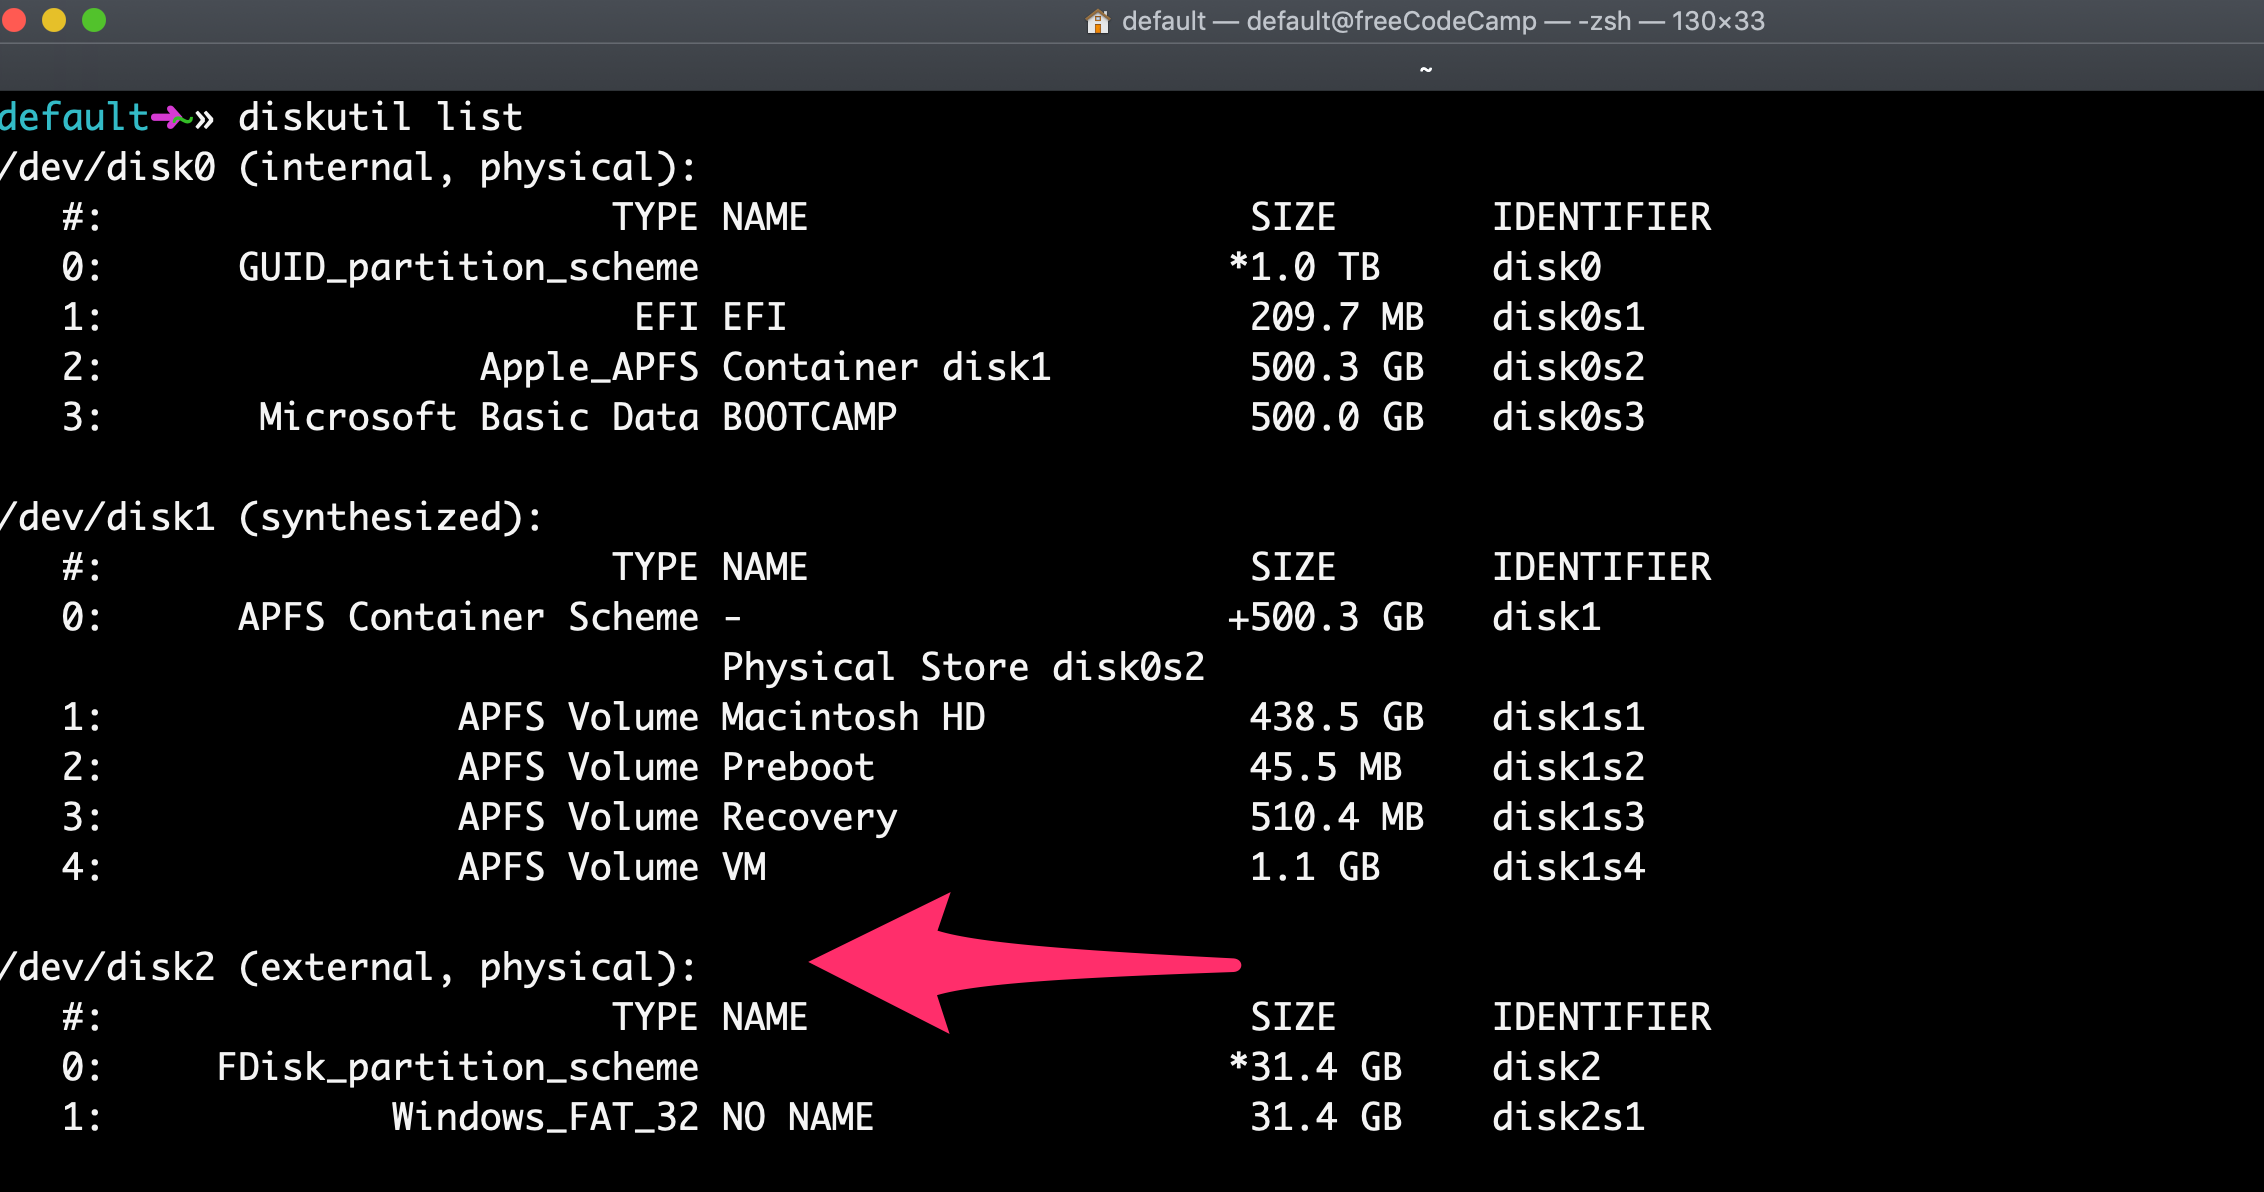
Copy the text I point to here. It will probably be something like

/dev/disk2.

Step 4: Format your USB Drive to work with Windows

Next format your USB drive to Windows FAT32 format. This is a format that Windows 10 will recognize.

Note that you should replace the disk2 with the name of the your drive from step 3 if it wasn't disk2. (It may be disk3 or disk4).

Run this command using the correct disk number for your USB:

diskutil eraseDisk ExFAT "WIN10" GPT /dev/disk2

Then you'll see terminal output like this.

diskutil eraseDisk

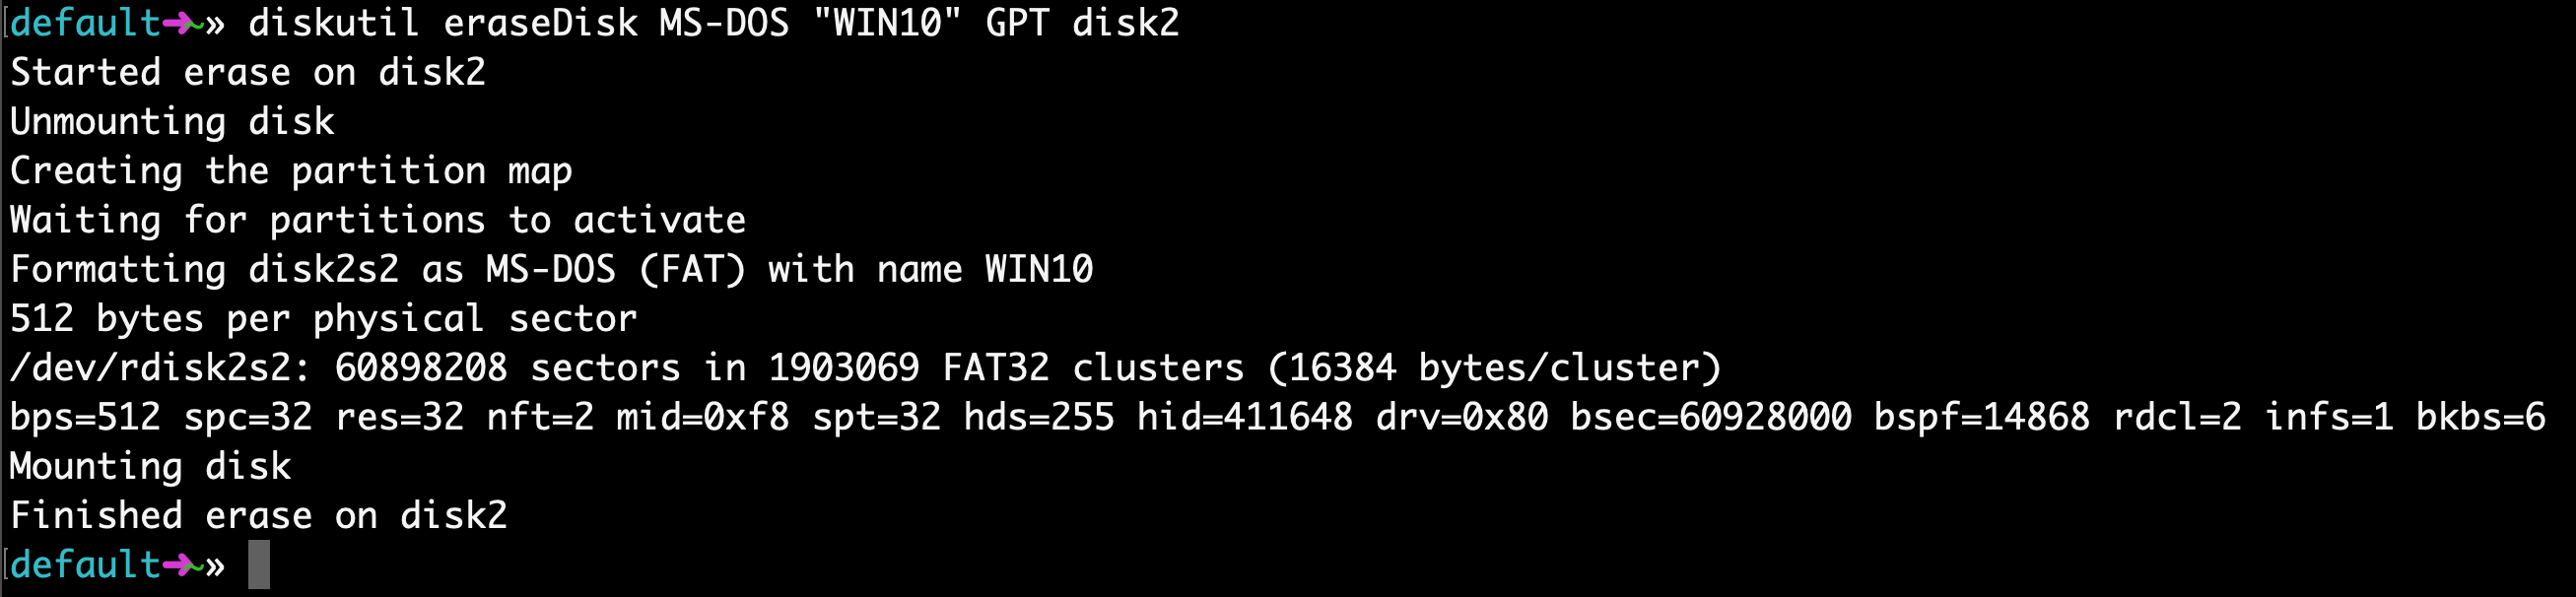
This will probably only take about 20 seconds on a newer computer, but may take longer on an older computer.

Step 5: Use hdiutil to mount the Windows 10 folder and prepare it for transfer.

Now we're going to prep our downloaded ISO file so we can copy it over to our USB drive.

You will need to check where your downloaded Windows 10 ISO file is and use that. But your file is probably located in your ~/Downloads folder with a name of Win10_1903_V1_English_x64.iso.

hdiutil mount ~/Downloads/Win10_1903_V1_English_x64.iso

Step 6: Copy the Windows 10 ISO over to your USB Drive Now run the following command to copy your Windows Win10_1903_V1_English_x64.iso to your USB drive.

cp -rp /Volumes/CCCOMA_X64FRE_EN-US_DV9/* /Volumes/WIN10/

Step 7: Put your USB into your new PC and start loading Windows

Congratulations - your computer now should boot directly from your USB drive. If it doesn't, you may need to check your new PC's BIOS and change the boot order to boot from your USB drive.

Windows will pop up a screen and start the installation process.

Enjoy your new PC, and your newly-installed copy of Windows.

@paulkinzo
Copy link

paulkinzo commented Apr 26, 2022

There is one issue with exFAT drive. I found out some of the laptops and Mac could not detect bootable USB formatted by exFAT. You have to either format the USB with FAT32 and split install.wim file afterwards or use third-party app to do the dirty work such as UUByte ISO Editor for Mac.

@danielpasten
Copy link

I hate UUByte meat riders.

@Dagnan
Copy link

Dagnan commented Jun 14, 2022

How come no one has an up to date script for WIN11, which do not need UUbyte, Wonder ISO or other paid tools?

@ehrenmann1977
Copy link

why not use balena etcher?

@gtfunes
Copy link

gtfunes commented Aug 9, 2022

This didn't work for me, the USB was not recognized by my laptop. What worked was doing something like this: https://www.freecodecamp.org/news/how-make-a-windows-10-usb-using-your-mac-build-a-bootable-iso-from-your-macs-terminal/

@Appsorwebs
Copy link

balena etcher didn't flash windows iso when I tried it.

@darkhan-ai
Copy link

Thanks, it works!

@andrzejskowron
Copy link

This solution doesn't work

@jmiremba
Copy link

jmiremba commented Dec 6, 2022

This process did not work as written. Specifically, the USB is not bootable: you will see a "Invalid boot partition" message on a Dell Latitude E7440 (old laptop, I know). I eventually had to dish out for a license and use WonderISO, which produced a bootable USB I could use.

@ABaker14791
Copy link

"Step 6: Copy the Windows 10 ISO over to your USB Drive Now run the following command to copy your Windows Win10_1903_V1_English_x64.iso to your USB drive."

Not sure what this means? Why are you copying it twice?

Either way this method does not work.

@maximpn
Copy link

maximpn commented Jan 11, 2023

Started erase on disk4
Unmounting disk
The volume on disk4 couldn't be unmounted because it is in use by process 0 (kernel)
Error: -69888: Couldn't unmount disk

@person246
Copy link

Started erase on disk4
Unmounting disk
The volume on disk4 couldn't be unmounted because it is in use by process 0 (kernel)
Error: -69888: Couldn't unmount disk

just use disk utility

@UAnton
Copy link

UAnton commented May 3, 2023

cp: /Volumes/CCCOMA_X64FRE_RU-RU_DV9/sources/install.wim: File too large

@andersonlcc
Copy link

andersonlcc commented May 12, 2023

This does not work. The USB drive is not seen as a bootable media from quick boot menu on my PC. Instead, I found out this app does all the dirty work at the background (extract ISO file and split install.wim). In my case, it only took 10 minutes to make a Windows 10 bootable USB on my MacBook Pro running macOS Monterey 12.6.3. However, you need to pay a few bucks, which is worth the time you are playing with commands.

iso-editor-cut-install-wim

@ehrenmann1977
Copy link

ehrenmann1977 commented May 13, 2023 via email

@ehrenmann1977
Copy link

ehrenmann1977 commented May 13, 2023 via email

@wieczorek1990
Copy link

UNetbootin is open source.

@WindyRous
Copy link

If using Terminal seems a bit daunting, you can consider using an alternative tool like "WonderISO." This tool provides a user-friendly interface to create bootable ISO images on your Mac. What's more, you can explore software like "Boot Camp Assistant" (which is a tool provided by Apple to assist in setting up dual boot systems with Windows) or using virtualization software like Parallels Desktop or VirtualBox to install Windows and create a bootable USB drive from within a virtual machine.

@igorcosta
Copy link

This does not work. The USB drive is not seen as a bootable media from quick boot menu on my PC. Instead, I found out this app does all the dirty work at the background (extract ISO file and split install.wim). In my case, it only took 10 minutes to make a Windows 10 bootable USB on my MacBook Pro running macOS Monterey 12.6.3. However, you need to pay a few bucks, which is worth the time you are playing with commands.

iso-editor-cut-install-wim

Sorry, but this doesn't work at all.

@TechUnRestricted
Copy link

TechUnRestricted commented Oct 11, 2023

You can use the application that I created specifically for these purposes.
It's completely free and open source.

WinDiskWriter

WinDiskWriter has huge compatibility with older versions of macOS, starting with good old Mac OS X 10.6 Snow Leopard up to the latest one โ€” macOS 14.0 Sonoma.

WinDiskWriter Main Window

Supported Microsoft Windows Versions:

  • Windows 11
  • Windows 10
  • Windows 8.1
  • Windows 8
  • Windows 7
  • Windows Vista
    [including Server Editions]

๐Ÿ“€ UEFI & Legacy Boot Support! ๐Ÿ“€

๐Ÿ›  Windows 11 TPM & Secure Boot Path Support! ๐Ÿ› 

I hope that this software will solve your problems.

I decided to make it, because I suffered at one time when I tried to create a bootable flash drive with Windows on macOS.

@selasegithub
Copy link

You can use the application that I created specifically for these purposes. It's completely free and open source.

WinDiskWriter has huge compatibility with older versions of macOS, starting with good old Mac OS X 10.6 Snow Leopard up to the latest one โ€” macOS 14.0 Sonoma.

WinDiskWriter Main Window

Supports creating bootable flash drives for the following versions of Microsoft Windows:

  • Windows Vista
  • Windows 7
  • Windows 8
  • Windows 8.1
  • Windows 10
  • Windows 11
    [including Server Editions]

Moreover, WinDiskWriter offers a unique feature that allows users to patch the Windows 11 image to bypass the need for TPM and Secure Boot requirements.

I hope that this software will solve your problems. I decided to make it, because I suffered at one time when I tried to create a bootable flash drive with WIndows on macOS.

Hi,

I wanted to try this for the purposes above but have no idea how to run or compile it and have it running on Mac. Grateful if you could guide me along.

Thank you.

@TechUnRestricted
Copy link

Hello @selasegithub.

  1. Get the latest version of WinDiskWriter from the Release page.
    image
  2. Extract the archive by double-clicking on the downloaded .zip file [If not done automatically by your browser]
  3. Do the "Control + Mouse Click" on the WinDiskWriter application.
    image
  4. Due to the abcense of Apple Developer Signature in my App, you will see the following message:
    image
    You need to do the 3rd step again.
  5. Now you should get the "Open" option:
    image
    Click on it.

Congrats! Now you have a working WinDiskWriter ๐Ÿ‘.

If you need more details, you can check my detailed guide on dev.to.

@JOduMonT
Copy link

@paulkinzo mentionned wimlib which is the way to split install.wim but a little too subtily for some of us

There is one issue with exFAT drive. I found out some of the laptops and Mac could not detect bootable USB formatted by exFAT. You have to either format the USB with FAT32 and split install.wim file afterwards or use third-party app to do the dirty work such as UUByte ISO Editor for Mac.

this is why @UAnton posted

cp: /Volumes/CCCOMA_X64FRE_RU-RU_DV9/sources/install.wim: File too large

@gtfunes posted a how to about how to use wimlib

This didn't work for me, the USB was not recognized by my laptop. What worked was doing something like this: https://www.freecodecamp.org/news/how-make-a-windows-10-usb-using-your-mac-build-a-bootable-iso-from-your-macs-terminal/

YES install.wim need to be splited because xFAT (like FAT 32) have a limitation of file size.

YES this how to work if you split install.wim

Yes is it better to follow the FreeCodeCamp

@DownrightNifty
Copy link

DownrightNifty commented Jan 23, 2024

You can use the application that I created specifically for these purposes. It's completely free and open source.

WinDiskWriter has huge compatibility with older versions of macOS, starting with good old Mac OS X 10.6 Snow Leopard up to the latest one โ€” macOS 14.0 Sonoma.

โค๏ธ This worked perfectly, thanks! Surprised it took so long for someone to make something like this.

@TechUnRestricted
Copy link

@DownrightNifty, hi!
I'm glad that everything worked out for you ๐Ÿ‘

Thanks a lot for the feedback. Have a nice day!

@keithorange
Copy link

Hello @selasegithub.

1. Get the latest version of WinDiskWriter from the [Release](https://github.com/TechUnRestricted/windiskwriter/releases/) page.
   <img alt="image" width="214" src="https://user-images.githubusercontent.com/83237609/275045385-616cd676-cfe6-40d9-8fe9-a76bb1fcc664.png">

2. Extract the archive by double-clicking on the downloaded .zip file [If not done automatically by your browser]

3. Do the "Control + Mouse Click" on the WinDiskWriter application.
   <img alt="image" width="314" src="https://user-images.githubusercontent.com/83237609/275046073-5f2a19ac-2b3a-4330-817e-cea927afa467.jpg">

4. Due to the abcense of Apple Developer Signature in my App, you will see the following message:
   <img alt="image" width="372" src="https://user-images.githubusercontent.com/83237609/275046224-06879ee6-46b6-4223-8ad9-a946a68692d5.png">
   You need to do the 3rd step again.

5. Now you should get the "Open" option:
   <img alt="image" width="372" src="https://user-images.githubusercontent.com/83237609/275046718-3d346fe1-f6c8-40b4-a04f-7eb6d0591e34.png">
   Click on it.

Congrats! Now you have a working WinDiskWriter ๐Ÿ‘.

If you need more details, you can check my detailed guide on dev.to.

@TechUnRestricted plz add this to README!!!!! much thanks

@barbarapatton405
Copy link

Thanks, but i bought windows 10 pro from a Microsoft partner https://s2keys.com/, key activated without any problem.

@100ferhas
Copy link

100ferhas commented May 4, 2024

@TechUnRestricted thank you for your project, just found it while I was looking for a quick&easy tool to make bootable USB on Mac ๐Ÿ‘

Trying right now! ๐Ÿ˜†

@TechUnRestricted
Copy link

@100ferhas Hope it will work for you! :)

Sign up for free to join this conversation on GitHub. Already have an account? Sign in to comment