If you, like me, resent every dollar spent on commercial PDF tools,
you might want to know how to change the text content of a PDF without
having to pay for Adobe Acrobat or another PDF tool. I didn't see an
obvious open-source tool that lets you dig into PDF internals, but I
did discover a few useful facts about how PDFs are structured that
I think may prove useful to others (or myself) in the future. They
are recorded here. They are surely not universally applicable --
the PDF standard is truly Byzantine -- but they worked for my case.
Je Sian Keith Herman jskherman
senderle
/ hand-modify-pdf.md
Created
September 23, 2020 15:03
So you want to modify the text of a PDF by hand
gegeriyadi
/ Removing all HTML and CSS comments in Sublime Text .md
Last active
February 27, 2024 22:41
To quickly and easily remove all unwanted comments when using Sublime text, perform a search and replace (CMD, ALT & D) and enter the following. Make sure that regex search is enabled by clicking the small icon in the bottom left that looks like an astrix.
For example, to remove all HTML comments:
(?s)<!--.*?-->search and replace with blank
Or to remove all CSS comments:
joncardasis
/ Storing-Images-On-Github.md
Last active
June 8, 2024 07:45
Storing Images and Demos in your Repo
In this quick walkthough you'll learn how to create a separate branch in your repo to house your screenshots and demo gifs for use in your master's readme.
In order to prevent any loss of work it is best to clone the repo in a separate location to complete this task.
Create a new branch in your repo by using git checkout --orphan assets
This file contains bidirectional Unicode text that may be interpreted or compiled differently than what appears below. To review, open the file in an editor that reveals hidden Unicode characters.
Learn more about bidirectional Unicode characters
| #!/bin/bash | |
| # Locate the history file in your profile, and copy it to the same folder as this script. | |
| # On Mac: ~/Library/Application\ Support/Google/Chrome/Default/History | |
| # On Windows: C:\Users\YOUR USER NAME\AppData\Local\Google\Chrome\User Data\Default\History | |
| sqlite3 History <<! | |
| .headers on | |
| .mode csv | |
| .output out.csv |
alirobe
/ reclaimWindows10.ps1
Last active
June 7, 2024 16:24
This Windows 10 Setup Script turns off a bunch of unnecessary Windows 10 telemetery, bloatware, & privacy things. Not guaranteed to catch everything. Review and tweak before running. Reboot after running. Scripts for reversing are included and commented. Fork of https://github.com/Disassembler0/Win10-Initial-Setup-Script (different defaults). N.…
This file contains bidirectional Unicode text that may be interpreted or compiled differently than what appears below. To review, open the file in an editor that reveals hidden Unicode characters.
Learn more about bidirectional Unicode characters
| ### | |
| ### | |
| ### UPDATE: For Win 11, I recommend using this tool in place of this script: | |
| ### https://christitus.com/windows-tool/ | |
| ### https://github.com/ChrisTitusTech/winutil | |
| ### https://www.youtube.com/watch?v=6UQZ5oQg8XA | |
| ### iwr -useb https://christitus.com/win | iex | |
| ### | |
| ### |
gtallen1187
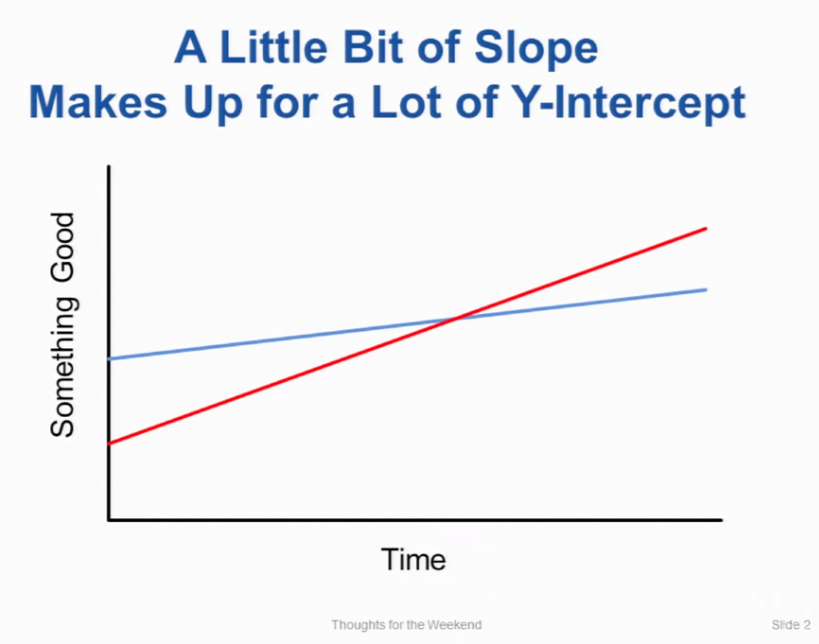
/ slope_vs_starting.md
Created
November 2, 2015 00:02
A little bit of slope makes up for a lot of y-intercept
pluskid
/ report-template.tex
Last active
May 26, 2023 00:40
A LaTeX template that I use for writing notes and reports.
This file contains bidirectional Unicode text that may be interpreted or compiled differently than what appears below. To review, open the file in an editor that reveals hidden Unicode characters.
Learn more about bidirectional Unicode characters
| %%%%%%%%%%%%%%%%%%%%%%%%%%%%%%%%%%%%%%%%%%%%%%%%%%%%%%%%%%%%%%%%%%%%% | |
| % Use the koma-script document style | |
| \documentclass{scrbook} | |
| \KOMAoptions{twoside=false} % disable two-side formatting for scrbook | |
| % alternatively, for shorter essay, use the following | |
| % \documentclass{scrartcl} | |
| %%%%%%%%%%%%%%%%%%%%%%%%%%%%%%%%%%%%%%%%%%%%%%%%%%%%%%%%%%%%%%%%%%%%% | |
| %%%%%%%%%%%%%%%%%%%%%%%%%%%%%%%%%%%%%%%%%%%%%%%%%%%%%%%%%%%%%%%%%%%%% | |
| % Useful packages |
Chaser324
/ GitHub-Forking.md
Last active
May 31, 2024 12:21
GitHub Standard Fork & Pull Request Workflow
Whether you're trying to give back to the open source community or collaborating on your own projects, knowing how to properly fork and generate pull requests is essential. Unfortunately, it's quite easy to make mistakes or not know what you should do when you're initially learning the process. I know that I certainly had considerable initial trouble with it, and I found a lot of the information on GitHub and around the internet to be rather piecemeal and incomplete - part of the process described here, another there, common hangups in a different place, and so on.
In an attempt to coallate this information for myself and others, this short tutorial is what I've found to be fairly standard procedure for creating a fork, doing your work, issuing a pull request, and merging that pull request back into the original project.
Just head over to the GitHub page and click the "Fork" button. It's just that simple. Once you've done that, you can use your favorite git client to clone your repo or j
This file contains bidirectional Unicode text that may be interpreted or compiled differently than what appears below. To review, open the file in an editor that reveals hidden Unicode characters.
Learn more about bidirectional Unicode characters
| % Copyright (c) 2010 Michael Ummels <michael@ummels.de> | |
| % | |
| % Permission to use, copy, modify, and/or distribute this software for any | |
| % purpose with or without fee is hereby granted, provided that the above | |
| % copyright notice and this permission notice appear in all copies. | |
| % | |
| % THE SOFTWARE IS PROVIDED "AS IS" AND THE AUTHOR DISCLAIMS ALL WARRANTIES | |
| % WITH REGARD TO THIS SOFTWARE INCLUDING ALL IMPLIED WARRANTIES OF | |
| % MERCHANTABILITY AND FITNESS. IN NO EVENT SHALL THE AUTHOR BE LIABLE FOR | |
| % ANY SPECIAL, DIRECT, INDIRECT, OR CONSEQUENTIAL DAMAGES OR ANY DAMAGES |
NewerOlder