Step by step instructions on how to deplot cla-bot on AWS; before starting for the first time, please read http://blog.scottlogic.com/2017/05/08/aws-lambda-github-bot.html
- Access IAM service from AWS Dashboard
- On "Access Type", check "Programmatic access"
- When done, save "Access key ID" as "AWS_ACCESS_KEY_ID" and "Secret Access key" as "AWS_SECRET_ACCESS_KEY"
- Choose "AWS Service Role"
- on "AWS Lambda" row, click on "Select"
- Select "AWSLambdaFullAccess" and "IAMFullAccess" and click on "Next Step"
- Set Role name as "cla-bot-role" and click on "Create role"
- Click on the newly created "cla-bot-role" and save "Role ARN" as "AWS_ROLE_ARN"
- Log into Github.com
- Access https://github.com/settings/apps/new
- Set homepage URL to https://symphonyoss.github.io/cla-bot
- Set "User authorization callback URL" to <API_URL> (will be defined on step #5)
- Set "Webhook URL" to <API_URL> (will be defined on step #8)
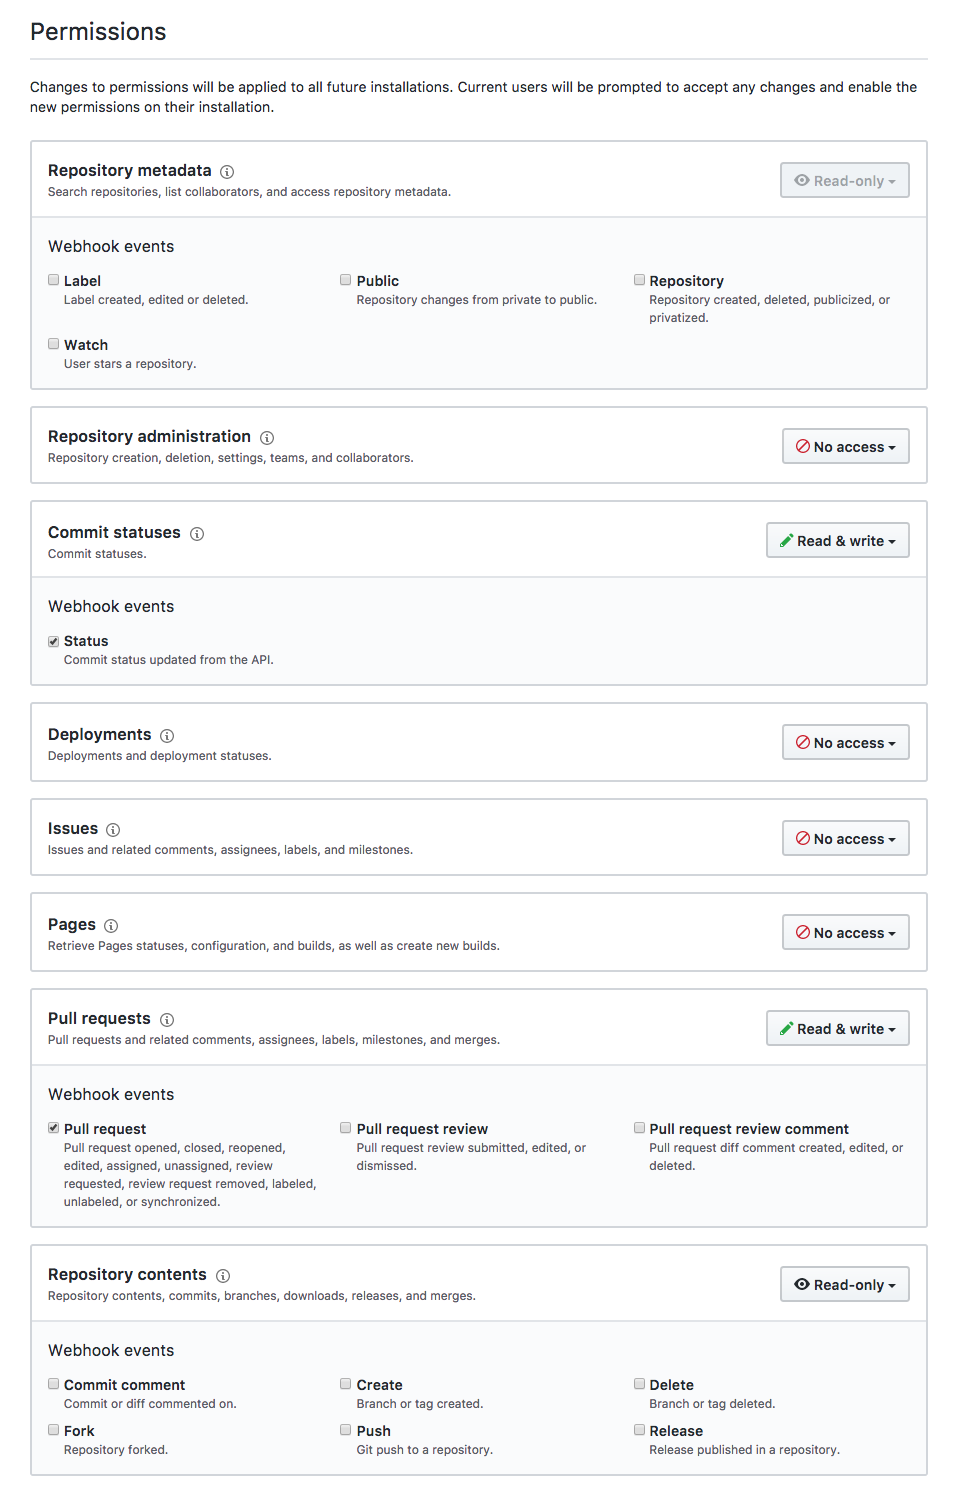
- On Permissions:
- "Commit statuses" set to "Read & write"
- "Issues" set to "Read & write"
- "Pull requests" set to "Read & write" and check "Pull Request" item
- "Repository contents" set to "Read-only"
- Set "Only on this account" to "Where can this GitHub App be installed?"
- Click on "Save"
- Click in "Generate Private Key" and download it locally
- Save INTEGRATION_KEY" as the local path to the downloaded file, "INTEGRATION_ID" as the 4-digits number reported on the top right of the Github App screen and BOT_NAME as the name of the Github App
Click on the "Install" button (top-right of Github App page) and enable it only for the current account, only on one repository.
Important! Make sure that you also add clabot-config repository at org level, if you want to use the same configuration across all org repositories.
In the permissions tab, add all the items reported in the screenshot posted in this gist comment
Follow github docs and save the generated token as "GITHUB_ACCESS_TOKEN"; no scopes or permissions must be defined, all items must be unchecked.
# Checkout this project
git clone git@github.com:ColinEberhardt/cla-bot.git

# Configure vars for deployment
touch cla-bot/.env

### Make sure to replace the following vars with values saved on preivous steps:
# AWS_ACCESS_KEY_ID=<AWS_ACCESS_KEY_ID>
# AWS_SECRET_ACCESS_KEY=<AWS_SECRET_ACCESS_KEY>
# AWS_ROLE_ARN=<AWS_ROLE_ARN>
# AWS_REGION=us-east-1
# AWS_HANDLER=index.handler
# AWS_MEMORY_SIZE=128
# AWS_TIMEOUT=3
# AWS_RUNTIME=nodejs6.10

touch cla-bot/deploy.env

### Make sure to replace the following vars with values saved on previous steps:
# GITHUB_ACCESS_TOKEN=--your-token-here--
# INTEGRATION_ENABLED=true
# INTEGRATION_KEY=--integration-key--
# INTEGRATION_ID=--integration-id--
# LOG_URL=https://symphonyoss.github.io/cla-bot/
# BOT_NAME=cla-bot
# Matches the DynamoDB table name
# LOGGING_TABLE=clabot-log-test
# Matches the API Gateway Stage name
# AWS_ENVIRONMENT=test
# Matches the AWS Lambda function name, tho node-lambda adds the "-lambda" as suffix
# AWS_FUNCTION_NAME=cla-bot
cd cla-bot
npm install -g node-lambda
node-lambda deploy --configFile deploy.env
- Access API Gateway from AWS Dashboard
- Click on "Create API"
- Select "New API", set name and click on "Create API"
- Select "Resources" from the left menu, click on "Actions > Create Method"
- Choose "POST" as method and confirm
- Define "Lambda Region" field to match "<AWS_REGION>" (see step #6)
- Define "Lambda Function" field to match "<AWS_FUNCTION_NAME>-lambda" (see step #6)
- Click on Save; a dialog "Add Permission to Lambda Function" will show up, click on "Ok"
- Click on "Integration Request" and extend "Body Mapping Templates"
- Select "When there are no templates defined (recommended)" for field "Request body passthrough"
- Click on "Add mapping template", type "application/json" for "Content-Type", confirm and paste the following content in the text area:
{
  "body" : $input.json('$'),
  "headers": {
    #foreach($header in $input.params().header.keySet())
    "$header": "$util.escapeJavaScript($input.params().header.get($header))" #if($foreach.hasNext),#end

    #end
  },
  "method": "$context.httpMethod",
  "params": {
    #foreach($param in $input.params().path.keySet())
    "$param": "$util.escapeJavaScript($input.params().path.get($param))" #if($foreach.hasNext),#end

    #end
  },
  "query": {
    #foreach($queryParam in $input.params().querystring.keySet())
    "$queryParam": "$util.escapeJavaScript($input.params().querystring.get($queryParam))" #if($foreach.hasNext),#end
    #end
  }
}
- Click on "Save"
- Click on "Actions > Deploy API"
- Select "[New Stage]" as "Deployment Stage"
- Type "<AWS_ENVIRONMENT>" (see step #6) on "Stage name"
- Save the "Invoke URL" as API_URL
If you have problems invoking the Lambda function, check the Lambda role configurations and enable API Logging (via the API Stage Editor)
- Set timeout to 5 mins
- Name: same as LOGGING_TABLE on step 6.
- Primary key: uuid
- Open Postman (or similar)
- Set method to "POST"
- Set URL as <API_URL> (see step #8)
- Add header param "Content-type" with value "application/json"
- Send the request
- Check the response from Postman
- Check AWS Cloudwatch logs, see if they match
permissions ...