Follow these instructions for an easy way to get up and going quickly! These are complete instructions, and will be the easiest way to get started on a new RG35XX.
Get a high quality SD (e.g. SanDisk Extreme) card, 128GB or larger, 256GB is recommended. Don't skimp here, they're cheap, and don't use the card that comes with the RG35XX as it's crap.
Download and install Disk Genius
Download and install Rufus.
Download and install 7-zip.
Download "RG35XX-MicroSDCardImage.7z.001" and "RG35XX-MicroSDCardImage.7z.002" from GarlicOS.
Open "RG35XX-MicroSDCardImage.7z.001" in 7-zip and extract to a folder on your hard drive, e.g. Downloads. This will create "garlic.img" and "README.txt"
Start Rufus.
Ensure correct SD Card device is selected.
Click "SELECT" and open "garlic.img".
Click "START" to write the image.
Note: This step is only required if you want to use a single SD card.
Start Disk Genius.
Extend the 3.2GB FAT32 partition of the SD Card to as large as it'll go, to fill the SD card:
- Right click the FAT32 partition, choose "Set Volume Name (V)" and name it "ROMS". This will make it easier to find this partition in explorer.
- Right click on the same partition, choose "Extend Partition (Ctrl_F12)", and click "Start" then "Yes" twice. Click "Complete" when done.
- Note the drive letter of the "ROMS" partition. If there is no drive letter, then right click on the same partition, choose "Assign New Drive Letter (G)", and click "OK.
Rename the "CFW Partition:
- Right click the 10.0MB FAT16 partition, choose "Set Volume Name (V)" and name it "CFW".
Close Disk Genius.
In all of the following steps, overwrite any existing files when extracting files.
Download Tiny Best Set: GO!, and extract the following files to the root of the "ROMS" partition:
- tiny-best-set-go-games.zip
- tiny-best-set-go-expansion-64-games.zip
- tiny-best-set-go-expansion-128-games.zip
- tiny-best-set-go-arcade-names-garlic.zip
- alternate preview images (3 image mix)/tiny-best-set-go-imgs-garlic-3mix.zip
- alternate preview images (3 image mix)/tiny-best-set-go-expansion-64-imgs-garlic-3mix.zip
- alternate preview images (3 image mix)/tiny-best-set-go-expansion-128-imgs-garlic-3mix.zip
To include "Tomb Raider" for the PlayStation, also copy these files to the specified folder within the "ROMS" partition:
- Tomb Raider/Tomb Raider (USA) (Rev 6).chd -> /Roms/PS
- Tomb Raider/tomb-raider-img-garlic-3mix -> /Roms/PS/Imgs
Download Tiny Best Set: GO! Arcade Update, first delete all .zip files in the Roms/Arcade folder, and then extract the following files to the root of the "ROMS" partition:
- tiny-best-set-go-arcade-update-garlic.zip
- tiny-best-set-go-arcade-update-garlic-imgs-3mix.zip
Download TINY BEST SET GO! EXTRA (Unofficial add-ons for the 128GB set), first go into Roms/ARCADE on your SD card, sort by size, and delete any .zip files that are 1000 KB or larger, and then extract the following files to the root of the "ROMS" partition:
- TINY BEST SET GO! EXTRA (unofficial) arcade games and folders.7z
- TINY BEST SET GO! EXTRA (unofficial) arcade games and folders (3-image mix).7z
- TINY BEST SET GO! EXTRA (unofficial) console games.7z
- TINY BEST SET GO! EXTRA (unofficial) console games (3-image mix).7z
If you have a 256GB (or larger) SD: Download TINY BEST SET GO! EXTRA+ (unofficial) EVEN MORE PS1 and extract the following files to the root of the "ROMS" partition:
- TINY BEST SET GO! EXTRA+ (unofficial) EVEN MORE PS1.7z
- TINY BEST SET GO! EXTRA+ (unofficial) EVEN MORE PS1 (3-image mix).7z
Download the torrent "128gb_archive.torrent" from 128GB Rom Pack and extract the following files:
- Garlic.zip (extract to root of SD)
- Roms.zip (extract to ROMS folder in SD)
- Update.zip (extract to root of SD)
Systems in 128 Rom Pack:
- Arcade - Mame 2003+ (375)
- Atari - 2600 (50)
- Atari - Lynx (16)
- Lexaloffle - Pico 8 (85)
- NEC - TurboGrafx 16 (81)
- NEC - TurboGrafx CD (25)
- Nintendo - Game Boy (155)
- Nintendo - Game Boy Advance (156)
- Nintendo - Game Boy Color (108)
- Nintendo - NES (275)
- Nintendo - SNES (327)
- Sega - 32X (18)
- Sega - CD (48)
- Sega - Game Gear (42)
- Sega - Genesis (188)
- Sega - Master System (55)
- SNK - Neo Geo (138)
- SNK - Neo Geo CD (36)
- SNK - Neo Geo Pocket (21)
- Sony - Playstation (212)
Download Retro System Icons, and inside the ZIP copy "/retro_system_icons/system" folder to "/CFW/skin" on the "ROMS" partition.
Download Updated Retroarch Cores and extract to "/CFW/retroarch" on the "ROMS" partition.
Now safely eject the SD card, and place it into TF1 on your RG35XX!
Download RG35XX-CopyPasteOnTopOfStock.7z.001 and RG35XX-CopyPasteOnTopOfStock.7z.002
Open the .7z.001 file in 7-zip and extract to root of SD card.
Eject SD card and boot.
This makes GBx games look much better and improves perf. Not sure why this isn't a default.
Open RetroArch option in GarlicOS.
- Settings > Video
- Threaded Video
- Settings > Video > Scaling
- Keep Aspect Ratio
Quit RetroArch
To enable an overlay for a system (FC, GB, GBA, GBC, SFC), while in a game:
Note: First hold MENU for a second and then while holding MENU, press X.
- Menu + X to open Quick Menu
- "B" to back out to RetroArch Main Menu
- Settings > On-Screen Display > On-Screen Overlay > Overlay Preset
- Choose the correct overlay preset for the system you're playing.
- "B" 3x to back out to main menu.
- Quick Menu > Overrides
- Save Core Overrides
Note: First hold MENU for a second and then while holding MENU, press X.
- Start a GameBoy game
- Menu + X to open Quick Menu
- "Core Options"
- GB Colorization: Auto
- Internal Palette: GB - DMG
- Interface Blending: Simple
- "B" to go back.
- "Resume" (setting will be automatically saved)
By default, a game continues from a save state, which is super cool, but if you want to start a game from the beginning, start it by pressing the START button rather than pressing the "A" button.
To switch discs in multi-disc games:
Note: First hold MENU for a second and then while holding MENU, press X.
- Menu + X to open Quick Menu
- Disc Control > Eject Disc
- Change the Disc Index
- Insert Disc
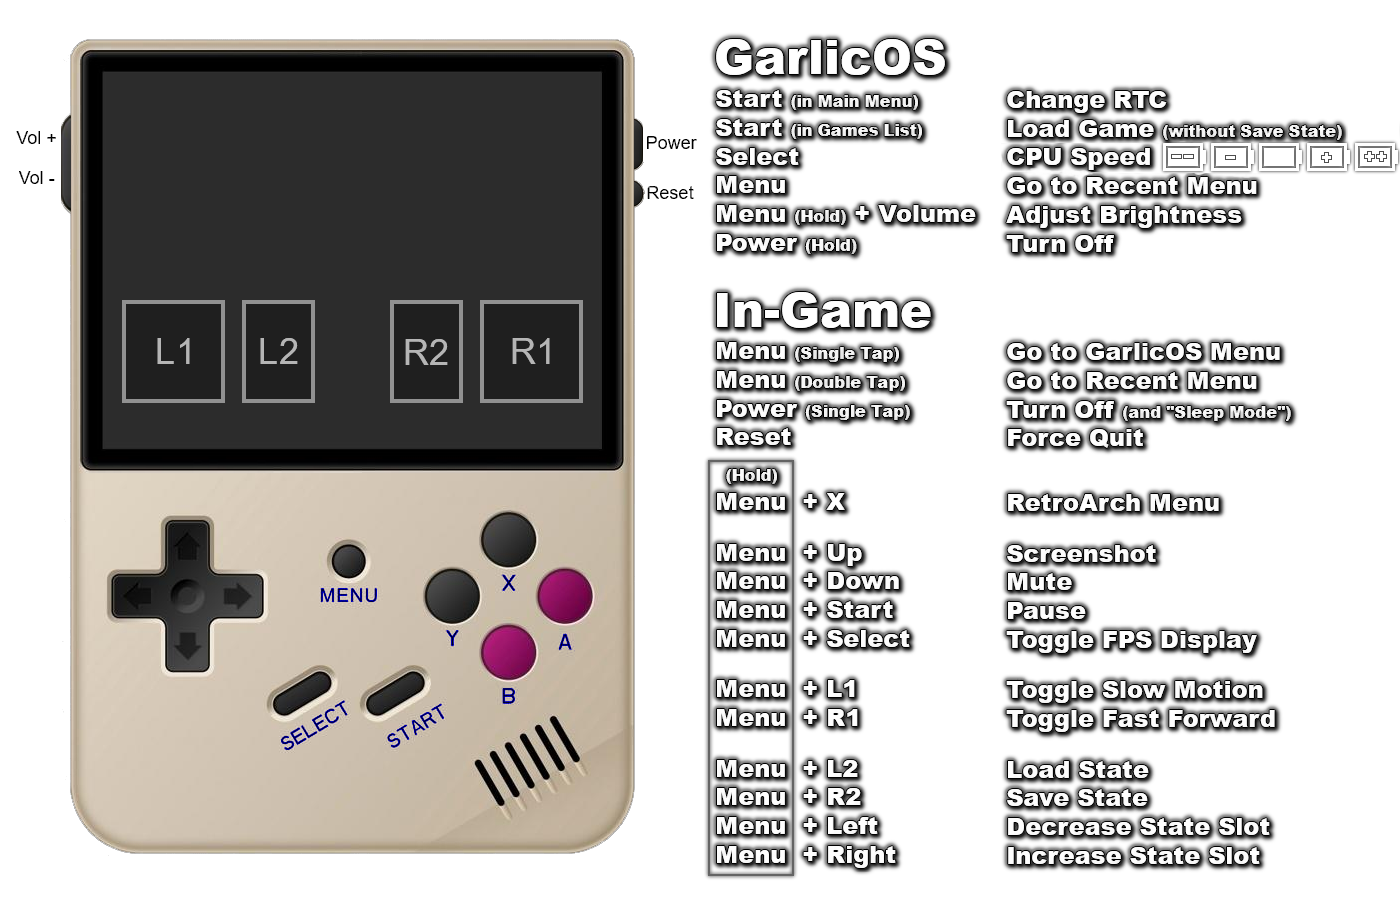
In main menu:
| Button | Action |
|---|---|
| POWER | Sleep |
| MENU + POWER | Shutdown |
| A | Enter |
| B | Return |
| Select | Change CPU speed |
| Start | Change the clock time (in main menu) |
| MENU + Vol + | brightness |
| MENU + Vol - | brightness |
In game menu:
| Button | Action |
|---|---|
| Y | Save/Remove Favorite |
| A | Start game |
| Start | Start game without saved state |
During the game:
Note: First hold MENU for a second and then while holding MENU, press the button.
| Button | Action |
|---|---|
| MENU | Return to GarlicOS |
| L1 + L2 | MAME Menu ("Arcade" only) |
| MENU + X | Retroarch Menu |
| MENU + UP | Screenshot |
| MENU + DOWN | Audio Mute |
| MENU + LEFT/RIGHT | Change the save state slot |
| MENU + L1 | Fast forward toggle |
| MENU + R1 | Slow motion toggle |
| MENU + START | Pause |
| MENU + SELECT | FPS display |
The HDMI port on the rg35xx is a Mini HDMI port. To use the HDMI, get a "Mini HDMI Male to HDMI Female Cable" and plug one end into the 35xx, and the other end into a standard HDMI cable.
GarlicOS can play video files! To convert videos to make them suitable for RG35XX:
Install ffmpeg.
In terminal, use the following command (ensure the output extension is mkv):
ffmpeg.exe -i [INPUT_FILENAME] -vf scale=640:-2 -vcodec libx264 -pix_fmt yuv420p -profile:v main -level 3.1 -preset medium -crf 23 -x264-params ref=4 -acodec libvorbis -movflags +faststart -hide_banner -loglevel error -stats [OUTPUT_FILENAME].mkvCopy video file to /Roms/VIDEOS folder in "ROMS" partition.
-vf scale=640:-2 keeps the aspect ratio, width of 640 and ensures that the size of width and height is multiple of 2.
There is an updated video player, MPlayer that can be installed as well. follow the instructions in the "readme.txt" file in the zip for installation instructions.
If you want to get up and running with a curated set of ROMS with only a 16GB SD card, try this.
Insert SD card.
Open "ROMS" drive in Explorer.
Download Pungent Best Set.
Extract to the root of the "ROMS" drive.
Eject SD card and boot.
From Gunseikan on Reddit:
Downloaded this set and added it to a Garlic OS 1.4.9 setup on the RG35XX. For some reason certain NES roms are running slow. Super Mario Bros. seems fine, but Castlevania and Mega Man are running slower, both gameplay and audio. I tested this for the FCEUmm core and Nestopia: same result. Triend overclocking in retroarch: same result. Tried increasing the clock speed on the rg35xx: same result. Using the stock OS and roms the thing came with the games run as intended. The USA roms ran at normal speed without any tinkering.
So if you use Pungent Best Set, note that you might want to replace the NES roms with USA versions.
| Folder Name | System |
|---|---|
| AMIGA | Amiga (Commodore, 1985) |
| AMIGACD | Amiga CD 32 (Commodore, 1993) |
| APPS | Various |
| ARCADE | Arcade (Mame 2003) |
| ATARI | Atari 2600 (Atari, 1977) |
| ATARIST | Atari ST (Atari, 1985) |
| C128 | Commodore 128 |
| COLECO | ColecoVision (Coleco, 1982) |
| COMMODORE | Commodore 64 |
| CPC | Amstrad CPC (Amstrad, 1984) |
| CPS1 | Capcom Play System 1 (Capcom, 1988) |
| CPS2 | Capcom Play System 2 (Capcom, 1993) |
| CPS3 | Capcom Play System 3 (Capcom, 1996) |
| DOOM | Doom (id, 1993) |
| DOS | MS-DOS (DOSBOX) |
| EIGHTHUNDRED | Atari 8bit (Atari, 1980) |
| FAIRCHILD | Fairchild Channel F (Fairchild, 1976) |
| FBA2012 | Final Burn Alpha |
| FBNEO | Final Burn Neo |
| FC | Nintendo Entertainment System / NES (Nintendo, 1985) |
| FDS | Famicom Disk System (Nintendo, 1986) |
| FIFTYTWOHUNDRED | Atari 5200 (Atari, 1982) |
| GB | Nintendo Game Boy (Nintendo, 1989) |
| GBA | Nintendo Game Boy Advance (Nintendo, 2001) |
| GBC | Nintendo Game Boy Color (Nintendo, 1998) |
| GG | Sega Game Gear (Sega, 1991) |
| GW | Game & Watch (Nintendo, 1980) |
| INTELLIVISION | Mattel Intellivision (Mattel, 1979) |
| JAGUAR | Atari Jaguar (Atari, 1993) |
| LYNX | Atari Lynx (Atari, 1989) |
| MAME2000 | MAME 2000 |
| MD | Sega Genesis / MegaDrive (Sega, 1988) |
| MEGADUCK | Mega Duck (Welback, 1993) |
| MS | Sega Master System (Sega, 1986) |
| MSX | MSX - MSX2 (Microsoft, 1983) |
| NEOCD | SNK NeoGeo CD (SNK, 1994) |
| NEOGEO | SNK NeoGeo (SNK, 1990) |
| NGP | SNK NeoGeo Pocket & Color (SNK, 1999) |
| ODYSSEY | Magnavox Odyssey 2 |
| PANASONIC | 3DO (Panasonic, 1993) |
| PCE | NEC TurboGrafx-16 / PC-Engine(NEC/Hudson, 1989) |
| PCECD | NEC TurboGrafx CD / PC-Engine CDROM2 (NEC/Hudson, 1989) |
| PCFX | PCFX (NEC/Hudson, 1994) |
| PCNINETYEIGHT | NEC PC-98 (NEC, 1982) |
| PET | Commodore PET (Commodore, 1977) |
| PICO | PICO-8 |
| POKE | Nintendo Pokemon mini (Nintendo, 2001) |
| PORTS | Ports collection |
| PS | Sony Playstation (Somy, 1995) |
| QUAKE | Quake (id, 1996) |
| SATELLAVIEW | Super Famicom Satellaview (Nintendo, 1995) |
| SCUMMVM | ScummVM |
| SEGACD | Sega CD / Mega-CD (Sega, 1991) |
| SEGASGONE | Sega SG-1000 (Sega, 1983) |
| SEVENTYEIGHTHUNDRED | Atari 7800 (Atari, 1986) |
| SFC | Super Nintendo / Super Famicom (Nintendo, 1991) |
| SGB | Super Game Boy (Nintendo, 1994) |
| SGFX | NEC SuperGrafx (NEC/Hudson, 1989) |
| SUFAMI | Bandai Sufami Turbo (Bandai, 1996) |
| SUPERVISION | Watara Supervision (Watara, 1992) |
| THIRTYTWOX | Sega 32X (Sega, 1994) |
| TIC | TIC-80 Tiny Computer (Various) |
| VB | Nintendo Virtual Boy (Nintendo, 1995) |
| VECTREX | GCE Vectrex (GCE, 1982) |
| VIC20 | VIC-20 (Commodore, 1981) |
| VIDEOPAC | Odyssey2 VideoPac (Magnavox, 1978) |
| VIDEOS | Video Player |
| VMU | Dreamcast VMU (Sega, 1998) |
| WS | Bandai WonderSwan & Color (Bandai, 2000) |
| X68000 | Sharp X68000 (Sharp, 1987) |
| ZXEIGHTYONE | Sinclair ZX81 (Sinclair, 1981) |
| ZXS | Sinclair ZX Spectrum (Sinclair, 1982) |
Garlic supports these libretro cores as well:
| Folder Name | System |
|---|---|
| C128 | Commodore 8-bit - vice_x128 |
| GPSP | Nintendo Game Boy Advance - gpsp |
| NESTOPIA | NES/Famicom - nestopia |
| PCEIGHTYEIGHT | NEC PC-8000 / PC-8800 - quasi88 |
| PLUS4 | Commodore Plus-4 vice_xplus4 |
| UZEBOX | Uzebox - uzem |
| XONE | Sharp X1 - x1 |
The following cores don't appear to be supported in Garlic:
| Folder Name | System |
|---|---|
| C64 | Commodore 64 (Commodore, 1982) |
| CANNONBALL | Enhanced OutRun Engine |
| CAVESTORY | Cave Story (Pixel, 2004) |
| DAPHNE | LaserDisc Game Emulator |
| DUKE | Duke Nukem 3D (3D Realms, 1996) |
| GX4000 | GX4000 (Amstrad, 1990) |
| MGBA | MGBA Emulator (Nintendo, 2001) |
| MSU1 | Super Nintendo CD (Nintendo/Sony (1992) |
| OPENBOR | OpenBOR (2006) |
| PDF Reader | |
| SM64 | Super Mario 64 (Nintendo, 1996) |
| WOLF | Wofenstein 3D (id, 1992) |
/CFW/config/coremapping.json contains a JSON mapping of ROM folder to the core used, e.g.
"ARCADE": "km_mame2003_xtreme_libretro.so",These cores are in /CFW/retroarch/.retroarch/cores.
Note that theme support is rather inconsistent between versions. For now, I suggest you don't install a custom theme.
Install Skraper
Click "Wizard", click "YES"
- Enter Screenscraper Account info, click "Validate", click "NEXT"
- Front-End Selection: GENERIC EMULATION, click "NEXT"
- Choose root of ROM path (e.g. /Roms on SD card), click "NEXT"
Click "FINISH"
Add missing systems (due to folder naming differences)
- Click "+"
- Uncheck "Show Categories"
- Under "Console" select:
- ATARI 2600
- ATARI 5200
- ATARI 7800
- GENESIS
- MASTER SYSTEM
- NES
- PC-ENGINE CD-ROM
- PLAYSTATION
- SEGA 32X
- SUPER NINTENDO
- TURBOGRAFX-16
- VIRTUAL BOY
- WATARA SUPERVISION
- WONDERSWAN
- Click "OK"
Games & Front-End Tab:
Modify Games/Roms Folder for each of those systems (click on each one at a time in left panel):
e.g. "F:\Roms\NEC PC Engine CD-Rom" to "F:\Roms\PCECD"
- ATARI 2600 : ATARI
- ATARI 5200 : FIFTYTWOHUNDRED
- ATARI 7800 : SEVENTYEIGHTHUNDRED
- GENESIS : MD
- MASTER SYSTEM : MS
- NEC PC ENGINE : PCE
- NEC PC-ENGINE CD-ROM : PCECD
- NES : FC
- PLAYSTATION : PS
- SEGA 32X : THIRTYTWOX
- SUPER NINTENDO : SFC
- VIRTUAL BOY : VB
- WATARA SUPERVISION : SUPERVISION
- WONDERSWAN : WS
Click on "ALL SYSTEMS" (left panel)
Media Tab:
Note that 320x240 is used here, despite the native resolution being 640x480. This is done to create smaller image files which load faster.
- Click on "MANUAL" and Click "-" (Remove)
- Click on "IMAGES MIX"
- Output folder:
%ROMROOTFOLDER%\media\images->%ROMROOTFOLDER%\Imgs
- Output folder:
- In right box, click ">" until "INTERNAL MIX" > "2 IMAGES MIX" shows.
- Cleanup output folder before generating new medias
- Resize width to: 320
- Resize height to: 240
- "Keep Image Ratio"
Click play button in button right corner, click "OK"
When complete, you can deelte the *.dat files that are in each ROM folder.
In addition, each ROM folder will have a *.Missing.Serial.txt file - this file contains ROMS that weren't known to skraper.
On the "CFW" partition (not the "ROMS" partition) boot_logo.bmp.gz exists in the root. This is a 640x480 24-bit gzipped compressed BMP file. Replace it with a different BMP file that you've gzipped, e.g. gzip.exe --best .\boot_logo.bmp, to change the GarlicOS boot logo.
/CFW/config/mame.csv is a comma-seperated list of mame rom name to friendly name, e.g.
aligator,Alligator Hunt (World, protected)
If you find that one of your MAME roms isn't showing a friendly name, it might not be in this list!
The images for the overlays (.png files) live in /CFW/retroarch/.retroarch/overlay.
/CFW/retroarch/.retroarch/retroarch.cfg has paths to interesting files and folders, e.g.
content_favorites_path = ":/.retroarch/content_favorites.lpl"
content_history_directory = "/mnt/SDCARD/Saves/CurrentProfile/lists"
content_history_path = "/mnt/SDCARD/Saves/CurrentProfile/lists/content_history.lpl"
savefile_directory = "/mnt/SDCARD/Saves/CurrentProfile/saves"
savestate_directory = "/mnt/SDCARD/Saves/CurrentProfile/states"
screenshot_directory = "/mnt/SDCARD/Screenshots"
If a game won't start, it's possible that the RetroArch logs will give you some indication why.
Logs are stored in /CFW/retroarch/.retroarch/logs/retroarch.log.


I wrote up instructions for macOS.