Skip to content

Instantly share code, notes, and snippets.

@KhaosT
Last active December 2, 2024 18:03
Show Gist options
  • Save KhaosT/1406a6b6bea38f59e059c2afcb39d545 to your computer and use it in GitHub Desktop.
Save KhaosT/1406a6b6bea38f59e059c2afcb39d545 to your computer and use it in GitHub Desktop.
Make your own Touch ID Button

Tools Needed

  • iFixit iOpener Set
  • T4 Screwdriver
  • T3 Screwdriver

Steps

  1. Soften adhesive using iOpener IMG_1610

  2. After about 60~90 seconds, use Opening Picks (or a slot screwdriver that's thin enough to fit) to pry open the back cover from upper right corner IMG_1611

  3. Apply more forces to completely remove the back cover IMG_1612

  4. Disconnect the battery IMG_1614 IMG_1615

  5. Remove the screws (T4) that keeping the black plate attached to the frame and remove the black plate

  6. Disconnect all 3 connectors from the logic board and take out the logic board from the Keyboard frame IMG_1616 IMG_1618
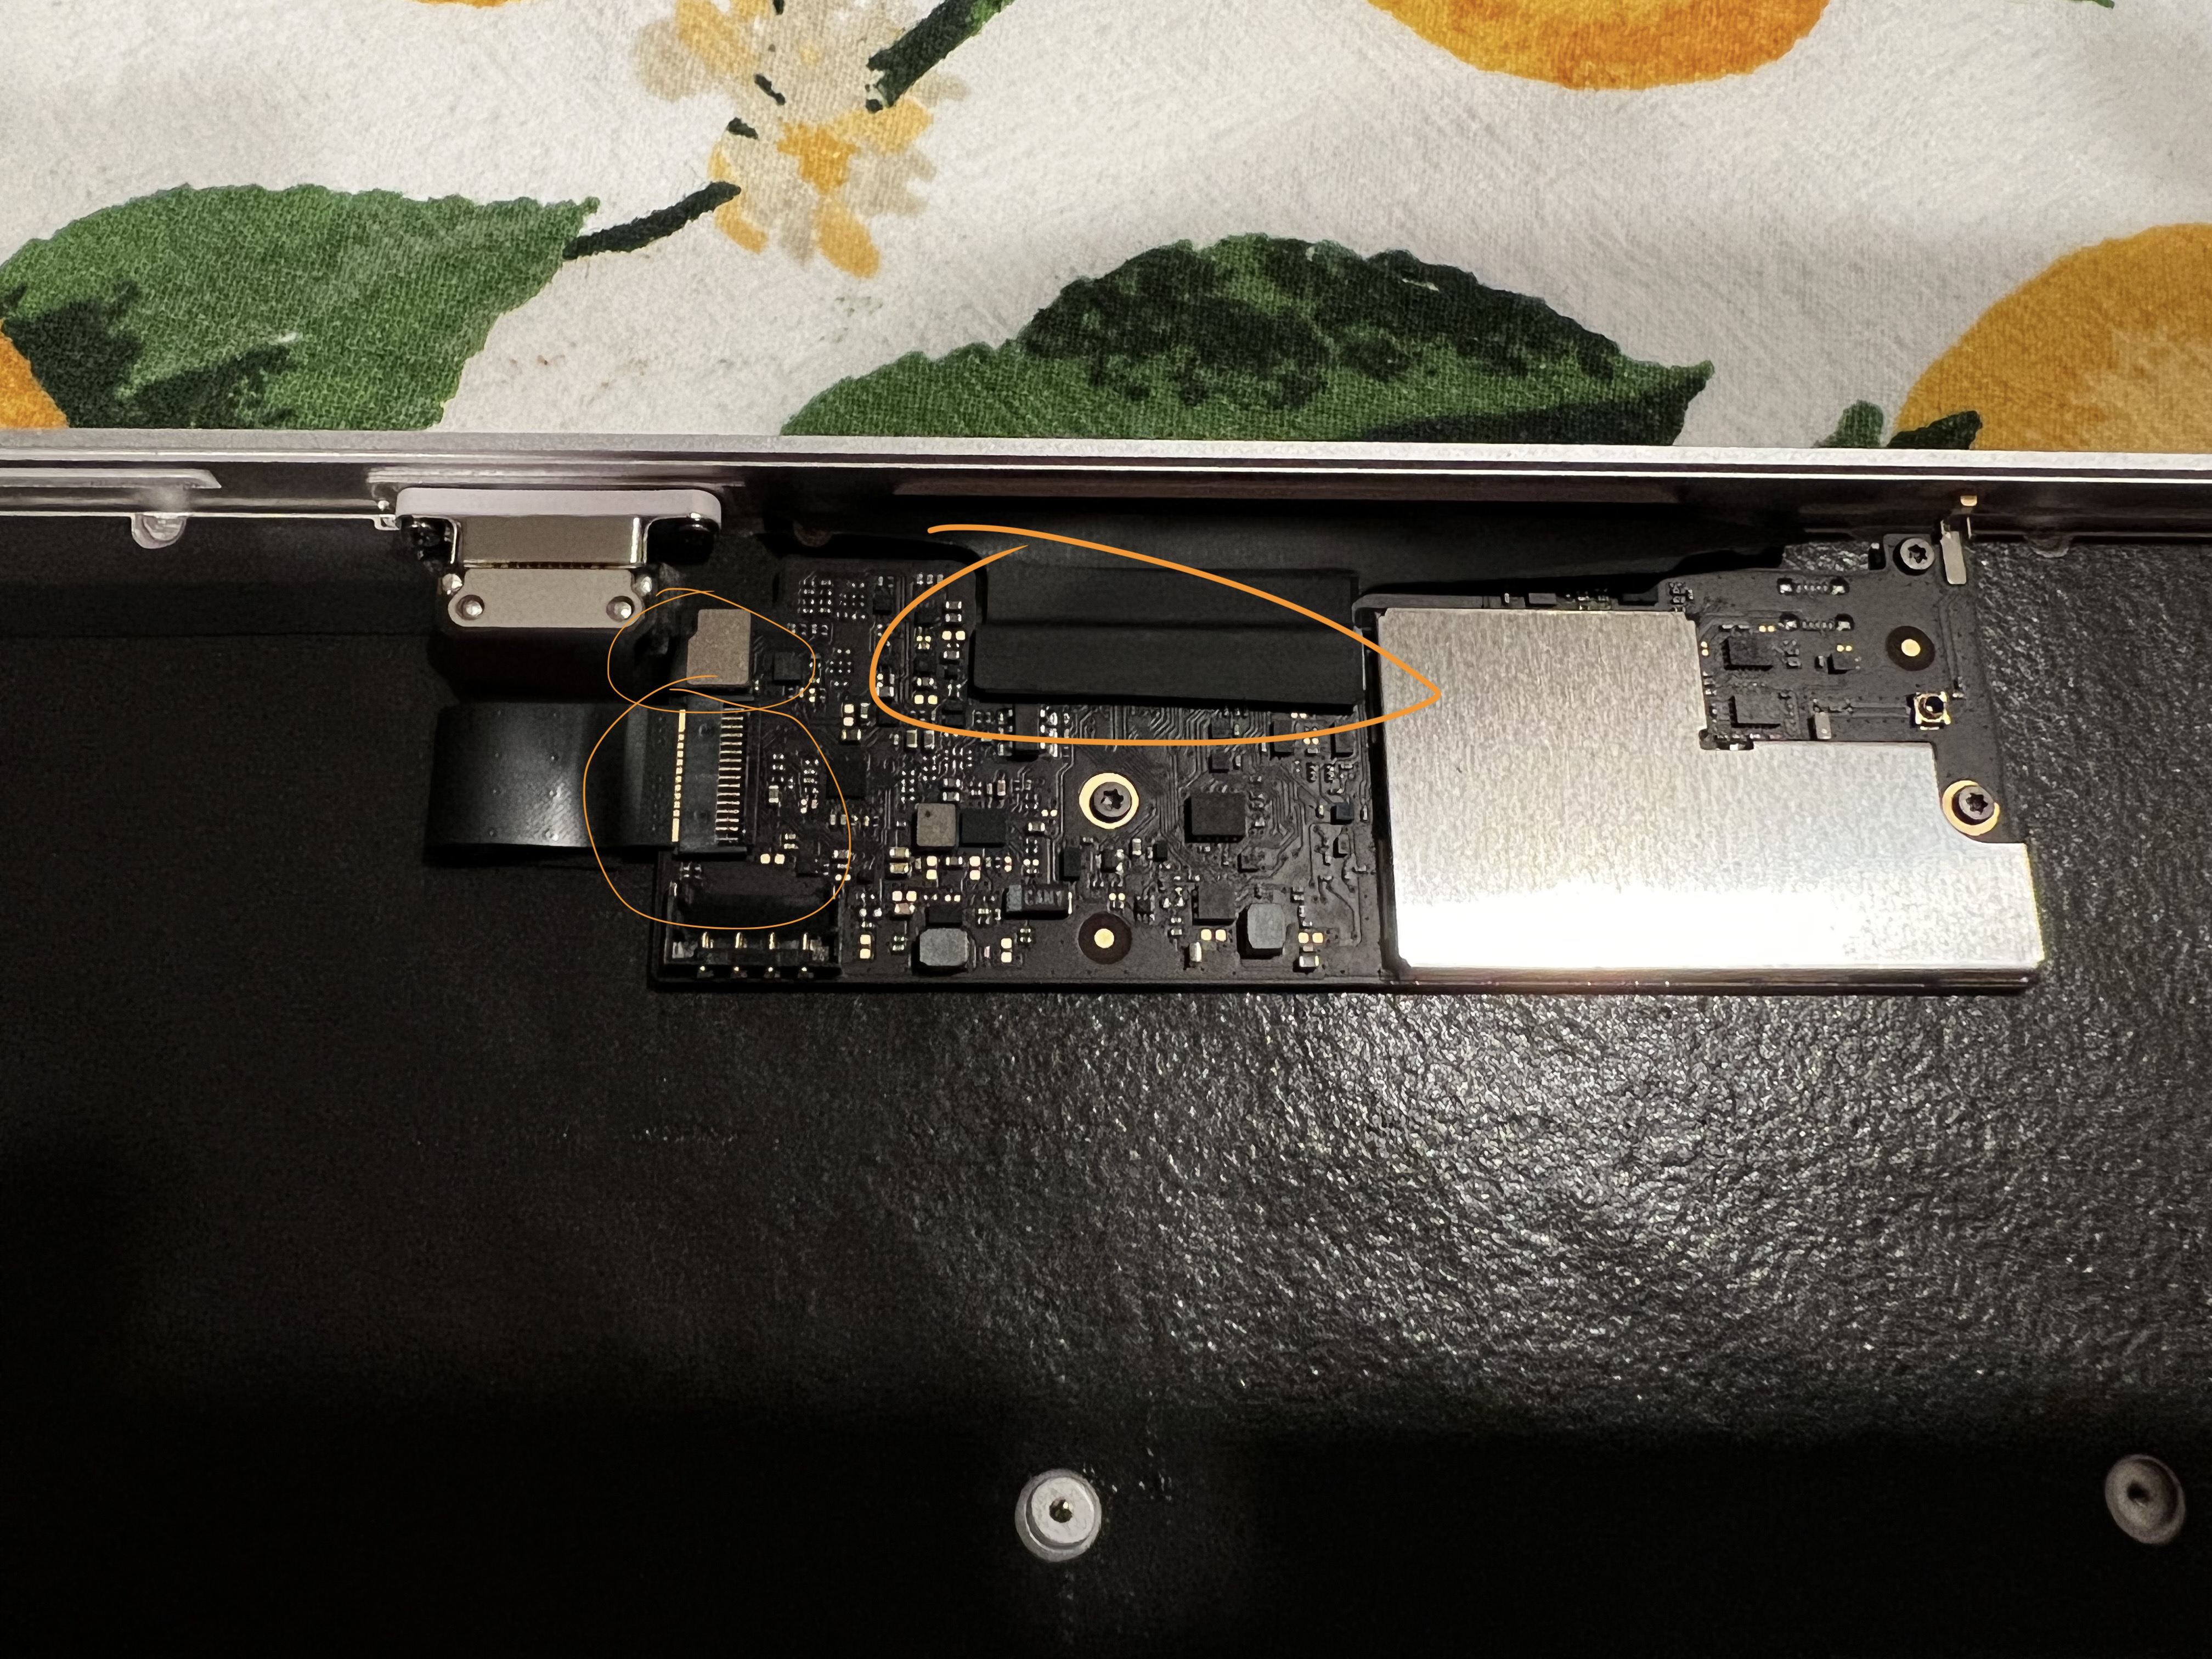
  7. Remove the Lightning connector (T3) IMG_1620

  8. Remove the power switch from upper left corner (T3)

  9. Carefully remove the sticker(?) from the connector and disconnect Touch ID sensor from the connector IMG_1621
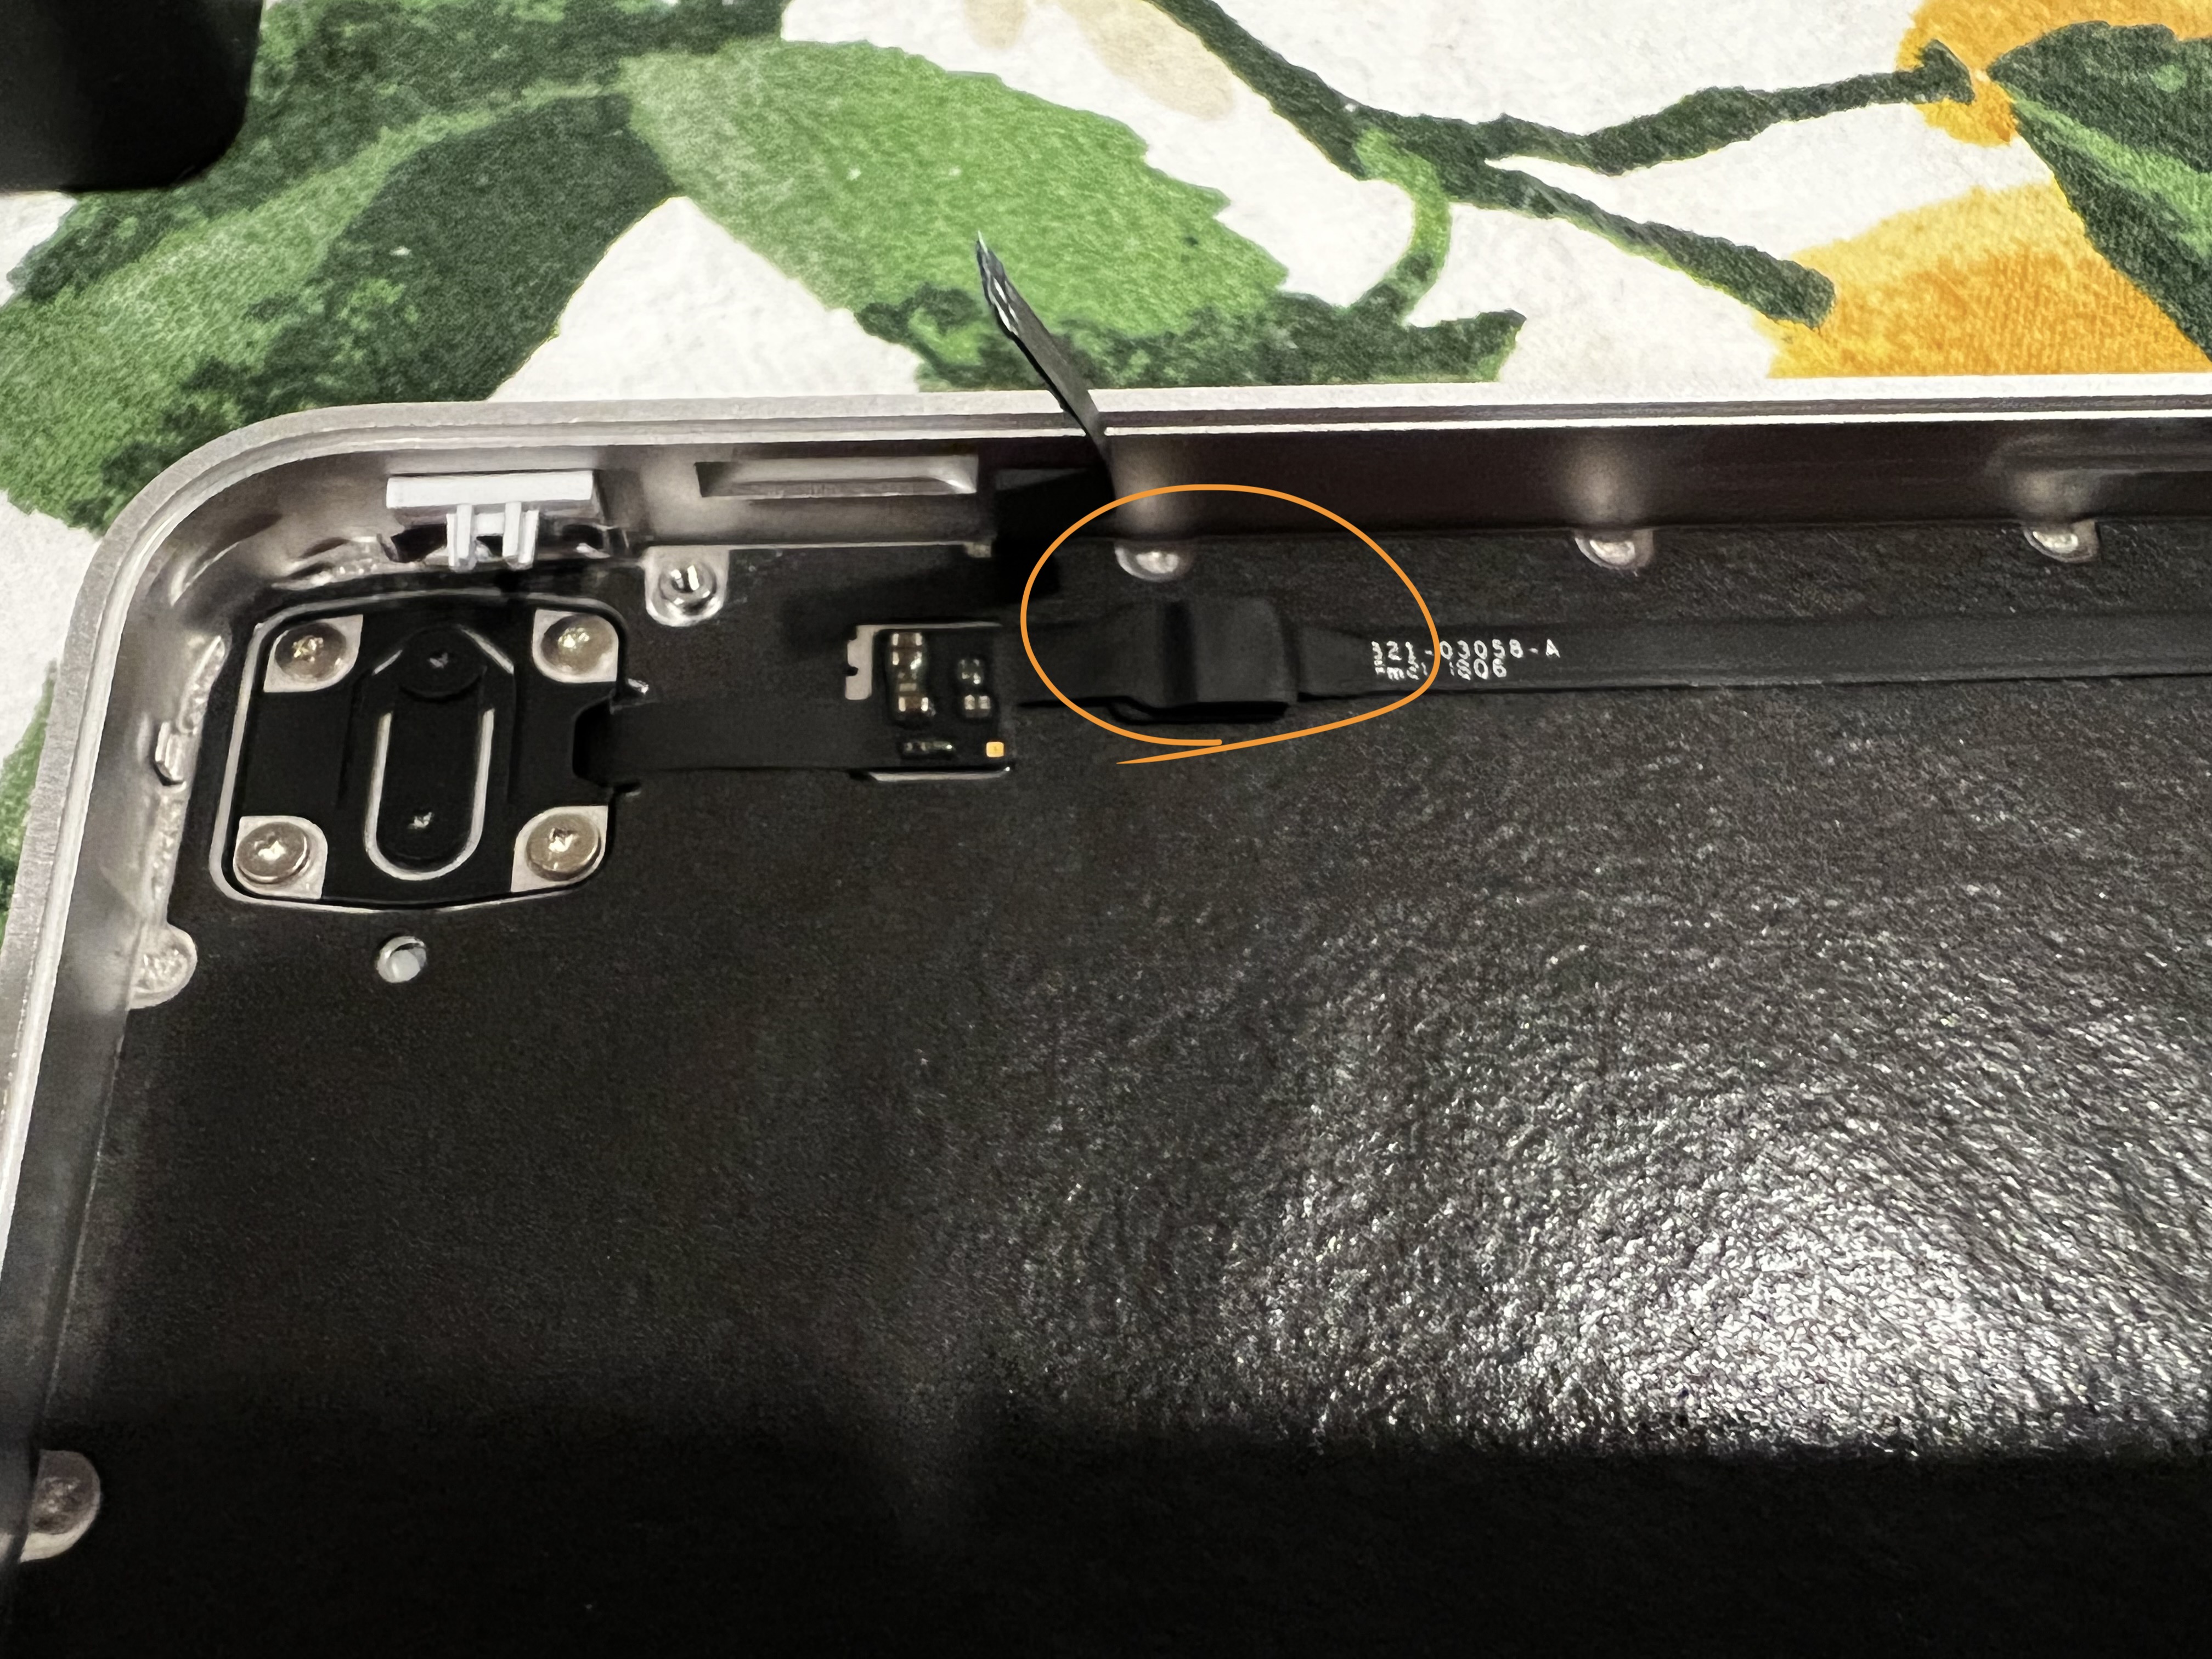
  10. Unscrew the mounting screws around the Touch ID sensor (T3), and remove the Touch ID sensor L1030076

  11. Carefully remove the flex cable used to connect Touch ID sensor

Now you have all the parts to put together a standalone Touch ID device for your Apple silicon Mac.

After connecting the Lightning connector and Touch ID sensor back to the logic board, you can pair the Touch ID sensor with your Mac under System Preferences.

If the pairing step doesn't appear when you go to Touch ID settings -> add a new fingerprint, make sure the Touch ID sensor is correctly connected and try power cycle the Touch ID device.

@spkane
Copy link

spkane commented Mar 20, 2024

@KhaosT Do you know if this works with both versions of the TouchID magic keyboard? The one with and without the number pad?

I assume so, but I would like to know if anyone can confirm that.

@KhaosT
Copy link
Author

KhaosT commented Mar 20, 2024

@KhaosT Do you know if this works with both versions of the TouchID magic keyboard? The one with and without the number pad?

I assume so, but I would like to know if anyone can confirm that.

The logic board for the one with number pad is a lot longer than the one without. Depending on your use case, that might not be desirable. But yeah, both can be taken out and use standalone.

@cubuspl42
Copy link

As I don't own the iFixit iOpener Set, I heated the keyboard on my Prusa MK4 heatbed (75 degrees Celcius). It worked very well. I did some prying, some heating, more prying, more heating, and so on (I'm not 100% sure it was needed, but didn't hurt). I used a metal nail polisher as a lever. You need to put some force when tearing the back plate off.

It's difficult to open the keyboard without leaving any marks, but I guess the keyboard without Touch ID and the controller isn't worth much anyway.

@humza2000
Copy link

lol i used a hair dryer and a kitchen knife. totally destroyed the keyboard but it was worth it!

@humza2000
Copy link

IMG_0317 Done! 3d files: https://www.printables.com/model/399770-touch-id-keycap-for-mechanical-keyboard More photos: IMG_0300 IMG_0294

it wont let me upload new photos :(
this is what the io and insides look like:
IMG_0300
IMG_0294

@humza2000
Copy link

IMG_0915
IMG_0916

@humza2000
Copy link

IMG_0917

@cubuspl42
Copy link

I followed the tutorial, and the button is working in general. But I have an issue. Once or twice a day, after a break from using my MacBook, the extracted Touch ID button seems to stop working. The Magic Keyboard is seen in the System Preferences. The issue goes away after reconnecting the Lighting cable, but I have to input the password manually at least once in such a case. Does anyone have the same problem?

@spkane
Copy link

spkane commented Jun 27, 2024

I'm so dumb, I teared appart the battery cable when removing the backplate, does anyone knows where can I buy one ? or find a way to replace it 😭

The battery is model number A1645

You can find them online: https://www.google.com/search?q=a1645+battery

@krubenok
Copy link

@spkane - you don't need the battery for this to work. I removed it and only use it powered over the lightning port. macOS will just report it being at 0% all the time.

@spkane
Copy link

spkane commented Jun 27, 2024

@spkane - you don't need the battery for this to work. I removed it and only use it powered over the lightning port. macOS will just report it being at 0% all the time.

Thanks. I know that. Indeed, you only need it if you want it to remain wireless.

I was just answering the older post about where you can get a replacement if you want one. The batteries are online, both originals and cheaper knockoffs.

@spkane
Copy link

spkane commented Jul 6, 2024

Would anyone happen to have a model that encapsulates the battery as well?

These are some options that include the battery.

https://www.printables.com/model/885599-clickable-touch-id-box-tkl-board-wireless-version
https://www.printables.com/model/307249-mac-keyboard-touchid-button-case-with-battery

@spkane
Copy link

spkane commented Jul 10, 2024

Another note for others, some/many of the 3d printed boxes expect you to have some of the screws and the spring plate, so you may want to avoid throwing things away until you have reassembled everything as you want it.

@alexmakus
Copy link

alexmakus commented Jul 28, 2024

I love Apple Extended Keyboard II, and I use it everyday with my Mac. So naturally I wanted to improve it with a Touch ID — and I finally did, using this tutorial, some other videos and some creativity. After retrieving the components, I mounted them at the bottom of my AEKII
IMG_8465
(it required some trimming of plastic molds but nothing major)

I had to cover the battery with some extra layer of thick paper to prevent it being poked by the soldered ends from the PCB:
IMG_8467

I used one of the port openings on the side for installing the Touch ID sensor
IMG_8466

In a typical Apple fashion, I did the Lighting port at the bottom — I figured I don't need to charge it too often, so it will do.

I paired it with my Mac, and it works, which is kind of amazing! :)

Thank you everyone for a ton of input here, it definitely helped me not to screw up things.

@alexmakus
Copy link

The picture from the bottom
IMG_8464

@GregoryBai
Copy link

@alexmakus Wow, do you have a full pic of your gorgeous m0118?

@alexmakus
Copy link

@alexmakus Wow, do you have a full pic of your gorgeous m0118?

IMG_8480-2048x1152

this is the end-result, although I'm considering moving the Touch ID sensor inside.

@meirtolpin11
Copy link

Is it possible to use a third-party battery? I want to integrate the touch sensor into a wireless split keyboard and I don't have enough place for the mac keyboard battery...
Is it possible to solder another battery or it should be exactly the same battery with apple's connector?

@ArminCoin
Copy link

Would anyone happen to have a model that encapsulates the battery as well?

These are some options that include the battery.

https://www.printables.com/model/885599-clickable-touch-id-box-tkl-board-wireless-version https://www.printables.com/model/307249-mac-keyboard-touchid-button-case-with-battery

Is there a reason why no cases have a power switch? All of the cases with batteries are always on, or am I wrong??

Sign up for free to join this conversation on GitHub. Already have an account? Sign in to comment