Skip to content

Instantly share code, notes, and snippets.

@KhaosT
Last active April 19, 2024 14:45
Show Gist options
  • Save KhaosT/1406a6b6bea38f59e059c2afcb39d545 to your computer and use it in GitHub Desktop.
Save KhaosT/1406a6b6bea38f59e059c2afcb39d545 to your computer and use it in GitHub Desktop.
Make your own Touch ID Button

Tools Needed

  • iFixit iOpener Set
  • T4 Screwdriver
  • T3 Screwdriver

Steps

  1. Soften adhesive using iOpener IMG_1610

  2. After about 60~90 seconds, use Opening Picks (or a slot screwdriver that's thin enough to fit) to pry open the back cover from upper right corner IMG_1611

  3. Apply more forces to completely remove the back cover IMG_1612

  4. Disconnect the battery IMG_1614 IMG_1615

  5. Remove the screws (T4) that keeping the black plate attached to the frame and remove the black plate

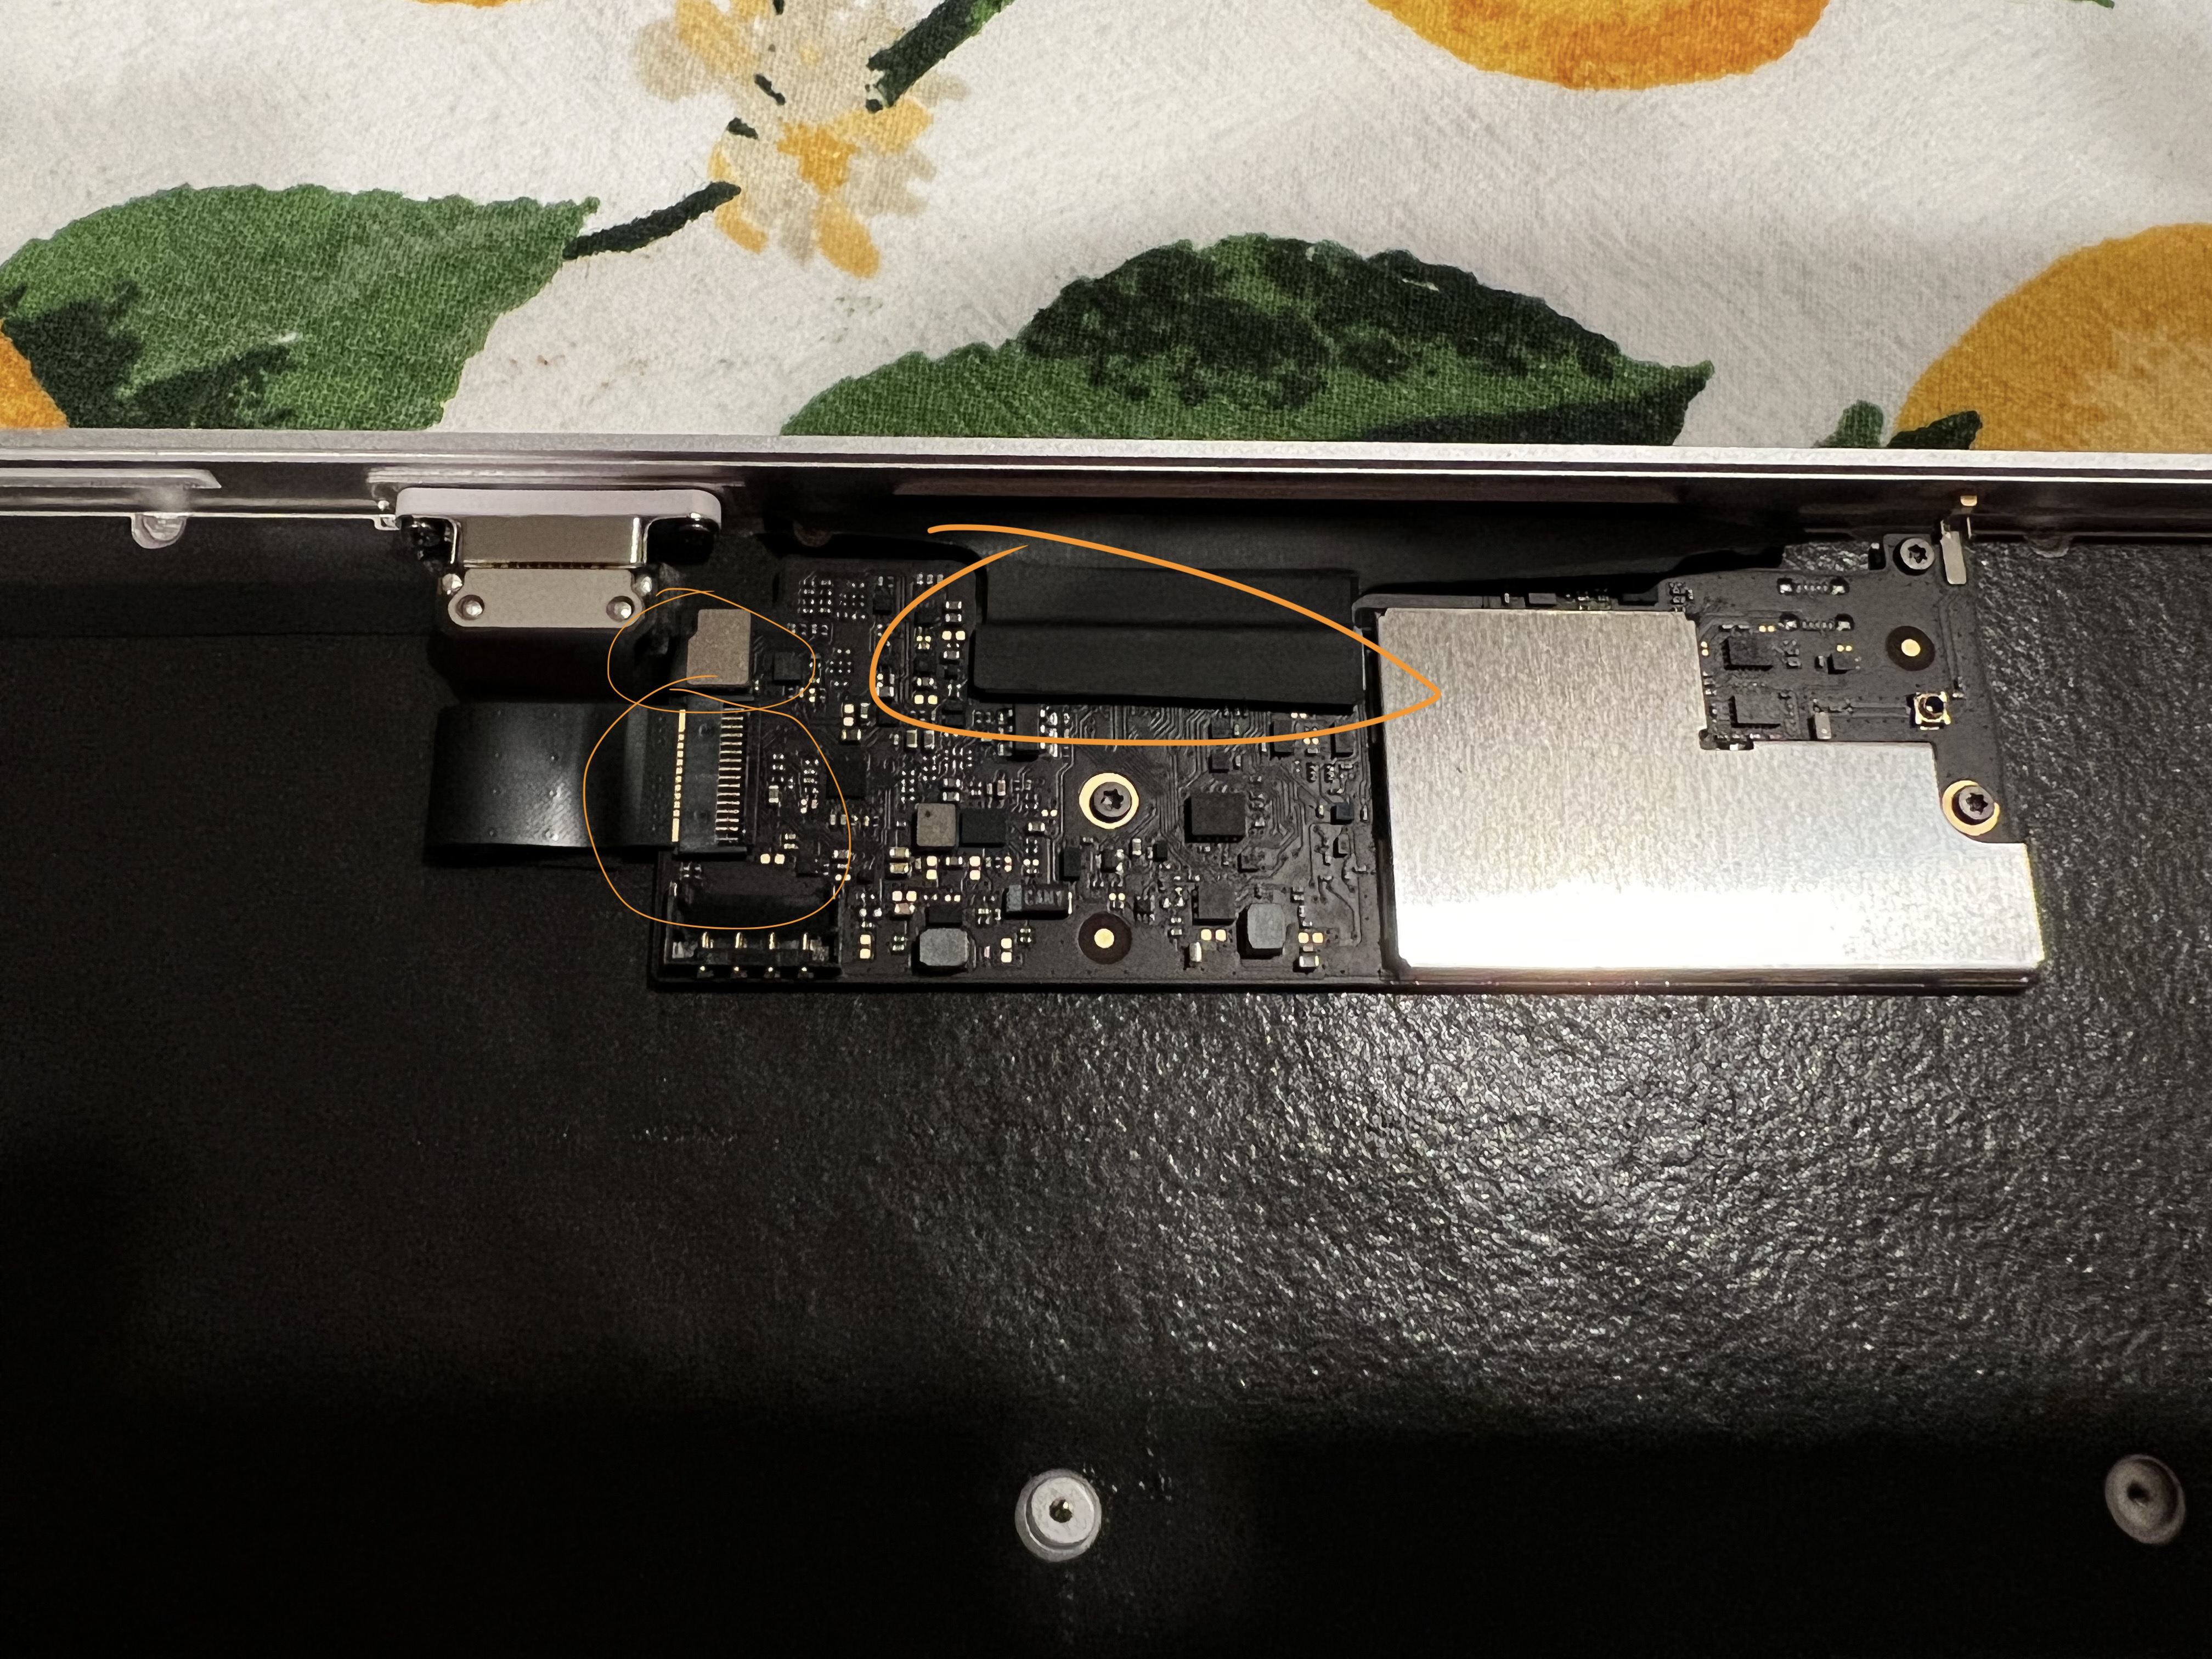
  6. Disconnect all 3 connectors from the logic board and take out the logic board from the Keyboard frame IMG_1616 IMG_1618

  7. Remove the Lightning connector (T3) IMG_1620

  8. Remove the power switch from upper left corner (T3)

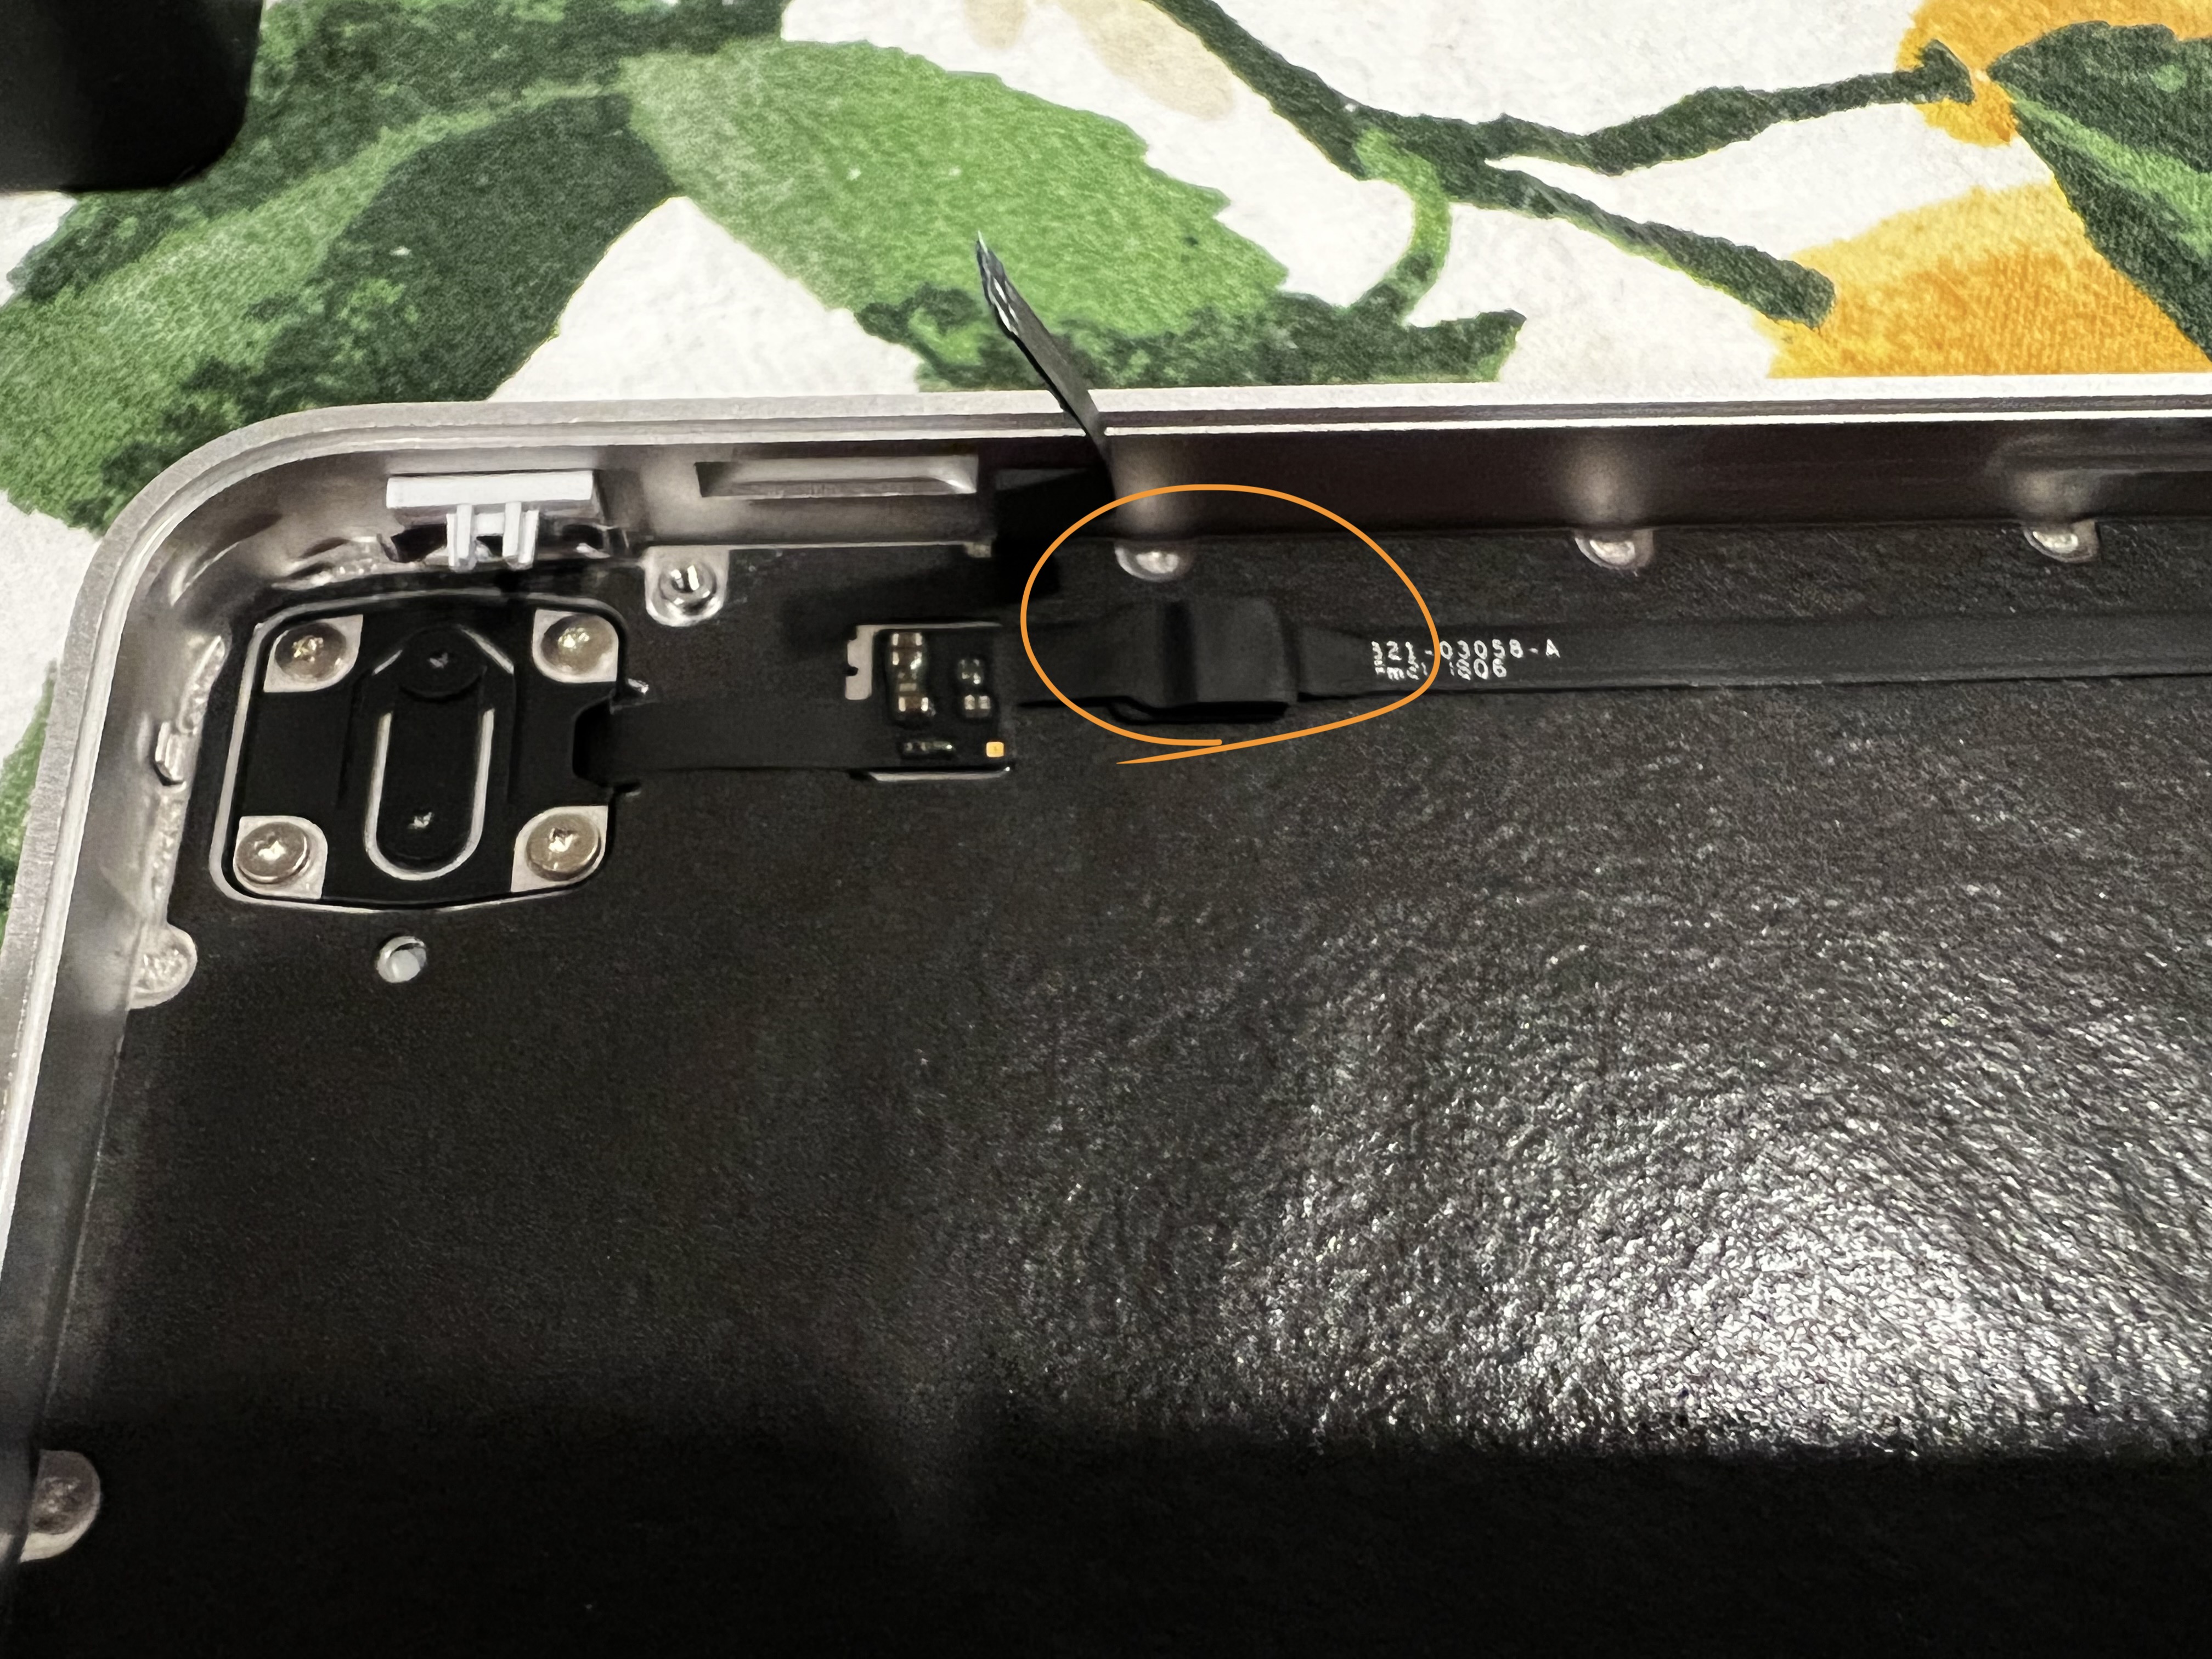
  9. Carefully remove the sticker(?) from the connector and disconnect Touch ID sensor from the connector IMG_1621

  10. Unscrew the mounting screws around the Touch ID sensor (T3), and remove the Touch ID sensor L1030076

  11. Carefully remove the flex cable used to connect Touch ID sensor

Now you have all the parts to put together a standalone Touch ID device for your Apple silicon Mac.

After connecting the Lightning connector and Touch ID sensor back to the logic board, you can pair the Touch ID sensor with your Mac under System Preferences.

If the pairing step doesn't appear when you go to Touch ID settings -> add a new fingerprint, make sure the Touch ID sensor is correctly connected and try power cycle the Touch ID device.

@Calvin-LL
Copy link

Calvin-LL commented Jan 1, 2023

Thanks to this guide, I was able to make this last week. Link to model
IMG_3940

@nixwiz
Copy link

nixwiz commented Jan 4, 2023

Thanks to this guide, I was able to make this last week. Link to model IMG_3940

And thanks for that link. I had been trying a different 3D printed case and it was giving me fits getting a good print.

@humza2000
Copy link

humza2000 commented Jan 23, 2023

IMG_4770 2

Thanks for the inspiration here @KhaosT, mine worked out great, fully functional and wireless.

Few tips for anyone else wanting to give it a try:

  • the battery has a pull-tab adhesive, so you don't need to pry it out (like I did)
  • the white keycap of the Touch ID button will come off easily if you lever/pry it, there is a very small amount of adhesive on it - this gives the option for a cleaner case/mount

I would be willing to bet that these "could" be relocated into a different keyboard key cap. There is a lot of ribbon cable for the sensor so with some creativity (and a bit more electronics nous than I have, to maybe share the battery) to it could be achieved.

Is the bluetooth antenna on the pcb and did you use the TKL keyboard?
UPDATE now that I've opened my keyboard: The bluetooth antenna is on the pcb. I thought there was a MHF4 or MHF1 connector on the left side of the pcb in the pictures, but there isn't!

@awolfram
Copy link

I don't get it. How do you remove the connectors? I just destroyed mine by trying to pry them off, in turn tearing them.

@humza2000
Copy link

I don't get it. How do you remove the connectors? I just destroyed mine by trying to pry them off, in turn tearing them.

@jdsimcoe
Copy link

jdsimcoe commented Feb 5, 2023

What wallpaper / screen saver is this?

image

@humza2000
Copy link

humza2000 commented Feb 15, 2023

@toomellow
Copy link

Any of you guys wanna make some $ and bang one of these out for me? I'd be cool with supplying the keyboard and paying upfront. Would just do it myself but don't have the time. Hate this damn magic keyboard but love the god damn Touch ID

@hackrmomo
Copy link

IMG_0317 Done! 3d files: https://www.printables.com/model/399770-touch-id-keycap-for-mechanical-keyboard Additional photos: https://www.reddit.com/r/MechanicalKeyboards/comments/113b0mb/keychron_k2_pro_with_touch_id/?utm_source=share&utm_medium=web2x&context=3

What does your IO look like? I want to do something similar with a Tofu65 + dz65rgbv3 but that has a USB C in (which I'm assuming the Keychron does too). How do you interface the lightning port?

@humza2000
Copy link

IMG_0317 Done! 3d files: https://www.printables.com/model/399770-touch-id-keycap-for-mechanical-keyboard Additional photos: https://www.reddit.com/r/MechanicalKeyboards/comments/113b0mb/keychron_k2_pro_with_touch_id/?utm_source=share&utm_medium=web2x&context=3

What does your IO look like? I want to do something similar with a Tofu65 + dz65rgbv3 but that has a USB C in (which I'm assuming the Keychron does too). How do you interface the lightning port?

Look at the additional photos.

@kencherasaro
Copy link

kencherasaro commented Mar 24, 2023

I would definitely be willing to pay for one of these! Any takers? I am a software guy not a hardware guy ;-)

@litossssss
Copy link

Question: I don't have a 3D printer so I outsourced the printing to Shapeway. On the C-plate, they said they could not print the indented center portion to the specified measurement because "too delicate" and it risked being broken during production, they printed a bit thicker. I don't have the 3D printed units yet as they are still in production so I cant test anything, but, do you foresee a problem with this change in thickness in the center portion of the c plate? Thanks in advance

@Calvin-LL
Copy link

Question: I don't have a 3D printer so I outsourced the printing to Shapeway. On the C-plate, they said they could not print the indented center portion to the specified measurement because "too delicate" and it risked being broken during production, they printed a bit thicker. I don't have the 3D printed units yet as they are still in production so I cant test anything, but, do you foresee a problem with this change in thickness in the center portion of the c plate? Thanks in advance

I'm assuming you are referring to my model. This conversation would've been more appropriate on Printables since this is not my gist. I'm not sure which portion they're referring to and whether it ended up taller or shorter so I can't tell for sure. I'm assuming they're referring to the cylinder in the exact center, if it's too short then button wouldn't reach it, if it's too tall then the button will be pressed all the time but you can always file it down with a nail file.

@krubenok
Copy link

I still need to 3D print the keycap (h/t to @humza2000 for the idea and file, I was originally planning on replacing the nob instead), but it turned out really well. I used a mill to remove enough aluminum on the lower case of a Keychron Q10 to get the lightning cable through. The female connector is just taped to the underside of board on the inside so it has enough hold to not move around, but I had to plug the cable in before shutting the case. I don't disconnect my keyboard very often so I'm ok with this compromise but might revisit in future if it starts to bother me.

The random gashes in the aluminum are due to the tray coming out of the vise mid operation in the mill. After that I cleaned it up with a file and I think when I do my second one of these for my work keyboard, I'll just do the whole thing with a file. It goes fairly easily manually.
IMG_0895
IMG_0896

@tspan09
Copy link

tspan09 commented May 8, 2023

Do you know how to make it smaller? Only using the components needed for touch id and removing the rest? I also wonder if you could use a slim touch id button from the new iPad mini in place of the original. I’d love to mod this into my Logitech vertical mouse if my questions/suggestions would work.

@startswithaj
Copy link

Would anyone happen to have a model that encapsulates the battery as well?

@petervillaroman
Copy link

petervillaroman commented Aug 19, 2023

Does anyone know if the Ukrainian Apple Magic Keyboard would work ( I don’t really see why not). It’s $30+ cheaper than the regular American version.

@Whitespace
Copy link

Does anyone know if the Ukrainian Apple Magic Keyboard would work ( I don’t really see why not). It’s $30+ cheaper than the regular American version.

Yes it should work just fine. I bought the cheapest refurbished keyboard off eBay (Italian layout) and it's been great.

@petervillaroman
Copy link

petervillaroman commented Aug 23, 2023

Does anyone know if the Ukrainian Apple Magic Keyboard would work ( I don’t really see why not). It’s $30+ cheaper than the regular American version.

Yes it should work just fine. I bought the cheapest refurbished keyboard off eBay (Italian layout) and it's been great.

That's great to hear! I ended up buying a used one off ebay as well.
I'd highly recommend ebay for anyone looking for a cheap alternative. I got mine for $61.67 total.

@mattiacolombomc
Copy link

Has anyone tried to attach a spare Macbook Touch ID button to the Magic Keyboard Logic Board? 😏

@mattiacolombomc
Copy link

@matthewryan would it be possible to have more details about the wood model you made? that looks super clean!
thanks in advance!

@dimitris-c
Copy link

Thanks added one recently to my Keychron Q1
296794840-f7b7f71a-2b56-496b-b333-80d6b71ebeb4

@matthewryan
Copy link

matthewryan commented Mar 12, 2024

@mattiacolombomc it was actually a pretty simple implementation:

  • A small length of pine;
  • a large hole drilled through the centre (10.5mm from memory) -- the plastic keycap around the sensor is easily removed;
  • a bunch of patience using fine chisels to remove the space for internals (rough, but worked fine);
  • spray lacquer and fixed the components with a dab of superglue and some small screws

I've actually revisited this and had another crack at it, installing the whole thing (inc. battery) into a Keychron K8 keyboard... it all somehow fits!

IMG_3388 Large
IMG_3389 Large
IMG_3390 Large
IMG_4766 Large
IMG_5361 Large

@spkane
Copy link

spkane commented Mar 20, 2024

@KhaosT Do you know if this works with both versions of the TouchID magic keyboard? The one with and without the number pad?

I assume so, but I would like to know if anyone can confirm that.

@KhaosT
Copy link
Author

KhaosT commented Mar 20, 2024

@KhaosT Do you know if this works with both versions of the TouchID magic keyboard? The one with and without the number pad?

I assume so, but I would like to know if anyone can confirm that.

The logic board for the one with number pad is a lot longer than the one without. Depending on your use case, that might not be desirable. But yeah, both can be taken out and use standalone.

@cubuspl42
Copy link

As I don't own the iFixit iOpener Set, I heated the keyboard on my Prusa MK4 heatbed (75 degrees Celcius). It worked very well. I did some prying, some heating, more prying, more heating, and so on (I'm not 100% sure it was needed, but didn't hurt). I used a metal nail polisher as a lever. You need to put some force when tearing the back plate off.

It's difficult to open the keyboard without leaving any marks, but I guess the keyboard without Touch ID and the controller isn't worth much anyway.

@humza2000
Copy link

lol i used a hair dryer and a kitchen knife. totally destroyed the keyboard but it was worth it!

@humza2000
Copy link

IMG_0317 Done! 3d files: https://www.printables.com/model/399770-touch-id-keycap-for-mechanical-keyboard More photos: IMG_0300 IMG_0294

it wont let me upload new photos :(
this is what the io and insides look like:
IMG_0300
IMG_0294

@humza2000
Copy link

IMG_0915
IMG_0916

@humza2000
Copy link

IMG_0917

Sign up for free to join this conversation on GitHub. Already have an account? Sign in to comment