This is an initiative to create an overview of the issues found with the Creality CR-6 SE.
As of this writing (2020-09-19) the large number of the motherboard issues have not been publicly acknowledged. Hopefully this overview forces Creality to acknowledge the issues with the Creality CR-6 SE leveling free 3d printer.
According to Creality all issues should be resolved in the newer models:
Here are the improvements we did as below: 1, remove the step-down IC, from 24 V to 12 V. After many times verified, There is no difference from 24 V. 2, use new motherboard, from the design aspect, remove the buck IC, better circuit design. 3, the fuse is the self-recovery fuse, the principle is to absorb current, but easy to cause smoke. After experimental evidence, 0 Ω resistance can play the same role, and will not smoke. 4, increase the PVC sheet, insulating tape, etc., the purpose to block the hot bed bare position, to prevent the circuit > conductivity. 5, Remove the ground wire and organize the circuit conduction.
They've also been sending some kits to some users so they can fix the issue on their own printer.
The power switch fails. This can cause it to turn off mid-print, not turn off at all, or smoke coming from the switch. It appears that the issue is two-fold:
- Creality used the wrong crimps for the switch: the switch is rated 10A, but 16A crimps were used for connecting the wires to the switch.

- The switch itself is of bad quality and does not make good contact internal contact. Eventually the switch fails.
Some users have been replacing the switches proactively. It is very hard to get into contact with support, and otherwise it takes weeks for something as trivial as a switch to arrive.
This issue has been sort-of acknowledged by Creality.

It appears that in the newer batches Creality has switched to a new switch. You can identify this switch by that it has three prongs.
UPDATE 2020-12-08: From printer produced in November a new switch has been used with three pins. This doesn't have the sparking issues.

In multiple reported cases the auto-bed leveling system can't level the bed. That is especially annoying because the print bed does not have bed leveling screws. There appears to be a workaround by manually leveling the bed tightening screws.
The filament run-out sensor seems to have a high failure rate. There appear to be multiple issues happening:
- The PCB of the filament run-out sensor is not fixed in the housing. This appears to be fixable by the user though (video on YouTube).

-
The wiring to the filament runout sensor can become loose due to vibrations. Fixable as seen in this video.
-
The filament sensor fails entirely: it never detects filament. It is not fixable, but can be bypassed by using a 10K resistor.

The largest issue with the CR-6 SE is the motherboard issues. It cannot be worked around by the user and requires a replacement.
UPDATE 2020-12-08: It appears that there is a new motherboard revision 2020-06-12 v4.5.3 now
These issues have not been (fully) acknowledged by Creality
There appear to be several issues happening:
-
The printer motherboard can be powered up via USB, and this causes boot failures because the motherboard gets confused. This can be worked around by using an USB optocoupler or preventing the USB 5V pin connecting.
-
The printer works fine, but connecting it via USB blows up the USB host ports on the Raspberry PI or computer attached.
-
The printer work fine, but plugging in an USB cable blows up the printer. Sparks may occur.

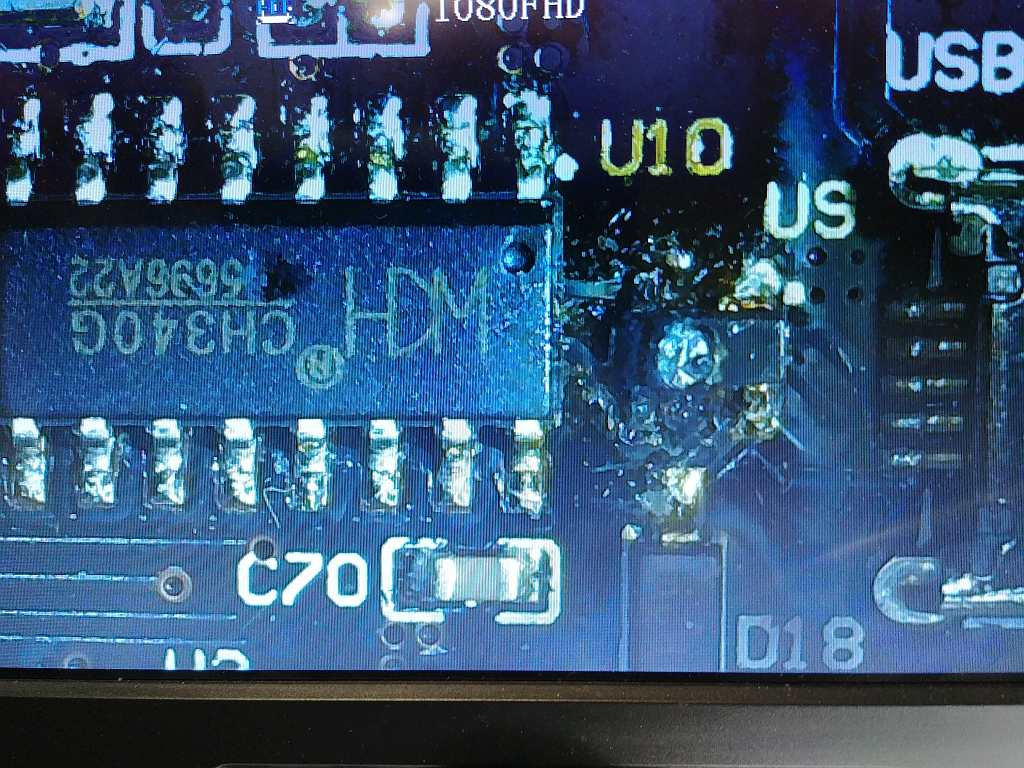
Several reports have been made that the motherboard PCB itself melts down, accompanied with smoke. Sometimes this happens shortly after first power on or shortly after the first print. However, it can and has happened after two weeks too.
This issue has been partially acknowledged by Creality, stating that 0.15% of the motherboards are affected.

Back on the envelope calculation: 0.15% means that on 10.000 units only 15 motherboards are affected. That seems reasonable, but as of this writing only 4000 units were received. Count maybe 1000 sold in retail and you come to about 5000 units "in production".
Let's count. To protect the privacy of the people who posted it I'm using the initials of the people, so you can see there is no double counting.
- 4 August by JL Just received my CR6 SE yesterday. But quickly notice this major issue. The moment it is turned on the heat bed automatically heats up without touching anything. Luckily I have a good and responsive reseller that is sorting out with Creality now.

- 17 August by JW - Put the cr-6 se together last night, ran an eevee test. It worked awesome. This morning turned it on and it popped with a puff of smoke.

-
15 August by /u/The_Sqeuakening I wish I had looked for this place before assembling my printer, the motherboard on mine burned as soon as I started it. [...] I had set the power supply to the correct voltage for my region so I am fairly certain it was not the power supply.
-
25 August by /u/Prymus142 Prints great. Rather it did, Now the screen won't come on. So I have a brick.
-
29 August by /u/Kingpenny1 Second Time Turned On, Smoke Poured Out. Be Careful!

- 1 September by TI Well my CR-6 SE just went up in smoke. I just set it up. It was heating and then started smoking.

- 4 September by HW it printed once perfectly. The 2nd time turning it on it started smoking

- 4 September by "Mike" *In case you were wondering what it looks like when a CR6 burns up, here is my buddy Mike's. Smoked on first start up... *

- 4 September by DP After a week or so of small successful prints I was looking forward to a weekend off work of putting the CR 6 se through the paces and really testing it. So far I have only printed when I could be around to monitor it and I have been turning off the power to it when not in use. Apparently I am the latest victim of the faulty motherboard issue apparently. When I least expected it I just leveled the bed and was ready to start another small print when this happened. Reaching out to support to see how they handle it.


- 12 September by JJ 3 weeks ago my machine would not turn on. Checked the power cable, the fuse and figured it was the switch; it was not making as sound when turning on or off and all of the wires where on tightly. Ordered a new switch and replaced it by following [redacted]'s post using the Digi-key switch and fuses. Was finally able to replace it today and then my motherboard threw off a large spark who do i need to contact for a replacement because this is so frustrating. It worked for almost 2 weeks in the beginning and has been down ever since

- 14 September by RB So here's a pic of the traces that are burning on the back of the main board. My board next to one that is burn't. The Stepper motor 10.7v trace is burnt open as well as one of the 24v traces.

- 15 September by JH *plugged in my USB cable to my computer. Fried both the computer and the printer... USB Port on the Printer CB was shorted the gnd and D+ pins. *

- 15 September by CH Looks like I’m now a member of the burnt motherboard club... I’ve had mine for over two weeks with no issues and had just finished a 20 hour print.

-
16 September by MB Mine cant boot after spark and smoke, plug in usb for octoprint and electrical spark coming out.. cant even boot, already raised a ticket to creality and hopefully they reply soonest..
-
16 September by AD So I plugged in my microUSB cable to connect it my PC and it looks like my USB shorted itself, smoked a little, and I saw a flash of flames.
-
17 September by JR Decided to try to try my hand at octoprint. Set it up on my windows machine and decided to try it out for this print. Did my level, and went to connect usb first with the 5v pin blocked as I have seen recommended. My cable started to smoke and quickly hot enough to melt. Pulled that out quick. Picked up another cable, plugged it in to my pc and then went to plug it in, and it started parking as soon as it touched the micro usb port shield! What am I doing wrong?
-
19 September by Joel Telling HOLY CRAP. Went to plug in a USB cable on the @Creality3dprint CR-6 SE and THERE WERE SPARKS. Power cycled printer, and now it’s stuck at this screen and dead. :(
-
19 September by /u/dominos789 My CR6 is currently stuck on the loading screen and does not boot. Have tried updating the main firmware and the display firmware without any luck. Tried formatting the SD card, changing the file name, keeping the SD card pushed in. I am able to connect using octoprint and it seems to be stuck in a boot loop (printer sends a "start" command when already on, per octoprint).
-
19 September by NO We connected the Printer with the micro USB to the PC to start the first test prints quick. It starts to smell and the usb cable become very hot. Now the printer restarts every time with every action. To be a bit more specific: after the usb plug was removed, we killed the power and had it restarted.The display started up as well, like it should, but as soon as you went to leveling or any other option and you pushed 2-3 buttons it restarted everytime.
-
21 September by LR Well there goes my mainboard. I went to change the e-steps with pronterface, the second I plugged in the usb. There was spark no magic smoke though.

- 23 September by /u/McNick97 Thought I checked everything... Apparently not. First time powering up the printer and flashing the firmware worked. Then I tried lowering the x gantry. Didn't move and suddenly I heard a poof sound and smelled the magic smoke.

- 24 September by almumen When I turn on the printer, it immediately heats up non stop that I had to stop it before it catches fire! look at the heat bed temperature against the target temperature! Here I set the target @60 thinking that 0 is the problem. but the heating continues past 60 non-stop!

- 28 September by /u/Yeraze Just happened. After a few days of successful prints, I just had a long 20hour print finish successfully. Was removing it from the bed when there was a sudden “hiss” and flash visible from inside the case.. a few flames and a ton of smoke. Opened it up, you can see the burn where something blew. Ironically, the blue fuse right next to it is perfectly fine. That part under the heatsink is visibly loose now, all the traces burnt.

Seems not as horrible as it seems, but it does seem that the failure rate is slightly about 0.15%. Remember that 50% of the 10,000 backers did not receive their unit yet (as of writing at most 5000 units have arrived) - but also an unknown number has been sold through resellers (1000-3000?).
We're not at the end of the Kickstarter yet. The units sent on 4-10 August are now arriving in Europe. This means that over 50% of the units did not arrive yet.
Secondly, this has already been a horribly handled Kickstarter. Creality has been either dishonest about shipping ("express shipping" "we will ramp up production to three shipments per week") or has switched their decisions multiple times ("no sorry, we ship by top countries first, oh and we forgot to mention that add-ons orders will be shipped last").
If you live in Europe or Australia, and ordered add-ons, that means you're at the back of the line when it comes to shipping. Those printers are now (mid-September) being shipped. With shipping times being over 40 days, imagine receiving your printer at the end of October, only to have it go up in a puff of smoke.
If you're looking to buy the Creality CR-6, note that there are plenty of alternative printers that work just as well (or even better). For the price of a Creality CR-6 SE, for instance, you can get a BIQU B1 with a BLTouch and TMC2209 drivers in UART mode (sold separately).


you are absolutely beautiful! first i didn't cut the earth wire i disconnected it. then you say that you have to insulate the clips with kapton tape, but once isolated reconnect the earth wire to give yourself a clear conscience comes back exactly to disconnecting it! so don't give a lesson please!