- AGB-001
- ASS101 screen
- Ribbon adapter
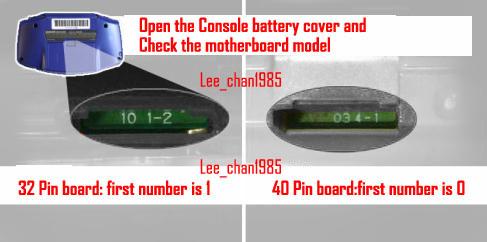
You can tell the model by taking off the battery cover and looking at the motherboard model
- 32 pin: 1st number is "1"
- 40 pin: 1st number is "0"
You can tell the type by the ribbon circuitry or connector color (source)
- A: uniform widths, white connector
- AB/B: differing widths, brown connector
- 32/40 pin: Must purchase one that matches your AGB-001 motherboard
- Solderless: Will not be as bright unless you add a wire
- Solder required: Must connect P1 to left leg of DA1
- Switch: Allows switching between high/low through the battery compartment. Requires slight shell modification. Physical switch so it keeps setting across device reboots.
- 5 level w/ key combo: Allows switching through 5 brightness levels with Select + L, but boots with lowest setting every time.
- 32 pin + Type-A: Perfect (source)
- 32 pin + Type-AB: Washed out and dim (source)
- 40 pin + Type-A: Washed out and bright (tested). Possibly connect 103 to GND to fix (source)
- 40 pin + Type-AB: Perfect (tested)
- Remove rubber grommet and backing from front and back of AGS-101 screen or else it won't fit
- Must modify shell to fit new screen
- Can adjust screen using potentiometer through hole behind sticker on the back
- If buying a new shell with hardware, use the hardware that came with the shell since the hardware might be different and the shell is designed for them
- AGB-001
- AGS-001 screen
- Ribbon adapter

I installed an aftermarket AGS-101 screen into a 40pin AGB console using an older/cheaper ribbon cable. The resulting picture quality was very washed out with horizontal interference lines. After following the steps outlined in this Reddit post (including leaving Q3 alone) the quality of the screen looks great.