Skip to content

Instantly share code, notes, and snippets.

@nguyenanhtu
Last active January 20, 2024 23:35
Show Gist options
  • Star 84 You must be signed in to star a gist
  • Fork 32 You must be signed in to fork a gist
  • Save nguyenanhtu/33aa7ffb6c36fdc110ea8624eeb51e69 to your computer and use it in GitHub Desktop.
Save nguyenanhtu/33aa7ffb6c36fdc110ea8624eeb51e69 to your computer and use it in GitHub Desktop.
Guide to configure SSL in XAMPP for Windows

How to test 'https' in XAMPP for localhost ? I will guide you

Menu

  • Create certificate
  • Config Apache to access https instead of http
  • Config mod rewrite to generate SSL url
  • Config Virtual host to test site

Step 1 : Create certificate

  • Go to your XAMPP installation directory (in my case it’s E:\xampp), figure out apache folder. In this, find & run batch file named makecert.bat

    Step 1 image

  • A CMD window will appear like that, this is where you setup your certificate to verify your website. All you need is only typing all information that ‘s very easy, except one information “Common Name”, at this you must be typed exactly your URL website. For example in localhost, I will use a Virtual host URL (I will configure it later)

    Step 1.2 image

Step 2 : Config Apache to access https instead of http

  • Now this is time for you to config Apache to access folders with “https” instead of “http”. First, we will force ssl when access folders by add this directive “SSLRequireSSL” in this config file (e:\xampp\apache\conf\extra\httpd-xampp.conf)

    Step 4 image

  • Open this and add line that I talked above in all list folders below :

    • e:\xampp\phpmyadmin
    • e:\xampp\htdocs\xampp
    • e:\xampp\webalizer
    • e:\xampp\security\htdocs
  • Another config file that also need directive SSLRequireSSL located in e:\xampp\webdav.

Step 3: Config mod_rewrite to generate SSL url

  • This next optional step is to redirect “http” requests to “https” requests for the pages we want to secure. This is more user friendly and allows you to still use http when you type in the address (and automatically switch to https:// and encryption). If you don’t do this, and you used SSLRequireSSL, you will only be able to access these pages by typing https://. This is fine and probably a little bit more secure, but is not so user friendly. To accomplish the redirection, we will use mod_rewrite so that we don’t have to use the server name in this part of the config file. This helps keep small the number of places in the config files where the server name is written (making your config files more maintainable).

  • First, we need to make sure that mod_rewrite is enabled. To do this, edit E:\xampp\apache\conf\httpd.conf and get rid of the comment (# character) in this line : #LoadModule rewrite_module modules/mod_rewrite.so Make it look like this : LoadModule rewrite_module modules/mod_rewrite.so

    Step 5 image

  • Now paste all this text to the config file at address E:\xampp\apache\conf\extra\httpd-xampp.conf(That is rewrite URL, if not, you can't access your site via SSL):

    <IfModule mod_rewrite.c>
        RewriteEngine On
    
        # Redirect /xampp folder to https
        RewriteCond %{HTTPS} !=on
        RewriteCond %{REQUEST_URI} xampp
        RewriteRule ^(.*) https://%{SERVER_NAME}$1 [R,L]
    
        # Redirect /phpMyAdmin folder to https
        RewriteCond %{HTTPS} !=on
        RewriteCond %{REQUEST_URI} phpmyadmin
        RewriteRule ^(.*) https://%{SERVER_NAME}$1 [R,L]
    
        # Redirect /security folder to https
        RewriteCond %{HTTPS} !=on
        RewriteCond %{REQUEST_URI} security
        RewriteRule ^(.*) https://%{SERVER_NAME}$1 [R,L]
    
        # Redirect /webalizer folder to https
        RewriteCond %{HTTPS} !=on
        RewriteCond %{REQUEST_URI} webalizer
        RewriteRule ^(.*) https://%{SERVER_NAME}$1 [R,L]
    
        # Redirect /folder_name folder to https
        RewriteCond %{HTTPS} !=on
        RewriteCond %{REQUEST_URI} folder_name
        RewriteRule ^(.*) https://%{SERVER_NAME}$1 [R,L]
    
    </IfModule>
    

Step 4 : Config Virtual host to test site

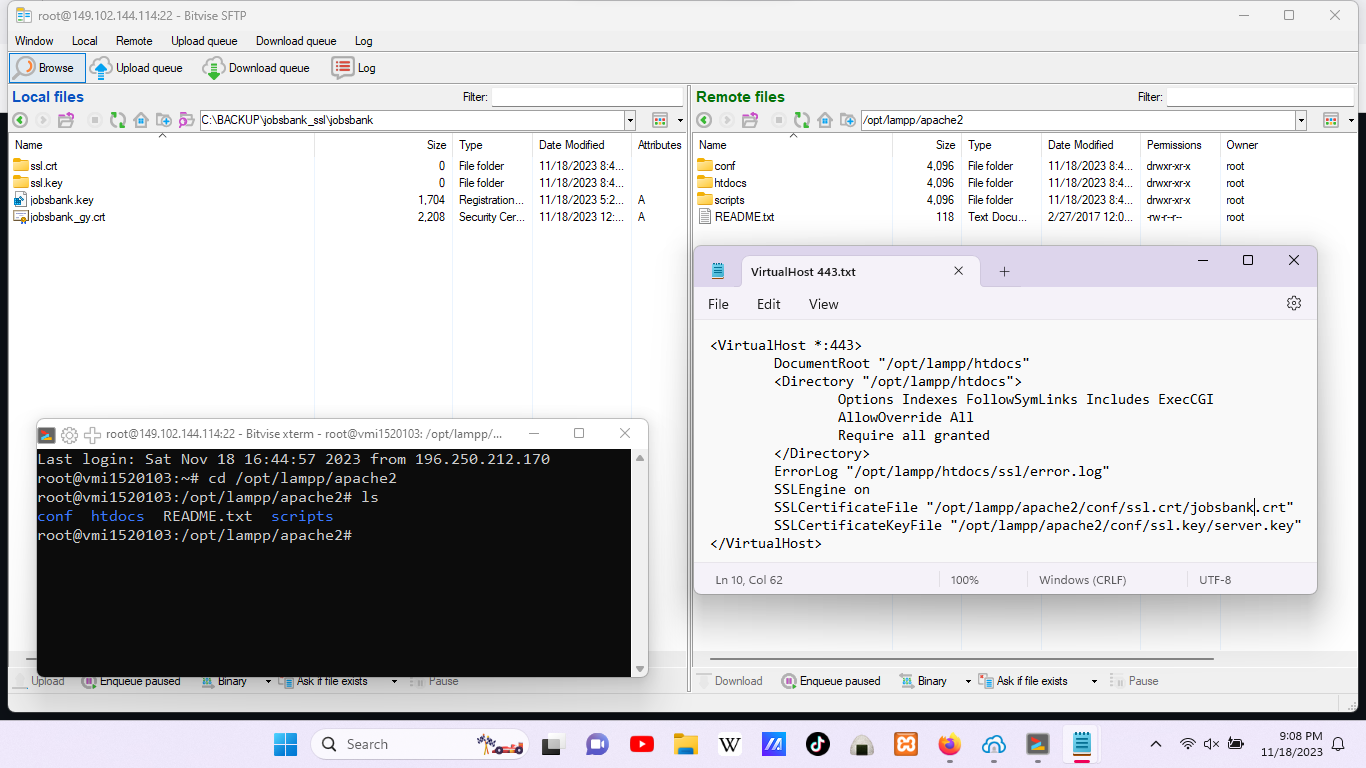
It’s time to config a virtual host to make a better URL to access our project. So, let’s go to file at address : E\xampp\apache\conf\extra\httpd-vhosts.conf Create new virtual config as following sample :

  • VirtualHost *:443 : This is port to run SSL

  • DocumentRoot : Point to your project folder

  • SSLEngine on : Turn on SSL

  • SSLCertificateFile : Just copy, don’t modified it because in step create certificate, XAMPP will auto put your certificate in appropriate folder.

  • SSLCertificateKeyFile : Same as SSLCertificateFile.

    After all, if you configure everything correctly, it will show you result like this :

    Last image

@ligantx
Copy link

ligantx commented Oct 8, 2020

worst tutorial ever

I'll tell you a secret.. make a better one :)

@AleksBaikalski
Copy link

I don't know what it is, but definitely not a tutorial. A piece of fiction, gently speaking.

@idude0407
Copy link

If you can't make a tutorial that can be understood clearly you should not bother with it!

@dimpurw
Copy link

dimpurw commented Mar 14, 2021

@ayandyan I followed the httpd-xampp.conf file, but an error occurred in the apache xampp, the error was blocked port

maybe there is another solution ... ???

@Luco104
Copy link

Luco104 commented Jun 17, 2021

totally wasted my time following this "tutorial". Please delete this and learn to write correctly next time.

@darkelement1987
Copy link

darkelement1987 commented Jul 4, 2021

How would i do this if i already own a cert?

My provider gave me 3 files + a key

mydomain.cer
Sectigo_RSA_Domain_Validation_Secure_Server_CA.crt
USERTrust_RSA_Certification_Authority.crt

I have no idea where to put which files, and in which config files. tried several tutorials, can't get it working

@ereztdev
Copy link

Do no use this tutorial.

@akashrahman-me
Copy link

Fake tutorial

@arafatx
Copy link

arafatx commented Nov 17, 2022

He created this note for himself and I can understand why people don't understand. Please be kind.

@Janvier123
Copy link

This actually worked for me.
same here! Thx

@johnmahugu
Copy link

Its not really that hard, sorry if you were having some trouble, instead of paying for a cert what you need is to create one at Lets Encrypt, this application was made for this purpose, the best thing about it is that you can generate your cert free, but it expires after 3 months, all one needs to do is write a small cron job in python or whatever you prefer, that auto renews the cert and viola! free cert for life :)
i have attached a screen shot here to show you all the relevant stuff you need to know in one image, think cheat sheet hehehe, if you have any questions dont hesitate to get in touch, all the best guys. (ps it should not take you more than 15 minutes to set a new SSL secured domain up, you will notice i only use free stuff, but thats very good, better than most commercial stuff you find out there, and with those few remarks here you go ...)
ssl-setup

@johnmahugu
Copy link

(create crs file, get it verified by a CA like lets encrypt or comodo) on the left, create your folders, insert the appropriate files and then upload to your server then create your virtual host code and append it, easy, restart apache. and we are good.

@johnmahugu
Copy link

my https:// is now active. it took me the time before the first post and this one to propagate 5 minutes or so, all the best :)

Sign up for free to join this conversation on GitHub. Already have an account? Sign in to comment