-
-
Save swiftgeek/0ccfb7f87918b56b2259 to your computer and use it in GitHub Desktop.
Perhaps it's not RW1990 ? Finding reputable supplier can be sometimes tricky
I ordered few pieces from two other suppliers. I've read russian forums. Many other people are having same issues like me. We will see how new stuff will handle with writing.
It was a problem with iButtons. Maybe they just have send me a DS version instead of RW.
I just received few pieces from two other suppliers and and all of them works without any problem.
For anyone coming to this later, I can confirm that's probably crappy iButtons. I just had the same problem and out of a batch of 10 only 2 could be rewritten.
For me this code didn't write to my RW1990. However, a slightly modified version found here does: https://github.com/tes66/Arduino-Uno/blob/master/RW1990.ino
However, this isn't fully complete (a hardcoded pin 10 is used); so here is my slightly modified version:
#define pin 10

OneWire ibutton (pin); // I button connected on PIN 2.

byte addr[8]; //array to store the Ibutton ID.

void setup(){
 Serial.begin(115200);
}

void loop(){
  if (!ibutton.search (addr)){//read attached ibutton and asign value to buffer
    ibutton.reset_search();
    delay(200);
    return;
 }

  Serial.print(millis()/1000);
  Serial.print("> ");
  for (byte x = 0; x<8; x++){
    Serial.print(addr[x],HEX); //print the buffer content in LSB. For MSB: for (int x = 8; x>0; x--)
     Serial.print(" ");
  }

  //compute crc//
  byte crc;
  crc = ibutton.crc8(addr, 7);
  Serial.print("CRC: ");
  Serial.println(crc,HEX);
  if ( Serial.read() == 'w' ){
    ibutton.skip();ibutton.reset();ibutton.write(0x33);
    Serial.print("  ID before write:");
    for (byte x=0; x<8; x++){
      Serial.print(' ');
      Serial.print(ibutton.read(), HEX);
    }
    // send reset
    ibutton.skip();
    ibutton.reset();
    // send 0xD1
    ibutton.write(0xD1);
    // send logical 0
    digitalWrite(pin, LOW); pinMode(pin, OUTPUT); delayMicroseconds(60);
    pinMode(pin, INPUT); digitalWrite(pin, HIGH); delay(10);

    Serial.print('\n');
    Serial.print("  Writing iButton ID:\n    ");
    // Hardcode here your desired ID //
    // 01 D5 9F DC 02 00 00 96
    byte newID[8] = {0x01, 0xA8, 0x29, 0xC9, 0x01, 0x00, 0x00, 0xCA};

    ibutton.skip();
    ibutton.reset();
    ibutton.write(0xD5);
    for (byte x = 0; x<8; x++){
      writeByte(newID[x]);
      Serial.print('*');
    }
    Serial.print('\n');
    ibutton.reset();
    // send 0xD1
    ibutton.write(0xD1);
    //send logical 1
    digitalWrite(pin, LOW); pinMode(pin, OUTPUT); delayMicroseconds(10);
    pinMode(pin, INPUT); digitalWrite(pin, HIGH); delay(10);

  }
}

int writeByte(byte data){
  int data_bit;
  for(data_bit=0; data_bit<8; data_bit++){
    if (data & 1){
      digitalWrite(pin, LOW); pinMode(pin, OUTPUT);
      delayMicroseconds(60);
      pinMode(pin, INPUT); digitalWrite(pin, HIGH);
      delay(10);
    } else {
      digitalWrite(pin, LOW); pinMode(pin, OUTPUT);
      pinMode(pin, INPUT); digitalWrite(pin, HIGH);
      delay(10);
    }
    data = data >> 1;
  }
  return 0;
}
@MagicLegend For me this version also working fine. Thanks!
@MagicLegend Thanks for your version because the code written by @swiftgeek was hardcoded pin 8 in part of his code, and whene I use it with pin 12 my ibutton writing didn't work.
Hello,
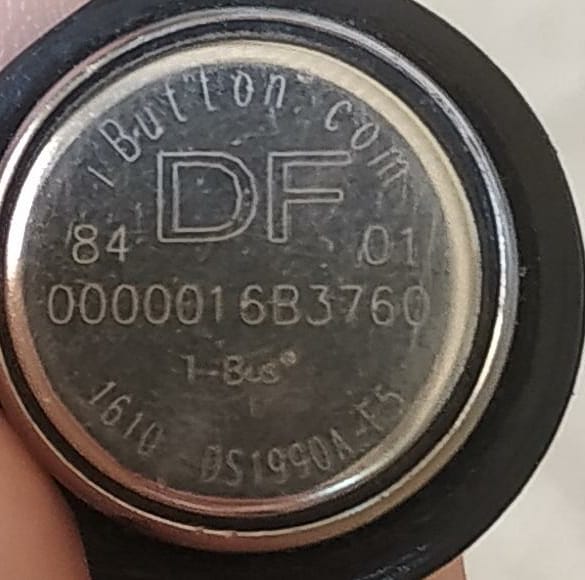
I have a button like in the picture and I can't read it.
I burned the code and connected as needed but there is nothing on the screen ... can someone help me, please?
There is also a number on the button that might be used?

- If You using program above use pin 8 for data or change in program for pin 7.
- Do You gave +5v on pin "AREF"?
- If You using program above use pin 8 for data or change in program for pin 7.
- Do You gave +5v on pin "AREF"?
1.I use pin 8
2.I put it this way:
5V to RES 4.8K to pin 8 to the middle part of the Ibutton and the outside of the button simply to ground
Ok, my mistake, on phone it is a pin 8, but on photos I see GND - Resistor to pin 8 .
@DavidFpv do You use program from MagicLegend on 17 Nov 2019?
Do You change line:
#define pin 10
to
#define pin 8
?
Do You have other 1wire button to check?
Do You chech this 1wire button on other device (intercom with reader)?
o You have other 1wire button to che
As for the resistor connected to GND you are right.
This is an outdated picture.
Everything is connected as I mentioned
"program from MagicLegend on 17 Nov 2019" No, I did not try. I will try tomorrow
Which penis to use? 10 or 8
This button works 100% because it opens a door
Maybe try connecting a smaller RES?
I realized people do it ...
Use program writen by MagicLegen. You can use pin 10 or 8 - but you must set in program what pin You use.
4.8k it may be too big. Try 4.7k.
Use program writen by MagicLegen. You can use pin 10 or 8 - but you must set in program what pin You use.
4.8k it may be too big. Try 4.7k.
Ok I will try it.
Regarding the resistor I saw someone who used 330 ohms ... what do you say about that?
I use 4.7k ohms like others projects. It works and I don't see the need to use other values.
IS IT POSSIBLE TO WRITE DATA ON ds1990a-f5?
No, ds1990a-f5 is read only chip.
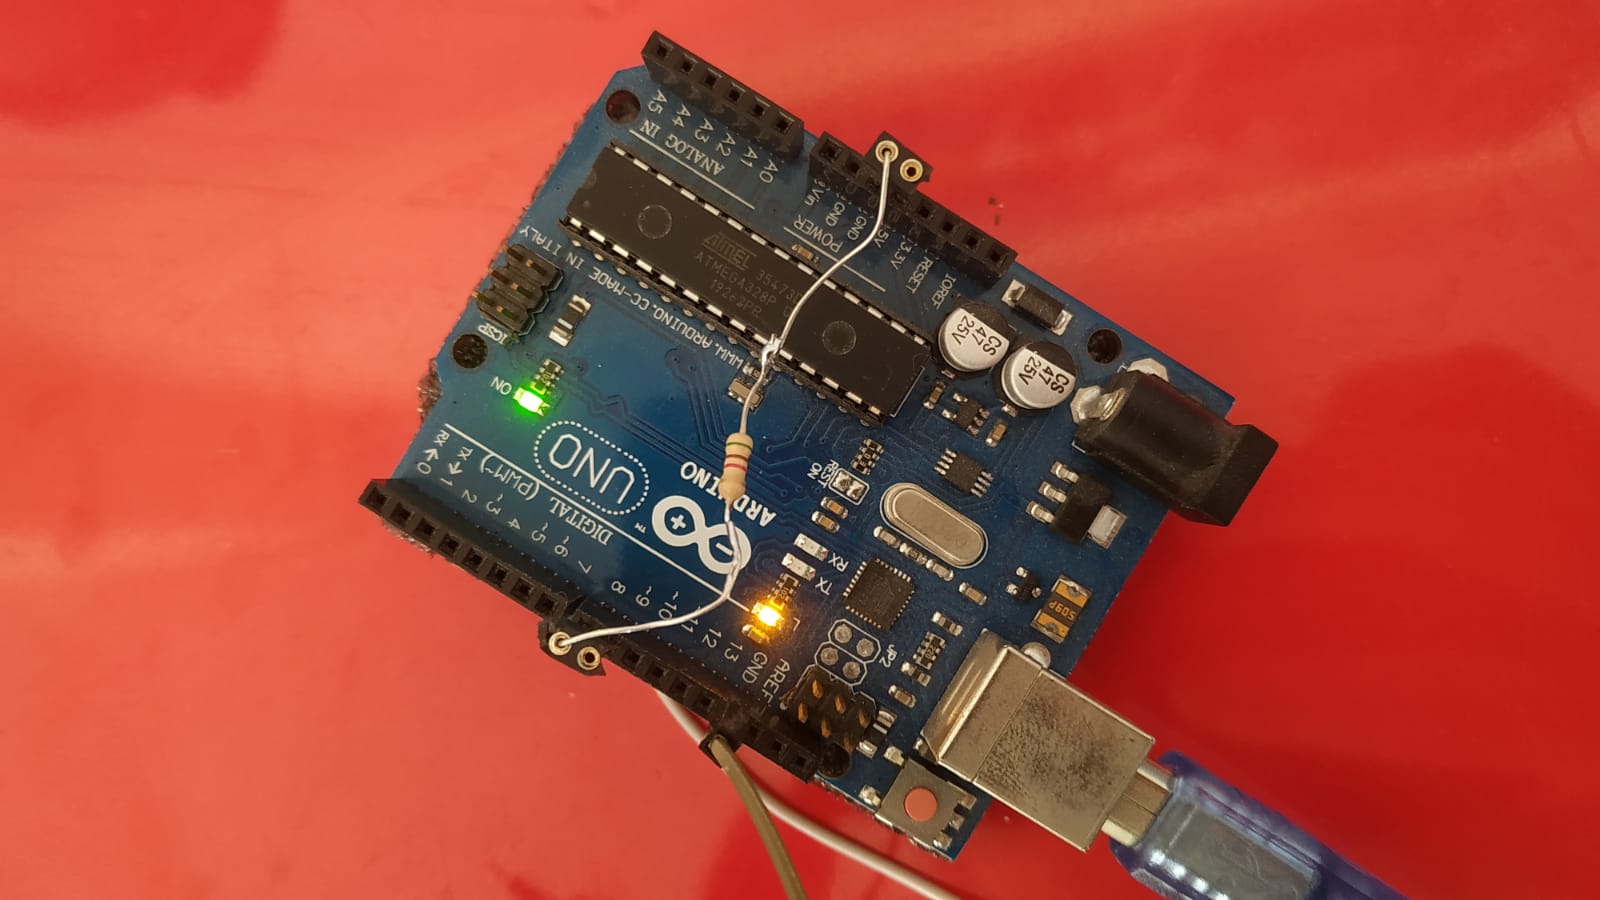
I'm trying to use my Arduino UNO as a reader/programmer for RW1990 Dallas iButtons. I use your code. Reading is working like a charm but I have problem with programming even one iButton. I run the write procedure and when it's finished iButton has still same number.
I guess wiring is ok because reading works. I simply connected iButton reader with Arduino's GND, second pin of iButton reader is connected to D8. The same pin is pulled up with resistor to 5V and basically that's all.
What I've already tried to do is:
Beside of coding I have doubt about origin of bought iButtons. They are not manufactured by Dallas but distributor declares full compatibility with RW1990/TM1990A. What am I doing wrong? Please, can you help me?