How to Force RGB Color Output instead of YPbPr on your M1 Apple Silicon Mac for an External Monitor.
This step-by-step video tutorial will guide you through the procedure of forcing RGB color output on your M1 Mac.

Here is the direct link to the video tutorial: https://www.youtube.com/watch?v=Z1EqH3fd0V4
The video also has Closed Captions (Subtitles) that you can enable, to make it easier to follow if needed.
Please note that you're doing any changes on your own risk.
Here are each of the Terminal commands mentioned in the tutorial, so that you can just copy and paste them:
open /Library/Preferences
plutil -convert xml1
plutil -convert binary1
plutil -lint
The step-by-step procedure on how to force RGB Color Output on M1 and M2 based Macs with Terminal commands
-
Open Terminal and use this command to make Finder select the displays plist file:
open -R /Library/Preferences/com.apple.windowserver.displays.plist -
Drag and drop the com.apple.windowserver.displays.plist file to Desktop manually. Don't use the
cpcommand, as it won't add your current user with writing privileges. -
Convert the file to XML:
plutil -convert xml1 ~/Desktop/com.apple.windowserver.displays.plist -
Open the converted file with the default plain text editor (avoid using the built-in TextEdit app if possible, since it might modify the file and make it unreadable by the system)
open -t ~/Desktop/com.apple.windowserver.displays.plist
or
open -a CotEditor.app ~/Desktop/com.apple.windowserver.displays.plist -
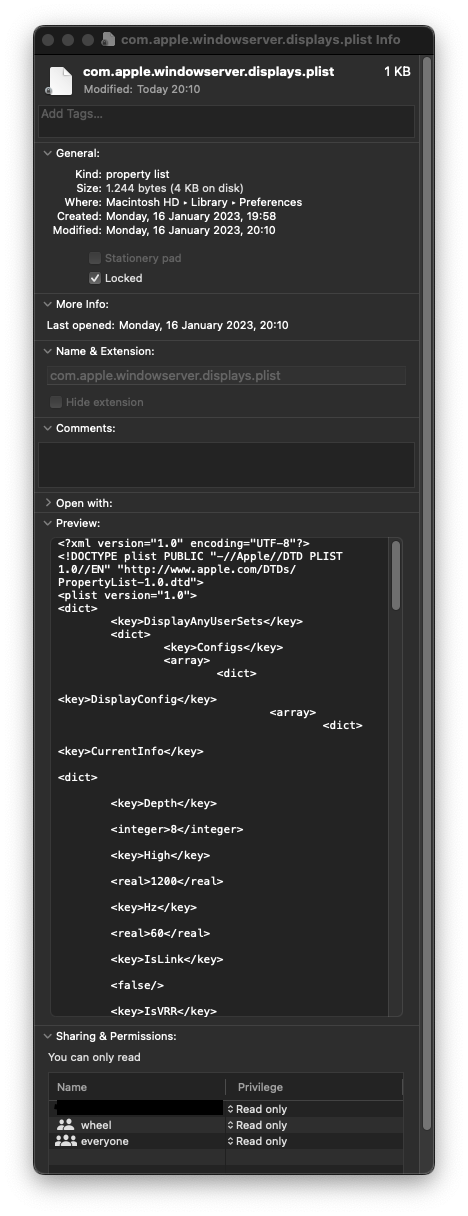
Copy and paste the missing LinkDesription Key under the current display (check the screenshot below for an example of how it should look like):
				<key>LinkDescription</key>
				<dict>
					<key>BitDepth</key>
					<integer>8</integer>
					<key>EOTF</key>
					<integer>0</integer>
					<key>PixelEncoding</key>
					<integer>0</integer>
					<key>Range</key>
					<integer>1</integer>
				</dict>
-
Save the file and then convert it to binary again:
plutil -convert binary1 ~/Desktop/com.apple.windowserver.displays.plist -
Check if the plist file is valid:
plutil -lint ~/Desktop/com.apple.windowserver.displays.plist -
Open the /Library/Preferences/ folder again:
open /Library/Preferences/ -
Drag and drop the updated com.apple.windowserver.displays.plist file from Desktop to the Library folder manually. Don't use the
cpcommand, as it won't add your current user with writing privileges. -
Right Click on the com.apple.windowserver.displays.plist file in the Library folder and click on Get Info
-
Check the boxes for Stationery and Locked.
-
Reboot the Mac.
(Alternative) Terminal commands to force RGB Color Output on M1 and M2 based Macs and workaround for losing RGB color after waking up from sleep
-
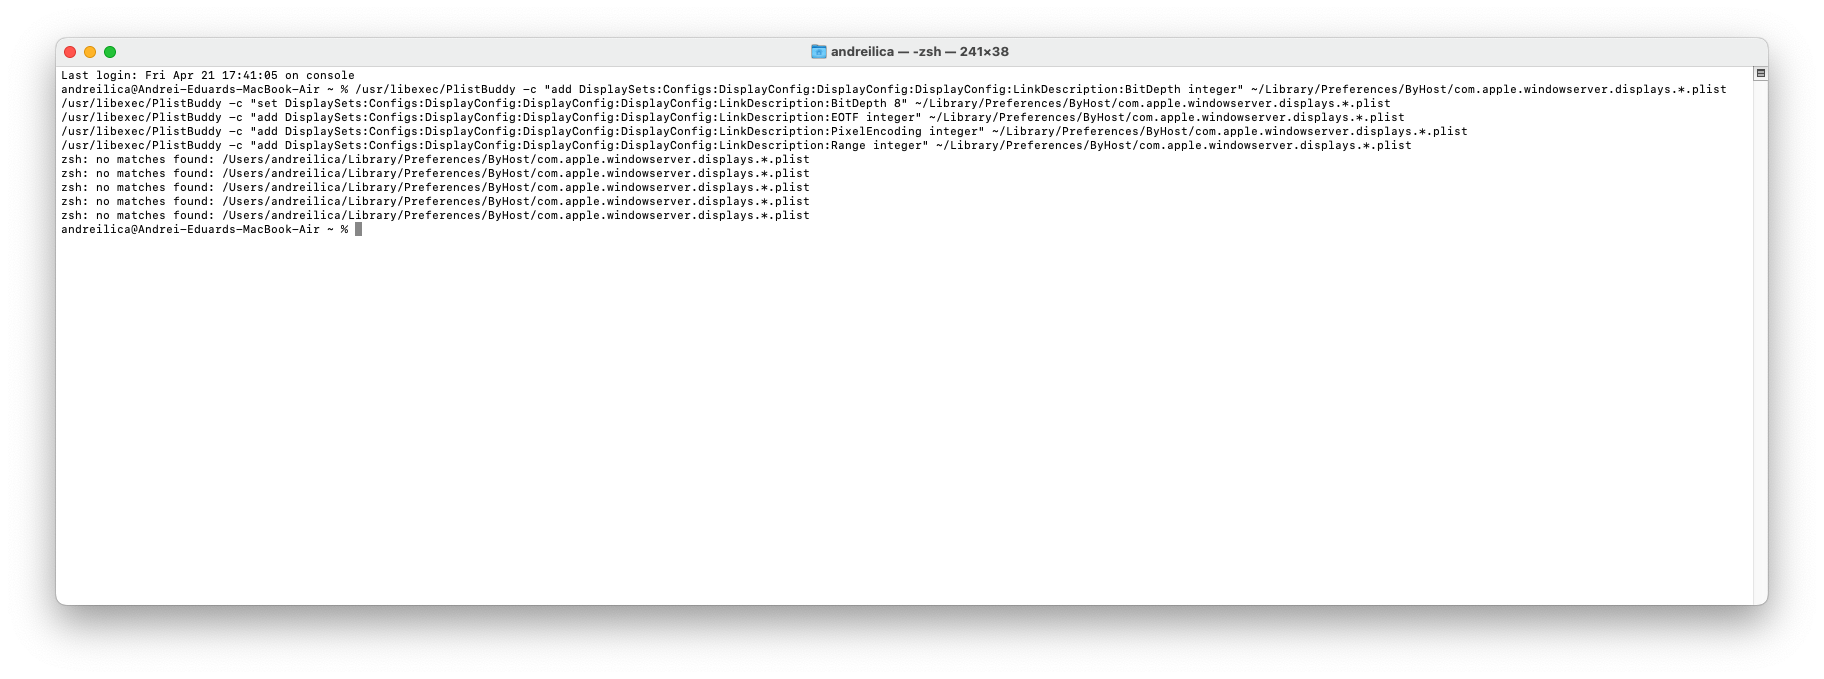
Open Terminal
-
Paste the following commands to edit the User's displays plist file com.apple.windowserver.displays.[UUID].plist using the built-in PlistBuddy function in macOS:
/usr/libexec/PlistBuddy -c "add DisplaySets:Configs:DisplayConfig:DisplayConfig:DisplayConfig:LinkDescription:BitDepth integer" ~/Library/Preferences/ByHost/com.apple.windowserver.displays.*.plist
/usr/libexec/PlistBuddy -c "set DisplaySets:Configs:DisplayConfig:DisplayConfig:DisplayConfig:LinkDescription:BitDepth 8" ~/Library/Preferences/ByHost/com.apple.windowserver.displays.*.plist
/usr/libexec/PlistBuddy -c "add DisplaySets:Configs:DisplayConfig:DisplayConfig:DisplayConfig:LinkDescription:EOTF integer" ~/Library/Preferences/ByHost/com.apple.windowserver.displays.*.plist
/usr/libexec/PlistBuddy -c "add DisplaySets:Configs:DisplayConfig:DisplayConfig:DisplayConfig:LinkDescription:PixelEncoding integer" ~/Library/Preferences/ByHost/com.apple.windowserver.displays.*.plist
/usr/libexec/PlistBuddy -c "add DisplaySets:Configs:DisplayConfig:DisplayConfig:DisplayConfig:LinkDescription:Range integer" ~/Library/Preferences/ByHost/com.apple.windowserver.displays.*.plist
- Reboot your Mac
(Workaround) If your Mac loses RGB color after waking up from sleep mode, either Reboot your Mac (recommended) or use this Terminal command to stop the WindowServer and login again (not recommended):
sudo killall -HUP WindowServer
The end result is having your M1 mac output RGB color to your external monitor instead of YPbPr,
potentially making the colors more accurate and the text a bit more crisp, even on older 1080p monitors.
Hopefully this tutorial would be useful to someone.
Please feel free to ask in the comment section if you have any questions regarding this procedure.
While doing a lot of testing on how the Dual-Cable workaround makes RGB to work on M1, I've discovered what changes it makes to macOS, and managed to create a more streamlined workaround without the need to use a second cable.
To make things easier, I've created a step-by-step video tutorial of the whole procedure that should force RGB color output on your M1 Mac connected to an external monitor, and works on an HDMI-to-HDMI cable connection.
Big thanks goes to the amazing community and all their help over the years to solve issues like this:
https://gist.github.com/ejdyksen/8302862
https://gist.github.com/adaugherity/7435890
Apple Open Source Project Files for Displays and Graphics
https://opensource.apple.com/source/IOKitUser/IOKitUser-1445.60.1/graphics.subproj/IODisplayLib.c
https://opensource.apple.com/source/IOGraphics/IOGraphics-517.17/IOGraphicsFamily/IOFramebuffer.cpp.auto.html
How to Edit and Convert binary plist files
http://hints.macworld.com/article.php?story=20050803111126899
https://apple.stackexchange.com/questions/155393/how-to-beautify-binary-dict-files
https://discussions.apple.com/thread/1768480
How to Edit plist files using defaults and PlistBuddy
https://ss64.com/osx/defaults.html
https://github.com/mathiasbynens/dotfiles/blob/master/.macos
@sudowork has created an awesome script written in Phyton that automates the steps and checks for duplicate files.
You can find more info about it here:
https://github.com/sudowork/fix_m1_rgb
@dangh has created an alernative script for fishshell.
You can find more info about it here:
https://github.com/dangh/force-rgb.fish
@GetVladimir I've also created a Shortcut to Force RGB Color Output using the built-in Shortcuts app.
You can find how to create the Shortcut here:
https://gist.github.com/GetVladimir/c89a26df1806001543bef4c8d90cc2f8?permalink_comment_id=4531552#gistcomment-4531552
@entropyconquers has created a script based on this method written in Phyton that automates the steps, makes a backup and checks for duplicate files.
You can find more info about it here:
https://github.com/entropyconquers/Force-RGB-Color-on-M1-M2-Mac-Script
Multiple PixelEncoding and Range keys in the same plist file
Note that there might be multiple instances of the PixelEncoding and Range keys in the same file, one for each output of your monitor and for different AirPlay devices. You might need to update the integer on each one to get RGB color output on all displays.
Getting RGB color only before login
There might be multiple duplicate plist files with the same name in different locations.
Make sure that you only have the main modified file in:
/Library/Preferences
Then make a backup and remove duplicate displays plist files from these locations (if any):
~/Library/Preferences
or
/Users/username/Library/Preferences
and
/Users/username/Library/Preferences/ByHost
Please note that you'll need to have administrator privileges in order to modify the file in /Library/Preferences. Thanks goes to @keegandent and @StrategicalIT for pointing this out.
USB-C to DisplayPort
From what I've seen, it seems that macOS Monterey 12.0.1 finally outputs RGB color by default on some monitors when using USB-C to DisplayPort cable on M1 Apple Silicone Macs.
You might need to make a backup and delete these 2 files:
/Library/Preferences/com.apple.windowserver.displays.plist
and
/Users/yourname/Library/Preferences/ByHost/com.apple.windowserver.displays.[UDID].plist
Restart your Mac and it should properly output RGB color on the monitor on the next boot.
HDMI to HDMI
The situation with HDMI seems to got a bit more complicated. Now the whole section for the LinkDescription might be missing from the com.apple.windowserver.displays.plist on a clean install and doesn't seem to be recreated when rotating the screen either.
Luckily, the solution still works, but you might need to manually add this whole section in the displays plist file:
					<key>LinkDescription</key>
					<dict>
						<key>BitDepth</key>
						<integer>8</integer>
						<key>EOTF</key>
						<integer>0</integer>
						<key>PixelEncoding</key>
						<integer>0</integer>
						<key>Range</key>
						<integer>1</integer>
					</dict>
The section usually goes right under the CurrentInfo key, and it should look something like this:

This should get your RGB color output working on M1 Mac mini, even when connected with HDMI to HDMI cable.
Multiple monitors when one them is using HDMI to HDMI
Additional thanks goes to @somogyi-ede who tested this with multiple monitors and confirmed that the LinkDescription key needs to be added under each monitor instance in order for all of them to receive RGB color output. Link to the comment
USB-C to DisplayPort
The macOS 13 Ventura beta seems to outputs RGB color by default on some monitors when using USB-C to DisplayPort cable on M1 Apple Silicone Macs.
You might need to make a backup and delete these 2 files:
/Library/Preferences/com.apple.windowserver.displays.plist
and
/Users/yourname/Library/Preferences/ByHost/com.apple.windowserver.displays.[UDID].plist
Restart your Mac and it should properly output RGB color on the monitor on the next boot.
HDMI to HDMI
Similar as macOS Monterey, the situation with HDMI on macOS Venturs seems a bit more complicated. Usually the whole section for the LinkDescription might be missing from the com.apple.windowserver.displays.plist on a clean install and doesn't seem to be recreated when rotating the screen either.
Luckily, the solution still works, and you still need to manually add this whole section in the displays plist file:
					<key>LinkDescription</key>
					<dict>
						<key>BitDepth</key>
						<integer>8</integer>
						<key>EOTF</key>
						<integer>0</integer>
						<key>PixelEncoding</key>
						<integer>0</integer>
						<key>Range</key>
						<integer>1</integer>
					</dict>
The section usually goes right under the CurrentInfo key, and it should look something like this:
This should get your RGB color output working on M1 Mac mini, even when connected with HDMI to HDMI cable.
(Optional) Lock the plist file and set it as stationary
After the macOS Ventura 13.3 update, the plist file seems to get overwritten on reboot.
After you make the edits in the file, you can try setting the file /Library/Preferences/com.apple.windowserver.displays.plist as Stationery pad and Locked, so that it doesn't get overwritten on every reboot

To do this, right click on the plist file, click on Get Info and check the boxes next to Stationery pad and Locked
This requires further testing and might cause some issues, like not being able to remember new resolutions or display settings. Please note that you're making any changes at your own risk.
USB-C to DisplayPort
The macOS 14 Sonoma seems to outputs RGB color by default when using USB-C to DisplayPort cable.
HDMI to HDMI
The macOS 14 Sonoma seems to outputs YCbCr color by default when using HDMI to HDMI cable.
-
Forcing RGB Color Output still seems to work with the original procedure of modifying the plist files
-
Modifying the display plist files still works with the alternative version
-
After the plist files are modified, putting the Mac to sleep and waking it, it seem to keep the RGB Color output (this seems to be fixed at least on a M1 Mac mini)
If you have any additional questions, please feel free to contact me.


@xilopaint thank you for the question and congrats on the new Mac!
The most reliable way is if there is a On-Screen Display menu (OSD) on the monitor itself where it shows the color output.
If it doesn't have the feature, then you can also tell from your Mac by going into Settings > Display and check the Color profile drop-down menu.
When you open the drop-down menu, if there is a color profile with the name starting with SD 170M-A close to the very top of the list, then your Mac is most likely outputting YCbCr color.
If the SD 170M-A profile is all the way down on the list, then it's most likely outputting correctly in RGB color.