Skip to content

Instantly share code, notes, and snippets.

@GetVladimir
Last active June 29, 2026 20:50
Show Gist options
  • Select an option

  • Save GetVladimir/c89a26df1806001543bef4c8d90cc2f8 to your computer and use it in GitHub Desktop.

Select an option

Save GetVladimir/c89a26df1806001543bef4c8d90cc2f8 to your computer and use it in GitHub Desktop.
Force RGB Color on M1 Mac

Force RGB Color on M1 Mac

How to Force RGB Color Output instead of YPbPr on your M1 Apple Silicon Mac for an External Monitor.

This step-by-step video tutorial will guide you through the procedure of forcing RGB color output on your M1 Mac.

Force RGB Color on M1 Mac

Here is the direct link to the video tutorial: https://www.youtube.com/watch?v=Z1EqH3fd0V4

The video also has Closed Captions (Subtitles) that you can enable, to make it easier to follow if needed.


Please note that you're doing any changes on your own risk.

Terminal commands used in the video

Here are each of the Terminal commands mentioned in the tutorial, so that you can just copy and paste them:

open /Library/Preferences

plutil -convert xml1

plutil -convert binary1

plutil -lint


The step-by-step procedure on how to force RGB Color Output on M1 and M2 based Macs with Terminal commands

  1. Open Terminal and use this command to make Finder select the displays plist file:
    open -R /Library/Preferences/com.apple.windowserver.displays.plist

  2. Drag and drop the com.apple.windowserver.displays.plist file to Desktop manually. Don't use the cp command, as it won't add your current user with writing privileges.

  3. Convert the file to XML:
    plutil -convert xml1 ~/Desktop/com.apple.windowserver.displays.plist

  4. Open the converted file with the default plain text editor (avoid using the built-in TextEdit app if possible, since it might modify the file and make it unreadable by the system)
    open -t ~/Desktop/com.apple.windowserver.displays.plist
    or
    open -a CotEditor.app ~/Desktop/com.apple.windowserver.displays.plist

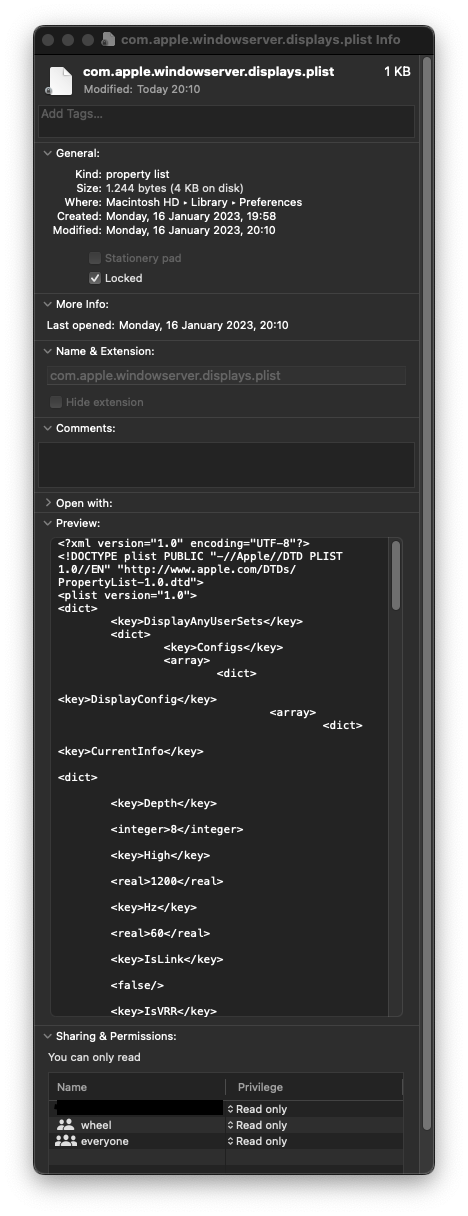
  5. Copy and paste the missing LinkDesription Key under the current display (check the screenshot below for an example of how it should look like):

				<key>LinkDescription</key>
				<dict>
					<key>BitDepth</key>
					<integer>8</integer>
					<key>EOTF</key>
					<integer>0</integer>
					<key>PixelEncoding</key>
					<integer>0</integer>
					<key>Range</key>
					<integer>1</integer>
				</dict>
  1. Save the file and then convert it to binary again:
    plutil -convert binary1 ~/Desktop/com.apple.windowserver.displays.plist

  2. Check if the plist file is valid:
    plutil -lint ~/Desktop/com.apple.windowserver.displays.plist

  3. Open the /Library/Preferences/ folder again:
    open /Library/Preferences/

  4. Drag and drop the updated com.apple.windowserver.displays.plist file from Desktop to the Library folder manually. Don't use the cp command, as it won't add your current user with writing privileges.

  5. Right Click on the com.apple.windowserver.displays.plist file in the Library folder and click on Get Info

  6. Check the boxes for Stationery and Locked.

  7. Reboot the Mac.

That's it!


(Alternative) Terminal commands to force RGB Color Output on M1 and M2 based Macs and workaround for losing RGB color after waking up from sleep

  1. Open Terminal

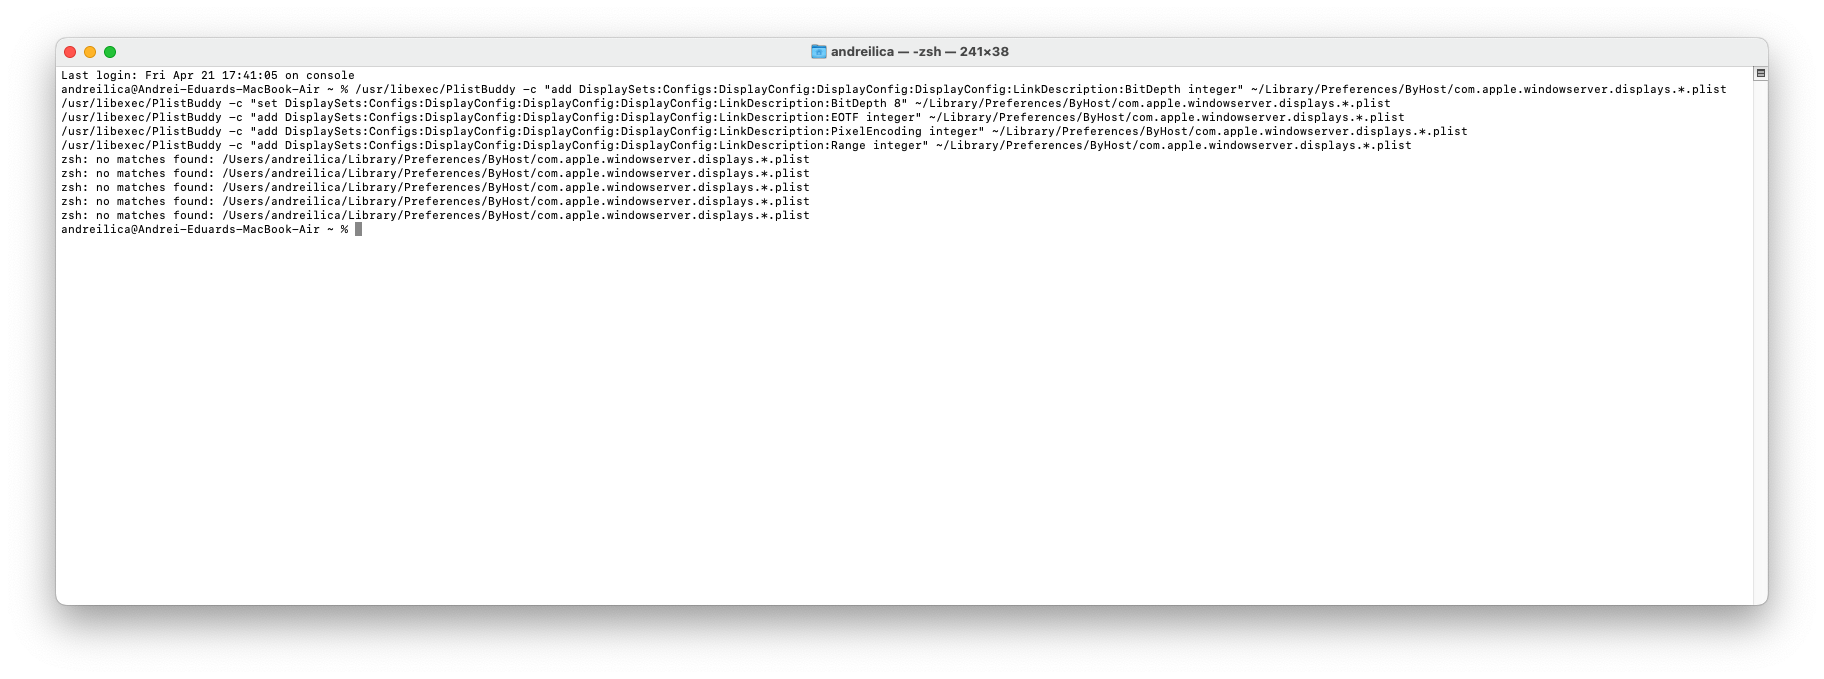
  2. Paste the following commands to edit the User's displays plist file com.apple.windowserver.displays.[UUID].plist using the built-in PlistBuddy function in macOS:

/usr/libexec/PlistBuddy -c "add DisplaySets:Configs:DisplayConfig:DisplayConfig:DisplayConfig:LinkDescription:BitDepth integer" ~/Library/Preferences/ByHost/com.apple.windowserver.displays.*.plist
/usr/libexec/PlistBuddy -c "set DisplaySets:Configs:DisplayConfig:DisplayConfig:DisplayConfig:LinkDescription:BitDepth 8" ~/Library/Preferences/ByHost/com.apple.windowserver.displays.*.plist
/usr/libexec/PlistBuddy -c "add DisplaySets:Configs:DisplayConfig:DisplayConfig:DisplayConfig:LinkDescription:EOTF integer" ~/Library/Preferences/ByHost/com.apple.windowserver.displays.*.plist
/usr/libexec/PlistBuddy -c "add DisplaySets:Configs:DisplayConfig:DisplayConfig:DisplayConfig:LinkDescription:PixelEncoding integer" ~/Library/Preferences/ByHost/com.apple.windowserver.displays.*.plist
/usr/libexec/PlistBuddy -c "add DisplaySets:Configs:DisplayConfig:DisplayConfig:DisplayConfig:LinkDescription:Range integer" ~/Library/Preferences/ByHost/com.apple.windowserver.displays.*.plist
  1. Reboot your Mac

(Workaround) If your Mac loses RGB color after waking up from sleep mode, either Reboot your Mac (recommended) or use this Terminal command to stop the WindowServer and login again (not recommended):

sudo killall -HUP WindowServer


End result

The end result is having your M1 mac output RGB color to your external monitor instead of YPbPr, potentially making the colors more accurate and the text a bit more crisp, even on older 1080p monitors.

Hopefully this tutorial would be useful to someone.

Please feel free to ask in the comment section if you have any questions regarding this procedure.


Background

While doing a lot of testing on how the Dual-Cable workaround makes RGB to work on M1, I've discovered what changes it makes to macOS, and managed to create a more streamlined workaround without the need to use a second cable.

To make things easier, I've created a step-by-step video tutorial of the whole procedure that should force RGB color output on your M1 Mac connected to an external monitor, and works on an HDMI-to-HDMI cable connection.

Credits

Big thanks goes to the amazing community and all their help over the years to solve issues like this:
https://gist.github.com/ejdyksen/8302862
https://gist.github.com/adaugherity/7435890

Useful Sources

Apple Open Source Project Files for Displays and Graphics
https://opensource.apple.com/source/IOKitUser/IOKitUser-1445.60.1/graphics.subproj/IODisplayLib.c
https://opensource.apple.com/source/IOGraphics/IOGraphics-517.17/IOGraphicsFamily/IOFramebuffer.cpp.auto.html

How to Edit and Convert binary plist files
http://hints.macworld.com/article.php?story=20050803111126899
https://apple.stackexchange.com/questions/155393/how-to-beautify-binary-dict-files
https://discussions.apple.com/thread/1768480

How to Edit plist files using defaults and PlistBuddy
https://ss64.com/osx/defaults.html
https://github.com/mathiasbynens/dotfiles/blob/master/.macos

Apps based on this method

@sudowork has created an awesome script written in Phyton that automates the steps and checks for duplicate files.
You can find more info about it here: https://github.com/sudowork/fix_m1_rgb

@dangh has created an alernative script for fishshell.
You can find more info about it here: https://github.com/dangh/force-rgb.fish

@GetVladimir I've also created a Shortcut to Force RGB Color Output using the built-in Shortcuts app.
You can find how to create the Shortcut here: https://gist.github.com/GetVladimir/c89a26df1806001543bef4c8d90cc2f8?permalink_comment_id=4531552#gistcomment-4531552

@entropyconquers has created a script based on this method written in Phyton that automates the steps, makes a backup and checks for duplicate files.
You can find more info about it here: https://github.com/entropyconquers/Force-RGB-Color-on-M1-M2-Mac-Script

Additional notes

Multiple PixelEncoding and Range keys in the same plist file
Note that there might be multiple instances of the PixelEncoding and Range keys in the same file, one for each output of your monitor and for different AirPlay devices. You might need to update the integer on each one to get RGB color output on all displays.

Getting RGB color only before login
There might be multiple duplicate plist files with the same name in different locations.

Make sure that you only have the main modified file in:
/Library/Preferences

Then make a backup and remove duplicate displays plist files from these locations (if any):
~/Library/Preferences
or
/Users/username/Library/Preferences
and
/Users/username/Library/Preferences/ByHost


Please note that you'll need to have administrator privileges in order to modify the file in /Library/Preferences. Thanks goes to @keegandent and @StrategicalIT for pointing this out.

Updates regarding macOS Monterey

USB-C to DisplayPort
From what I've seen, it seems that macOS Monterey 12.0.1 finally outputs RGB color by default on some monitors when using USB-C to DisplayPort cable on M1 Apple Silicone Macs.

You might need to make a backup and delete these 2 files:
/Library/Preferences/com.apple.windowserver.displays.plist
and
/Users/yourname/Library/Preferences/ByHost/com.apple.windowserver.displays.[UDID].plist

Restart your Mac and it should properly output RGB color on the monitor on the next boot.

HDMI to HDMI
The situation with HDMI seems to got a bit more complicated. Now the whole section for the LinkDescription might be missing from the com.apple.windowserver.displays.plist on a clean install and doesn't seem to be recreated when rotating the screen either.

Luckily, the solution still works, but you might need to manually add this whole section in the displays plist file:

					<key>LinkDescription</key>
					<dict>
						<key>BitDepth</key>
						<integer>8</integer>
						<key>EOTF</key>
						<integer>0</integer>
						<key>PixelEncoding</key>
						<integer>0</integer>
						<key>Range</key>
						<integer>1</integer>
					</dict>


The section usually goes right under the CurrentInfo key, and it should look something like this:

pixelencoding

This should get your RGB color output working on M1 Mac mini, even when connected with HDMI to HDMI cable.

Multiple monitors when one them is using HDMI to HDMI
Additional thanks goes to @somogyi-ede who tested this with multiple monitors and confirmed that the LinkDescription key needs to be added under each monitor instance in order for all of them to receive RGB color output. Link to the comment

Updates regarding macOS 13 Ventura

USB-C to DisplayPort
The macOS 13 Ventura beta seems to outputs RGB color by default on some monitors when using USB-C to DisplayPort cable on M1 Apple Silicone Macs.

You might need to make a backup and delete these 2 files:
/Library/Preferences/com.apple.windowserver.displays.plist
and
/Users/yourname/Library/Preferences/ByHost/com.apple.windowserver.displays.[UDID].plist

Restart your Mac and it should properly output RGB color on the monitor on the next boot.

HDMI to HDMI
Similar as macOS Monterey, the situation with HDMI on macOS Venturs seems a bit more complicated. Usually the whole section for the LinkDescription might be missing from the com.apple.windowserver.displays.plist on a clean install and doesn't seem to be recreated when rotating the screen either.

Luckily, the solution still works, and you still need to manually add this whole section in the displays plist file:

					<key>LinkDescription</key>
					<dict>
						<key>BitDepth</key>
						<integer>8</integer>
						<key>EOTF</key>
						<integer>0</integer>
						<key>PixelEncoding</key>
						<integer>0</integer>
						<key>Range</key>
						<integer>1</integer>
					</dict>


The section usually goes right under the CurrentInfo key, and it should look something like this:

pixelencoding

This should get your RGB color output working on M1 Mac mini, even when connected with HDMI to HDMI cable.

(Optional) Lock the plist file and set it as stationary
After the macOS Ventura 13.3 update, the plist file seems to get overwritten on reboot.

After you make the edits in the file, you can try setting the file /Library/Preferences/com.apple.windowserver.displays.plist as Stationery pad and Locked, so that it doesn't get overwritten on every reboot

Stationery Pad Locked

To do this, right click on the plist file, click on Get Info and check the boxes next to Stationery pad and Locked

This requires further testing and might cause some issues, like not being able to remember new resolutions or display settings. Please note that you're making any changes at your own risk.

Updates regarding macOS 14 Sonoma Beta

USB-C to DisplayPort
The macOS 14 Sonoma seems to outputs RGB color by default when using USB-C to DisplayPort cable.

HDMI to HDMI
The macOS 14 Sonoma seems to outputs YCbCr color by default when using HDMI to HDMI cable.

  • Forcing RGB Color Output still seems to work with the original procedure of modifying the plist files

  • Modifying the display plist files still works with the alternative version

  • After the plist files are modified, putting the Mac to sleep and waking it, it seem to keep the RGB Color output (this seems to be fixed at least on a M1 Mac mini)

If you have any additional questions, please feel free to contact me.

@GetVladimir

GetVladimir commented Feb 19, 2022

Copy link
Copy Markdown
Author

@Ezzahhh That is awesome! Thank you so much for the update and I'm glad to hear that the USB-C to DisplayPort cable solved most of the issues.

There is one more thing you can check regarding the monitor being detected as a television, but it's a bit of a long shot:

  • If you have access to your Intel Mac, connect your monitor with the same USB-C to DisplayPort cable that you use now. Make sure that you also use the exact same port on the monitor as well (in case you have multiple ports)
  • Run the EDID patch script for x86 Intel Macs from either here (https://gist.github.com/ejdyksen/8302862) or here (https://gist.github.com/adaugherity/7435890) and generate an Override file
  • Now edit the Override file and add this key in it:
<key>DisplayIsTV</key>
<false/>

so that the full override plist looks something like this example plist:

<!DOCTYPE plist PUBLIC "-//Apple//DTD PLIST 1.0//EN" "http://www.apple.com/DTDs/PropertyList-1.0.dtd">
<plist version="1.0">
<dict>
  <key>DisplayProductName</key>
  <string>DELL U2415 (RGB)</string>
  <key>DisplayIsTV</key>
  <false/>
  <key>IODisplayEDID</key>
  <data>AP///////wAQrLigTEY0MCUYAQSlNCB4IgSVqVVNnSYQUFSlSwBxT4GAqUDR
wNEAAQEBAQEBKDyAoHCwI0AwIDYABkQhAAAeAAAA/wAwOERYRDQ5NzA0RkwK
AAAA/ABERUxMIFUyNDE1CiAgAAAA/QAxPR5TEQAKICAgICAgAGo=
</data>
  <key>DisplayVendorID</key>
  <integer>4268</integer>
  <key>DisplayProductID</key>
  <integer>41144</integer>
</dict>
</plist>
  • Finally, move the new override file to the appropriate /Library/Displays/Contents/Resources/Overrides/YourVendorID-xxxx/YourProductID-xxxx/ on your M1 Mac.

After the reboot, you should see the name of your monitor changed (if successful) in System Preferences > Displays and there is a chance that it will not be detected as a TV anymore.

@domscr2

domscr2 commented Feb 24, 2022

Copy link
Copy Markdown

Hi @GetVladimir, thank you so much for your efforts. While this has improved the blacks on my external monitor, I'm not sure the issue is 100% resolved...

My personal laptop is a M1 13-inch MacBook Pro
My work laptop is a Windows laptop
They're both plugged into the monitor via USB-C, and a Kensington SD4800P dock provides a HDMI output to my BenQ EW2750

  1. On my monitor OSD, the option to change the HDMI RGB PC Range is still greyed out, suggesting it's still outputting YUV
  2. If I plug the monitor into my Windows work laptop, which is using RGB 16-235 (Intel doesn't allow override), and plug back into the Mac, the issue occurs again until next reboot of the Mac.

Any thoughts or suggestions? Thanks in advance

@GetVladimir

GetVladimir commented Feb 24, 2022

Copy link
Copy Markdown
Author

@domscr2 thank you for your question.

Could you let me know what Color Profiles in System Preferences > Displays show up on top for your when you have the M1 MacBook Pro connected to the monitor?

Also, I've checked the dock that you mentioned (https://www.kensington.com/en-ca/p/products/connectivity/laptop-docks-usb-accessories/sd4800p-usb-c-10gbps-scalable-video-docking-station-60w-pd-dpdphdmi-windows/) and it seems to have a single HDMI port and 2 DisplayPorts. I would normally suggest that you try connecting from the DisplayPorts directly to the Monitor instead, but I see that the BenQ EW2750 only has HDMI input.

The workaround that has some chance to work would be (if possible) to use an USB-C to HDMI cable and connect your MacBook directly to the BenQ, without any hubs/docs/adapters in the middle. Then you will need to modify the plist again as you did before, but it should work even after restart.

@domscr2

domscr2 commented Feb 24, 2022

Copy link
Copy Markdown

Hi @GetVladimir, thank you so much for looking into it quickly and offering suggestions. I had a hunch and tried something that I haven't seen mentioned anywhere online:

In my /Users/[user]/Library/Preferences/ByHost folder - there was a com.apple.windowserver.displays.plist file, but it had some kind of GUID in the name, so the file name was actually com.apple.windowserver.displays.[letters and numbers].plist. Performing the same change in that plist file has completely resolved the behaviour I was experiencing.

Now, on my monitor OSD, the option to change the HDMI RGB PC Range is no longer greyed out, and switching between my work laptop and my Mac does not exacerbate the issue. Let's hope that the issue doesn't occur again, but at least I know exactly what to try next time.

Thanks again for your support.

@GetVladimir

Copy link
Copy Markdown
Author

@domscr2 Awesome! Thank you for the update and I'm glad to hear that you got it working.

Make sure to make a backup of the plist file in case you need to restore it back in the future.

Also, if you delete that plist file in ByHosts, macOS will read the settings directly from the one in /Library/Preferences/

(I don't recommend making any further changes though, as you already got it working)

@domscr2

domscr2 commented Feb 24, 2022

Copy link
Copy Markdown

@GetVladimir, have got a backup on the Desktop ready to go haha! The ByHosts file is getting automatically generated if I delete it, with the GUID I mentioned eariler, so have to perform the change on both files. Although, the ByHosts file, as mentioned online, seems to be affecting behaviour once signed in.

@GetVladimir

Copy link
Copy Markdown
Author

@domscr2 Yes, you are right. The Library plist file affects the settings globally, while the one in ByHosts affects the current user settings

@SergioSuarezGil

Copy link
Copy Markdown

The case of my MacBook is a bit strange... I have 3 USB-C to HDMI adapters. One of them works perfectly (USB-C to HDMI), but the other 2 (which coincidentally also have 3 usb-3 and card reader) have a pink screen....

I have tried everything you indicate here but it is impossible to remove that "pink" or "purple" tone from the screen :(

@GetVladimir

Copy link
Copy Markdown
Author

@sergiosuarezdev Thank you for your comment.

I'm sorry to hear that. From what you've said, the fault is very likely with the M1 compatibility with the adapters. It also doesn't help that the M1 might assign different UUIDs every time you connect them, so it's not easy to modify the plist files to make them work.

I'm afraid that the current workaround is to either use the only adapter that works, or to use a direct USB-C to DisplayPort cable to connect your MacBook with the Monitor.

@SergioSuarezGil

Copy link
Copy Markdown

I am using 2 screens with a DVI-HDMI connection, for the moment I will have to work only with the only adapter that works for me. But I usually work with 2 screens :(

I have read that in the case of the Macbook with M1 they would work well with this adapter using displaylink:
https://www.amazon.es/gp/product/B08R9WZKFN/

If it doesn't work either, what would be my alternative? Buy 2 new screens that do not work in RGB mode??

Thanks!!

@GetVladimir

Copy link
Copy Markdown
Author

@sergiosuarezdev I understand what you mean, the issue is annoying.

I don't know of anything else that will work properly with the M1 MacBook, since (officially) it supports only 1 External Monitor: https://support.apple.com/en-ie/guide/mac-help/mchl7c7ebe08/mac

@SergioSuarezGil

Copy link
Copy Markdown

Yes, anyway my pink screen problem is working with a matrix of screens but only connecting a single hdmi adapter :(

@poenagit

Copy link
Copy Markdown

I have a MBP M1 Pro running MACOSX 12.3 and Dell S2721QS connected with HDMI to HDMI. I tried through my hub and direct plug in. Still does not switch over to RGB. I had to add the block of PixelEncoding code in manually. Is the next step to try a usb-c to displayport cable? Any other suggestions? I don't have flickering but I noticed the colors are slightly off and monitor is dimmer.

@GetVladimir

GetVladimir commented Mar 21, 2022

Copy link
Copy Markdown
Author

@poenagit thank you for your question.

If you use a dock, you might have more entries in the displays plist file than just for the external monitor. This makes it a bit difficult to find the correct one to add the PixelEncoding key to.

My suggestion would be to make a backup and delete the displays plist file in:
/Library/Preferences
and
/Users/username/Library/Preferences/ByHost

After that, shutdown the Mac, unplug the dock, and make sure that only the Monitor is connected to the Mac with either USB-C-to-DisplayPort or USB-C-to-HDMI cable.

Turn on the Mac again and repeat the procedure of adding the PixelEncoding key again (if needed) in the plist file and it should work. There should also be only a couple of UUID entries in the displays plist files now instead of many.

If it works, make a backup of the working plist file, and replace it again whenever needed (like after connecting the dock again). The Monitor usually should be connected directly to the Mac and not go through the dock in order to work properly

@ChangHyun-Yoo

ChangHyun-Yoo commented Mar 22, 2022

Copy link
Copy Markdown

I have M1 Mac mini and connected Dell U2723QE with USB-C to C and connected Dell U2720Q with HDMI,

U2723QE with C to C outputting well with RGB but U2720Q with HDMI does not output RGB, It outputs YPbPr.

I tried your solution, but both plist files in the Preference folder and ByHost folder already have a value with PixelEncoding=0, Range=1.
I changed PixelEncoding to 1, Range to 0, It doesn't work, I changed PixelEncoding to 0, Range to 1 again, it doesn't work.

There is no solution you recommend?

Thank you for your article and video.

@GetVladimir

Copy link
Copy Markdown
Author

@ChangHyun-Yoo thank you for your comment and for the details.

I would recommend making a backup and deleting both plist files.

After that, reboot the Mac and repeat the procedure again. It's very possible that there are more UUIDs in the same plist file that need to have the PixelEncoding key added to it.

If nothing else works, the last resort is to get an USB-C to DisplayPort cable for the U2723Q, but then both USB-C ports on the Mac mini would be in use by the Monitors.

@ChangHyun-Yoo

Copy link
Copy Markdown

@GetVladimir With your recommendations, It works!! Thank you for your help.

You're my best

@GetVladimir

Copy link
Copy Markdown
Author

@ChangHyun-Yoo Thank you so much for your comment and I'm glad to hear that you got RGB color output working

@poenagit

Copy link
Copy Markdown

I was able to get it to work with HDMI-HDMI and then HDMI - hub

but when I unplug and plug it back in it reverts back and even with a restart.

I had to redo the plist again to get it to work

@GetVladimir

Copy link
Copy Markdown
Author

@poenagit thank you for the update. Glad to hear that you got it working without the hub.

You might wan to do a backup of the display plist file when it works, so that you can restore it when needed.

@Doogooder

Copy link
Copy Markdown

Hello,
Thank you so much for the fix.
Pretty disappointing something so simple is so hard with a Mac :/
I had an interesting outcome where the changes were made but I found the login screen was RGB but once login had completed it changed back to YPbPr.

I am using a Pioneer 508XDA via HDMI.

Code FYI is:

DisplayAnyUserSets Configs CurrentInfo Depth 8 High 768 Hz 60 IsLink OriginX 0.0 OriginY 0.0 Rotation 0 Scale 1 Wide 1360 LinkDescription BitDepth 8 EOTF 0 PixelEncoding 0 Range 1 Rotation 0.0 UUID 567570E8-8F36-4C5A-9B0D-A853A5E28DC9 UnmirrorInfo Depth 8 High 768 Hz 60 IsLink OriginX 0.0 OriginY 0.0 Rotation 0 Scale 1 Wide 1360 Orientations 567570E8-8F36-4C5A-9B0D-A853A5E28DC9 0 Underscan 567570E8-8F36-4C5A-9B0D-A853A5E28DC9 1 Version 1 DisplayUUIDMappings 4B4F77C8-2A95-E78F-0F93-5A69417CA049 7C0A4999-38E9-4CD6-B79B-7DD367454923 7D070E19-D819-1E00-0F93-5A69417CA049 567570E8-8F36-4C5A-9B0D-A853A5E28DC9 9B603E2E-98E1-E840-0F93-5A69417CA049 D25EA30C-5D91-4599-B843-16A5FF6148C0

@GetVladimir

GetVladimir commented Apr 1, 2022

Copy link
Copy Markdown
Author

@Doogooder thank you for your comment and I’m glad if you found the tutorial useful.

From what you've described, it seems like you have a duplicate displays plist file in /Users/yourname/Libraries/Preferences/ByHost

Make a backup of the displays plist file there and either edit it as you did with the first, or simply delete it. After the next reboot, you should have RGB color output after login as well

@Doogooder

Copy link
Copy Markdown

@Doogooder thank you for your comment and I’m glad if you found the tutorial useful.

From what you've described, it seems like you have a duplicate displays plist file in /Users/yourname/Libraries/Preferences/ByHost

Make a backup of the displays plist file there and either edit it as you did with the first, or simply delete it. After the next reboot, you should have RGB color output after login as well

Sorry I didn't realise Apple hide all of those duplicate files in hidden folders.
Crikey they work hard to make this stuff as difficult as possible.
Interestingly the login is YPbPr while the after login screen is RGB.
I will take it :)
The blacks are now beautiful again.
Thank you.

@GetVladimir

GetVladimir commented Apr 1, 2022

Copy link
Copy Markdown
Author

@Doogooder Awesome! Thank you for the update and I'm glad to hear that you got RGB color output working.

You might want to do a backup of the working displays plist file now, so that you can easily restore it in the future if needed, without having to edit the file again

@nvcken

nvcken commented Apr 15, 2022

Copy link
Copy Markdown

@GetVladimir
I have 2 monitor ( DELL & LG TV), I only have problem non RGB color when connect to LG TV.
So with this method, it will effect for any external monitor that I connect to MBP M1 or just only my problem monitor ?

@nvcken

nvcken commented Apr 15, 2022

Copy link
Copy Markdown

Hi @GetVladimir
I tried this already, but did not help, even more washed out than before patch, then I have to reverted back.
Could you check to see any further I can do? this is my specs

MacOS: Big Sur 11.6.5 (20G527)
MacBook Pro (13-inch, M1, 2020)
I connect to LG TV with this hub
https://www.amazon.com/HyperDrive-MacBook-Windows-Laptop-Devices/dp/B098NNLVZL
LG TV HDMI <-> Hub HDMI and Hub Thunderbolt <-> MBP Thunderbolt

@GetVladimir

GetVladimir commented Apr 15, 2022

Copy link
Copy Markdown
Author

@nvcken thank you for your comment and for the details.

First, check if you have HDR on your TV and disable it. You won't be able to use RGB and HDR at the same time.

Next, you'll need to update to at least the latest version of macOS Monterey. Big Sur is missing a lot of display properties for the M1 based Macs. Even though this is not a guarantee that it will work.

Finally, if nothing else works, it's very likely that your M1 MacBook is not fully compatible with the Hub when it comes to displays. You'll want to try with an USB-C to HDMI cable instead.

Also, please note that the M1 MacBook only supports 1 external display officially

ghost commented May 11, 2022

Copy link
Copy Markdown

Hi @GetVladimir!

Thanks a mil!

I had to do a bunch of troubleshooting to get my monitor to output RGB.

The displays file in /ByHosts was overriding the file in the normal /Preferences files. This seems to happen if you've fiddled with something like BetterDummy.

Deleted both files in both locations, redid the tutorial and it finally worked! (HDMI to HDMI).

This is for anyone reading this thread that might not have done this!

Again, thank you so much, the display looks a ton better now!

@GetVladimir

Copy link
Copy Markdown
Author

@TheeKuZu you're very welcome! Thank you so much for your comment and I'm glad to hear that you got RGB color output working on HDMI to HDMI connection

@Vladutu

Vladutu commented May 15, 2022

Copy link
Copy Markdown

Hi @GetVladimir ,
I have an m1 chip macbook pro with monterey (12.3.1) installed and I'm connected to my external monitor (lenovo Y25f) with hdmi. I tried the python script which deletes all those files from the other locations and also manually added the "LinkDescription" section in the file from /Library/Preferences, but it doesn't change anything. In display settings I have a color profile section and the best looking is "Rec.ITU-R BT.709-5" but it still doesn't look very good. On my previous intel chip mac the script "patch-edid" worked very good from the first try. Do you have any other solution that I can try? Thank you

Sign up for free to join this conversation on GitHub. Already have an account? Sign in to comment